Edision NANO T265 User manual

Category
TV set-top boxes
Type
User manual

Edision NANO T265 is a powerful digital terrestrial and cable receiver that opens the gateway to a world of entertainment options. With its ability to receive both DVB-T2 and DVB-C signals, you can enjoy a wide range of free-to-air channels in stunning high definition. It also supports H.265/HEVC decoding, ensuring you get the best possible picture quality. The EDISION Electronic Program Guide (EPG) provides detailed information about upcoming shows, making it easy to plan your viewing.

Edision NANO T265 is a powerful digital terrestrial and cable receiver that opens the gateway to a world of entertainment options. With its ability to receive both DVB-T2 and DVB-C signals, you can enjoy a wide range of free-to-air channels in stunning high definition. It also supports H.265/HEVC decoding, ensuring you get the best possible picture quality. The EDISION Electronic Program Guide (EPG) provides detailed information about upcoming shows, making it easy to plan your viewing.

nano T265+
Digital Terrestrial & Cable HDMI dongle Receiver DVB-T2/C H.265/HEVC
User’s Guide
Support
USB
2Version of October 10th, 2021
The CE certificate of the product is available on our webpage, by visiting this link: https://www.edision.gr/en/support
For information about EDISION Hardware or Software matters, please contact [email protected]
Version of October 10th, 2021 3
Contents
►Safety ................................................................................................................ 4-5
►Remote control ................................................................................................... 6
►Description .........................................................................................................7
►Features ............................................................................................................... 8
►Information Bar (InfoBar) ...................................................................................9
►EDIVISION – Your Electronic Program Guide ...........................................10-11
►Installation ........................................................................................................12
Terrestrial Scan DVB-T/T2 ...................................................................................................12
Cable Scan DVB-C ...............................................................................................................13
►Channel ..............................................................................................................14
Organizing Services ..............................................................................................................14
Organizing Favourites ..........................................................................................................16
Delete All Channels .............................................................................................................. 17
►System ...............................................................................................................18
Language ..............................................................................................................................18
Software upgrade ................................................................................................................ 19
Timer setting .........................................................................................................................20
Miscellaneous Settings ........................................................................................................20
AV setting ..............................................................................................................................21
Lock Control ........................................................................................................................ 21
Time Setting ..........................................................................................................................22
Information ............................................................................................................................22
►Media / Internet .................................................................................................23
Network Setting ................................................................................................................... 23
Record Files ..........................................................................................................................24
PVR Management* ............................................................................................................. 24
YouTube ...............................................................................................................................25
Weather .................................................................................................................................25
Video .....................................................................................................................................26
Music .................................................................................................................................... 26
Photos ................................................................................................................................. 26
USB Remove ........................................................................................................................26
*It is not possible to use the Programmable Decoder Activation and the Programmable Recording functions, when the decoder is
connected for power supply to the USB port of the TV. To use these functions, please connect the decoder with an external USB 5V 1A
/ 220v DC power supply unit.
Recommended devices: 08-07-0102 - PSU 5V/1.0A 2pin EU kit with USB adaptor
08-07-0103 - PSU 5V/2.0A 3pin UK kit with USB adaptor
4Version of October 10th, 2021
►Important safety instructions
1) Please read these instructions carefully.
2) Keep these instructions in a safe place for future reference.
3) Pay extra attention to «warning» points.
4) Follow all instructions.
5) Do not use the device near water.
6) Clean with a dry cloth only.
7) Do not use near heat sources, such as radiators, heat accumulators, ovens or other devices (including
ampliers) generating heat.
8) Only operate this product with the type of power source indicated on the label. If you are unsure about the
type of power supply you use at home, ask your electricity supplier. Disconnect the device from the mains
before maintenance or installation procedure.
9) Protect the mains cable from damage.
10) Only use auxiliary devices/accessories specied by the manufacturer.
11) Disconnect the device during thunderstorms or extended periods of non-use.
12) All maintenance work should be carried out by qualied service personnel. Maintenance is required when
the device is damaged in any way, including damage to the mains cable or mains plug. Also in case the
device becomes exposed to liquids or moisture, was dropped or does not function properly.
13) Make sure that the ventilation slots are always unobstructed.
14) Attention should be paid to the environmental aspect of battery disposal.
15) Only use the device in moderate climate.
WARNING: In order to avoid the risk of re or electric shock, do not expose this device to rain or moisture.
WARNING: The batteries should not be exposed to excessive heat and heat sources such as direct sunlight,
re, etc.
Version of October 10th, 2021 5
This symbol indicates that there is risk of electric shock.
This symbol indicates that the operating instructions contain important operating and maintenance infor-
mation.
This symbol indicates that the product has a double insulation between voltage and user accessible
parts. Only use parts provided by the manufacturer during repair.
This symbol on the product or in the operating instructions indicates that the electrical or electronic de-
vice must be disposed of separately from household waste at the end of the service life. Separate col-
lection systems exist for recycling.
For further information, please contact your local authorities or your dealer where you purchased the product.
6Version of October 10th, 2021
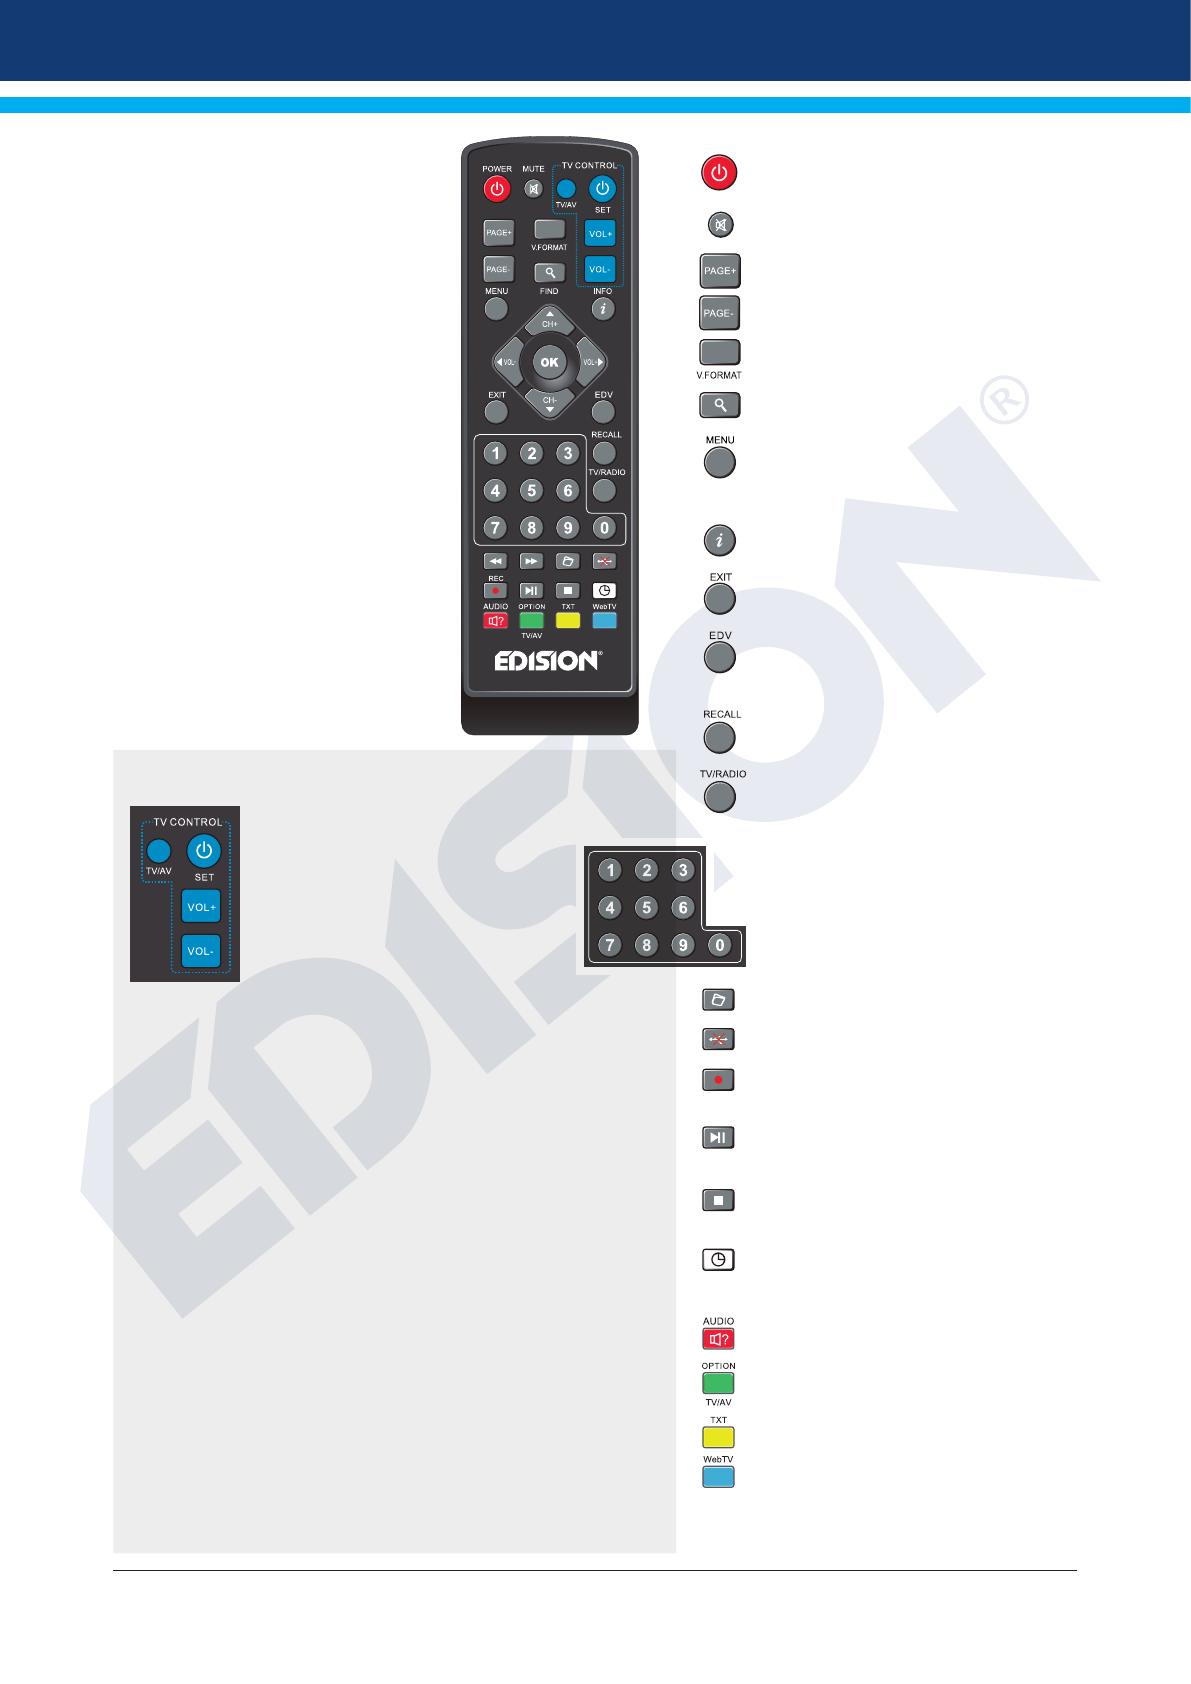
►Remote control Power
Switches between operation and standby
Mute
Mutes or unmutes the audio temporarily
PAGE+ / PAGE -
Scrolls the channel-list forward or backwards
V. FORMAT
Changes the display TV standard
FIND
For searching for programms in lists
Menu
Open main menu & select sub menu
using by navigation button
INFO
Displays the information bar
EXIT
Stops a menu/pop-up window
EDV
Selection of the electronic program support
EDIVISION
RECALL
Returns to previous channel
TV/RADIO
Switch to TV mode. Switch to Radio mode
NUMERIC KEY (0-9)
Control the numerical operation
and change the Channel/Service
number directly
Displays a le-list
Safe USB Removal
REC
Activates immediately recording-option
PLAY/PAUSE
Play start/pause
Stops timeshift, recording or playing
Allows you to set the time
at which the Receiver autom.
switches to standby mode
Activates the audio-menu
Option button. Switching between
TV/AV mode (Not in HDMI mode)
Activates the menu “Subtitle/teletext”
Web TV key
ADJUSTMENT OF TELEVISION FUNCTIONS
Your set-top-box remote control has 4 learning-function keys, in the up
right hand side TV
keypad panel area. Each one can be used accordingly
as the following example:
1. Turning your TV set ON/OFF [SET]
2. Increasing/decreasing volume [VOL+ , VOL-]
3. Switching between TV/AV mode [TV/AV]
The other 39 keys are for the control of the EDISION
set-top-box.
Press [SET] key in the up right hand side TV keypad panel area continuously for 5
Sec. until the LED lights up and keep lighting, then release the key. This means the
remote control is in the learning mode.
Within 10 seconds, press the key in the original TV IR control, which needs to be
learned, for example the [POWER] key, then the red LED is flashing. It means this
button is ready to receive the learning signal.
Aim the emission port of the original TV remote control at the front at the emission
port at the front of your set-top box remote control (distance between these two ports
has to be about 2~3 CM).
Then press the key which is to be learned in your original TV remote control, for exam-
ple the [POWER] key of your original TV remote control continuously for 3 seconds.
If the red LED flashes quickly for three times and keep lighting, it means the set-top
box remote control has succeeded in receiving the signal and you have completed the
learning procedure of ON/OFF [TV POWER] key.
Then release the [POWER] key of your original TV remote control.
If the copying procedure fails , the red LED will blink and stay OFF. In this case please repeat
the procedure.
For the next programmable function, please repeat steps 1 to 2:
• Switching between TV/AV mode [TV/AV]
• Increasing/decreasing volume [VOL+ , VOL-]
Now you can operate your TV with the 4 programmed by you keys of your set-top box remote
control.
During the operation, the LED will flash to indicate that the signal is transmitted!
Version of October 10th, 2021 7
►Description
Package Contents
1 Receiver
2 IR Remote Control 2in1
3 USB cable type-Y
4 HDMI extension cable
5 IR cable
6 SMA to IEC adaptor
7 1 x Cable tie
8 2 x «ΑΑΑ» batteries
9 Mini Manual GR/EN/DE/ES/IT/FR
Connections
1 HDMI: Connection to an HDTV quality TV
2
/
USB: Connection for USB storage devices & Powering
(DC 5V) via TV USB port
3 Infrared sensor for the reception of remote control commands
4 ANT IN: Input for connecting to terrestrial or cable signal from
the antenna via SMA to IEC adaptor
Connecting and switching on
Note: For trouble-free signal reception your antenna
and cable installation should be calibrated and
inspected by a qualied professional with a digital
TV-level-measuring instrument.
Connect the receiver using HDMI
extension cable via the HDMI port to
your TV’s HDMI input port
Then connect the coaxial cable via
SMA to IEC adaptor with the terrestrial
or cable signal to the ANT IN input of
the receiver.
Connect the Jack to IR cable to the
IR IN port to control the STB with the
Remote Control unit.
Insert the batteries into the remote
control. Notes on the remote control
can be found on the back of these
instructions.
For STB powering (DC 5V) via TV USB
port, connect the USB cable type-Y
to the USB port of the STB and to the
USB port on the TV.
The receiver starts with the BOOT
process and is operational with in a
short time.
1
2
3
4
1
HDMI in
2
USB 2 USB 1
After the rst start,
choose your language
ANT IN:
coaxial-wire input from
terrestrial / cable signal
coaxial-wire Antenna
“The terms HDMI, HDMI High-Definition Multimedia Interface, and the HDMI Logo
are trademarks or registered trademarks of HDMI Licensing Administrator, Inc.”
2
3
4
5
6
7
8
9
12mm
80 mm
27 mm 1
8Version of October 10th, 2021
►Features
Technical Features:
Type: Digital Terrestrial & Cable HDMI dongle Receiver DVB-T2/C H.265/HEVC 10 Bit
H.265/HEVC 10 Bit decoding support (covered by patents listed at patentlist.hevcadvance.com)
Resolution: 720p/50Hz, 720p/60Hz, 1080i/50Hz, 1080i/60Hz, 1080p/50Hz, 1080p/60Hz
Video resolution up to Full HD 1080p
Ports: USB, HDMI, IR in (jack), ANT IN, USB
USB WiFi Support
Apps: Youtube, Weather Forecast
Multilingual OnScreenDisplay
EDIVISION electronic program guide
Supports Picture In Grak (PIG)
Channel Edit and Favourite Lists
Auto and Manual channel search
PVR via USB
Τime Shift function
Subtitle support
Teletext support
Software upgrade & backup via USB
Supports Online Software upgrade HTTP
Supports FAT 16/32, NTFS
Parental control
Powered 5V via TV USB port
Media player MP3/AC3/AAC/JPEG/PNG/MP4/MOV/AVI/MKV/MPG/MPEG/Xvid/DviX
Applications:
Youtube
Weather Forecast
Connections:
1 x USB 2.0 slot
1 x Jack to IR
Input ANT-IN: 1x IEC-type adaptor
Connection TV: 1x HDMI
Powered 5V via TV USB port
Package includes:
IR remote control 2-in-1
USB cable type-Y
HDMI extension cable
Jack to IR cable
SMA to IEC adaptor
1 x Cable tie
2 x «ΑΑΑ» batteries
Mini Manual GR/EN/DE/ES/IT/FR
General:
Dimensions: (W x H x D): 80x17x12 (mm)
Weight: 0,1 kg
Color: black
Warranty: 2 years
Support
USB
Version of October 10th, 2021 9
►Information Bar (InfoBar)
When in the TV/Radio mode, the ‘INFO’ button displays an information bar (InfoBar) at the lower edge of the
screen. This bar is faded-in up to 5 seconds.
How to change the duration of fading of the information bar:
1. Press the ‘MENU’ button to open the main menu.
2. Use the left/right arrow buttons to navigate to the ‘System’ item.
3. Use the up/down arrow buttons to navigate to the ‘Other settings’ menu item and press the OK button.
4. Use the left/right arrow buttons to select the value in seconds you want to set (max. 10s)in the ‘OSD time
exceeded’ item.
5. Press the EXIT button to exit the menu.
The information bar in TV or Radio mode displays a lot of information about the current program and the se-
lected channel:
- The place in the list of programs
- The name of the channel
- The current show (if available) along with the start time
- The next show (if available) along with the start time
- The time and date
- If the program is blocked
- If the channel/program is shown in HD
- If the channel is in the favourites list
- If the channel is broadcast encoded
- TTX: displays if there are Videotext/subtitles for the current show
Functions and settings:
When the information bar appears, you can display (again) the INFO button to display detailed information
about the current program (if available). they. With the left/right arrows you switch between the information
for the current and the next show. With the red key you can display further (technical) information. With the
EXIT key you exit the menu of detailed information.
With the EXIT key you turn off the information bar again.
10 Version of October 10th, 2021
►EDIVISION - Your electronic program guide
Basic information: EDIVISION is an online program guide with its own OSD menu. EDIVISION displays the
information provided by the program vendor in a variety of ways, concisely and concisely. Furthermore, you
can use it to schedule up to 8 time-adjustable recordings (Timer). Note that not all channels/program provid-
ers have accompanying program information.
The program driver is activated with the “EDIVISION” key on the remote control.
Functions and settings:
Depending on what mode you are
in, the window ‘EDIVISION’ also
has different reticulation. Use the
green key to select the function
(Now EPG, Next EPG, More,
Schedule).
In the “ Now EPG “ and “Next
EPG” modes you will nd infor-
mation on the current or next
show in text form on the upper
left, while on the top right you
can see the current image on
the TV screen (in TV mode). At
the bottom you will nd the current list of programs, in which you can navigate with the up/down arrows and
select another channel with the OK button. This list shows, in addition to the channel, the duration and title
of the show. Press the OK button (as appropriate several times) and detailed broadcast information will be
displayed, if available.
In the “More” mode, information
about the program is displayed
in the form of a table and in
chronological order. Use the left/
right arrows to navigate through
the schedule information of a
channel, use the up/down arrows
to move the cursor through the
channel list. If necessary, you
must press the OK button if you
have selected another channel
and want the accompanying pro-
gram information to be displayed.
If the cursor is on the right side of
a program title, you can press the OK button to display detailed information about that show (if available).
In the “Schedule” mode, the current program list is displayed on the left, and on the right, the information
about the program, in the form of a table and per week. Navigate left/right between the channel list and the
summary by day of the week, while with the Page keys +/- you can navigate through the days of the week,
with the up/down arrows navigate through the respective list in the corresponding direction. If the cursor is in
the right column on a program title, you can press the OK button to display more information about that show
(if available).
Version of October 10th, 2021 11
In all functions you can use
the following functions and
the following keys:
The red button displays a sum-
mary of the existing channel lists
(groups). Use the arrow keys to
navigate through the summary
mode and the OK key to specify
the channel list that you wish to
be used by EDIVISION.
With the green key you can
with the up/down arrows and
OK button to select at any time
between the different ways of
presenting EDIVISION.
Use the yellow key to go to the Timer menu to schedule recordings. Use the up/down arrow keys to navigate
between menu items.
The following settings can be made in the “Timer” menu:
Timer number: By opening the “Timer” menu automatically switches to the next (available)
adjustable timer. With the left/right arrows or the OK key and the up/down
arrows you can move between the (set) timers.
Selection: Specify how the recording works here. You can choose whether the registra-
tion will be done once, or whether it will be done on a daily basis, per week
or per month.
Event: Specify here the type of recording program (TV/radio channel).
Channel: Select the channel here.
Date: Select the (start) date of the registration here.
Start Time: Select here the start time of the recording.
Duration: Here you specify the recording duration (recording duration).
Standby at the end: Here you can specify whether the receiver will switch to Standby mode after
the end of the recording.
The EXIT key exits the timer menu. If you have made changes and you want to save them, conrm your se-
lection with ‘Yes’ in the dialog box that appears.
Note: Can against in case an error message is displayed. This usually happens when you have chosen the
wrong time or start date. Check your settings!
Also note that recording is successful only when a suitable USB memory device is connected to the receiver
at the scheduled time.
Exit “EDIVISION” by pressing the EXIT key.
12 Version of October 10th, 2021
►Menu: Program
► Installation
► Channel
► System
► Media / Internet
►Installation
► Terrestrial Scan DVB-T/T2
► Cable Scan DVB-C
DVB-T/T2
This menu item will come in
handy when setting up DVB-T
reception. Make sure the anten-
na is in a good receiving posi-
tion.
At the bottom you can see the
intensity and quality level of the
antenna signal. This indication
may vary depending on the an-
tenna installation location or the
values you select in the menu
elds.
Menu functions and settings:
Scan DVB-T2: Press the OK button here to enter the DVB-T setup menu (see below).
Region: Select the area here.
Tuner Power 5V: Here you can set additional voltage for DVB-T reception.
LCN: Here you can choose if you want the channel names to be included in
the search.
Red key (Auto search):
In the “Auto search” section you can choose between “All”
and “Free to Air”. With OK, the automatic channel search starts.
Version of October 10th, 2021 13
Green key (TP Edit):
If you select “TP Edit” (Manual
Search) in the next item and
press the OK button, the search
process starts according to the
settings you made.
Exit the “DVB-T2” menu by
pressing the EXIT key.
DVB-C
TP index:
Set the transmitter here. If you
change a value here, other set-
tings (frequency, configuration)
are affected under certain con-
ditions.
Frequency:
Here you can enter the frequen-
cy with the number buttons.
Symbol Rate:
Here you can enter the Symbol
Rate.
NIT Search: Marking of the network of stations transmitted in the corresponding
transmission ow.
Here the search is the option to nd an exact station.
QAM: Here you can choose between QAM16, QAM32, QAM64, QAM128
or QAM256 values.
Green key:
Manual search If you select “Manual search” in the next item and press the OK button,
the search process starts according to the settings you made.
Red key:
Auto search In the “Auto search” section you can choose between “All” and “Free to Air”.
With OK, the automatic channel search starts.
Yellow key:
DVB-C NID With “DVB-C NID” you can specify the channel search by entering
a specic cable TV provider frequency.
14 Version of October 10th, 2021
► Channel
► Organizing Services
► Organizing Favourites
► Delete All Channels
Organizing Services
In this menu you can congure
your channel lists for TV or radio
channels.
Notes: Make sure the receiver
is in operation. If you want to
edit a radio channel, the receiver
must be in Radio mode. With the
TV/Radio button you can switch
from one mode to another.
Basic information:
In the left column of the menu
window you will nd the list of channels of the current channel list and on the right side the symbols for
“Move”, “Lock”, “Delete”, “Rename” and “Skip”.
Menu Features and Settings:
With the left/right arrows you can go to the menu window from one column to another, with the up/down
arrows you move the cursor in each column up or down.
You can select one or more channels in the left column by pressing the OK button.
With the red key you can display a summary of all channel lists/groups and select accordingly. The type of
list you are currently in will be displayed in the title of the window.
The green key displays further available options. There are the following possibilities:
Select All: All channels are selected.
Unselect All: All channels are unselected.
Select Others: All channels that were not previously selected are now selected.
Select TP: All channels of a transmitter can be selected.
How to move a channel:
1. Place the cursor (blue bar) in the channel list on the channel you want to move.
2. Now go to the right side of the menu using the arrow key on the right and navigate the cursor with the up/
down arrows to the ‘Move’ symbol. The symbol is highlighted in color.
3. Press the OK button.
4. Now use the up/down arrows to move the channel through the list. You can also use the Page buttons for
this purpose.
5. By pressing the OK button the channel remains in the new position and the “Move” function is terminated.
Note: You can move multiple channels at once by rst highlighting the corresponding channels in the chan-
nel list (left side menu) via the OK key and then following steps 2-5 above.
Version of October 10th, 2021 15
How to lock a channel:
1. Place the cursor (blue bar) in the channel list on the channel you want to lock.
2. Now go to the right side of the menu using the arrow key on the right and navigate the cursor with the up/
down arrows to the “Lock” symbol. The symbol is highlighted in color.
3. Press the OK button. The “ Lock “ symbol will appear behind the channel name in the channel list.
Note: You can lock more channels at the same time by rst highlighting the corresponding channels in the
channel list (left side menu) via the OK button and then following steps 2-3 above.
When selecting a locked channel you are prompted to enter a password. Otherwise the channel is not
shown.
How to unlock a channel:
1. Place the cursor (blue bar) in the channel list on the locked channel.
2. Now go to the right side of the menu using the arrow key on the right and navigate the cursor to the “Lock”
symbol. The symbol is highlighted in color.
3. Press the OK button. Enter the password you selected, and the channel is unlocked. In the channel list the
“Lock” symbol is removed.
Note: You can unlock more channels at the same time by rst highlighting the corresponding channels in the
channel list (left side menu) via the OK button and then following steps 2-3 above.
How to delete a channel:
1. Place the cursor (blue bar) in the channel list on the channel you want to delete.
2. Now go to the right side of the menu using the arrow key on the right and navigate the cursor to the “De-
lete” symbol. The symbol is highlighted in color.
3. Press the OK button. The channel is deleted from the list.
Note: You can delete more channels at the same time by rst highlighting the corresponding channels in the
channel list (left side menu) via the OK key and then following steps 2-3 above.
How to rename a channel:
1. Place the cursor (blue bar) in the channel list on the channel you want to rename.
2. Now go to the right side of the menu using the arrow key on the right and navigate the cursor to the “Re-
name” symbol. The symbol is highlighted in color.
3. Press the OK button.
4. A window with an input eld appears. Use the arrows and the OK key to select characters and letters. You
can delete the last character (of your entry) by navigating the cursor, in the eld with the letters, in the
symbol “<-”. You can add a space by moving the arrows to the “-” symbol. Conrm your selection by going
to the “OK” eld with the arrows. The new name is added to the channel list. You can leave the input win-
dow at any time, using the EXIT key, and thus interrupt the proce.
Exit the “Edit Channel” menu by pressing the EXIT key. If you have made changes, a dialog box appears
prompting you to conrm the changes. Selecting “Yes” changes the settings.
Note: Only if you conrm with “Yes” are the channels deleted, moved and/or locked. If you select “NO” NO
changes are saved.
16 Version of October 10th, 2021
Organizing Favourites
In this menu you can congure
the lists of your favourite TV and
radio programs. In the favourites
lists you can organize your fa-
vourite channels, which you will
nd very useful.
Basic information:
This menu is structured in three
columns. On the left you will nd
the list of available channels,
depending with the summary
state you selected. On the right
is the current, selected favourites list. In the middle there are the symbols for ‘Add’, ‘Remove’, ‘Move’ and
‘Rename’.
Menu functions and settings:
With the left/right arrows you can move from one column to another, with the up/down arrows move the cur-
sor up or down in each list. You can select one or more channels by pressing the OK button.
If you are in the left column, you can use the red key to display a summary of all lists (except favourite lists)
and select, using the arrow keys and the OK key, another group/list. You can see which list is currently dis-
played in the title of the left column.
The green key displays further available options. There are the following options:
Select All: All channels are selected.
Unselect All: All channels are unselected.
Select Others: All the channels that were not previously selected are now selected.
Select TP: All channels of a transmitter can be selected
With the ‘yellow’ key you can change your favourites list to view it or edit it. Press the “yellow” key to dis-
play the summary status with the favourites lists. Use the up/down arrows and the OK key to select the
favourites list you want to edit. This list will appear on the right side of the menu. On the left side are marked
with a symbol those channels, which already exist in the selected favourites list
How to add a channel to a favourites list:
1. Place the cursor (yellow bar) in the channel list in the left menu window on the channel you want to add.
2. Now go to the middle column of the menu and navigate the cursor to the “Add” symbol. The symbol is
highlighted in color.
3. Press the OK button. The channel will be added to the bottom of the favourites list. On the left side of the
menu the channel will be marked with a symbol.
Note: You can add more channels to favourite lists at the same time by rst highlighting the corresponding
channels in the channel list (left side menu) via the OK button and then following steps 2-3 above.
Version of October 10th, 2021 17
How to delete a channel from the favourites list:
1. Place the cursor (yellow bar) in the favourites list in the right menu window on the channel you want to re-
move.
2. Now go to the middle column of the menu and navigate the cursor to the “Delete” symbol. The symbol is
highlighted in color.
3. Press the OK button. The channel will be removed from the favourites list. On the left side of the menu the
channel is no longer indicated by the relevant symbol.
Note: You can remove more than one favourite channel at a time by rst highlighting the corresponding
channels in the Favourites list (right menu side) and then following steps 2-3 above.
How to move a channel in the favourites list:
1. Place the cursor (yellow bar) in the favourites list in the right menu window on the channel you want to
move.
2. Now go to the middle column of the menu and navigate the cursor to the “Move” symbol. The symbol is
highlighted in color.
3. Press the OK button.
4. Use the up/down arrows to move the selected channel. The channel is now moving up or down in the list.
5. By pressing the OK button the channel remains in the new position and the “Move” function is terminated.
Note: You can move multiple channels at once by rst highlighting the corresponding channels in the Fa-
vourites list (right menu side) and then following steps 2-5 above.
How to rename a favourites list:
1. Press the “yellow” key and select the favourites list you want to rename.
2. Now go to the middle column of the menu and navigate the cursor to the “Rename” symbol. The symbol is
highlighted in color.
3. Press the OK button.
4. A window with an input eld appears. Use the arrows and the OK key to select characters and letters. You
can delete the last character (of your entry) by navigating the cursor, in the eld with the letters, in the
symbol “<-”. You can add a space by moving the arrows to the “-” symbol. Conrm your selection by going
to the “OK” eld with the arrows. You can leave the input window at any time, using the EXIT key, and thus
interrupt the process.
Exit the “Edit Favourites” menu by pressing the key EXIT. If you have made changes, a dialog box ap-
pears prompting you to conrm the changes. Selecting “Yes” changes the settings saved.
Note: Only if you conrm with ‘Yes’ are channels deleted, moved and/or added to favourites lists. If you se-
lect “NO” NO changes are saved.
Delete all
At this point it is possible to delete all channels (settings). The password is 0000.
18 Version of October 10th, 2021
►Settings
► Language
► Software Upgrade
► Timer setting
► Miscellaneous Settings
A/V settings
► Lock Control
► Time Setting
► Information
Language
Menu functions and settings:
Menu language:
Here you select the language in
which the menus are displayed.
First audio language: Select
the audio language for the rst
channel here.
Second audio language:
Select the audio language for
the second channel here.
EDIVISION: Specify the language in which the EDIVISION (EDV) online program guide
will be displayed (The language must be supported by the program provider).
Language subtitles: Set the language in which the information will be displayed here subtitles
(Language should be supported by the program provider).
Teletext: Set the language in which the Teletext / Videotext information will be displayed
here (The language must be supported by the program provider).
Exit the “Language” menu by pressing the OK button.
Version of October 10th, 2021 19
Software upgrade
Basic information:
ΤThis menu is only available if a
suitable USB memory module,
which you recognize from the
receiver, is connected. Other-
wise you do not have access to
this menu.
A further requirement for “USB/
HDD Update” is that the corre-
sponding software le is located
on the USB memory drive. This
le with the “.bin” le extension
you can download it from your
internet-connected computer from the website HYPERLINK “http://www.edision.gr/” http://www.edision.gr
Save the le downloaded to your computer to the USB memory stick and insert it into the “nano T265+” USB
port.
Note: The speed of the update via USB may depend on the organization of the data in the USB memory. It
is recommended to pre-format the USB memory via the “HDD formatting” item in the “USB”/”Memory device
information” menu (start formatting with the yellow key) and then save the Software (.bin) le to it.
Menu functions and settings:
File Path: If the receiver nds les for updating on the USB memory device, it displays them. You can use
the arrows and the OK button to select the le that will be updated. If no le is found, ‘No File’ will appear on
the screen.
Section: With the arrows and the OK button here you can set which parts of the software you want to be up-
dated.
Start: Once you have selected the software le and the update mode, navigate with the up/down arrows to
the “Start” point. Press the OK button to start the update process.
Caution: The Software upgrade starts immediately with the OK button pressed and may not be interrupted.
Exit the “USB/HDD Update” menu by pressing the EXIT key.
HTTP (Online) Update:
Online Update Mode: Specify at this point which area of the software you want to be updated via HTTP (On-
line).
You can choose between Software & Loader or Software.
20 Version of October 10th, 2021
Timer setting
In this menu you can make up to
8 time-supported entries (Timer).
You will also nd a lot of informa-
tion in the EDIVISION section.
Menu functions and settings:
Timer number: Opening the
“Timer” menu automatically
switches to the next one (avail-
able) adjustable timer. You can
move between the (set) timers
with the left/right arrows or the
OK key and the up/down arrows.
Selection: Specify how the recording works here. You can choose if the registration will be done once,
or if it will be done on a daily basis, per week or per month.
Event: Specify the type of recording program here (TV / radio channel).
Channel: Select the channel here.
Start Date: Select the (start) date of the registration here.
Start Time: Select here the start time of the recording.
Duration: Here you specify the recording duration (recording duration). Waiting Stand by after.
REC: Here you can specify whether the receiver will switch to Standby mode after the
end of the recording.
Miscellaneous settings
Channel list num: Set channel
list number
Subtitle Auto: Here you can set
subtitle display options.
0.5 Watt Standby: Setting
‘ON’ or ‘OFF’
  • Page 1 1
  • Page 2 2
  • Page 3 3
  • Page 4 4
  • Page 5 5
  • Page 6 6
  • Page 7 7
  • Page 8 8
  • Page 9 9
  • Page 10 10
  • Page 11 11
  • Page 12 12
  • Page 13 13
  • Page 14 14
  • Page 15 15
  • Page 16 16
  • Page 17 17
  • Page 18 18
  • Page 19 19
  • Page 20 20
  • Page 21 21
  • Page 22 22
  • Page 23 23
  • Page 24 24
  • Page 25 25
  • Page 26 26
  • Page 27 27
  • Page 28 28

Edision NANO T265 User manual

Category
TV set-top boxes
Type
User manual

Edision NANO T265 is a powerful digital terrestrial and cable receiver that opens the gateway to a world of entertainment options. With its ability to receive both DVB-T2 and DVB-C signals, you can enjoy a wide range of free-to-air channels in stunning high definition. It also supports H.265/HEVC decoding, ensuring you get the best possible picture quality. The EDISION Electronic Program Guide (EPG) provides detailed information about upcoming shows, making it easy to plan your viewing.

Ask a question and I''ll find the answer in the document

Finding information in a document is now easier with AI