
Trakker Antares®
242X Handheld
Terminal

3
2
Intermec Technologies Corporation
Corporate Headquarters
6001 36th Avenue W.
Everett, WA 98203
U.S.A.
www.intermec.com
The information contained herein is proprietary
and is provided solely for the purpose of allowing
customers to operate and service Intermec-
manufactured equipment and is not to be released,
reproduced, or used for any other purpose without
written permission of Intermec.
Information and specifications contained in this
document are subject to change without prior notice
and do not represent a commitment on the part of
Intermec Technologies Corporation.
© 2004 by Intermec Technologies Corporation. All
rights reserved.
The word Intermec, the Intermec logo, Norand,
ArciTech, CrossBar, Data Collection Browser,
dcBrowser, Duratherm, EasyCoder, EasyLAN,
Enterprise Wireless LAN, EZBuilder, Fingerprint, i-
gistics, INCA (under license), InterDriver, Intermec
Printer Network Manager, IRL, JANUS, LabelShop,
Mobile Framework, MobileLAN, Nor*Ware,
Pen*Key, Precision Print, PrintSet, RoutePower, TE
2000, Trakker Antares, UAP, Universal Access Point,
and Virtual Wedge are either trademarks or registered
trademarks of Intermec Technologies Corporation.
Throughout this manual, trademarked names may be
used. Rather than put a trademark (
™ or ®) symbol
in every occurrence of a trademarked name, we state
that we are using the names only in an editorial
fashion, and to the benefit of the trademark owner,
with no intention of infringement.
There are U.S. and foreign patents pending.
Wi-Fi is a registered certification mark of the Wi-Fi
Alliance.
Microsoft, Windows, and the Windows logo are
registered trademarks of Microsoft Corporation in the
United States and/or other countries.
This product includes software developed by the
OpenSSL Project for use in the OpenSSL Toolkit.
(http://www.opensssl.org/).
This product includes cryptographic software written
by Eric Young (EA[email protected])
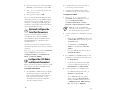
Contents
About This Guide ............................................ 5
Introducing the Trakker Antares 242X
Terminals .................................................... 5
Charge the Main Battery Pack .................... 6
Connect the Backup Battery ....................... 7
Install the Main Battery Pack ...................... 7
Charge the Backup Battery ......................... 8
Set the Time and Date ................................ 9
(Optional) Configure the Serial Port
Parameters ........................................... 10
Configure the 2425 Radio and Network
Parameters ........................................... 10
Using the Keypad........................................... 12
Choosing Your TE 2000 Application ............. 12
Where to Go From Here ................................ 13
Specifications ................................................. 14
ii iii

5
4
About This Guide
This guide describes how to set basic parameters
to start using the Trakker Antares
®
2420 and
2425 terminals. You may need to refer to
additional Intermec documents to configure
the 242X for your data collection network. For
a list of documents see “Where to Go From
Here” on page 13.
Introducing the Trakker
Antares 242X Terminals
The 2420 and 2425 are handheld data collection
terminals.
2420
The 2420 has an integrated I/O port to
transmit data to and accept data from a host
computer or other serial device using RS-232
communications. You use these programmable
terminals to run custom applications.
2425
The 2425 has all the capabilities of the
2420, and it can also communicate in a radio
frequency (RF) network. The 2425 provides
real-time communication with a host either
through the access points and the Intermec
Gateway or DCS 30X (UDP Plus or WTP)
or directly through the access points (TCP/IP).
The 2425 can also run client/server applications,
TE 2000™ terminal emulation applications,
and Data Collection Browser™ (dcBrowser™).
The 2425 with an IEEE 802.11b
radio installed is Wi-Fi certified
for interoperability with other
802.11b wireless LAN devices.
iv

7
6
The 242X terminals include these features:
Scan module accessories for bar code data
collection
16-line by 20-character CGA-compatible
screen, angled for easy viewing
Keypad to match the application or language
you ordered
Serial port to support RS-232
communications
Rechargeable lithium-ion battery pack
(shipped separately) for main power and
rechargeable NiCad backup battery for
memory backup
Adjustable antenna on the 2425 supports RF
communications
Charge the Main Battery
Pack
You must fully charge the lithium-ion main
battery pack before using the terminal. Use the
accessory battery charger to charge the main
battery pack.
To charge the main battery pack
• Place the battery pack in an empty slot in the
battery charger. It is fully charged in about 2
hours. For help, see the documentation that
came with your battery charger.
Tip: Keep a spare, charged main battery pack on
hand.
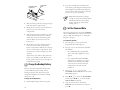
Connect the Backup Battery
The backup battery is shipped inside the 242X,
but it is not connected.
To connect the backup battery
1 Open the battery door by pushing down on
the battery door latch and sliding it down.
Lift up the top edge of the battery door to
remove it.
2 Find the two connectors in the backup
battery compartment. One connector is
attached to the backup battery. The other
connector is attached to the terminal. Push
the two battery wire connectors together
until they lock.
3 Gently fold and push the wires into the open
area of the backup battery compartment near
the wall.
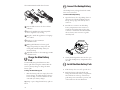
Install the Main Battery Pack
1 If the battery door is not off, open the door.
2 Hold the battery pack with the flat side
facing the inside of the battery compartment.
The small arrow on the top of the battery
pack must point toward the top (screen) end
of the 242X. See the next illustration.
I/O
F
1
F2
F4
F3
F
5
F
n
L
A
B
C
D
E
F
G
H
I
J
K
L
M
N
O
P
Q
R
S
T
U
Z
V
W
X
Y
Fn
R
E
nter
7
8
9
4
5
6
1
2
0
3
T
ab
E
sc
242GS.008
I/O
F1
F2
F4
F
3
F5
Fn
L
A
B
C
DE
F
G
H
IJ
K
L
M
N
O
P
Q
R
ST
U
Z
V
W
XY
F
n
R
E
nter
7
8
9
4
5
6
1
2
0
3
Ta
b
E
sc
TRAKKER
ANTARES
2425
TRAKKER
ANTAR
ES
2420
2
3
1
4
5
6
242GSG.002
Battery wire
connectors
Backup
battery
1
2
3
1
2
3
4
5
6

9
8
3 Place the battery pack into the upper (larger)
half of the battery compartment.
4 Hook the slots on the bottom of the battery
pack into the slots in the battery
compartment.
5 Slide the battery pack toward the top of the
terminal until it locks into the connectors
inside the bottom case. The battery pack
must be all the way forward to close the
battery door.
6 Hook the bottom edge of the battery door
into the bottom case above the backup
battery compartment. Push the door down to
close it over the battery compartment. Slide
the battery door latch toward the top of the
terminal.
If the battery door will not shut, the battery
pack is not installed correctly. Remove the
battery pack and repeat Steps 2 through 6 to
install the battery pack.
Charge the Backup Battery
Before you use the terminal for the first time,
you must fully charge the backup battery.
During normal use, the main battery pack
charges the backup battery with the terminal
turned on or off.
To charge the backup battery
1 Install a fully charged main battery pack.
2 Leave the terminal turned off and let the
main battery pack charge the backup battery.
The backup battery will be fully charged in
about 18 hours. The main battery pack still
has most of its power remaining.
Note: The backup battery charges
enough to operate the terminal within
20 minutes. However, the backup
battery will only provide limited
backup power.
Set the Time and Date
You can use the keypad to access the TRAKKER
Antares 2400 Menu System and set the time and
date. For help with the keypad, see “Using the
Keypad” on page 12.
To set the time and date
1 Press the q key on the top left of the
keypad. The Boot Menu appears.
2 Press B to boot the terminal and initialize
the firmware.
• On a 242X with the programmable
option, the sample application screen
appears.
• On a 2425 loaded with a TE 2000
application, the 2425 tries to connect
to the Intermec Gateway, DCS 30X,
or host. It cannot connect until you
configure the radio and network
parameters.
3 Press ) y 2 4 8 to access the
TRAKKER Antares 2400 Menu System. The
Main Menu appears.
4 Press { { ; to choose the System Menu,
and then press { { ;to choose the Set
Time and Date command.
5 Type the current time in the format
HH:MM:SS (hours:minutes:seconds) and
press {.
242GSG.003
Connector
end
Connector pin
(2 places)
Slots
4
5

11
10
6 Type the current date in the format YYYY/
MM/DD (year/month/date) and press {.
7 Press ; to save the changes and exit the
Time and Date screen.
8 Press d twice and choose OK.
If you are using the Wavelink Avalanche client
management system, you can quickly configure
the parameters for your terminal. For help, see
Chapter 2, “Configuring and Managing the
Terminals,” in the Trakker Antares 2400 Family
System Manual (P/N 071389).
(Optional) Configure the
Serial Port Parameters
You can connect the terminal to a PC or
other RS-232 device with the TD2400
Communications Dock, the Trakker Antares
Optical Link Adapter, or the RS-232 scan
module adapter.
The values you set for the terminal’s serial port
must match the values set for the host computer’s
serial port.
Press ) y 2 4 8 to access the TRAKKER
Antares 2400 Menu System. Choose
Configuration Menu > Communications
Menu > Serial Port [COM1].
Configure the 2425 Radio
and Network Parameters
Before you can use the 2425, you need to install
and configure each device in the RF network.
To configure the RF network
1 In a UDP Plus or WTP network, configure
the Intermec Gateway or DCS 30X. For
help, see the documentation that shipped
with your Intermec Gateway or your
DCS 30X user’s manual. In a TCP/IP
network, configure the host.
2 Configure the access points. For help, see
your access point user’s manual.
3 Configure each Trakker Antares 2425
terminal. For help, see the next procedure.
To configure the terminal
1 Press ) y 2 4 8 to access the
TRAKKER Antares 2400 Menu System.
Choose Configuration Menu >
Communications Menu > Primary
Network or Advanced Network or Radio.
Note: If you are using the WTP
network, you do not need to configure
the Advanced Network parameters.
2 Set these parameters on the Primary Network
screen:
• Make sure that 2.4 GHz (OpenAir radio)
or 802.11 DS (802.11b radio) appears in
the
Activate field.
• For UDP Plus, set Controller IP
Address, or for TCP/IP, set Host IP
Address.
• For a non-DHCP environment only, set
Terminal IP Address.
3 For a UDP Plus or TCP/IP network, set the
parameters on the Advanced Network screen:
• Set Network Port.
• For the Intermec Gateway, DCS 30X,
or host on a different subnetwork, set
Default Router and Subnet Mask.
4 Set these parameters on the Radio screen:
• For a WLI Forum OpenAir radio, set
Domain and Security ID.
• For an IEEE 802.11b radio and no
802.1x security, set Network Name.
Scroll to the WEP security screen and
set WEP Encryption,
WEP Transmit
Key, and at least one WEP Key.
6
7

13
12
• For an IEEE 802.11b radio and 802.1x
security, set Network Name. Scroll to
the 802.1x TTLS or 802.1x LEAP
security screen and set User Name
and Password.
For more information about the radio
and network parameters, see Chapter 6,
“Configuration Command Reference” in the
2400 Family system manual.
Using the Keypad
The terminals come with a color-coded keypad
to make it easier to remember key combinations.
You can also use the arrow keys ({, [, ], or })
to move around an application screen.
Choosing Your TE 2000
Application
If you have a TE 2000 application, your terminal
is configured for TE 2000 VT/ANSI by default.
You may need to change the configuration to TE
2000 5250 or TE 2000 3270.
To change the TE 2000 configuration
1 On your terminal, press ( !. The TE 2000
main menu appears.
2 Select Set-up Parms and press ;. A
password prompt appears.
3 Type C R 5 2 4 0 1 and press
;.
4 Select Protocol Opts, Data Stream, and
then select the appropriate TE 2000
configuration.
5 Save your changes by selecting Exit Menus
from the TE 2000 main menu. Press Y, and
type C R 5 2 4 0 1 at the
Enter Password prompt.
For information about using TE 2000 terminal
emulation, see the appropriate TE 2000 guide
listed in the next section.
Where to Go From Here
Now that your new terminal is working, you
may need additional information to use the
242X in your data collection system:
• The Trakker Antares 242X Handheld Terminal
User’s Manual (P/N 064024) and the Trakker
Antares 2400 Family System Manual (P/N
071389) contain all the information
necessary to install, configure, operate, and
troubleshoot the 2420 and 2425.
• These TE 2000 terminal emulation guides
provide information about how to configure
TE 2000 terminal emulation: the TE 2000
5250 Terminal Emulation Programmer’s
Guide (P/N 977-055-004), the TE 2000
3270 Terminal Emulation Programmer’s
Guide (P/N 977-055-003), and the TE 2000
VT/ANSI Terminal Emulation Programmer’s
Guide (P/N 977-055-005).
• For additional help using dcBrowser, see the
online help that ships with the dcBrowser
gateway software, or see the Data Collection
Browser Client User’s Guide (P/N 070011).
The Intermec web site at www.intermec.com
provides our current manuals as PDF files for
you to download.
To order accessories and printed documentation,
contact your local Intermec representative.
Position on
the Keypad
Color
To Type the
Character
Middle of
the key
Press the key.
Left side
above the key
Orange
Press the orange ) key,
and then press the key.
Centered
above the key
Green
Press the green ? key,
and then press the key.
Right side
above the key
Blue
Press the blue ( key,
and then press the key.

15
14
Specifications
Length: 26.9 cm (10.6 in)
Height: 7.1 cm (2.8 in) at scan module
5.8 cm (2.3 in) at grip
Width: 8.1 cm (3.2 in) at scan module
6.35 cm (2.5 in) at grip
Weight: 2420 623.7 g (22 oz)
2425 765.45 g (27 oz)
Note: The weight includes the main
battery pack and the backup battery.
Electrical rating: x 7,4 to 12V; 750mA

16
Trakker Antares 242X Handheld Terminal Quick
Start Guide
*064183-006*
P/N 064183-006
6001 36th Avenue West
Everett, WA 98203
U.S.A.
www.intermec.com
© 2004 Intermec Technologies Corp.
All Rights Reserved
-
 1
1
-
 2
2
-
 3
3
-
 4
4
-
 5
5
-
 6
6
-
 7
7
-
 8
8
-
 9
9


Intermec Trakker Antares 2420 Quick start guide
- Type
- Quick start guide
- This manual is also suitable for
Ask a question and I''ll find the answer in the document
Finding information in a document is now easier with AI
Related papers
-
Intermec Trakker Antares 2420 User manual
-
Intermec CV30 User manual
-
Intermec Trakker Antares 2400 User manual
-
-
Intermec DCS 300 Software Manual
-
-
-
-
-
