Page is loading ...

ICON TECH LINE: 951.689.ICON www.iconvehicledynamics.com
JK BODY MOUNTED TIRE CARRIER
WITH LICENSE PLATE MOUNT
INSTALLATION INSTRUCTIONS
DOCUMENT: INST_25226_REVA • UPDATED: NOV 2020
APPLICATION
These installation instructions apply to the following
products:
25226 07-18 JK BODY MNT TIRE CARRIER KIT
COMPONENTS INCLUDED
(1) Tire Carrier Frame
(1) Tailgate Plate
(2) Hinge Brackets (Upper & Lower)
(1) Adjustable Tire Mount Bracket - Carrier Side
(1) Adjustable Tire Mount Bracket - Wheel Side
(1) License Plate Relocation Bracket
TECH NOTES
NOTE: These installation instructions are based on a
clean installation on to a stock 2007-2018 Jeep JK
Wrangler. Previously modified vehicles may require
additional steps.
TOOLS REQUIRED
• 9/16” Socket and Wrench 13MM Socket
• 7/16” Socket and Wrench T50 Torx Bit
• 3/8” Allen Wrench or Hex bit Rubber Hammer or
Dead Blow Hammer
• 5/16” Allen Wrench or Hex bit #1Screw Driver/
Flat Head Screw Driver
• 3/4” Open End Wrench
• 17mm Open End Wrench
• Metal Cutting Tool: Dremel or 4-1/2” Angle
Grinder with metal cutting wheel
• Medium Grade Loctite
Thank you for purchasing this ICON Vehicle Dynamics product. Please read through this entire document before proceeding with
installation. If you are not confident in your mechanical skills, please seek the help of a professional to perform the installation. Check your
packages immediately upon arrival to ensure that everything listed is included, and to check for damage during shipping. If anything is
missing or damaged, or if you need technical assistance with any aspect of this installation, call (951) 689-ICON as soon as possible.
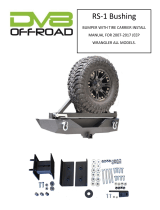
HARDWARE INCLUDED
(4) 1 Delrin Hat Bushing
(2) 2 Bushing Sleeve
(1) 3 Delrin Striker
(1) 4 Male Rod End CM6
(1) 5 Female Rod End CF6
(4) 6 1/4-20 Gr8 Nylon Insert Lock Nut
(6) 7 1/4 SAE Flat Washer
(2) 8 1/4-20 X 1/2 Gr8 Hex Head Cap Screw
(2) 9 1/4-20 X 1-3/4 Gr8 Hex Head Cap Screw
(6) 10 3/8-16 X 1 Gr8 Hex Head Cap Screw
(6) 11 3/8-16 Gr8 Nylon Insert Lock Nut
(8) 12 3/8 SAE Gr8 Flat Washer
(1) 13 3/8-24 Jam Nut - RH Thread
(2) 14 1/2-13 X 4-1/2 SS Socket Head Cap Screw
(2) 15 1/2-13 Gr8 Nylong Insert Lock Nut
(2) 16 1/2 SAE Gr8 Flat Washer
(4) 17 M10 SS Flat Washer
(2) 18 M10-1.50 SS Nylon Insert Lock Nut
(2) 19 M10-1.50 X 110 SS Socket Head Cap Screw
(3) 1/2-20 Wheel Lug Stud
(3) 1/2-20 Wheel Lug Nut
(2) Tig Welded Cam Adjuster
1
2
5
4
6
10
12
13
14
13
7
8
9
3
11 16
19
15
18

P. 2
ICON TECH LINE: 951.689.ICON www.iconvehicledynamics.com
JK BODY MOUNTED TIRE CARRIER
IMPORTANT NOTICES - PLEASE READ FIRST
READ ALL INSTRUCTIONS THOROUGHLY
FROM START TO FINISH BEFORE BEGINNING
INSTALLATION! IF THESE INSTRUCTIONS ARE
NOT PROPERLY FOLLOWED SEVERE FRAME,
SUSPENSION AND TIRE DAMAGE MAY RESULT
TO THE VEHICLE!
ICON VEHICLE DYNAMICS RECOMMENDS
ALL INSTALLATION TO BE PERFORMED BY A
PROFESSIONAL SHOP/SERVICE TECHNICIAN.
PRODUCT FAILURE CAUSED BY IMPROPER
INSTALLATION WILL NOT BE COVERED UNDER
ICON’S WARRANTY POLICY.
INSTALLATION INSTRUCTIONS
1. Ensure the vehicle is placed on a flat, level surface
with the transmission in PARK, the tires chocked,
and the emergency brake ON. Wear safety
glasses from this point forward.
2. Use a ratchet with 3/4” deep socket to remove
the lug nuts holding the factory spare tire and set
them aside.
FIG.1
3. Remove factory tire carrier by removing the 8
bolts with a 13mm Socket Retain these 8 bolts as
they will be re-used.
4. Remove the factory vent insert and plastic hinge
covers. These will not be re-used.
5. With the tailgate closed and firmly latched, use a
13mm socket and T50 Torx bit to remove the TOP
tailgate hinge only. Retain the four 13mm bolts
and six T50 bolts they will be reused.
IMPORTANT: DO NOT remove the bottom hinge until
after the following modifications have been made to
the top hinge and it has been re-installed.
6. Once the hinge has been removed from the jeep,
secure it in a vise and cut through the center of
the hinge pin that holds the two parts of the hinge
together with a metal cut-o wheel. A Dremel or
4-1/2” angle grinder works well.
FIG.1
7. After the pin has been cut, pull the pieces of the
pin out and separate the two halves of the hinge.
Retain the long half of the hinge that mounts
to the tail gate. The half of the hinge that was
attached to the Jeep’s body tub will not be re-
used.
8. Install the provided Upper Hinge Bracket on to
the jeep using three of the stock T50 hinge bolts.
Apply medium grade Loctite to the bolt threads.
9. Install the long factory hinge half to the carrier
hinge bracket using the provided M10-1.50 X 110
SS Socket Head Cap Screw with M10-1.50 Lock
Nut and Flat Washer. Swing the long hinge half
to the tailgate and attach it by re-using two of the
OE hinge bolts.
FIG.1
10. Repeat the previous steps to remove the lower
hinge assembly, cut the hinge pin and separate the
two hinge halves, and install the supplied Lower
Hinge Bracket. Be careful to keep the tailgate
securely latched shut until both the upper and
lower hinges with the new Hinge Brackets have
been installed and all fasteners tightened.

P. 3
ICON TECH LINE: 951.689.ICON www.iconvehicledynamics.com
JK BODY MOUNTED TIRE CARRIER
11. Install the suplied Tailgate Plate on to the tailgate,
in place of the OE tire carrier. Re-use the eight
OE 13mm tire carrier bolts.
12. Install the supplied U-Shaped Delrin Striker
bushing into the center tabs of the Tailgate Plate
with the supplied 1/4-20 X 1-3/4 Gr8 Hex Head
Cap Screws, 1/4 Flat Washers and 1/4-20 Gr8
Nylon Insert Lock Nuts. It is not necessary to fully
tighten this hardware yet, as some adjustments
will be made later in the process.
FIG.1
13. Lightly coat the Delrin Hat Bushings and steel
Bushing Sleeves with general purpose grease,
and install them into the hinge bushing housings
on the Tire Carrier Frame. Light taps with a dead
blow hammer in a circular motion will help seat
the bushings. Install the delrin bushings halves
first, followed by the steel bushing sleeves.
14. Mount the Tire Carrier Frame into the Hinge
Brackets on the Jeep. At each hinge, use a
supplied 1/2-13 X 5 SS Socket Head Cap Screw,
Cam Adjuster Washer (placed just under the head
of the Cap Screw, 1/2-13 Nylon Insert Lock Nut and
1/2 Flat Washer (placed just above the Lock Nut.
Snug the bolts up but leave loose for adjustment
after installation is complete.
FIG.1
15. Assemble the Male Rod End CM6, Female Rod End
CF6, and 3/8-24 Jam Nut - RH Thread into a tie-
rod assembly and connect it to the TailGate Plate
using a supplied 3/8-16 X 1-3/4 Gr8 Hex Head
Cap Screw, 3/8 Flat Washer and 3/8-16 Gr8 Nylon
Insert Lock Nut.
16. Attach the opposite end of the tie-rod assembly
to the tabs on the back side of the Tire Carrier
Frame using the remaining 3/8-16 X 1-3/4 Gr8 Hex
Head Cap Screw, 3/8 Flat Washer and 3/8-16 Gr8
Nylon Insert Lock Nut.
FIG.1
17. Adjust the length of the Tie Rod Assembly so
that the U-shaped striker on the back of the Tire
Carrier Frame seats snugly into the U-Shaped
Delrin Striker Bushing when the tailgate is latched
shut. If the carrier rattles, the heim joints need
to be shortened until the rattle has stopped.
Once the length of the Tie Rod has been adjusted
correctly, tighten the Jam Nut. Note that the
bolts holding the U-shaped Delrin Striker Bushing
should still be left un-tightened, as they will be
adjusted later.
FIG.1
18. Install the Adjustable Tire Mount Bracket - Carrier
Side on to the Tire Carrier Frame, with the
triangular shape pointing up, using four 3/8-16
X 1 Gr8 Hex Head Cap Screws, 3/8 Flat Washers
and 3/8-16 Nylon Insert Lock Nuts. There is some

P. 4
ICON TECH LINE: 951.689.ICON www.iconvehicledynamics.com
JK BODY MOUNTED TIRE CARRIER
adjustment available in the vertical location of the
bracket. Select the height that works best with
your wheel and tire diameter, taking into account
bumper clearance and desired departure angle.
FIG.1
19. Place the Adjustable Tire Mount Bracket - Wheel
Side againse the back of your spare tire wheel and
align it to determine the correct three lug stud
holes to use for your wheel’s bolt patter. Use a
hammer to tap the supplied Wheel Lug Stud into
the bracket, making sure the knurls of the wheel
studs are fully seated into the bracket.
20. Set the Wheel Side Bracket on to the Carrier Side
Bracket and use two 3/8-16 X 1 Gr8 Hex Head Cap
Screws, 3/8 Flat Washers and 3/8-16 Nylon Insert
Lock Nuts to bolt them together. Snug these bolts
but leave loose enough for wheel backspacing
adjustment.
21. Mount the spare tire on to the Tire Mount Bracket,
install the supplied Wheel Lug Nuts, and tighten.
Slide the wheel and wheel bracket forwards
towards the front of the Jeep so that the tire is
pushing against the carrier on both sides. Make
sure the tire is as tight to the carrier as possible,
then tighten the two 3/8” bolts in the wheel and
carrier bracket.
22. Mounting License Plate Relocation Bracket
(Optional). Using the supplied 1/4-20 X 1/2 Gr8
Hex Head Cap Screws, Flat Washers and Lock Nuts
to mount the license plate bracket to the wheel
bracket. The license plate may now be mounted
to the License Plate Relocation Bracket. Note that
a suitable license plate light (not provided) will
need to be installed.
23. Perform final adjustments by turning the cam
adjusters on the Tire Carrier Hinge, so that the
carrier sits level and opens smoothly. Once
adjustments have been made, tighten all of the
nuts and bolts on the entire carrier, including
the bolts that attach the U-shaped Delrin Striker
Bushing to the Tailgate Plate.
24. VERIFY ALL FASTENERS ARE PROPERLY
TORQUED BEFORE DRIVING VEHICLE.
Congratulations! Your installation is complete.
RE-TORQUE ALL NUTS, BOLTS AND LUGS AFTER 100
MILES AND PERIODICALLY THEREAFTER.

P. 5
ICON TECH LINE: 951.689.ICON www.iconvehicledynamics.com
JK BODY MOUNTED TIRE CARRIER
LIMITED LIFETIME WARRANTY
ICON Vehicle Dynamics warrants to the original retail purchaser who owns the vehicle on which the product
was originally installed. ICON Vehicle Dynamics does not warrant the product for finish, alterations,
modifications and/or installation contrary to ICON Vehicle Dynamics instructions. ICON Vehicle Dynamics
products are not designed, nor are they intended to be installed on vehicles used in race applications, for
racing purposes or for similar activities. (A “race” is defined as any contest between two or more vehicles, or
a contest of one or more vehicles against the clock, whether or not such contest is for a prize). This warranty
does not include coverage for police or taxi vehicles, race vehicles, or vehicles used for government or
commercial purposes. Also excluded from this warranty are sales outside of the United States of America and
Canada.
ICON Vehicle Dynamics’ obligation under this warranty is limited to the repair or replacement, at ICON Vehicle
Dynamics’ discretion, of the defective product. Any and all costs of removal, installation or re-installation,
freight charges and incidental or consequential damages are expressly excluded from this warranty. Items that
are subject to wear are not considered defective when worn and are not covered.
ICON Vehicle Dynamics components must be installed as a complete kit as shown in our current application
guide. Any substitutions or exemptions of required components will immediately void the warranty. Some
finish damage may happen to parts during shipping and is not covered under warranty.
This warranty is expressly in lieu of all other warranties expressed or implied. This warranty shall not apply to
any product that has been improperly installed, modified or customized subject to accident, negligence, abuse
or misuse.
7929 Lincoln Ave. Riverside, CA 92504
Phone: 951.689.ICON Fax: 951.689.1016
www.iconvehicledynamics.com
FOLLOW US ON FACEBOOK!
/