Page is loading ...

Friction Pad
(B)
PATTERNS
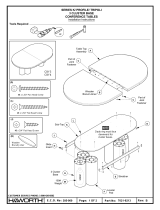
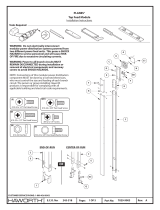
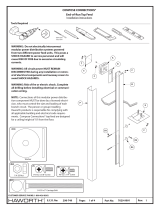
Tools Required
#2
36"- 48"
UNITS SHIPPED ASSEMBLED
UNITS SHIPPED UN-ASSEMBLED
#10-12 x 1-1/4" Flat Head Screw
(C)
Top
OR
Storage Box
Installation Instructions
Sliding Doors
(optional)
R
P
Lock Strip
(Optional)
3"
QStorage Box
1 of 4
Page:
E.C.O. No:
CUSTOMER SERVICE PHONE: 1-800-426-8562
244-374 7029-9557
Part No: Rev: H
(D)
Minix 1/4 Turn Cam
(L)
Double Locking Carcase
24 x 11mm Minix Bolt
(E)
IMPORTANT NOTICE: This instruction
is for Storage Boxes ordered after
10/20/14. Note the hardware changes
used to assembly the product.
NO TRACKTRACK
OR
D
G
E
F
Left End
Panel
Right End
Panel
H
Back
Panel
J
Bottom
K
L
Base
A
Friction Pad
B
C

Friction Pad
(B)
#10-12 x 1-1/4" Flat Head Screw
(C)
1 2
3
4
2 of 4
Page:
E.C.O. No:
CUSTOMER SERVICE PHONE: 1-800-426-8562
7029-9557
Part No: Rev:
(D)
Minix 1/4 Turn Cam
G
G
K
K
L
F
F
H
H
E
E
C
D
B
21
D
D
J
A
244-374 H
1
2
3
3

R
1
2
DOOR INSTALLATION
1
2
R
Q
NOTE: Paran wax MUST
be applied to bottom edge of
door to improve sliding door.
NOTE: Install back
right door rst.
1
C
L
3"
2
3 of 4
Page:
E.C.O. No:
CUSTOMER SERVICE PHONE: 1-800-426-8562
7029-9557
Part No: Rev:
244-374 H
NOTE: Adhesive
side towards track.
P
NOTE: Install anti-dislodge
strips (P) for sliding doors in
the track at the center of each
door as shown.

4 of 4
Page:
E.C.O. No:
CUSTOMER SERVICE PHONE: 1-800-426-8562
3
7029-9557
Part No: Rev:
C
L
3"
244-374 H
NOTE: Adhesive
side towards track.
P
NOTE: Install anti-dislodge
strips (P) for sliding doors in
the track at the center of each
door as shown.
OPTIONAL LOCK PLUG INSTALLATION
2
CK-3
HW-SERIES
Install lock plug (HW-SERIES)
NOTE: Position cam to unlocked
(12:00 o’clock position.
NOTE: It may be necessary to
rotate cam until lock plug
engages.
NOTE: Hold the lock
plug (HW-SERIES) in
place with thumb
while removing the
control key (CK-3).
Remove round key (CK-3) and insert square key (X)
13
X
CK-3
HW-SERIES
Replace square key (X) with round key (CK-3)
1
2
CK-3
X
HW-SERIES
1
2
/


