Page is loading ...

GETTING STARTED GUIDE
Trimble® TSC3 Controller
Microsoft
®
Windows Embedded Handheld 6.5

This is the April 2012 release of the Trimble TSC3 Controller Getting Started Guide. The Trimble TSC3 operating system is
based on the Microsoft Windows Embedded Handheld 6.5 software.
© 2012, Trimble Navigation Limited. All rights reserved. Trimble and the Globe & Triangle logo are trademarks of Trimble
Navigation Limited, registered in the United States and in other countries. Microsoft and Windows Embedded Handheld are
either registered trademarks or trademarks of Microsoft Corporation in the United States and/or other countries. All other
trademarks are the property of their respective owners.
Technical Assistance
If you have a problem and cannot nd the information you need in the product
documentation, contact your local Trimble Authorized Distribution Partner.
Alternatively, go to the Trimble Support page at www.trimble.com/support.html, and
then do one of the following:
• To browse the available online support resources for the Trimble TSC3 controller,
click the Trimble TSC3 link.
• To request technical assistance from Trimble Support, click the submit an inquiry
link, ll in the form, and then click Send.
Additional information is available from Windows Embedded Handheld:
http://www.microsoft.com/windowsembedded/en-us/evaluate/windows-embedded-
handheld.aspx

3
Contents
Welcome ...................................................................................... 3!
Device Hardware ......................................................................... 4!
Unit Setup .................................................................................... 6!
Working with the Unit and the Battery...................................... 10!
Status indicators......................................................................... 15!
Settings on your Unit .................................................................16!
Communication.......................................................................... 19!
Connecting to a PC .................................................................... 19!
Working with Bluetooth ............................................................ 21!
Working with Wi-Fi (Wireless Lan, WLAN or 802.11) ........... 23!
Working with the Camera.......................................................... 25!
Working with the Barcode Scanner........................................... 28!
Working with the GPS............................................................... 29!
Working with the Wireless WAN.............................................. 31!
Troubleshooting ......................................................................... 35!
Caring for your Unit .................................................................. 36!
Environmental Considerations................................................... 37!
Environmental Specifications.................................................... 38!
Hardware Specifications ............................................................ 38!
Regulatory Information ............................................................. 39!
Declaration of Conformity......................................................... 40!
Safe Use of your Unit ................................................................ 41!
Appendix A................................................................................ 44!
Using SatViewer........................................................................ 44!
Welcome
Congratulations on your purchase of the most powerful and
advanced handheld computer available on the market today. Its
rugged design allows you to work in harsh outdoor environments.
You can operate your unit in blazing heat, subzero cold, driving
rain or dusty job sites – places you could not take a consumer-
grade handheld computer.
NOTE: Not all the features discussed in this manual will apply to
every unit, as some of the features are offered as options. If the
feature described does not apply to your unit, please disregard that
section.

4
Device Hardware
Front View
Back View
NOTE: Some features are offered as options and may not apply to your unit. Be sure
to read the warranty and safety information in this manual prior to using your unit.
Notification
LEDs
Enter
Power
Battery Door
Latch
(under
hand strap)
Battery
Door
Hand
Strap
Stylus
2.4 GHz
Antenna
(if present)
Navigation
Pad
Enter
Dual LED
Camera
Flash
Qwerty
Keypad
Camera

5
Top View
Bottom View
I/O
The I/O has a mini-USB client (to connect to Microsoft Windows
Mobile Device Center, used on Microsoft Windows Vista® and
Windows 7®, or connect to Microsoft ActiveSync®, used on
Microsoft Windows XP®), a USB host port (to connect to USB
client devices) and a DB9 RS-232 connector (for use with serial
devices).
NOTE: COM1 is always reserved in software for the 9-pin port.
Many USB peripheral devices supported by personal computers
(Microsoft Windows XP, Microsoft Vista, Microsoft Windows
7, etc.) are not supported by this unit. Mass storage devices (e.g.
memory drives) and USB Human Interface Devices (HID) (e.g.
keyboards) are supported. Before purchasing a USB peripheral,
check with the manufacturer to ensure that it will operate with
one of these natively supported USB classes. Some devices have
no applicability in Windows Embedded Handheld. For example,
mice do not make sense to use with your unit because it is
designed to be touchscreen or keypad operated.
Serial
External
Power
USB
Host
Barcode
Scanner
(if present)
Stylus
Holder
2.4 GHz
Antenna
(if present)
Audio
Jack
Mini-
USB
Client
Pin 5
Pin 1
Pin 9
Pin 6
Serial
External
Power
USB
Mini-
USB
Client

6
Unit Setup
1. Install the SD card (if desired)
1. Lift up the plastic regulatory label in
the battery compartment.
2. Gently slide the SD card into the slot.
3. Close the plastic regulatory label.
If your unit has the WWAN option, install
the GSM SIM card. See page 31 for installation instructions.
2. Install the battery
The Lithium-Ion (Li-Ion) battery
with the battery cover is shipped
detached from the unit. Insert the
battery at the bottom of the
compartment first so the connector
on the battery mates with the pins
in the battery compartment. Using
your thumb, the flat end of the
stylus or a coin, turn the latch located above the
battery clockwise until tightened. As the
latch is turned, the battery lowers level to
the case.
3. Attach the hand strap
Attach the hand strap to the back case, as
shown.
4. Attach audio port cover and
stylus
Attach the tethers to the back case,
as shown.

7
5. Attach the I/O Dust cover (optional)
While the unit is completely sealed, the dust
cover protects the connectors from foreign
objects.
6. Apply the screen protector
To keep the touchscreen clean and protected,
apply the screen protector following the
instructions provided in the screen protector
package. Unprotected screens become scratched and scuffed over
time. Screen protectors extend the life of the display by providing a
protective and replaceable barrier between abrasive grit and the
surface of the display. It is recommended to replace the screen
protector every 2 months, or more often if heavily used.
Screen damage associated with not using a screen protector, not
using the approved screen protector or failure to follow the
instructions for installation may void the product warranty.
7. Charge the battery
The power supply that ships with your unit has four international
plugs that fit almost every electrical outlet in the world. Connect the
appropriate plug to the power cord and attach to the power supply.
Plug into an electrical outlet and plug the barrel end of the power
supply into the unit.
Warning! Be sure to only use the power supply included with your
unit. Use of other adapters may void the product warranty.
8. Turning your unit on and off (resume/suspend)
The unit should boot up when the battery is installed. If not, press
and release the green Power key on the keypad. To turn your unit
off, press and release the Power key again.
One of the most convenient features of your unit is
“suspend/resume”. There is no waiting for the unit to boot up every
time it is turned on. (It does not occur on the first boot-up.)
IMPORTANT: Fully charge the battery at least 4 hours after
installing in the unit. The battery LED (left LED) will turn
green when fully charged.

8
9. Language selection
The first time the unit is turned on or if the firmware is re-loaded,
you may need to select the desired language.
1. Use the up or down arrows to highlight the language desired
and press Enter to select it. (The touchscreen is not enabled
yet).
2. Use the up or down arrows to highlight the checkbox.
3. Press Enter to place a checkmark in the box for “Yes”.
4. Use the up or down arrows to highlight NEXT and press
Enter.
5. Wait while your unit is being configured to the chosen
language. It will restart when finished.
IMPORTANT: Carefully choose the correct language because
all other languages are removed after this selection. Contact
technical support if the wrong language was selected.
UP
DOWN
ENTER
NEXT

9
NOTE: Only Microsoft applications and messages will be
translated into languages other than English. All other error
messages, notifications and other applications may appear in
English.
10. Align screen
When the unit first turns on, the message “Tap the screen to set up
your Windows Embedded Handheld-based device” will appear.
The align screen message will display a series of targets to tap in
sequence on the screen. Use the stylus to tap the targets firmly and
accurately. Sometimes you need to repeat the alignment procedure
more than once to provide a satisfactory alignment.
11. Password – lock (optional)
You do not have to provide a password unless you are concerned
about unauthorized use. To eliminate using a password, tap Skip.
If you opt for password protection the password must be entered
every time the unit is turned on or the Power key is pressed to
resume operation.
WARNING: BE CERTAIN TO REMEMBER THE PASSWORD.
The only way to recover from a forgotten password is to perform a
Clean Boot and you will LOSE all application software, licenses,
settings and data on your unit. See page 14 on how to perform a
Clean Boot.
12. Setup is complete
Tap the screen to start using your unit.

10
Working with the Unit and the Battery
Home Screen
The Home Screen is an easy way to launch your favorite programs.
You can view high-level information at a glance, with notifications
for Live services, e-mail and SMS/MMS.
Data Collector: Hover over the top bar of the Home Screen to
access the Wireless Manager. This manages wireless settings
like Wi-Fi, Bluetooth and Phone.
Pictures: You can select All Photos to open up Pictures and
Videos. Tap Camera to start taking pictures.
Music: You can select your music from this menu.
Time: You can select your time zone, set the time and date to the
correct values and set alarms.
Text: If you have the phone feature set up on your unit, you can
send and receive text messages from this menu.
E-mail: Email can be set up and launched here.
Calendar: Appointments can be managed from here.
Favorites: Internet Explorer can be launched from here.
You can change to the classic Today Screen by tapping / Settings
/ Home / Items.
Extreme Heat
Extreme heat: The battery is designed to stop operating
at or above the extreme heat of +149 °F (+65 °C). If
this icon appears, the battery has overheated to +140 °F
(+60 °C).
CAUTION: If the battery temperature exceeds 158 °F (70 °C) it will
be disabled and will need to be replaced.

11
Battery Life
The Lithium-Ion (Li-Ion) battery life is dependent upon the
application and operating environment. For example, estimated
battery life will be approximately 34 hours with the unit turned on
but idle, with the backlight on, all radios and compass off when
using a new battery.
Tips for extending the battery life:
- Display backlight: Tap / Settings / System / Backlight to
minimize the amount of time the backlight stays on and dim it
to only as bright as required to view the display.
- Wi-Fi, Bluetooth, camera, or barcode scanner: Turn off when
not needed. (Camera and barcode scanner are optional devices.)
- Flashlight: Minimize the use of the flashlight.
- WWAN: Turn the phone off when not in use.
- Cold temperatures: Keep the unit as close to room ambient
temperature (77 °F or 25 °C) as possible. If feasible, keep it
inside your coat or a vehicle when not in use.
- GPS: Ensure that the GPS-aware applications that communicate
with the GPS are closed when not in use.
- Auto features: Tap / Settings / Power / Advanced. Specify
your unit to turn off in a short time if not in use. Tap /
Settings / Bluetooth / Wake Settings. Turn off Allow
Bluetooth activity to turn the device on. Bluetooth could turn
on your unit, transfer data and drain the battery.
- Heavy processing by the CPU may have some impact on battery
life, but is typically less significant.
Charging the battery
The battery can be charged in the unit or apart from the unit with an
external battery charger (sold separately, as an accessory). Connect
the plug for your country to the power cord and attach to the power
supply. Plug into an electrical outlet and plug the barrel end of the
power supply into the unit. The unit will be charged in about 4 hours.
A full charge is indicated by the battery indicator (left LED) turning
green. The recommended temperature range for charging is
between +32 °F and +104 °F (0 °C and +40 °C). If the battery
temperature is outside of this range, the battery may not charge.
Warning! Be sure to only use the power supply included with your
unit. Use of other adapters may void the product warranty.

12
Changing the battery
The unit was designed to be able to change the battery quickly
without resetting it. The unit saves enough power (in Replace
Battery mode) that if you swap the battery within approximately
one minute, it will not trigger a reset.
WARNING: If the saved power runs out before the new battery is
installed, the unit will reset. This will not impact saved data,
programs or configuration, however unsaved data will be lost and
the time settings may be reset.
To change a battery assembly, perform the following steps:
1. Close open applications and save data in case the battery
exchange takes too long.
2. Remove the hand strap from the unit.
3. Enter the Replace Battery mode (so alarms will not wake up
the unit while changing the battery). Hold down the Power key
for about 3 seconds then release to display the power menu.
Tap Replace Battery/SIM. See page 13.
4. Turn the latch located above the battery counterclockwise.
5. Remove the battery from the unit.
6. Quickly insert the replacement battery onto the unit.
7. Turn the latch located above the battery clockwise.
8. Replace the hand strap.
9. Turn on the unit to resume operation.
Battery power: Tap / Settings / Power to see how much
battery power is remaining. Tap Advanced to turn the display off
when not in use to conserve battery power.
Notification LEDs
At the top of the unit are three LEDs that provide status information:
Left LED
Center LED
Right LED
Colors: amber, green, red
Colors: amber, green, red
Colors: amber, blue, green
Battery Status:
Green: fully charged
Amber: charging
Red: battery error
OS Status (application dependent):
Red-blinking: alarm
WWAN Status:
Amber-blinking: 2G connection
Green-blinking: 3G connection
(if OS status alarm and WWAN is
on, the red will blink faster)
Bluetooth on:
Blue-blinking
Wi-Fi on:
Amber-blinking
GPS on:
Green-blinking
(LED will flash in a sequence
if multiple features are on)

13
Speaker and microphone
Your unit comes with an integrated speaker and a microphone. It
also has a 3.5 mm audio jack that is wired for a headset with a
stereo speaker and microphone combination. To record, tap /
Notes (or hold down the Fn key and the 5 key). If you do not see
the Recording toolbar, tap Menu / View Recording Toolbar. Tap
the round Record symbol on the screen. The unit will record until
the square Stop symbol is pressed. The recorded file will be saved
in the Notes folder.
Power key features
The Power key turns the unit on and off and performs a number of
additional functions.
Power menu: Hold down the Power key for about 3 seconds to
display a countdown. Continuing to press the Power key will cause
a reset when the countdown reaches zero. If you release the Power
key while the countdown is proceeding, you access the following
menu. Tap an option or OK to exit.
Clean Screen: Disables the
touchscreen for cleaning. Press the
enter key to re-enable the
touchscreen.
Align Touchscreen: Repeats the
alignment procedure.
Replace Battery/SIM: Ensures that
alarms will not wake up the unit while
changing the battery or accessing the
SD card or the SIM under the battery.
Shutdown: Intended for long-term storage to put the unit in its lowest power mode.
Running application state and unsaved data will be lost. Internal GPS parameters will be
reset to their default settings. To take the unit out of the shutdown mode, press the power
key and the unit will boot up. NOTE: While in shutdown mode, the battery LED does not
work, but if the power supply is plugged in, it will still charge.
Reset: Stops all running programs and restarts the unit. No file system data is lost, only
open or unsaved files will be lost. All registry settings, control panel, personal
information, GPS settings and databases are preserved.
NOTE: If the countdown or the Power menu does not appear when the power button is
held down, continue to hold down the power button for at least 8 seconds to start the
reset. It may take up to 10 seconds for the unit to start after the power button has been
released.

14
Perform a Clean Boot
WARNING: Application software installed by
the customer and some licenses, settings and
user data will be cleared if this function is performed!
Hold down the Power key until the countdown begins and then
release it to show the Power Menu described above. Tap Reset.
Upon the appearance of the boot screen, press and hold the power
key and then press the right soft key . A screen appears
warning that if you continue, this operation will clear the persistent
store. Follow the instructions on the screen ONLY if you want to
completely clear your unit.
Storage memory
Unlike many handhelds that can lose data if they lose power, all
your data is always stored in non-volatile persistent storage
memory. Losing power will not impact saved data or
configurations other than the real-time clock. As with any computer
system, we recommend that you regularly backup your data to
removable media or to a PC.
Accessing storage memory using File Explorer
File Explorer ( / File Explorer) lets you browse the contents of
folders on your unit. To easily delete, rename, or copy an item,
touch and hold the item and then select the function desired.
NOTE: Unlike PC’s, Windows Embedded Handheld does not
support a Recycle Bin. Once a file is deleted, it cannot be
recovered.
Task Manager
Closing programs still leaves them resident in RAM. Windows
Embedded Handheld will close background programs to free up
RAM if resources are low. To manually close programs, tap /
Task Manager. Tap on the program and tap End Task or tap
Menu / End all Tasks.
Flashlight
The dual LEDs for the camera flash can also be used as a flashlight.
Tap / Flashlight to toggle the Flashlight on and off.

15
Status indicators
Following are some of the status indicators seen on your unit’s
display.
Icon
Description
Icon
Description
!
Battery power is low
!
Other networks are detected. Tap to
access an available network
!
Battery power is very
low
!
Wireless network connected
Battery
communication error
!
Active connection, but not currently
synchronizing
Battery charging
!
Inactive connection to computer or
wireless network
Battery level
!
Synchronizing
!
Battery warning out of
temperature range
!
Synchronizing error
!
Instant messages
received
!
Pending alarm
!
Speaker is on
!
Phone is turned on and signal
strength
!
Speaker is off (or in
mute position)
!
Phone is turned off. To turn it on,
tap this icon
!
SIM card missing
!
No signal
Faulty SIM card
!
No service. Phone connection
unavailable or network error.
E-mail has been
received
!
Lost signal. The unit is searching for
a signal.
Tap to view more
notifications
!
EDGE network is available
Data call is in
progress
EDGE network connected
Roaming mode
GPRS network available
3G connected
GPRS network connected
HSDPA network available

16
Settings on your Unit
Tap / Settings. Some of the more useful settings are described
below.
Lock (password)
If you want password protection from unauthorized use of your
unit, tap / Settings / Lock. The password must be entered every
time you turn the unit on or resume operation.
WARNING: BE CERTAIN TO REMEMBER THE PASSWORD.
The only way to recover from a forgotten password is to perform a
Clean Boot. However, you will LOSE all application software,
licenses, settings and data on your unit. For instructions on how to
perform a Clean Boot, see page 14.
Buttons (keys)
Tap / Settings / Personal / Buttons. Under Program Buttons,
your favorite programs can be assigned to several of the keypad
buttons. The list of assignable keys is shown on the left hand side
with the program that is assigned by default on the right. To
reassign a key, select the key in section 1 and change to the desired
program or action from the pull-down list in section 2.
You can customize the way your Up/Down control repeats by
changing the settings under the Up/Down Control tab.
The yellow (function key) accesses the symbols in yellow on
the keypad of the unit. Several settings can be changed under
Keyboard Options.
Auto release: Press and release the key to access a yellow task
for one use. It then goes back to the standard function for the key.
Manual release: Press the function key to toggle it on and off.
Yellow tasks remain active until the function key is pressed
again.
Disabled: The function key has to be held down while pressing
any other key to access the yellow task.
Play Sticky Key Sounds: To disable sticky key sounds, remove
the check in the box.

17
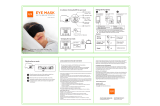
Compass calibration
To re-calibrate the compass, tap / Settings / System / Compass
Calibration. Tap on Calibrate to begin.
1.
Hold the unit level and
press the Enter key.
Press Enter key.
2.
Rotate the unit 180
degrees (while keeping it
horizontal) and
press the Enter key
again.
Rotate and press Enter key.
3.
Rotate the unit upside
down and press the Enter
key again.
Rotate upside down and press Enter.
Backlight for display
Tap / Settings / System / Backlight. The default for the
backlight is on. Tap Battery Power, External Power and
Brightness to change settings.
To toggle the backlight on and off, hold down the Fn key and the 9
key to access the (moon). Once toggled off, the backlight will
stay off until it is toggled back on. Screen taps and key presses will
not cause it to turn on.
Memory
Tap / Settings / System / Memory to see how much Storage
memory and Program memory is available. If there is an SD card
installed under the battery, tap Storage Card to view the available
memory on the card. You can also find the large files that are using
storage memory.

18
System information
Tap / Settings / System / System Information. Firmware
version, serial number, processor speed, RAM and Flash size,
wireless configurations, battery and card port information can be
found here.
Power
Tap / Settings / Power to view the approximate battery power
remaining. Tap the Advanced tab and choose the settings for
automatically turning off the unit when not in use.

19
Communication
Your unit may offer multiple methods of communication with other
devices as described below. Not all the features apply to every unit,
as some of the features are offered as options. If the feature
described does not apply to your unit, please disregard that section.
Connecting to a PC
Connecting your unit to a PC allows you to copy files, synchronize
information, send and receive e-mail and install applications on your
unit. Connectivity software is pre-installed on your handheld unit.
Microsoft Windows Vista® & Windows 7®: Microsoft
Windows Mobile Device Center may be pre-installed on your
PC. If it is not on your PC, go to www.microsoft.com and
search for Windows Mobile Device Center to install it.
NOTE: It does not recognize the serial port and Serial
ActiveSync is not supported at all. You must connect by either
USB or Bluetooth.
Microsoft Windows XP® SP3 or later: Microsoft ActiveSync
4.5 or greater is required. (Microsoft Office Outlook 2000 and
older is not supported.)
NOTE: If you have an earlier version on your PC, you need to
upgrade to version ActiveSync 4.5 prior to connecting to your
unit. Go to http://www.microsoft.com and search for
ActiveSync.
IMPORTANT: Do not connect your unit to the USB port on the
PC until after you install connectivity software to your PC. If you
prematurely connect the unit to your PC, your PC USB drivers may
get into a confused state and will not connect. If you suspect that
something like this has happened, uninstall the connectivity
software on your PC, reboot, and reinstall.
After the connectivity software is installed on the PC, connect the
unit to the PC:
1. Connect the USB end of the synchronization cable to the PC.
2. Turn on your unit.
3. Connect the mini-USB end of the cable to your unit.

20
Troubleshooting connection problems
1. Confirm the unit is configured to communicate with the PC.
Tap / ActiveSync / Menu / Connections. Confirm the box
Synchronize all PC’s using this connection is checked and
USB is selected from the dropdown list.
2. If the unit is unable to connect to the PC via ActiveSync, try
disabling any personal firewall software running on the PC.
TCP/IP ports need to be open.
3. Reset the unit.
4. If you have more than one unit, PC and/or cable, testing
different combinations of equipment can help isolate the cause
of the problem.
5. If you suspect the unit may have been connected to the PC
USB port before the connectivity software was installed, then
uninstall, reboot the PC, and reinstall.
6. Confirm the version of connectivity software used on your PC
(Microsoft ActiveSync 4.5 or greater for Windows XP or
Windows Mobile Device Center for Windows 7 and Vista).
7. Tap / Settings / Connections / USB to PC and change the
check box Enable advanced network functionality.
/