Page is loading ...

INSTALLATION AND OPERATION MANUAL
MODELS: 4 Post Automotive Lift
T7000-4N
Maximum Lifting Capacity 7,000 lbs.
T7000-4NT
Maximum Lifting Capacity 7,000 lbs.
T7000-4S
Maximum Lifting Capacity 9,000 lbs.
T7000-4ST
Maximum Lifting Capacity 9,000 lbs.
IMPORTANT SAFETY INSTRUCTIONS
SAVE THESE INSTRUCTIONS
Keep this operation manual near the machine at all
times. Make sure all users read this manual.
WARNING:
INSTRUCTIONS TO READ THE MANUAL(S) THOROUGHLY BEFORE INSTALLING,
OPERATING, SERVICING, OR MAINTAINING THE LIFT.
PLEASE READ THE ENTIRE CONTENTS OF THIS MANUAL, PRIOR TO INSTALLATION AND OPERATION. BY
PROCEEDING WITH THE LIFT INSTALLATION AND OPERATION YOU AGREE THAT YOU FULLY UNDERSTAND THE
FULL CONTENTS OF THIS MANUAL. THIS MANUAL MUST BE READ BY ALL USERS. FAILURE TO OPERATE THIS
EQUIPMENT AS DIRECTED MAY CAUSE INJURY OR DEATH.
Questions, problems, missing parts? Before
returning to your retailer, call our customer
service department at 1-888-448-6746
(1-888-44 TORIN), or www.tcegarage.com
8 a.m.- 5 p.m., PST, Monday-Friday.
Read carefully and understand all
ASSEMBLY AND OPERATION
INSTRUCTIONS before operating.
Failure to follow the safety rules and other
basic safety precautions may result in serious
personal injury.
RECEIVING
The shipment should be thoroughly inspected as
soon as it is received. The signed Bill of Lading is
acknowledgement by the shipping carrier as receipt
of this product as listed in your invoice as being in
a good condition of shipment. If any of these goods
listed on this Bill of Lading are missing or damaged,
do not accept goods until the shipping carrier makes
a notation on the freight bill of the missing or
damaged goods. Do this for your own protection.
WARNING:
ORIGINAL INSTRUCTIONS IN ENGLISH LANGUAGE
TORIN COMMERCIAL EQUIPMENT
1 REV 190425

Model Name
Model Number
ALI Gold Label Serial #
Lift Serial #
Date of Manufacture
Date of Purchase
Power Unit Model #
Power Unit Date of Mfg.
Power Unit Serial #
READ THIS ENTIRE MANUAL BEFORE INSTALLATION & OPERATION BEGINS
IMPORTANT
Before You Begin Register This Product.
For future reference, record the model name, model number, serial numbers, date of manufacture
and purchase date of this product. You can nd this information on the product.
Save the receipt, warranty and these instructions. This information is required when calling for parts
or warranty issues. Warranty is non-transferable. To be able to make a claim under a written warranty,
the manufacturer requires you to register the product by lling in and returning a warranty card or by
registering the product online at www.tcegarage.com.
TO VALIDATE YOUR LIFT WARRANTY
Register online before rst use at www.TCEGARAGE.com
SAVE THESE INSTRUCTIONS
OWNER / USER RESPONSIBILITY
DO NOT OPERATE OR REPAIR THIS PRODUCT WITHOUT READING THIS MANUAL.
Read and follow the safety instructions. Keep Instructions readily available for operators. Make certain all operators are
properly trained and understand how to safely and correctly operate the product. By proceeding you agree that you fully
understand and comprehend the full contents of this manual. Failure to operate this product as intended may cause injury
or death. The manufacturer is not responsible for any damages or injury caused by improper use or neglect. Allow prod-
uct operation only with all parts in place and operating safely. Use only genuine replacement parts. Service and maintain
the product only with authorized or approved replacement parts; negligence will make the product unsafe for use and will
void the warranty. Carefully inspect the product on a regular basis and perform all maintenance as required. Store these
instructions in a protected dry location. Keep all decals on the product clean and visible. Do not modify and/or use for any
application other than that for which this product was designed. If you have any questions relative to a particular applica-
tion, DO NOT use the product until you have rst contacted the distributor or manufacturer to determine if it can or should
be performed on the product.
TORIN COMMERCIAL EQUIPMENT
2 REV 190425

SHIPPING DAMAGE CLAIMS
Once the equipment/product has been shipped, bill of sale passes to the Purchaser. Materials damaged in
shipment claims must be made by the Purchaser against the Freight Carrier at the time of shipment arrival.
Any freight damage must be noted on the freight bill before signing and reported to the freight carrier with a
freight claim established. Manufacturer is not responsible for freight claims. Identify the components and check
for shortages. If shortages are discovered, please contact the Distributor / Sales Representative in your area
for service. It is the customer’s responsibility to arrange for unloading of products shipped.
SHIPPING FREIGHT
This item is shipped via “truck freight” (common carrier or at-bed, not UPS). Truck freight companies do NOT
require their drivers to unload shipments. An additional “Lift Gate” fee will apply if the driver unloads the mer-
chandise. The shipping carrier will call and schedule delivery, at which time, you may request a “Lift Gate”
(provided the weight and dimensions of the product ts the criteria for lift gate service) and arrange payment
with the carrier for that service.
GENERAL SAFETY RULES
WARNING: Read and understand all instructions. Failure to follow all instructions listed below
may result in serious injury.
CAUTION: Do not allow persons to operate or assemble this product until they have read
this manual and have developed a thorough understanding of how the product works.
WARNING: The warnings, cautions, and instructions discussed in this instruction manual
cannot cover all possible conditions or situations that could occur. It must be understood by the operator
that common sense and caution are factors that cannot be built into this product, but must be supplied by the
operator.
HAZARD DESCRIPTIONS
Use alertness and prudence in a hazardous situation; care; wariness.
Identify the hazard levels used in this manual with the following denitions and signal words:
IMPORTANT INFORMATION:
This lift is designed for indoor use only, and should not be installed in a pit or uneven surface.
Manufacturer recommends the oor on which the lift is to be installed must be 6” inch minimum thickness
concrete, with a minimum compressive strength of 3000 psi, and reinforced with steel bar, and a minimum
edge distance of 8 inches. (Contact your building architect for information before installing on Pre-stressed
concrete.)
The lift has specic electrical requirements as described in the Installation Instructions section of this manual.
This lift has a minimum ceiling height requirement as described in the Installation Instructions section of this
manual. Failure by the owner to provide the recommended shelter, mounting surface, electrical supply, and
ceiling height could result in unsatisfactory lift performance, property damage, or personal injury.
DANGER:
Immediate hazards which
will result in severe liability or
exposure to personal injury or
death.
WARNING:
Hazards or unsafe practices
which could result in severe
personal injury or death.
CAUTION:
Hazards or unsafe practices
which may result in person-
al injury, product or property
damage.
TORIN COMMERCIAL EQUIPMENT
3 REV 190425

IMPORTANT SAFETY INSTRUCTIONS
WARNING: When using your garage equipment, basic safety precautions should always be
followed, including the following:
1. Read all instructions. Study, understand, and follow all instructions before operating this device.
2. Care must be taken as burns can occur from touching hot parts.
3. Do not operate equipment, with a damaged cord or if the equipment has been dropped or damaged -
until it has been examined by a qualied service person.
4. Do not let a cord hang over the edge of the table, bench, or counter or come in contact, with hot mani
folds or moving fan blades.
5. If an extension cord is necessary, a cord, with a current rating equal to or more than that of the
equipment should be used. Cords rated for less current than the equipment may overheat. Care should
be taken to arrange the cord so that it will not be tripped over or pulled.
6. Always unplug equipment from electrical outlet when not in use. Never use the cord to pull the plug
from the outlet. Grasp plug and pull to disconnect.
7. Let equipment cool completely before putting away. Loop cord loosely around equipment when storing.
8. To reduce the risk of re, do not operate equipment in the vicinity of open containers of ammable
liquids (gasoline).
9. Adequate ventilation should be provided when working on operating internal combustion engines.
10. Keep hair, loose clothing, ngers, and all parts of body away from moving parts.
11. To reduce the risk of electric shock, do not use on wet surfaces or expose to rain.
12. Use only as described in this manual. Use only manufacturer's recommended attachments.
13. ALWAYS WEAR SAFETY GLASSES. Everyday eyeglasses only have impact resistant lenses; they are
not safety glasses.
14. To reduce the risk of injury, close supervision is necessary when this product will be used around
children. (Pertains to cabinets only.)
15. To reduce the risk of injury, never overload the drawers or shelves. Refer to loading instructions.
16. To reduce the risk of electric shock or re, never overload receptacles. Refer to markings for the proper
load on receptacles.
17. Do not exceed rated capacity.
18. Use only on hard, level surfaces with less than 3 degrees of slope.
19. Do not move or dolly the vehicle while on the lift.
20. Lift only on areas of any vehicle as specied by the vehicle manufacturer.
21. No alterations shall be made to this product.
22. Only attachments and/or adapters supplied by the manufacturer shall be used.
23. Do not get under or allow anyone under the vehicle until it has been supported with auxiliary jack
stands on both the front and rear of the vehicle.
24. Center load on lifting arms and saddles prior to lifting.
25. Secure vehicle to ensure no shifting, movement, or tipping will occur when performing maintenance on
any vehicle.
26. Verify that safety locks are engaged on the arms and lifting carriages before performing any work.
27. NEVER use lift with a motorcycle, lawn mower, or lawn tractor.
28. Do not use this product for any use other than the manufacturer specied usage. Failure to heed these
warnings may result in personal injury and/or property damage. The distributor is not responsible for
any damages or injury caused by improper use or neglect.
29. Do not use wood blocks or any other non-approved load sustaining devices or any other non-approved
lifting devices for a means of lifting a vehicle, stabilizing, securing, spacing, adding additional height, or
load being raised. The manufacturer only warrants loads to be sustained by adapters or accessories
validated by the manufacturer. Failure to head these warnings may cause injury or death.
30. Do not adjust power unit pressure relief valve, any tampering will void warranty and may cause cata
strophic failure. Failure to head these warnings may result in injury or death.
TORIN COMMERCIAL EQUIPMENT
4 REV 190425

IMPORTANT SAFETY CONSIDERATIONS
To maintain the product and user safety, the responsibility of the owner is to read and follow these
instructions.
• Inspect the product for proper operation and function before each use.
• Do not modify the product in any way. Unauthorized modication may impair the function and/
or safety and could aect the life of the equipment. There are specic applications for which the
product was designed.
• Always check for damaged or worn out parts before using the lift. Broken parts will aect the
equipment operation. Replace or repair damaged or worn parts immediately.
• Keep instructions readily available for equipment operators.
• Make certain all equipment operators are properly trained; understand how to safely and correctly
operate the unit.
• Allow unit operation only with all parts in place and operating properly.
• Use only genuine replacement parts.
• Service and maintain the unit only with authorized or approved replacement parts; negligence will
make the product unsafe for use and void the warranty.
• Carefully inspect the unit on a regular basis and perform all maintenance as required.
• Keep all decals on the unit clean and visible.
GENERAL SAFETY INSTRUCTIONS:
Training - Do not allow anyone who has not read this manual, and/or does not understand the re-
quirements to use the product.
Spectators - Do not allow bystanders around the lift or under the load supported. Do not allow anyone
in a vehicle while the lift is in use or is supporting a load. Keep all bystanders away from lift when in
use.
Operators - Not for use by children or people with reduced mental capacity. Not for use under the
inuence of drugs or alcohol.
Inspection - Inspect the product carefully before each use. Ensure the product is not damaged, ex-
cessively worn, or missing parts. Do not use the lift unless it is properly lubricated. Using a lift that is
not in good clean working condition or properly lubricated may cause serious injury.
TORIN COMMERCIAL EQUIPMENT
5 REV 190425

SAFETY STICKER IDENTIFICATION
Use care when identications and markings are on lift. These identications are put in place to help
with your safety and the safety of others. Always use caution when working around vehicle lift. Re-
place labels if damaged or torn.
WIRE ROPE INSPECTION LABEL
(LABEL TO BE ATTACHED BY MANUFACTURER)
Registered by TORIN Inc. 4355 E. Brickell St. Ontario, California 91761 USA
Phone: 1-909-390-8588 Fax: 1-909-390-8618
Designed in USA, Made in China
Model
Serial Number
Manufactured Date
Liing Capacity
lb kg
mm
A -
B -
C -
D -
Cable Lengths
mm
mm
mm
mm
Cable Diameter
TCE Torin Commercial Equipment
50/60 Hz usage
Manufacturer recommends using a 25-amp circuit for operang li
WIRE ROPE INSPECTION AND MAINTENANCE
Equalizing and Lifting Cables should be replaced every three years when visible signs of damage are apparent.
DO NOT USE THE LIFT WITH DAMAGED OR WORN CABLES.
•Wire Rope WILL FAIL if worn-out, overloaded, misused, damaged, improperly maintained or abused.
Wire rope failure may cause serious injury or death!
Protect yourself and others:
• ALWAYS INSPECT wire rope for WEAR, DAMAGE or ABUSE BEFORE USE.
• NEVER USE wire rope that is WORN-OUT, DAMAGED or ABUSED.
• NEVER OVERLOAD a wire rope.
• INFORM YOURSELF: Read and understand manufacturer's literature or
"Wire Rope and Wire Rope Sling Safety Bulletin"
• Wire Rope should be maintained in a well-lubricated condition at all times. Wire rope is only fully protect
ed
when each wide str
and is lubricated both internally and externally. Excessive wear will shorten the life of the wire
rope. The manufacturer suggests using a wire rope lubricant that penetrates to the core of the wire rope,
providing long term lubrication. All wire rope, sheaves and guide rollers in continuous service should be observed
during normal operation and visually as per the scheduled maintenance. A complete and thorough inspection of
all ropes in use must be made as below and all rope which has been idle for a period of a month or more should
be given a thorough inspection before it is put back into service. Factors such as abrasion, wear, fatigue, corrosion,
improper winding and kinking are often of greater signicance in determining if a wire rope is usable.
Recommended Lubrication Product:
A high grade penetrating lubricant for wire rope, chain and cable that contain a petroleum solvent that carry the
lubricant into the core of the wire rope, then evaporates, leaving behind a heavy lubricating lm to protect and
lubricate each strand. A penetrating lubricant is essential in any lubrication program as most wire rope fails from
the inside out.
Check all guide rollers, sheaves and hardware that are in operational contact are visually checked for wear and
lubrication
For additional information and instructions see the USER INSTRUCTION MANUAL provided with the lift.
WARNING
Failure to read, understand, and follow these instructions
may cause death or serious injury. Read and understand
these instructions before using the lift.
WIRE ROPE INSPECTION LABEL
(LABEL TO BE ATTACHED BY MANUFACTURER)
TORIN COMMERCIAL EQUIPMENT
6 REV 190425

POWER UNIT WARNING LABELS
(LABEL TO BE ATTACHED BY MANUFACTURER)
Press
Button
(ON)
If connected to a circuit
protected by fuses, use
time delay fuses with
this equipment.
CAUTION
DO NOT USE BELOW
GARAGE FLOOR OR
GRADE LEVEL.
NE PAS UTILISER A UN
NIVEAU INFERIEUR A
CELUI DU PLANCHER DU
GARAGE OU DU SOL.
NO DEBE UTILIZARSE
DEBA JO DEL PISO DEL
GARAGE O DEL GRADO .
CAUTION
(1)MINIMUM CIRCUIT AMPACIT
Y OF
C
ONDUCTOR IS 15 A
(2) IF CONNECTED TO A CIRCUIT
PROTEC
TED BY FUSES, USE
TIME-DELAY FUSE MARKED “D”
ATTENTION
(1) COURANT ADMISSABLE MINIMAL
DE LA DERIVATION 15 A
(2) IF RELIÉ À UN CIRCUIT PROTÉGÉ
P
AR DES FUSIBLES, TIME-DELAY
UTILISATION FUSE MARQUÉ "D"
PRECA
UCIÓN
(1)CIRCUIT O DE MÍNIMO AM PA CI-
DAD CONDUC TOR ES DE 15 A
(2) SI ES TÁ CONECTADO A UN
CIRCUIT
O PROTEGIDO POR
FUSIBLES, USE ALARMAS DE
RE
TARDO FUSE EN LA LE TRA "D"
RISK OF ELECTRICAL SHOCK.
Do Not Remove Cover. No User-Serviceable Parts Inside.
Refer Servicing To Qualied Service Personnel.
Disconnect All Sources Of Supply Prior To Servicing.
CAUTION
RIESGO DE DESCARGA ELÉCTRICA.
No retire la cubierta. Sin usuario pueda reparar piezas en el interior. La
reparación al personal de servicio cualicado. Desconecte todas las
fuentes de para la revisión de la oferta.
PRECAUCIÓN / ATTENTION
RISQUE DE CHOC ÉLECTRIQUE.
Ne pas retirer le boîtier. No User-réparable Pièces Inside. TECHNICIENS QUALIFIÉS du
personnel de service. Débranchez toutes les sources de Fourniture Avant l'entretien.
DANGER / PELIGRO
Risk Of Explosion. This equipment has internal
arcing or sparking parts which should not be
exposed to flammable vapors. This Equipment
Has Internal Arcing Or Sparking Parts Which
Should Not Be Exposed To Flammable Vapors. It
Should Not Be Located In A Recessed Area Or
Below Floor Level.
Risque d’explosion. Existe riesgo de explosión.
Este equipo tiene partes internas de cebado o de
producción de chispas que no deberían estar
expuestas a vapores inflamables. No debe ser
situado en una zona rebajada o por debajo del
nivel de piso.
Cet equipement a courber interne ou pieces
d’etincellement qui ne devralent pas etre exposes
aux vapeurs inflammables. ll ne devrait pas etre
situe dans un secteur enfonce ou au-dessous du
niveau de plancher.
WARNING/ADVERTENCIA/ATTENTION
MBS-01 REV160527
Always allow a minimum 2-second delay between motor starts. Failure to comply
may cause switch and/or motor to burnout. This could cause serious damage to
the equipment and/or personal property. Power unit must be wired by a qualified
electrician. This power unit should be located at least 18 inches (460 mm) above
the floor.
Asigne siempre un lapso mínimo de 2 segundos entre arranques del motor. Si no
se respetara este tiempo podrían recalentarse el interruptor y/o el motor. Esto
podría provocar serios daños al equipo y/o otros daños materiales. El cableado
de la unidad de energía debe ser realizado por un electricista calificado. Esta
unidad de energía debería estar ubicada al menos a 18 pulgadas (460 mm) sobre
el nivel del suelo.
Il faut toujours prévoir un délai minimum de 2 secondes entre les démarrages du
moteur. Ne pas respecter ce délai pourrait provoquer le grillage de l’interrupteur
et/ou du moteur. Ceci pourrait gravement endommager votre équipement et/ou
provoquer des dommages matériels. L’installation électrique de l’unité
d’alimentation doit être faite par un électricien qualifié. Cette unité d’alimentation
devrait être place au moins 18 pouces (460 mm) au-dessus du sol.
Hydraulic oil should only be changed when
equipment is fully lowered. Use only
recommended ISO AW32 or AW46 hydraulic
oils. Oil must be changed after the first week
of operation and once every 12 months or as
needed.
El aceite hidráulico debería cambiarse
únicamente cuando el equipo ha sido
completamente descendido. Utilice
únicamente aceites hidráulicos
recomendados ISO AW32 o AW46. El aceite
debe cambiarse después de la primera
semana de funcionamiento y una vez cada
12 meses o cuando sea necesario.
L’huile hydraulique ne devrait être changée
que lorsque l’équipement est complètement
abaissé. Utilisez seulement des huiles
hydrauliques recommandées ISO AW32 ou
AW46. L’huile doit être changée après la
première semaine de fonctionnement et
tous les 12 mois ou au besoin.
YXBS-01 REV151022
WARNING/ADVERTENCIA/ATTENTION
Power Unit Hydraulic Oil Label
USE SUPPLY WIRES
SUITABLE FOR
105 C (221F)
USE CABLES DE
ALIMENTACIÓN
CONVENIENTE PA RA
105C (221F)
EMPLOYER DES FILS
D’ALIMENTATION
POUR 105 C (221F)
Press Lever
to Lower
TORIN COMMERCIAL EQUIPMENT
7 REV 190425

WARNING
PINCH POINT.
Keep all body parts
and clothing clear
of moving parts.
Follow lockout
procedure before
cleaning or servicing.
Clear area if vehicle is
in danger of falling.
WARNING
PINCH POINT.
Keep all body parts
and clothing clear
of moving parts.
Follow lockout
procedure before
cleaning or servicing.
Keep feet clear when
lowering lift.
WARNING
PINCH POINT.
Keep all body parts
and clothing clear
of moving parts.
Follow lockout
procedure before
cleaning or servicing.
FRONT
REAR
SUPPLEMENTARY LIFTING DEVICES
DANGER
recommended lifting points, before lifting any
vehicle on the lift or supplementary lifting
devices on the lift.
Refer to the vehicle
manufacturer
WARNING
PINCH POINT.
Keep all body parts
and clothing clear
of moving parts.
Follow lockout
procedure before
cleaning or servicing.
DANGER
than lifting and entire vehicle. Vehicles are NOT
to be raised with a partial vehicle on the lift.
NEVER lift any vehicle
in any manner other
WARNING
PINCH POINT.
Keep all body parts
and clothing clear
of moving parts.
Follow lockout
procedure before
cleaning or servicing.
DO NOT operate lift
that is damaged or
under repair.
INSPECT THE LIFT DAILY.
WARNING
PINCH POINT.
Keep all body parts
and clothing clear
of moving parts.
Follow lockout
procedure before
cleaning or servicing.
ALWAYS Use chocks
or a blocking device
on vehicle before
raising lift.
WARNING
PINCH POINT.
Keep all body parts
and clothing clear
of moving parts.
Follow lockout
procedure before
cleaning or servicing.
WARNING
PINCH POINT.
Keep all body parts
and clothing clear
of moving parts.
Follow lockout
procedure before
cleaning or servicing.
DANGER
DO NOT override or
tamper with safety
devices or operating
controls. They are
installed for your safety.
Failure to comply will
result in death and
serious injury.
WARNING
PINCH POINT.
Keep all body parts
and clothing clear
of moving parts.
Follow lockout
procedure before
cleaning or servicing.
Read and understand
all instructions.
ONLY
AUTHORIZED
PERSONNEL
SHALL OPERATE
THIS
EQUIPMENT
SAFETY WARNINGS
4-Post rev190411
DO NOT PAINT OVER THIS LABEL. REPLACE IF DAMAGED OR LOST.
WARNING
PINCH POINT.
Keep all body parts
and clothing clear
of moving parts.
Follow lockout
procedure before
cleaning or servicing.
Clear area if vehicle is
in danger of falling.
WARNING
PINCH POINT.
Keep all body parts
and clothing clear
of moving parts.
Follow lockout
procedure before
cleaning or servicing.
Keep feet clear when
lowering lift.
WARNING
PINCH POINT.
Keep all body parts
and clothing clear
of moving parts.
Follow lockout
procedure before
cleaning or servicing.
FRONT
REAR
SUPPLEMENTARY LIFTING DEVICES
DANGER
recommended lifting points, before lifting any
vehicle on the lift or supplementary lifting
devices on the lift.
Refer to the vehicle
manufacturer
WARNING
PINCH POINT.
Keep all body parts
and clothing clear
of moving parts.
Follow lockout
procedure before
cleaning or servicing.
DANGER
than lifting and entire vehicle. Vehicles are NOT
to be raised with a partial vehicle on the lift.
NEVER lift any vehicle
in any manner other
WARNING
PINCH POINT.
Keep all body parts
and clothing clear
of moving parts.
Follow lockout
procedure before
cleaning or servicing.
DO NOT operate lift
that is damaged or
under repair.
INSPECT THE LIFT DAILY.
WARNING
PINCH POINT.
Keep all body parts
and clothing clear
of moving parts.
Follow lockout
procedure before
cleaning or servicing.
ALWAYS Use chocks
or a blocking device
on vehicle before
raising lift.
WARNING
PINCH POINT.
Keep all body parts
and clothing clear
of moving parts.
Follow lockout
procedure before
cleaning or servicing.
WARNING
PINCH POINT.
Keep all body parts
and clothing clear
of moving parts.
Follow lockout
procedure before
cleaning or servicing.
DANGER
DO NOT override or
tamper with safety
devices or operating
controls. They are
installed for your safety.
Failure to comply will
result in death and
serious injury.
WARNING
PINCH POINT.
Keep all body parts
and clothing clear
of moving parts.
Follow lockout
procedure before
cleaning or servicing.
Read and understand
all instructions.
ONLY
AUTHORIZED
PERSONNEL
SHALL OPERATE
THIS
EQUIPMENT
SAFETY WARNINGS
4-Post rev190411
DO NOT PAINT OVER THIS LABEL. REPLACE IF DAMAGED OR LOST.
OPERATING INSTRUCTION LABEL
(LABEL TO BE ATTACHED BY MANUFACTURER)
TORIN COMMERCIAL EQUIPMENT
8 REV 190425

TO RAISE THE LIFT:
1. Adjust the vehicle to be positioned within the runway ramps
and the center of gravity midway between the runways.
2. Press the power “on” button.
3. A clicking sound will be heard as the lift raises. These are
the carriage locks that will securely hold a vehicle.
4. Once the desired height has been achieved slightly raise
the carriage just above the last engaged latch position and
slowly lower the load on the safety locks using the hydraulic
lowering valve.
5. Verify that all 4 Safety Carriage locks have been engaged
before beginning work or walking under the lift.
6. Use of jack stands or other load supporting devices will
help in preventing load shifts. Manufacturer suggests that
high position hoist stands or other load supporting devices
are used at all times for additional security. Use additional
lifting equipment or stands when removing or installing heavy
vehicle components.
7. Make sure the vehicles center of gravity is always safe
before raising vehicle. Any points of contact on vehicle that
are not in good contact with lift or with lifting pads should
always be double checked. Always make sure the vehicle is
secure before lifting. ALways use only your vehicle
manufacturers’ recommended lifting points.
TO LOWER THE LIFT:
8. Lower any extension adapters or any supplementary lifting
devices on the lift, and move our of the lowering path.
9. To lower the lift, first raise the lift to clear the safety latches,
press the power “on” button, slightly raise the carriage just
above the last engaged latch position. The
carriages should now be in the free UN-LOCKED position.
9. GENTLY and SLOWLY press the pneumatic air release
button slowly while simultaneously pressing the hydraulic
lowering valve.
A. Simultaneously with the Safety Carriage Locks levers in
the UN-LOCKED Position and by pressing the lowering
control valve on the power unit, and the pneumatic air
release button lower the lifting carraiges slowly.
B. The runways will begin to lower the load.
C. Verify all locks have cleared at the first lock together,
before fully lowering the lift.
10. Lower the lift slowly until reach the lowest retracted position.
12. Place any arm extension adapters on column storage
brackets.
OPERATING INSTRUCTIONS
4-Post rev190411
BEFORE OPERATING LIFT READ OPERATING MANUAL AND SAFETY
DOCUMENTS SUPPLIED WITH THE LIFT. ONLY TRAINED and
AUTHORIZED PERSONNEL should operate the lift. Do not allow
customers or unauthorized personnel to operate the lift or remain in
the lift area during use.
WARNING THIS MOTOR HAS INTERNAL ARCING AND SPARKING
PARTS. TO MINIMIZE THE RISK OF EXPLOSION, DO NOT EXPOSE TO
FLAMMABLE VAPORS. Use only recommended ISO AW32 or AW46
hydraulic oils.
Power Unit Motor duty cycle is one full lifting operation 10 minutes, this will
include the lifting and lowering time.
OPERATING CONDITIONS: Lift is not intended for outdoor use and has an
operating temperature rating between 40°F – 105°F (4°C - 41°C)
DO NOT install on asphalt or other similar unstable surface. Columns are
supported only by anchoring to concrete floors. Manufacturer will not be
held responsible for any concrete that may not meet slope requirements and
will not be responsible for any charges relating to new concrete slabs
pouring or leveling or damage.
INSPECT THE LIFT DAILY. Do not operate if potential problems have been
identified or lift malfunctions. Do not operate if lift has damaged or broken
components. Check all moving parts for any type of damage that may affect
misalignment or operation of lift.
Inspect all anchors bolts and retighten if necessary. Re-torque as needed.
See installation manual for instructions.
ALWAYS ensure the safeties are engaged before any attempt is made to
work on or near the vehicle.
DO NOT operate the lift while batteries are charging
DO NOT raise/lower only one side of the vehicle
NEVER leave lift in elevated position unless the safeties are engaged.
NEVER operate the lift with any person or equipment below the vehicle.
DO NOT attempt to work on the vehicle or go near vehicle when lift is being
raised or lowered.
ALWAYS remain clear of lift when raising or lowering vehicle.
NEVER exceed the rated lift capacity.
ALWAYS position lifting arms, ramps, adapters and accessories properly
out of the way before pulling the vehicle into or out of the bay. Failure to do
so could damage the vehicle and/or the lift.
WARNING: Questions, problems, missing parts?
Before returning to your retailer, call our customer service department
at 1-888-448-6746 (1-888-44 TORIN), 8 a.m.- 5 p.m., PST, Monday-Friday.
www.TCEGARAGE.com or www.TCELIFTS.com
Read carefully and understand all ASSEMBLY AND OPERATION
INSTRUCTIONS before operating. Failure to follow the safety rules and
other basic safety precautions may result in serious personal injury.
WARNING: The warnings, cautions, and instructions discussed in this
instruction manual cannot cover all possible conditions or situations
that could occur. It must be understood by the operator that common
sense and caution are factors that cannot be built into this product,
but must be supplied by the operator.
WARNING: Read and understand all instructions. Failure to follow all
instructions listed below may result in serious injury.
CAUTION: Do not allow persons to operate or assemble this product
until they have read this manual and have developed a thorough
understanding of how the product works.
ONLY AUTHORIZED PERSONNEL ARE TO OPERATE LIFT.
DO NOT PAINT OVER THIS LABEL. REPLACE IF DAMAGED OR LOST.
OPERATING INSTRUCTION LABEL
(LABEL TO BE ATTACHED BY MANUFACTURER)
TORIN COMMERCIAL EQUIPMENT
9 REV 190425

TORIN COMMERCIAL EQUIPMENT
11 REV 190425

WARNING PARAGRAPH
The operation manual should be kept near the equipment at all times.
Please be sure to make sure that ALL USERS read this manual before use and operation.
Please read carefully the entire contents of this manual prior to installation and operation.
By proceeding you agree that you fully understand and comprehend the full contents of this manual.
Failure to operate this equipment as directed may cause injury or death.
The manufacturer is not responsible for any damages or injury caused by improper use or neglect.
IMPORTANT INFORMATION:
Read this manual thoroughly before installing, operating, or maintaining this lift.
This lift is designed for indoor use only, and should not be installed in a pit or uneven surface.
The oor on which the lift is to be installed must be 4-¼” inch minimum thickness concrete,
with a minimum compressive strength of 3000 psi, and reinforced with steel bar.
(Contact your building architect for information before installing on pre-stress concrete.)
The lifts have specic electrical requirements as described in the Installation Instructions section of this
manual.
This lift has a minimum ceiling height requirement as described in the Installation Instructions section of this
manual.
Failure by the owner to provide the recommended shelter, mounting surface, electrical supply, and ceiling
height could result in unsatisfactory lift performance, property damage, or personal injury.
SHIPPING DAMAGE CLAIMS
Once the equipment/product has been shipped, bill of sale passes to the Purchaser. Materials damaged in
shipment claims must be made by the Purchaser against the Freight Carrier at the time of shipment arrival.
Any freight damage must be noted on the freight bill before signing and reported to the freight carrier with
a freight claim established. Manufacturer is not responsible for freight claims. Identify the components and
check for shortages. If shortages are discovered, please contact the Distributor / Sales Representative in
your area for service.
It is the customers responsibility to arrange for unloading of products shipped.
HAZARD DESCRIPTIONS
Identify the hazard levels used in this manual with the following denitions and signal words:
Immediate hazards which will result in severe liability or exposure to personal injury or death.
Hazards or unsafe practices which could result in severe personal injury or death.
Hazards or unsafe practices which may result in personal injury, product or property damage.
Use alertness and prudence in a hazardous situation; care; wariness.
TORIN COMMERCIAL EQUIPMENT
10 REV 190425

INTENDED USE
This two-post car lift is designed to lift and raise light duty vehicles under 10,000-lbs. Our 2 post car
lifts oer variable lifting congurations, for unobstructed oor space while repairing vehicles.
TECHNICAL SPECIFICATIONS
Key Specs
Lift Capacity
Overall length
Overall Length Plate to Plate
Overall width
Overall height
Overall height of posts
Max. lifting height to top of run-
ways
Max. clearance under runways on
top of lock
Minimum ground clearance
Approach ramp length
Runway dimensions length
Runway dimensions width
Runway dimensions height
Outside width of both runways
(Adjustable)
Clearance between runways
(Adjustable)
Overall width outside of posts
Max. clearance between posts
Ramp gauge of steel
Post dimensions length
Post dimensions width
Locking positions (qty.)
Time of full rise (seconds)
Motor phase(s)
Voltage
Htz
Manufacturer warranty
#
A
A1
B
C
D
E
F
G
H
I
J
K
L
M
N
O
P
Q
R
-
-
-
-
-
-
-
-
-
-
-
-
-
-
-
-
-
-
-
-
-
-
-
-
-
T9000-4ST
(in) (lbs)
9,000-lbs
235.5
209.5
122
105
101.58
89.2
83
5.5
34.5
201.57
18.92
4.68
76 / 81.9
38.2 / 44.1
117
106.96
1/4”
6
5
18
70
1 Phase
220
60
2 Year Limited
T7000-4N
(in) (lbs)
7,000-lbs
200.48
175.03
107.51
92
87.8
75.5
69
5.5
34.5
166
18.92
4.68
69.4 / 75.6
31.6 / 37.9
102
92
1/4”
6
5
13
60
1 Phase
220
60
2 Year Limited
T7000-4NT
(in) (lbs)
7,000-lbs
235.5
209.5
107.5
105
101.58
89.2
83
5.5
34.5
201.57
18.92
4.68
69.4 / 75.6
31.6 / 37.9
102
92
1/4”
6
5
18
70
1 Phase
220
60
2 Year Limited
T9000-4S
(in) (lbs)
9,000-lbs
200.48
17503
122
92
87.8
75.5
69
5.5
34.5
166
18.92
4.68
76 / 81.9
38.2 / 44.1
117
106.96
1/4”
6
5
18
60
1 Phase
220
60
2 Year Limited
Safe Operating Temperature is between 40°F – 105°F (4°C - 41°C)
Manufacturer recommends using a 25-amp circuit for operating lift
TORIN COMMERCIAL EQUIPMENT
12 REV 190425

HHCS
SHCS
CSCS
(SAE)
¼-20
5/16-18
3/8-16
7/16-14
½-13
9/16-12
5/8-11
¾-10
7/8-9
HHCS
SHCS
CSCS
(Metric)
M6 X 1.0
M8 X 1.25
M10 X 1.50
NA
M12 X 1.75
M14 X 2.00
M16 X 2.00
M18 X 2.50
M22 X 2.5
(SAE)
Grade 2
(Metric)
Class 5.8
6
12
20
32
47
69
96
155
206
(SAE)
Grade 5
(Metric)
Class 8.8
10
19
33
54
78
114
154
257
382
(SAE)
Grade 8
(Metric)
Class 10.9
14
29
47
78
119
169
230
380
600
Socket Head
Cap Screw
Class 12.9
7.1
17
34
NA
59
94
146
210
NA
Socket Head
Cap Screw
Class 12.9
11.6
29
57
NA
99
158
250
341
559
¾ Anchor Bolts 150 ft-lbs (for Simpson Strong-Bolt® 2 Wedge Anchor provided)
FASTENER TORQUE RECOMMENDATIONS
Values are stated in foot pounds (ft-lbs)
TORIN COMMERCIAL EQUIPMENT
13 REV 190425

CONCRETE FOUNDATION ANCHORING SPECIFICATIONS AND REQUIREMENTS
Manufacturer recommends installation on 2-Post Models use a concrete pad 6 Inch Min.
Thickness / 3,000 PSI (4,000 PSI Recommended)
Before installing your new lift, check the following:
Select Lift Location: Always use architects building plans when available. Check layout dimension against
oor plan requirements making sure that adequate space is available.
Floor Requirements: The lift should be located on a relatively level oor of less than 3 degrees’ slope. If slope
is questionable, consider a survey of the site and/or the possibility of pouring a new level concrete slab. Failure
to do so could cause personal injury or death.
Ceiling Requirements: The area where the lift will be located should be free of overhead obstructions such as
heaters, building supports, electrical lines, etc.…
Defective Concrete: Visually inspect the site where the lift is to be installed and check for cracked or defective
concrete. If site is in question, contact a local inspection agency before installing lift.
DO NOT install on asphalt or other similar unstable surface. Columns are supported only by anchoring to con-
crete oors.
Manufacturer will not be held responsible for any concrete that may not meet slope requirements and will not
be responsible for any charges relating to new concrete slabs pouring or leveling or damage.
IMPORTANT INFORMATION AND GENERAL NOTES FOR EXPANSION ANCHORS
General Instructions for Installing Concrete Anchors
• These general instructions for the installer are provided to ensure the proper selection and installation of
Anchor Products and must be followed carefully. These general instructions are in addition to the specic
design and installation instructions and notes provided for each particular product, all of which should be
consulted prior to and during the installation Anchor Products.
• Use proper safety equipment.
• Most concrete mixes are designed to obtain the desired properties within 28 days after being cast
• (28-day cure).
• Concrete shall have compression strength of at least 3,000 PSI and a minimum thickness of 6” in order to
achieve a minimum anchor embedment. NOTE: When using the standard supplied ¾” x 5 ½” anchors; if
the top of the anchor exceeds 2 ¼” above the oor grade you DO NOT have enough embedment.
• Maintain a 8” minimum distance from any slab edge or seam. Hole to hole spacing should be a minimum 6
½” in any direction. Hole depth should be a minimum of 6”.
• Do not modify Mechanical Wedge Anchor products. The performance of modied products may be sub-
stantially weakened. Manufacturer will not warrant or guarantee the performance of such modied prod-
ucts.
• Do not alter installation procedures from those set forth in this Manual.
• Drill holes for mechanical anchors with carbide-tipped drill bits meeting the diameter requirements of ANSI
B212.15. A properly-sized hole is critical to the performance of mechanical anchors.
• Rotary-hammer drills with light, high frequency impact is recommended for drilling holes.
• Do not use excessively worn bits or bits which have been incorrectly sharpened.
• Please note that the use of oversized holes’ is NOT permitted for anchoring any lift. DO NOT USE Anchor
Adhesive to ll spacing of oversize holes’. Move lift location or ll holes with Anchor Adhesive and Re-drill
to correct Hole Specication. (See manufacturer for proper anchor adhesive curing times.)
TORIN COMMERCIAL EQUIPMENT
14 REV 190425

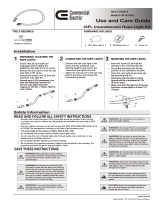
EXPANSION ANCHOR INSTALLATION INSTRUCTIONS ¾” X 5-1/2”
Anchor size is same as drill bit size ( .775” to .787“ )
Use a hammer drill with a Carbide tip, 3/4” diameter, solid drill bit. The bit tip diameter should be to
ANSI Standard B212.15-1994. The Simpson-Tie Strong Bolt 2 wedge anchor is used to resist static, wind and
seismic tension and concrete loads in cracked and uncracked concrete applications, with a
compressive strength of 3,000psi to 8,500psi. Supports Compliance with 2015, 2012, 2009, and 2006, 2003
International Building Code (IBC); and International Residential Code (IRC). The Strong-Bolt 2 wedge anchors
are torque-controlled, mechanical expansion anchors consisting of an anchor body, expansion clip, nut, and
washer.
Hammer Drill a hole to the same
nominal diameter as the
expansion anchor. The hole
depth must exceed the anchor
embedment at least ¼”. Use the
baseplate as a drilling template
to ensure proper anchor loca-
tions. (Drill completely through
the concrete oor in case
movement of the lift is required.)
Clean hole completely. Remove
dirt and dust with the use of a
shop vac. or an air compressor.
Assemble the at washer and
nut ush on the anchor bolt.
Drive the expansion anchor
into the hole using a hammer. If
shimming is required, make sure
to leave threads exposed for
proper shimming.
Tighten the nut to the
recommended installation
torque.
Installation complete.
Do not
cut or drill
through a
post
tension
cable!
(Locate any
post
tension
cables
before you
drill.)
Step
1
Step
2
Step
3
Step
4
Step
5
Do not disturb, bolt up, or apply
load to adhesive anchors prior to
the full cure of any adhesive.
Metal anchors and fasteners will
corrode and may lose load-car-
rying capacity when installed
in corrosive environments or
exposed to corrosive materials.
There are many environments
and materials which may cause
corrosion including ocean salt air,
re-retardants, fumes, fertilizers,
preservative-treated wood, dis-
similar metals, and other corrosive
elements. Finished Diameters
for Rotary and Rotary Hammer
Carbide Tipped Concrete Drills
per ANSI B212.15
TORIN COMMERCIAL EQUIPMENT
15 REV 190425

PRE-INSTALLATION PROCEDURES
Before beginning your installation make sure you read the installation manual and insure all instructions and
safety guidelines are fully understood. Check that all component parts are accounted for. Locate the installation
area, identify the center line of the bay and mark the oor. Also mark the center of bay entrance door. Connect
these two points with a short chalk line in the area where lift will be located. Draw a second chalk line at 90° to
locate the positions of both lift columns. (Refer to lift dimensions on this page)
Keep this manual with lift at all times.
DO NO INSTALL LIFT ON ASPHALT OR
ANY OTHER SURFACE THAN A
CONCRETE FLOOR CONFORMING
TO THE MINIMUM REQUIREMENTS
DETAILED IN THIS MANUAL. DO NOT
INSTALL THIS LIFT ON CONCRETE
WITH SEAMS OR CRACKS OR DEFECT.
IF YOU HAVE ANY QUESTIONS AND
CONCERNS WITH THE LIFT LOCATION
SELECTED CONTACT YOUR LOCAL
ARCHITECT.
Recommended Bay Size
12FT x 24FT
Use safety protective clothing and protective wear when installing lift.
Installation Tools Required:
25ft. Measuring tape
Chalk line and chalk
Heavy duty metal wire cutters
3 ft. Crow bar
Full set of metric wrenches and ratchet set
Full set SAE wrenches and ratchet set
Full set metric and SAE Allen keys
1-1/8” Socket and Calibrated Torque Wrench
Hammer
Sledge hammer (for installing anchor bolts)
Rubber mallet
Phillip screwdrivers
Flat blade screwdrivers
Snap ring pliers
(1) 10 ft. Step ladders
(1) 4 ft. Level
(1) rotary hammer drill with 3/4” diameter
masonry drill bit
Lifting devices: Use proper lifting devices
such as cranes or a forklift.
(8) 4” x 4” x 2FT wooden blocks
(use for unpacking)
(2) Persons
Gloves
Air Compressor
List of items included in shipment:
1 — Power Side Column
3 — Non-Power Side Columns
2 — Lifting Carriages
4 — Ramps
2 — Runways
1 — Cylinder
1 — Long Hydraulic Hose
1 — Air Hose
1 — Pneumatic Push Button
1 — Power Unit
2 — Chocks
4 — Safety Latch Cover Assemblies
1 — Hardware Kit
1 — Full Attached Safety Label Kit
1 — Installation Manual
16 — Expansion Anchor Bolts 3/4” X 5 –1/2”
1 — Installation Agreement signed by
purchaser and submitted to TCE for
Lift Valid Warranty.
A Qualied person should be consulted to address seismic loads and other local or state requirements.
A Qualied and Licensed Electrician should be consulted to install Electic Hydraulic Power Unit.
This car lift is designed for indoor installation, prohibiting outdoor installation of this lift.
Approved only for indoor installation. Outdoor Installation is not Recommended.
TORIN COMMERCIAL EQUIPMENT
16 REV 190425

Product Layout
TORIN COMMERCIAL EQUIPMENT
17 REV 190425

Packaging Illustration
Product Layout
TORIN COMMERCIAL EQUIPMENT
18 REV 190425

Rear Crosstube
Column with
Power Unit
Mounting
Bracket
Powerside
Runway
Oside
Runway
Front
Crosstube
Product Layout
TORIN COMMERCIAL EQUIPMENT
19 REV 190425

Product Layout
Optional Items NOT Included:
• Caster Kit
• Rolling Bridge Jack
• Oil Drain
• Oil Drip Trays
• Air Kit
• Air Tank
TORIN COMMERCIAL EQUIPMENT
20 REV 190425
/