Page is loading ...


ʹ
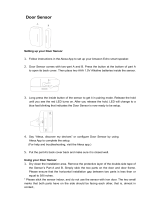
Setup with the bridge and app
Fig. 1; Plug in the bridge.
2x
Fig. 5; Hit the + to add a device.
Beach House
Fig. 3; Scan the QR Code on the bottom of the bridge.
Fig. 6; Pull down and release the pendant twice.
1.Download the App
Download the MyCurtains App from the google play store (for
Android) or the App Store (for Apple devices). Click
“Register Account” to create user accountǤǡ
Ǥ
2.Name your Bridge
Proceed to name your Bridge (make sure that your location
services on your phone are enable and permissions have been
granted to the Mycurtains app.)
3.Connect Power to Bridge
Find an outlet in a location central to the drapery you are
installing in the home. Insert the micro-usb end of the included
power cable into the power port on the bridge. Plug the other
end of the cable into an outlet (Fig. 1).
4.Enable Bluetooth
Make sure that Bluetooth is enabled on your phone and permis-
sions have been granted to the Mycurtains app.
5.Put Bridge into Pairing Mode
Press and release the button on the back of the bridge for one sec-
ond using a paper clip (Fig. 2). A solid blue light will turn on while
the bridge is in discover mode.
6.Connect the Bridge
Scan QR code on back of the bridge by using camera needs
camera permissions) or enter code manually (Fig. 3).
7.Connect to Wi-Fi
Choose from the list of available Wi-Fi networks to connect the
bridge and enter the Wi-Fi password (Fig. 4).
8.Learn the Devices
In the app under devices, hit the + sign (Fig. 5).
Pull down and release the Pendant twice on the drapery you
want to pair to the bridge. You will see the device pop up in the
menu on your Smart Phone screen (Fig 6).
Select the appropriate device, using the “identify” button if needed.
Once the device has been selected, name the device.
Repeat step 8 for all new devices.
Fig. 2; Press and release the button on the back of the bridge.
ǤͶǢϐǤ

͵
Setup with the bridge (No App)
1. Connect Power to Bridge
Find an outlet in a location central to the drapery you are installing
in the home. Insert the micro-usb end of the included power cable
into the power port on the bridge. Plug the other end of the cable
into an outlet.
Push a tack or pen into the hole in the back of the bridge to depress
ϐǤ
2. Put Bridge into Pairing Mode
On any drapery you would like to pair to the bridge pull down
and release the Pendant once to start the drapery, then once again
Ǥ ϐ
indicate the drapery has been paired.
3. Pair Drapery
Fig. X; Plug in the bridge.
Fig. X; Press and release the button on the back of the bridge.
Fig. X; Pull down and release the pendant twice.
2x

Ͷ
Pair the Remote to the drapery (Zigbee)
2. Initiate Learn Mode on Drapery
Pull down and release the Pendant twice to enter learn mode.
ϐǡǤ
should stop it.
3. Connect the Remote to the Drapery
On multi-channel remotes, select the channel you wish to pair to by
pressing the Channel button until the LED corresponding with the
appropriate channel is lit.
Depress the “pairing” button on the back of the remote by pushing
a pen or other object through the hole in the back of the remote.
The LEDs on the front will scroll.
Press and release the top left button on the remote. The drapery
ϐǤ
Fig. ʹǤͳ Pull down and release the Pendant twice.
Fig. ͵Ǥͳ Press the channel button until the desired channel is selected.
Fig. ͵Ǥʹ Press and release the back button on the remote.
Fig. ͵Ǥ͵ Press and release the top left button to pair.
1. Connect Remote to Bridge
If using the Current Products Corp. bridge, use a tack or other
object to depress and hold the recessed button on the bottom of
ǤϐǤ
Pull the “Pull” tab from the bottom of the remote. Next, push any
button on the face of the remote. The LEDs should scroll to show
Ǥϐϐ
the bridge.
Fig. ͳǤʹ Push any button on the face of the remote.
Fig. ͳǤͳ Press and release the back button on the bridge.
2x

ͷ
Integrate with Amazon Echo OR Echo Plus
ZigBee using the Current Products corp bridge
1. Set up your Echo
If your Alexa device is not yet set up, do so now by following the
instructions that came with your device.
Also be sure the bridge and app have been setup. For instructions
on how to set up your bridge and app, go to page 2.
2. Download the Skill
On the menu, select “Skills and Games”. Once you are on that page,
hit the spyglass icon at the top right hand corner
Search for the skill titled “My Curtains” or “Current Products”. If
you want to be able to trigger Alexa using both phrases, be sure to
download both skills.
3. Sign In
ϐ
bridge and app. You are now able to control your devices via
Amazon Alexa.
Using Alexa
Trigger Alexa using the trigger word selected when you installed
the skill.
Say “Alexa, Open ...” or “Alexa, Move ...”. Use percentages to get your
ϐǡDzdzDzdzǤ
You can control devices, groups, or trigger scenes through Alexa,
and create custom names for each in the MyCurtains app.
Download the Alexa Skill then sign into the CPC app.

Integrate with Amazon Echo Plus- Use Alexa’s built in ZigBee hub
1. Set up your Echo
If your Alexa device is not yet set up, do so now by following the
instructions that came with your device.
2. Add a Device
From the menu in the Alexa app, go to “Devices” and hit the plus
sign in the top right hand corner of the screen. Hit “Add Device” on
the menu that pops up on the screen. Select “Light” from the menu
on the next screen. Scroll down to the bottom of the next screen to
select “Other” as the brand, then hit “Discover Devices”.
While Alexa is searching, pull down and release the Pendant twice
on each drapery you want to pair to Alexa.
Each drapery you are pairing will show up as a lightbulb.
3. Customize in App
In the Alexa app, you can change the name of each device to better
your control of the devices. You can also add custom commands.
We suggest custom naming each device, and creating commands
for “open” and “close”.
Alexa App Steps

Remove the drapery from a network
2. Setup The Drapery for Reset
Move the curtain(s) to a position halfway between full open and
full closed.
3. Reconnect Power
Reconnect power to the unit by plugging the unit back in or by
reconnecting the battery tube.
In some instances it may become necessary to remove your drapery from the network. Removing the drapery from the network
will remove the drapery from the bridge and you will need to re-add it back to your network before you can use the remote or
app.
3. Perform Master Reset
Pull down on the Pendant and hold for 10 seconds or until the
drapery jogs.
Your drapery has now been removed from the network.
1. Remove Power
Disconnect power from the unit. For hardwired units, simply
unplug the device. For battery powered units, remove the battery
tube by twisting it off of the connection wire.
With power disonnected, pull down on the Pendant or cord and
release once.

ͺ
I. Integrate with Google home
ZigBee using the Current Products corp bridge
1. SET UP YOUR GOOGLE HOME AND CPC BRIDGE
If your Google Home device is not yet set up, do so now by following
the instructions that came with your device.
Also be sure the bridge and app have been setup. For instructions
on how to set up your bridge and app, see the Bridge Set Up Guide.
2. SET UP DEVICE
Open the Google Home app on your smart device and navigate
to the correct “home” (some users may have multiple homes
connected to one account).
Press the “Add” button, then “Set Up Device”, then “Works with
Google”. Use the search function to locate “Current Products
Drapery”.
See Figures 1-4.
Figure 1 - Open App and hit
Add
Figure 2 - “Set Up Device”
Figure 3 - “Works with Google” Figure 4 - Find and Select
Service
Home

ͻ
I. Integrate with Amazon Echo OR Echo Plus
ZigBee using the Current Products corp bridge
1. SET UP YOUR ECHO OR ECHO PLUS AND CPC BRIDGE
If your Alexa device is not yet set up, do so now by following the
instructions that came with your device.
Also be sure the bridge and app have been setup. For instructions
on how to set up your bridge and app, see the Bridge Set Up Guide.
2. DOWNLOAD THE SKILL
In the Alexa app menu, select “Skills and Games.” Once you are on
that page, hit the spyglass icon at the top right hand corner.
Search for the skill title “MyCurtains” or “Current Products.” If
you want to be able to trigger Alexa using both phrases, be sure to
download both skills.
See Figure 23.
3. SIGN IN
ϐ
bridge and app. You are now able to control your devices via
Amazon Alexa. See Figure 24.
4. USING ALEXA
Trigger Alexa using the trigger word selected when you installed
the skill.
Say “Alexa, Open or Close ...”. Use percentages to get your drapery to
ϐǡDzdzDzǤdz
You can control devices, groups, or trigger scenes through Alexa,
and create custom names for each in the MyCurtains app.
Figure 24 - Sign into the CPC app
Figure 23 - Download the Alexa Skill

ͳͲ
I. Integrate with Amazon Echo Plus- Use Alexa’s built in ZigBee hub
1. SET UP YOUR ECHO PLUS
If your Alexa device is not yet set up, do so now by following the
instructions that came with your device.
2. ADD A DEVICE
From the menu in the Alexa app, go to “Devices” and hit the “+”
in the top right hand corner of the screen. Hit “Add Device” on the
menu that pops up on the screen. Select “Light” from the menu on
the next screen. Scroll down to the bottom of the next screen to
select “Other” as the brand, then hit “Discover Devices.”
While Alexa is searching, pull down and release the Pendant twice
on each drapery you want to pair to Alexa.
Each drapery you are pairing will show up as a lightbulb.
3. CUSTOMIZE IN APP
In the Alexa app, you can change the name of each device to better
your control of the devices. You can also add custom commands.
We suggest custom naming each device, and creating commands
for “open” and “close”.
Figure 25 - Alexa App Steps
See Figure 25 for all integration steps.

ͳͳ
I. Change Positions on the drapery Track (Single)
Change the open Position
2. SET THE OPEN POSITION
By hand, pull the drapery until it reaches the desired open position.
See Figure 3.
3. EXIT LEARN OPEN POSITION MODE
Pull down and release the Pendant once to exit learn mode. The
ϐǤͶǤ
1. ENTER LEARN OPEN POSITION MODE
Pull down and release the Pendant so the drapery moves towards
the direction you would like to set as the “open” position. See Figure
1.
Figure 1 - Pull down and release the Pendant
Figure 3 - Pull the drapery by hand to the desired full open position
Note: If you have a remote control paired to the device, you can use
it to move the curtain into the desired full open position. A press
and release will move the drapery half an inch in a direction while a
press and hold will move the drapery continuously.
Figure 2 - Pull down and hold the Pendant for 5 seconds, then release
Figure 4 - Pull down and release the Pendant
For additional help during installation of your drapery track, visit www.currentproductscorp.com/support/drapery-track
or call 1-844-307-7435.
After the drapery reaches it’s current open position, it will stop
Ǥϐǡ
the drapery jogs.Then Release the Pendant. See Figure 2.

ͳʹ
Change the Close Position
2. SET THE CLOSE POSITION
3. EXIT LEARN CLOSE POSITION MODE
Pull down and release the Pendant once to exit learn mode. The
ϐǤͺǤ
1. ENTER LEARN CLOSE POSITION MODE
Pull down and release the Pendant so the drapery moves towards
the direction you would like to set as the “close” position. See Figure
5.
Note: If you have a remote control paired to the device, you can use
it to move the curtain into the desired close position. A press and
release will move the drapery half an inch in a direction while a
press and hold will move the drapery continuously.
By hand, pull the drapery until it reaches the desired close position.
See Figure 7.
Figure 5 - Pull down and release the Pendant to close drapery
Figure 7 - Pull the drapery by hand to the desired full close position
Figure 6 - Pull down and hold the Pendant for 5 seconds, then release
Figure 8 - Pull down and release the Pendant
After the drapery reaches the position, it will stop moving. Pull
ϐǡ
jogs. See Figure 6.
Release the Pendant.

ͳ͵
Change the open Position for the Room Side drapery (Motor 1)
2. SET THE OPEN POSITION
By hand, pull the curtain until it reaches the desired open position.
See Figure 11.
3. EXIT LEARN POSITION MODE
Pull down and release the Pendant once to exit learn mode. The
ϐǤ
12.
1. ENTER LEARN OPEN POSITION MODE
Pull down and release the Pendant so the room side drapery moves
towards the direction you would like to set as the “open” position.
See Figure 9.
Figure 9 - Pull down Pendant to move room side
drapery to open position
II. Change Positions on the drapery Track (dual)
Figure 10 - Pull down and hold the Pendant for 5 seconds, then release
Figure 11 - Pull the drapery by hand to the desired full open position
Figure 12 - Pull down and release the Pendant
After the drapery reaches the position, it will stop moving. Pull
ϐǡ
jogs. Then release the Pendant. See Figure 10.

ƮͳͶ
Change the Close Position for the room side drapery (MOTOR 1)
1. ENTER LEARN CLOSE POSITION MODE
Pull down and release the Pendant so the drapery moves towards
the direction you would like to set as the “close” position. See Figure
13.
Figure 14 - Pull down and hold the Pendant for 5 seconds, then release
2. SET THE CLOSE POSITION
By hand, pull the curtain until it reaches the desired close position.
See Figure 15.
3. EXIT LEARN CLOSE POSITION MODE
Pull down and release the Pendant once to exit learn mode. The
ϐǤ
16.
Figure 13 - Pull down Pendant to move room side
drapery to closed position
Figure 15 - Pull the drapery by hand to the desired full closed position
After the drapery reaches the position, it will stop moving. Pull
ϐǡ
jogs.Then release the Pendant. See Figure 14.
Figure 16 - Pull down and release the Pendant

ͳͷ
Change the open Position for the window side drapery (Motor 2)
2. SET THE OPEN POSITION
By hand, pull the drapery until it reaches the desired full open
position. See Figure 19.
3. EXIT LEARN OPEN POSITION MODE
Lift up and release the Pendant once to exit learn mode. The
ϐǤ
20.
1. ENTER LEARN OPEN POSITION MODE
Lift up and release the Pendant so the drapery moves towards the
direction you would like to set as the “open” position. See Figure
17.
Figure 18 - Lift up and hold Pendant for 5 seconds, then release
Figure 17 - Lift up and release Pendant to move
drapery to open position
Figure 19 - Pull the drapery to full open position
Figure 20 - Pull down and release Pendant
After the drapery reaches the position, it will stop moving. Lift up
ϐǡ Ǥ
Then release the Pendant. See Figure 18.

ͳ
Change the Close Position for the window side drapery (Motor 2)
2. SET THE CLOSE POSITION
By hand, pull the drapery until it reaches the desired full close
position. See Figure 23.
3. EXIT LEARN CLOSE POSITION MODE
Lift up and release the Pendant once to exit learn mode. The
ϐǤ
24.
1. ENTER LEARN CLOSE POSITION MODE
Lift up and release the Pendant so the drapery moves towards the
direction you would like to set as the “close” position. See Figure
21.
Figure 22 - Lift up and hold Pendant for 5 seconds, then release
Figure 23 - Pull drapery to full closed position
Figure 21 - Lift up and release Pendant to move
drapery to closed position
Figure 24 - Pull down and release Pendant
After the drapery reaches the position, it will stop moving. Lift up
ϐǡ Ǥ
See Figure 22.
Release the Pendant.

ͳ
III. Pair the Remote to the drapery (FM)
1. INITIATE LEARN MODE
Pull down and release the Pendant twice to enter learn mode.
ϐ ǡ Ǥ
tug should stop it. See Figure 25.
2. CONNECT THE REMOTE
On multi-channel remotes, select the channel you wish to pair to
by pressing the Channel button until the LED corresponding with
the appropriate channel is lit. See Figure 26.
2x
Figure 25 - Pull down and release Pendant
Figure 26 - Select channel by pressing channel button
Figure 27 - Depress pairing button on back of remote
Figure 28 - Press and release top left button on remote
Depress the “pairing” button on the back of the remote by pushing
a pen or other object through the hole in the back of the remote.
The LEDs on the front will scroll. See Figure 27.
Press and release the top left button on the remote. The drapery
ϐǤʹͺǤ

ͳͺ
IV. Enable or disable smart assist
Smart Assist allows users to pull the curtain manually and have the movement complete automatically. All drapery tracks come
with Smart Assist enabled.
1. MANUALLY MOVE THE DRAPERY
Begin with the drapery in the full open or full closed position.
Manually move the drapery more than a foot towards the opposite
direction. If Smart Assist is enabled, the drapery will begin to
complete the movement automatically. If Smart Assist is disabled,
the drapery will remain in place. See Figure 29.
2. ENABLE OR DISABLE SMART ASSIST
To disable Smart Assistϐ
seconds or until the drapery jogs, then release. Be sure to pull down
on the Pendant before the drapery reaches its limit. See Figure 30.
3. CONFIRM
ϐǤ
ϐǤ
Figure 32.
Figure 29 - Manually move the drapery one foot
Figure 30 - Pull down and hold Pendant for 5 seconds
Figure 31 - Pull down and hold Pendant for 5 seconds
Figure 32 - Pull down and release Pendant once
To enable Smart Assistǡϐ
or until the drapery jogs, then release. See Figure 31.

ͳͻ
V. Grouping Multiple Drapery Together
2. CONFIRM GROUPING
On a central unit you would like to designate as the ‘Master’, press
and hold all three buttons on the sensor box until all three LEDs
ϐǤ͵ͶǤ
ϐǤ
1. ENTER PAIRING MODE
On each drapery you would like to group, press and hold all three
ϐ Ǥ
Figure 33.
Figure 34 - Press and hold all 3 buttons
Figure 33 - Press and hold all 3 buttons
The grouping feature is available on all units with a sensor box. Grouping allows users to control multiple units simultaneously
with one manual command. Grouping also allows units to move together simultaneously when any one unit in the group has a
sensor automated command triggered.

ʹͲ
VI. Master Reset the Drapery
2. SETUP THE DRAPERY FOR RESET
Move the drapery to a position halfway between full open and full
closed. See Figure 37.
Figure 36 - Pull down on Pendant or cord and release once
3. RECONNECT POWER
Reconnect power to the unit by plugging the unit back in or by
reconnecting the battery tube. See Figure 38.
Figure 37 - Move drapery to halfway between full open and full closed
In some instances it may become necessary to master reset your drapery. Performing a master reset will restore the drapery to
its factory settings, erasing saved open and closed positions, groups, and all paired remotes.
4. PERFORM MASTER RESET
Pull down on the Pendant and hold for 10 seconds or until the
drapery jogs.
Next, push up on the Pendant for 10 seconds or until the drapery
jogs. See Figure 39.
Your drapery has now been master reset.
Figure 38 - Reconnect power
Figure 39 - Pull down and hold Pendant and lift up and hold Pendant
1. REMOVE POWER
Disconnect power from the unit. For hardwired units, simply
unplug the device. For battery powered units, remove the battery
tube by twisting it off of the connection wire. See Figure 35.
Figure 35 - Disconnect power
With power disconnected, pull down on the Pendant or
cord and release once. See Figure 36.
/