Screen Innovations SilenTrac Installation guide

Type
Installation guide
INSTALLATION GUIDE
[email protected] | 512.832.6939
Exclusively Distributed by
ʹ
Drapery Track Installation
ǡǤǤ ͳǦͺͶͶǦ͵Ͳ͹Ǧ͹Ͷ͵ͷǤ
ǡǣ
ͳȀͶdz
ͷȀ͸Ͷdzሺሻ
͸dz





͹Ȁ͸Ͷdz
ͳȀͶdz
͓ʹ
ሺሻ
ሺሻ


Track (Right draw shown) Carriers (installed)
Carrier Arm(s)
Return Clips
Primary Motor
Secondary Motor
Pendant
Brackets
Sensor Box
Fascia
Fascia Clips
Fascia Spacers (for ceiling mount)
Track Splice
͵ǤͳǦǤ
ʹǤʹǦ
I. Splicing the Track
ǡʹǣ
ͳǤ 
ͳǤͳǦ
Ǥ
ǣͳʹǯǡǤ
Ǥ
ͳǤʹǦሺሻǡ
          
         
Ǥ
Ǥ
ʹǤ 
ʹǤͳ Ǧ       ǡ
       
  Ǥ
ʹǤʹ Ǧ        
 Ǥ    ǡ    
 Ǥ
ʹǤ͵ Ǧ          

Ǥ
͵Ǥ 
͵Ǥͳ Ǧ      ǡ        
  Ǥ        
Ǥ
͵Ǥʹ Ǧ           
ǡ           
ǤǤ
Ǥ
ͶǤ 
ͶǤͳǦǡ
ǤǤ
c enter drawǡǤ
side drawǡǤ
ͳǤͳ
ͳǤʹ
͵
Ͷ
ǡǡǤ
Ǥ
NOTE:ǡǤ
ͳǤ 
ͳǤͳǦǤ͸dzǤʹǤͳǤͳ
ሺǡǤǡ
Ǥሻ
ʹǤͳǤͳǦ
2. DRapery Track Installation
ͳǤʹǦͳ͸dzǦ͵͸dzሺǡሻǤ
͵Ǥ
ǡ
  Ǥ    Dz dz 
Ǥ
ൌ൅൅
Ǧ ൌ
Ǧ ൌ
Ǧ ൌ
Ǧ ൌ
ǡǤ
BH
TE
DH
ʹǤͳǤʹǦ
BH = TE + DH + BC
Bottom Side
Bottom
Side
6” Every 16” - 36”
Every
16” - 36”
6”
6” Every 16” - 36” 6”
6” 6”
6”
6”
6” 6”
BC
ͷ
ʹǤͳǤ͵Ǧ
ǡ
ǤʹǤͳǤ͵Ǥ Front Mount
Pinch Pleat
Under Mount
Pinch Pleat
Pin Ripple
Ripplefold
Pro Tip:Ǥ
ʹǤͳǤͶ
Use the following guidelines when installing the drapery track to the wall or ceiling.

 
͵Ͳ̶
͵ͳ̶Ǧ͸Ͳ̶
͸ͳ̶ǦͻͲ̶
ͻͳ̶ǦͳʹͲ̶
ͳʹͳ̶ǦͳͷͲ̶
ͳͷͳ̶ǦͳͺͲ̶
ͳͺͳ̶ǦʹͳͲ̶
ʹͳͳ̶ǦʹͶͲ̶
͵
Ͷ
ͷ
͸
͹
ͺ
ͻ
ͳͲ
ʹͶͳ̶Ǧʹ͹Ͳ̶
ʹ͹ͳ̶Ǧ͵ͲͲ̶
͵Ͳͳ̶Ǧ͵͵Ͳ̶
ͳͳ
ͳʹ
ͳ͵
͵͵ͳ̶Ǧ͵͸Ͳ̶
͵͸ͳ̶Ǧ͵ͻ͸̶
ͳͶ
ͳͷ
͵ͻ͹̶ǦͶ͵ʹ̶ ͳ͸
͸ǡ
Ǥ
ǡǡ
ǡǤ
Ǥ
Ǥ
ǡǤǡ
͸ͺǤ
Ǥ
ǤǤ
͸
ʹǤʹǤͳǦ
ʹǤʹǤʹǦǤ
ʹǤʹǤ͵Ǧ
Ǥ
ʹǤ
ʹǤͳǦǤʹǤʹǤͳǤ
ǡǤ

Ǥ
ʹǤʹǦunsplicedǡǡ
       Ǥ   
ǡ
Ǥ
ǡǤʹǤʹǤʹǤ
ʹǤ͵Ǧsplicedǡǣ
 ǡ

Ǥ
ǡͺǡ
ͺǤ
ʹǤʹǤ͵Ǥ
ʹǤͶǦǡǡ
Ǥ
͹
ʹǤ͵ǤʹǦ
ʹǤ͵Ǥ͵Ǧ
͵Ǥ 
͵ǤͳǦ 
ǡǡǤǡ
Ǥǡ
ǤʹǤ͵ǤͳǤ
͵Ǥʹ Ǧ   ǡ      
     Ǥ   
        Ǥ
ʹǤ͵ǤʹǤ
͵Ǥ͵ Ǧ      ǡ    
      ሺ
   ሻǤ    Ǥ
ǤʹǤ͵Ǥ͵Ǥ
ʹǤ͵ǤͳǦ
ͶǤ 
ͶǤͳǦǡ
           Ǥ
ǤʹǤͶǤͳǤ
ʹǤͶǤͳǦ
ʹǤͶǤʹǦ
ʹǤͶǤ͵Ǧ
ͶǤʹǦǡ
Ǥ
ǤʹǤͶǤʹǤ
           
Ǥ
ǤʹǤͶǤ͵Ǥ
ʹǤͶǤͶǦ
   ǡ      
Ǥ
ǡͷǤʹǤͶǤͶǤ
ͺ
single draperyǡͳǤ
ʹǤͷǤʹǤ
ʹǤͷǤʹǦ
ʹǤͷǤ͵Ǧ
dual draperyǡͳ
ʹǤʹǤͷǤ͵Ǥ
ͷǤ ሺሻ

Ǥ
ʹǤͷǤͳǦ
 ǡ 
 ǡ           
ǤʹǤͷǤͳǤ
ͻ
͸Ǥ 
͸ǤͳǦ
Ǥ
ʹǤ͸ǤͳǤ
ǡ
ǡǤ
ʹǤ͸ǤͳǦ
ʹǤ͸ǤʹǦ
͸ǤʹǦǡ
ǤʹǤ͸Ǥʹ
ʹǤ͸Ǥ͵Ǧ
͸Ǥ͵Ǧǡ
ǡǤ
ʹǤ͸Ǥ͵Ǥ
Ǥ
͹Ǥ ሺሻ
͹Ǥͳ Ǧ     ǡ      

Ǥ
For front mounted batonǡ
Ǥ
ǤʹǤ͹ǤͳǤ ʹǤ͹ǤͳǦ
ʹǤ͹ǤʹǦ
7.2 - For a back mounted batonǡ
ǤʹǤ͹ǤʹǤ
ͳ
ʹ
͵
Ͷ
ͳͲ
ͳͳ
ͺǤ 
ͺǤͳ - On Alkaline battery powered unitsǡ
 ሺ͸ሻ ሺͺሻ  ǡ Ǥ
Ǥ
ǤʹǤͺǤͳǤ
ʹǤͺǤͳǦ
ͺǤ͵ǦOn 9V and 12V low voltage wall plug unitsǡ
ǤʹǤͺǤ͵ǤͳǤ
ͺǤʹǦ On Lithium Ion rechargeable battery powered unitsǡ
ǤʹǤͺǤʹǤͳǤ
ʹǤͺǤʹǤʹǦ

ʹǤͺǤ͵ǤͳǦ
ʹǤͺǤʹǤͳǦ
ǡ
Ǥ
Ǥ
ʹǤͺǤʹǤʹǤ
ʹǤͺǤ͵ǤʹǦ


ǡǤ
ʹǤͺǤ͵ǤʹǤ
ͳʹ
ʹǤͺǤͶǤͳǦƬ
ͺǤͶǦOn units with power and control over CAT5ǡ
ǤʹǤͺǤͶǤͳǤ
ʹǤͺǤͶǤʹǦ

ǤʹǤͺǤͶǤʹǤ
ͻǤ 
ǡ
 Ǥ 
Ǥ
 ǡ 
           
Ǥ     ǡ     
Ǥ
Ǥ
Be sure to secure any excess cord, leaving no more than 8 inches unsecured, to reduce the risk of child strangulation.
ͳ͵
ǡǡǤϐ
ϐሺDzdzሻǤ
The width of your panels should be large enough to cover the length of your track plus any return distance, plus any overlap in
the case of a center draw application.
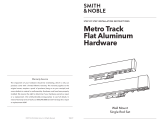
1. CAREFULLY DETERMINE EXTRUSION PLACEMENT
fc
TE
DH
Figure 2
1. Recessed Pocket DRAPERY TRACK INSTALLATION
Determine the location where you would like the extrusion and
track installed. Be sure the determined location can be installed
onto without damaging the structural integrity of the joist. Be sure
to leave appropriate spacing for the drywall to slide on the ceiling
side of the extrusion’s lip.
Be aware that some advertised drapery heights are not precise. To
verify correctness (and enlable proper extrusion mounting height) ,
Ǧϐሺሻ
height (DH), bottom clearance (BC), and track exposure (TE). See
Figure 2.
Minimum track exposure for under mount applications is 1.25”.
Recommended bottom clearance is 0.5” to 1”.
FC = DH + TE + BC
Figure 2- Under Mount Pin Setting
Under Mount
Pinch Pleat
Under Mount
Ripplefold or
Pin Ripple
If using hardwire power over CAT cable, and you are planning to run the cable through the ceiling, before installing the extrusion
permanently drill a hole in the lip of the extrusion on the motor end for the CAT cable to be run through. Be sure to run the CAT
cable before installing ceiling drywall.
ͳͶ
Using a pencil, mark the location on the ceiling you want the center
of the track and extrusion to be mounted. See Figure 6.
Next, determine the distance from the wall you want your drapery
track. Consider all factors, such as fullness of the drapery, fascia
return depth, drapery return length and drapery overlap at the
window sill. Decide on your distance carefully. After the extrusion
has been installed, the clearance cannot be adjusted. We recommend
1” of clearance between the top of the drapery to the wall when the
ሺDzdzሻǤ͹Ǥ
2. ASSEMBLE THE EXTRUSION
Slide each end onto the extrusion. For side draw tracks, be sure to
attache the motor and idler end recesses onto the correct sides of
the main extrusion. ͺǤ
Figure 6
Figure 7
Figure 8
Find where the center of your track (CT) will be placed by measuring
the window opening (WO) and divide by two. See Figure 5.
Figure 5
CT = WO
2
ͳͷ
Figure 10 - Screw in extrusion on a parallel joist beam
Figure 11 - Screw in extrusion to perpendicular joists
3.ATTACH THE EXTRUSION TO THE JOISTS
Install the extrusion by screwing it into the joist(s), using the
proper hardware for the substrate. If necessary, use a drill bit to
create a pilot hole.
For joists that run parallel to the window, screw in the
extrusion where each adjacent joist meets the parallel beam
ͳͲǤ
For joists that run perpendicular to the window, screw in
the extrusion at each joist intersection.
 ǡ    ϐ    
perpendicular joist to provide more surface area on which to
install the extrusionͳͳǤ
Once the drywall is installed, secure it to the extrusion lip
by screwing through the extrusion wing upward through the
drywall sheet.
Once all the lip screws are in place, mud and sand as
normal, covering the extrusion wings. Be careful not to mud
over the extrusion openinͳʹǤ
Figure 1ʹ- Secure extrusion to installed drywall sheet
ͳ͸
Figure 14 - Retain track in extrustion using temporary clips
Figure 16 - Mark each hole location.
4.MARK TRACK SCREW LOCATIONS
If your track is spliced, assemble it now using the provided
instructions.
Once your extrusion has been secured to the ceiling, hold the track
into the extrusion and, starting in the middle, squeeze the sides
of the    clip together and lift it into
the extrusion, lining up the lip in the clip so it inserts into the
groove in the extrusion wall.
Use a clip in the center, on each end, and periodically in between
as needed based on track length.
With the clips securing the track, use a marker to mark the location
of each pre-drilled track hole onto the extrusion. Holes will be pre-
drilled every 36”.
Once each location has been marked, remove the track by
removing all temporary retaining clips.
Figure 14 -
5.. PREP THE EXUSION FOR TRACK INSTALLATION
With the track off the extrusion, pre-drill (create a pilot hole)
through the extrusion at each marked location. This must be done
with the track off the extrusion to prevent possible metal shards
from getting into the track. Make sure the area is clean from debris
after drilling.
Be aware that in applications with joists perpendicular to the
window where you are not using blocking, the screws attaching
the track to the ceiling extrusion will likely not make contact with
a joist.
ͳ͹
8. INSTALL THE PIN CONNECTORS
Install the pin connectors before installing the track onto the
camlocks. See Figure 19.
9. INSTALL THE TRACK
Figure 21 - Use clips to hold up track.
Once each hole has been pre-drilled on the extrusion, hold the track
into the extrusion and, starting in the middle, snap the temporary
retaining clip into the extrusion to hold up the track. Use a clip in the
center, on each end, and periodically in between as needed based on
track length.
Once the track is temporarily secured, permanently attach the track
to the extrusion by screwing through each of the pre-drilled holes.
PLEASE BE SURE TO USE THE PROVIDED SCREWS. DO NOT USE
THIRD PARTY SCREWS.
NOTE: On Ripplefold and Pin Ripple tracks, be very cautious to
avoid the carrier string during this process. Damage to the carrier
string will result in having to replace the entire string of carriers.
Figure 20 - Snap in pin connector
Figure 19 - Pin connector placement options
Choose one or more connection points on the top of the track end,
then snap the pin connector into the chosen recess or recesses. See
Figure 20.
Once the track is installed, remove the temporary retaining clips.
Figure 21 - Permenantly secure track to recessed extrusion.
ͳͲǤͺǤ
ͳͺ
1. Install the Clips
On ceiling mount installations,ϐ
ǡʹǤ
On wall mounted track installationsǡ
ǡǤ
Ǥ

ǤͳǤ
ϐǡǤ
    ͳ͸dzǦʹͶdzǤ       
Ǥ
ͳǦ
2. Snap on the Fascia
         Ǥ   
ǡDzdz
Ǥǡ
    Ǥ   ǡ    
Ǥ
Ǥ
ǡ
ǤʹǤ
͵Ǥ 
 ǡ   ͵dz  ǡ       

Ǥ
Ǥ͵Ǥ
͵Ǧ
ʹǦ
I. Install the Fascia
ͳͻ
ͶǤ 

ϐǤǡ
ǤͶǤ
ǡǡ
ϐǤ
ͶǦ
II. Removing a Fascia Clip
ͳǤ 
ǡϐ
Ǥ

Ǥ
ǤͷǤ
ͷǦ
ʹǤ 
ǡ

Ǥ͸Ǥ
Ǥ
͸Ǧ
ͷǤ 
Ǥ
            
Ǥ
ʹͲ
Using the Drapery Track
Using the Pendant for Operation
The Pendant, can be pulled down or pushed up, depending on the desired movement.
On a single drapery, pulling the Pendant down activates the curtain. Pulling down once makes the curtain move towards the
next position, depending on if the curtain is open or closed. Pushing the Pendant up will stop it. Pulling down a second time after
stopping will allow the curtain to move in the opposite direction.
On a dual drapery, pulling the Pendant down activates the curtain plugged into the motor 1 slot. Pulling down once makes the
curtain move towards the next position, depending on if the curtain is open or closed. Pulling down a second time will stop it.
Pulling down a third time will move the curtain in the opposite direction.
Lifting up on the Pendant will activate the curtain plugged into the motor 2 slot. Lifting up once makes the curtain move towards
the next position, depending on if the drapery is open or closed. Lifting up a second time will stop it. Lifting up a third time will
move the curtain in the opposite direction.
Using Smart Assist
Smart Assist is a drapery track feature to allow users the ability to begin an open or close movement manually, and have the
drapery automatically complete the movement.
To trigger Smart Assist, simply pull the curtain approximately one foot towards the direction you would like to move the curtain.
Upon release, the curtain will continue moving in that direction until it reaches the full open or closed position.
  • Page 1 1
  • Page 2 2
  • Page 3 3
  • Page 4 4
  • Page 5 5
  • Page 6 6
  • Page 7 7
  • Page 8 8
  • Page 9 9
  • Page 10 10
  • Page 11 11
  • Page 12 12
  • Page 13 13
  • Page 14 14
  • Page 15 15
  • Page 16 16
  • Page 17 17
  • Page 18 18
  • Page 19 19
  • Page 20 20
  • Page 21 21
  • Page 22 22
  • Page 23 23
  • Page 24 24
  • Page 25 25
  • Page 26 26
  • Page 27 27
  • Page 28 28
  • Page 29 29
  • Page 30 30
  • Page 31 31
  • Page 32 32
  • Page 33 33
  • Page 34 34
  • Page 35 35

Screen Innovations SilenTrac Installation guide

Type
Installation guide

Ask a question and I''ll find the answer in the document

Finding information in a document is now easier with AI