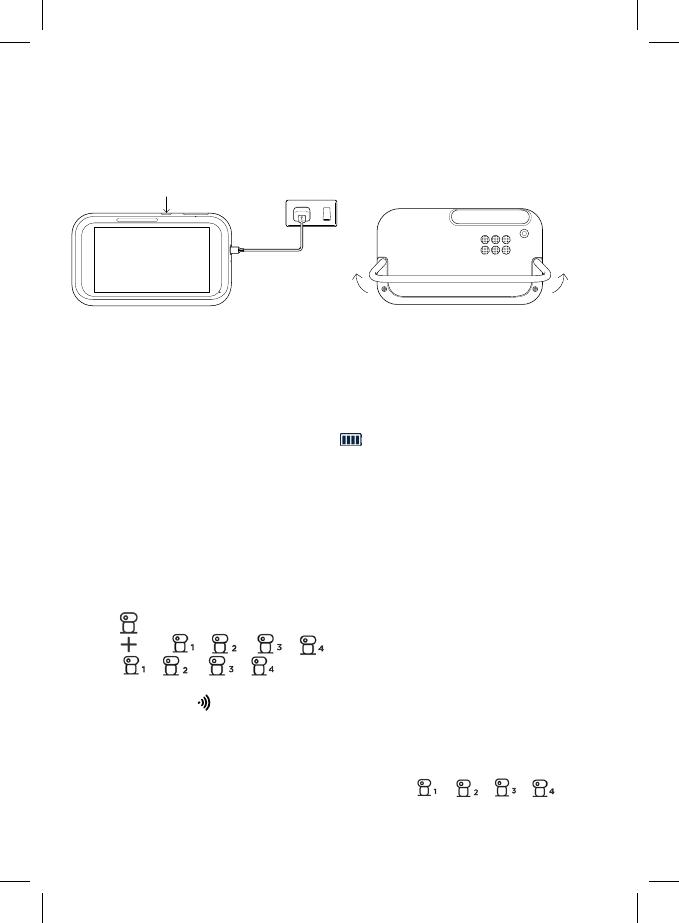
Motorola PIP1700CPU User guide

Category
Baby video monitors
Type
User guide

Motorola PIP1700CPU, a smart video baby monitor, lets you keep an eye on your little one from anywhere in your home or even remotely via a smartphone app. Equipped with a high-definition camera, it provides crystal-clear video and audio transmission, allowing you to see and hear your baby in real-time.

Motorola PIP1700CPU, a smart video baby monitor, lets you keep an eye on your little one from anywhere in your home or even remotely via a smartphone app. Equipped with a high-definition camera, it provides crystal-clear video and audio transmission, allowing you to see and hear your baby in real-time.

nursery
User Guide
Important Notes:
Charge the parent unit and the camera unit of PIP1700-P HD
TOUCH CONNECT for 16 hours before use.
5.0" Wi-Fi® HD Video Baby Monitor with
Touch Screen
For: PIP1700-P HD TOUCH CONNECT
PIP1700-P-2 HD TOUCH CONNECT
PIP1700-P-3 HD TOUCH CONNECT
PIP1700-P-4 HD TOUCH CONNECT
Safety instructions
WARNING
Strangulation Hazard. Children have STRANGLED in cords. Keep
this cord out of the reach of children (more than 1 metre away).
Never use extension cords with AC Adapters. Only use the AC
Adapters provided.
Baby monitor setup and use:
Choose a location for the baby unit that will provide the best view of your
baby in their crib.
Place the baby unit on a flat surface, such as a dresser, desk, shelf or wall
mount the unit securely with the wall mount bracket provided in the pack.
NEVER place the baby unit or cords in the crib or within reach of the baby
(the unit and cords should be more than 3 feet away).
WARNING
This Smart Video Baby Monitor is compliant with all relevant standards
regarding electromagnetic fields and is, when handled as described in the User
Guide, safe to use. Therefore, always read the instructions in this User Guide
carefully before using the device.
Adult assembly is required. Keep small parts away from children when
assembling.
This product is not a toy. Do not allow children to play with it.
This baby monitor is not a substitute for responsible adult supervision.
Keep this User Guide for future reference.
Do not place the baby (camera) unit or cords in the crib or within reach of
the baby (the unit and cords should be more than 3 feet away).
Keep the cords out of reach of children.
Do not cover the baby monitor with a towel, blanket, or other item that will
stop air circulation.
Never use extension cords with power adapters. Only use the power
adapters provided.
Test this monitor and all its functions so that you are familiar with it prior to
actual use.
Do not use the baby monitor near water or allow water or other foreign
substances to enter the power port or adapter.
Do not place the Baby Monitor near a heat source.
Only use the chargers and power adapters provided. Do not use other
chargers or power adapters as this may damage the device and battery
packs.
Do not touch the plug contacts with sharp or metal objects.
The unit should be set up and used so that parts of the user's body other
than the hands are maintained at a distance of approximately 8 inches
(20 cm) or more.
The wall mounting height is less than 2 m for the baby unit.
CAUTION
There is a risk of explosion if the battery is replaced by an incorrect type.
Dispose of used batteries according to the instructions.
Welcome...
to your new Smart Video Baby Monitor!
Thank you for purchasing your new Smart Nursery product. Now you can
see and hear your baby sleeping in another room or you can monitor your
older children in their playroom.
Important
To use your baby and parent units together, you must be able to establish
a radio link between them, and the range will be aected by environmental
conditions.
Any large metal object, like a refrigerator, a mirror, a filing cabinet, a
metallic door or reinforced concrete between the baby and parent units
may block the radio signal.
The signal strength may also be reduced by other solid structures, like
walls, or by radio or electrical equipment, such as TVs, computers, cordless
or mobile phones, fluorescent lights or dimmer switches.
Other 2.4GHz products, such as wireless networks (Wi-Fi® routers),
Bluetooth™ systems, microwave ovens or other baby monitors, may cause
interference with this product, so keep the baby monitor at least 5 ft (1.5 m)
away from these types of products, or switch them o if they appear to be
causing interference.
If the signal is weak, try moving the parent and/or the baby unit(s) to
dierent positions in rooms.
Need help?
If you have any problems setting up or using your PIP1700-P HD TOUCH
CONNECT, PIP1700-P-2 HD TOUCH CONNECT, PIP1700-P-3 HD TOUCH
CONNECT and PIP1700-P-4 HD TOUCH CONNECT, please visit us at:
motorolanursery.com/support
Alternatively, you may find the answer in the ‘Help’ section at the back of
this guide.
This User Guide provides you with all the information
you need to get the most from your Smart Video
Baby Monitor.
Read the instructions carefully, and be aware that
this Smart Video Baby Monitor is only intended as an
aid. It is not a substitute for responsible and proper
adult supervision.
Before you use the Smart Video Baby Monitor, set
up the parent and baby units. Follow the simple
instructions in ‘Getting started’, on the next few
pages.
Important
Use only the supplied power adapter (DC5V / 2000 mA) for the camera unit
and the parent unit.
Got everything?
Parent unit with built-in rechargeable Lithium-ion battery
Baby (camera) unit with built-in rechargeable Lithium-ion battery
AC power adapter for the parent unit
AC power adapter for the baby (camera) unit
Wall mount bracket and screws
If you have purchased multi camera pack, you will also have the following
additional items:
Baby (camera) unit(s)
AC power adapter(s) for the baby (camera) unit(s)
For Wi-Fi® internet viewing you will need a suitable Android or iPhone/iPad
device and Wi-Fi® internet connection of at least 0.6 Mbps upload bandwidth
per baby (camera) unit.
1. Welcome
This booklet provides you the quick start information of your
PIP1700-P HD TOUCH CONNECT. For a full explanation of all features,
download the user guide from motorolanursery.com.
2. Contents inside the box
USB Type C cable
x 2
Baby unit
Wall mounting screws
and wall anchors
Quick Start Guide
Quick Start Guide
Parent unit
Need help?
If you have problems setting up or using your PIP1700-P HD TOUCH
CONNECT, please contact Customer Services at motorolanursery.com/
support or
+1-800-763-2207 (United States and Canada).
USB-C power
socket x2
Wall mount bracket
3. At a glance
Baby (Camera) unit
A Camera
B Manual pan tilt head
C Desk stand
D Light sensor and Infrared LEDs
The light sensor detects a low level of ambient light to activate night vision
mode. The infrared LEDs around the camera and behind the black lens are
ON, and the screens on the parent unit and your smartphone turn black
and white. The night vision icon will be displayed at the top of the screen.
E Microphone
It picks up the sound from the baby.
Note: Make sure you remove any cover or protective tape from it.
F Speaker
G Antenna
H Power jack (USB-C)
J Power / Linking LED indicator
It lights up in blue when the parent unit is powered on and linked to the
baby (camera) unit.
It flashes red when the camera unit is not connected to either the parent
unit or Wi-Fi routers.
It turns OFF automatically during night mode.
K Pair button
Press and hold to pair to the parent unit.
L Temperature sensor
A
C
D
B
EK
F
G
H
M
I
J
L
I Slide switch (Power On/OFF the camera unit)
M Battery Charging LED Indication
Parent unit
B
D
F
G
H
AE
C
I
J
K
L
A Indications (green, green, orange, red, red)
Power indication: it lights up in green when powered on; it lights up in red
when charging and powered o.
Sound level indication: green, orange, red, red.
B Touch screen display
C Power button
Press to turn the display on or o. Press and hold to turn the parent unit on
or o.
D Volume down
Press to decrease the speaker volume.
E Volume up
Press to increase the speaker volume.
F Power jack
G Reset hole
Use a small pin to insert into it to perform a system reset and recover the
parent unit from a lock-up state.
H Microphone
I Antenna
J Flashlight
K Speaker
L Flip stand
4. Connect and charge
WARNING
Strangulation Hazard. Children have STRANGLED in cords. Keep adapter
cords out of the reach of children (more than 1 metre away). Never use
extension cords with AC adapters. Only use the AC adapters provided.
Note: Use only the supplied power adapter (DC5V / 2000 mA) for the
baby (camera) unit and the parent unit.
Baby (camera) unit
1. Plug the USB-C adapter into the UCB-C jack on the rear of the baby
(camera) unit and plug the other end of the AC adapter into the AC power
outlet.
2. Switch on the AC power (if your AC power outlet has a switch) and slide the
switch to ON position on the camere unit. The baby (camera) unit turns on and
the power indicator lights up in blue and flashes in red after 30 seconds if the
parent unit has not been powered up.
Press and hold
Parent unit
A rechargeable battery is already pre-installed inside the parent unit. When
fully charged, you can move the parent unit without losing the link and picture
from the baby (camera) unit. When charging the battery for the first time,
charge for at least 16 hours continuously. The subsequent charging time is
about 8 to 10 hours a day. Fully charged batteries should give up to 8 hours
usage time.
1. Plug the supplied USB type-C cable into the USB-C power socket.
2. Plug the USB-C power socket cable into the power jack on the side of the
parent unit and plug the other end into the wall socket.
3. Switch on the AC power (if your AC power outlet has a switch).
4. The parent unit turns on automatically.
5. When the parent unit is fully charged, will appear steadily on the
screen display.
6. Flip out the stand on the back of the parent unit to set up the desktop
stand.
Note: If the battery icon on the screen is red and an alert tone is heard, it
means the battery level is low and needs recharging.
Pair the baby (camera) unit to the parent unit
The video baby monitor is pre-registered to your parent unit. You do not need to
register it again unless the baby (camera) unit loses its link with the parent unit.
To re-register your baby (camera) unit, see the following steps.
1. Tap on the menu bar.
2. Tap and / / / will pop up.
3. Tap / / / to select a desired camera. The parent unit
starts searching the baby (camera) unit.
4. Press and hold on the rear of the baby (camera) unit until you hear
'Ready for pairing'. When pairing is successful, the video from the baby
(camera) unit will appear.
Notes
A baby (camera) unit can be paired only to one parent unit each time. If a baby
(camera) unit is currently paired with the parent unit, / / / will
appear in black on the screen and cannot be selected. Select the grey one for
a new registration.
5. Wall mount the baby (camera) unit
2
5.8mm
28.2mm
1
4 5
3
25mm
4.1mm
32.5mm
(1.28”)
6.0mm
(0.24”)
1. Place the supplied wall mount bracket on the wall and mark the positions
of 2 screw holes. Drill a screw hole at each marking.
2. Install the supplied wall anchors into 2 screw holes on the wall.
3. Insert the supplied wall mounting screws into the wall anchors.
4. Fix and fasten this screw on the baby (camera) unit and the wall mount
bracket.
5. Hang the wall mount bracket on the wall mounting screws on the wall.
6. Adjust the camera manually if necessary.
6. Before use
6.1 Intended use
Be aware that this Smart Digital Video Baby Monitor is only intended as an aid.
It is not a substitute for responsible and proper adult supervision.
6.2 Setup location
Do not place the baby (camera) unit or cords in the crib or within reach
of the baby. The unit and cords should be more than 1 meter (3 feet) away
from the baby.
Make sure there is at least 2 meters (6 feet) between the parent and baby
(camera) units to avoid audio feedback. If there is noise interference, move
the baby (camera) and parent units further apart.
Make sure the parent and baby (camera) units are not placed near other
electrical equipment. Move the parent and baby (camera) units 1.5 meters
(5 feet) away from other electrical equipment.
If the baby (camera) unit loses its link with the parent unit, a lost link screen
will be shown on the parent unit. Move the baby (camera) unit closer to the
parent unit.
> 1m
(3ft)
> 2m
(> 6ft)
6.3 Operating range
The video baby monitor has a range of up to 300 metres (1000 feet) outdoors
when there is a clear line of sight between the baby (camera) and parent units.
Any obstruction between the units will reduce the range significantly.
6.4 Check the microphone and speaker
Speak into the microphone of the baby (camera) unit. You should be able
to hear the sound from the parent's unit.
Adjust the speaker volume of the parent unit to the desired volume when
necessary.
-/+
7. Use your video baby monitor
7.1 Use the touch screen
7.2 Parent unit main menu
Adjust LCD brightness.
Zoom in/out.
Open the audio media playback.
Turn on/o the flashlight.
Set the alarm.
7.3 Status icons
Indicates the current signal
strength level (4 levels).
Indicates the night vision mode is
on. The video turns black and white.
Indicates the screen o time is set.
Unable to detect the baby unit.
Indicates the current battery level
(4 levels).
Temperature unit.
,
Talk back.
Camera selection.
View multiple cameras.
Screen on/o timer.
Temperature unit °C or °F.
The alarm is on.
The speaker is muted.
The flashlight is on.
Zoom is set up.
Audio media is playing.
Cycle view from camera.
Camera selected.
28°C 1 3 28°C 1 3
Swipe left or right to pan the
camera view (not available in
menu mode).
Swipe up or down to tilt the
camera view (not available in
menu mode).
Swipe up at the screen bottom to
pop up the menu bar. Swipe down
at the screen bottom to hide the
menu bar.
Scroll left or right on the menu bar
to see all options.
Note: Depending on the video settings, the display will go blank after 5
minutes, 15 minutes, or 30 minutes of inactivity to save power.
7.4 Adjust the brightness on the parent unit
1. Tap on the menu bar of the parent unit. The brightness status bar pops
up.
2. Tap / or swipe the brightness status bar left or right to select the
brightness level. There are 8 levels to choose from.
7.5 Zoom the screen
1. Tap on the menu bar of the parent unit. The zoom status bar pops up.
2. Tap / or swipe the zoom status bar left or right to select 1x or 4x
zoom.
7.6 Enable audio media playback
You can play back pre-recorded personal or preloaded audio content (lullabies,
soothing sounds and English audio books) on the baby (camera) unit to
soothe the baby. There are 10 preloaded lullabies/soothing sounds and 10
audio books in the baby (camera) unit.
7.6.1 Pre-recorded personal content playback
You can play back your personal content after recording the audio through the
App.
1. Tap on the menu bar of the parent unit. The options menu pops up.
2. Tap to view the names of your recordings displaying on the screen.
3. Tap to select a desired recording and start/stop playback.
7.6.2 Lullabies/soothe sounds playback
1. Tap on the menu bar of the parent unit. The options menu pops up.
2. Tap to view the names of lullabies or soothe sounds displaying on the screen.
3. Tap to select a desired lullaby or soothe sound and start/stop playback.
7.6.3 English audio book playback
1. Tap on the menu bar of the parent unit. The options menu pops up.
2. Tap to view the names of audio books displaying on the screen.
3. Tap to select a desired audio book and start/stop playback.
7.6.4 Adjust the volume level of audio playback
1. Tap on the menu bar of the parent unit. The options menu pops up.
2. Tap on the option menu. The volume status bar pops up.
3. Tap or to select the volume level. There are 6 levels to choose from.
7.7 Turn the flashlight on or o
Tap on the menu bar of the parent unit to turn on/o the flashlight.
7.8 Set the timer
You can set timers on the parent unit to remind you or caregivers of the time
to feed the baby, change the baby’s diaper or put the baby to bed.
1. Tap on the menu bar of the parent unit.
2. Tap
on
to turn on the timer, then tap or to select the time. Each key
press represents an interval of 15 minutes, up to an interval of 6 hours.
3. If the next feeding time is 4 hours later, press or to adjust the timer
until 04:00 is displayed.
4. Tap
save
to confirm the time, will appear on the status bar.
5. The parent unit will beep when the time limit is reached. Press any key to
stop the timer.
7.9 Two-way talk
You can use the Talk Back feature to comfort and reassure your baby. Whilst
using Talk Back you will not be able to hear your baby.
1. Tap on the menu bar of the parent unit to talk to your baby through
the parent unit's microphone.
2. Tap again when you finish speaking.
7.10 Use the camera
7.10.1 Pair or add a camera with the parent unit
See 'Pair the baby (camera) unit to the parent unit' in Section 4.
7.10.2 Remove a camera
1. Tap on the menu bar of the parent unit.
2. Tap and / / / will pop up.
3. Tap / / / to select a desired camera to remove it from
registration.
Note
You cannot remove the camera if it is the only registered camera in the parent
unit.
7.10.3 View a camera
1. Tap on the menu bar of the parent unit.
2. Tap and / / / will pop up.
3. Tap / / / to select a desired camera to view the picture
from that camera. The selected camera will appear in black on the screen.
7.10.4 Use the patrol mode
This function is available if you have more than one baby (camera) unit.
1. Tap on the menu bar of the parent unit.
2. Tap and the screen will display images from dierent registered cameras
every 12 seconds.
7.11 View multiple camera on screen
This function is available if you have more than one baby (camera) unit. When
the split screen function is on, you can view multiple cameras on the screen
and have a list of options.
To turn on or o the split screen function, tap on the menu bar of the
parent unit.
To select another screen, tap on the selected screen once.
To hide or display the menu bar of that screen, tap on the selected screen
twice.
7.12 Power saving mode
1. Tap in the menu bar of the parent unit, the screen o timer:
o
,
5m
,
15m
or
30m
(m = minutes) will pop up.
2. Select a screen o time.
3. The screen will be o after the time limit is reached.
4. Tap once on the screen to wake it up. Tap twice to open the menu bar.
Note
You can still hear the audio when the screen is o.
7.13 Set the temperature unit
The baby (camera) unit has a temperature sensor that can detect the baby
room temperature.
1. Tap on the menu bar of the parent unit. °
C
/
°
F
will pop up on the screen.
2. Tap °
C or
°
F
to confirm the temperature format.
7.14 Default settings
Audio playback volume level 3
Brightness 4
Flashlight O
Temperature unit °F
Lullaby 1
Power saving 5 mins
Audio book 1
Parent unit speaker volume 4
Alarm O
Zoom 1X
8. View the baby through your device
Minimum system requirement
Android™ System: Version 7.0 or above
iPhone® iOS: Version 11.0 or above
High Speed (Wi-Fi®) Internet: At least 0.6 Mbps upload bandwidth per camera
(you can test your internet speed on this site: http://www.speedtest.net).
Connect to Wi-Fi® and use the Nursery App
View your camera
from my compatible
device remotely
Camera Connect to internet
via Wi-Fi® router
1. Scan the QR code with your smart device and download the Motorola
Nursery App from App Store for iOS devices or from Google Play™ Store
for Android™ devices.
2. Install the App on your device.
3. Follow the on-screen instructions to run and sign up or log in to the App.
4. Open the Motorola Nursery App on your compatible smartphone or tablet.
5. Follow the in-app instructions to create your account and connect to your
device.
9. Help
No display
Try recharging the
battery pack.
Reset the parent and baby (camera) units. Unplug both units from the wall
socket, then plug them back in.
Check if the parent/baby (camera) unit is powered on.
Press and hold the power button on the parent unit to switch it on.
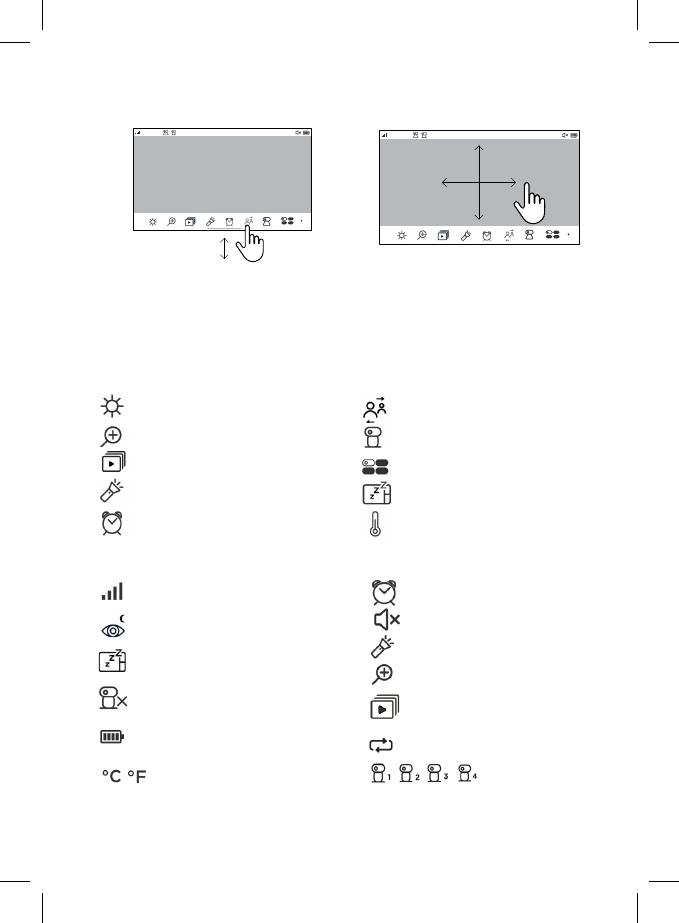
Make sure the correct camera is selected. Change the camera number if
necessary.
Make sure the display of the parent unit is turned on.
The parent unit display will go blank after 5 minutes, 30 minutes or 60
minutes to save power (depending on video settings).
No sound or the audio level is low.
Make sure that the protective tapes on the
parent and baby (camera) units
are removed.
Adjust the speaker volume level according to the instructions described in
the user guide.
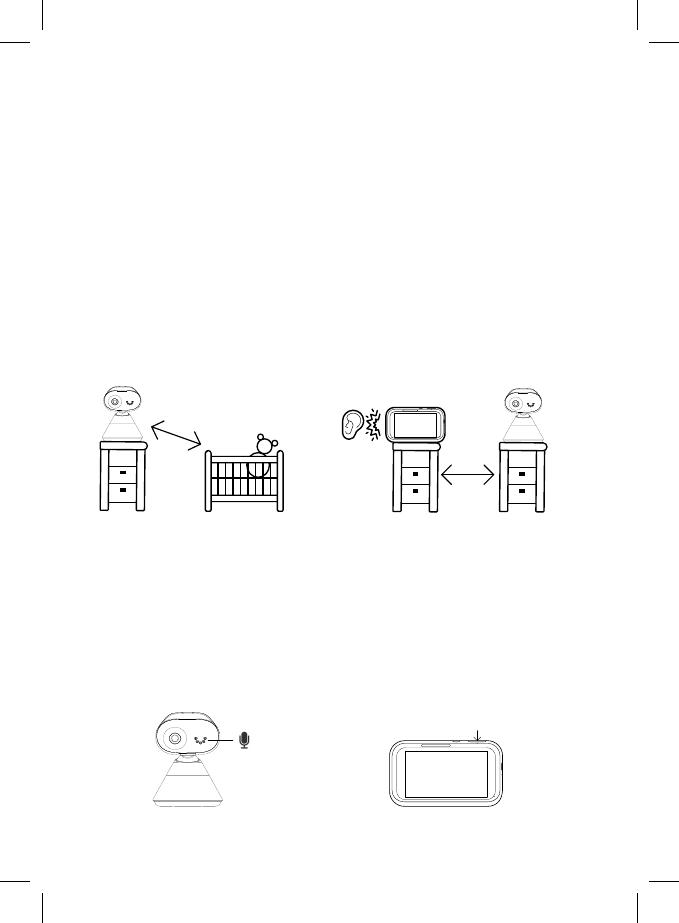
The baby (camera) unit has lost its link with the parent unit.
The baby (camera) unit is too far away and may be out of range. Move it
closer to the parent unit.
Disconnect both the parent and baby (camera) units from the power outlet.
Wait for about 15 seconds and reconnect them. Allow up to one minute for
the parent and baby (camera) units to synchronize.
Re-register your baby (camera) unit if necessary, see page 13.
Noise interference on your parent unit
Make sure there is at least 3 to 6 feet between the parent and baby
(camera) units to avoid audio feedback.
The baby (camera) unit is too far away and may be out of range. Move it
closer to the parent unit.
Make sure the parent and baby (camera) units are not placed near other
electrical equipment, such as a television, computer or cordless/mobile
telephone. Move the parent and baby (camera) units 5 feet away from
other electrical equipment.
Use of other 2.4 GHz products, such as wireless networks (Wi- Fi® routers),
Bluetooth™ systems, or microwave ovens, may cause interference with this
product.
If the signal is weak, try moving the parent and/or baby (camera) units to
dierent positions in rooms.
Noise interference on your device
To avoid background noise or echoes, ensure there is enough distance
between your device and the camera (baby unit).
Use of other 2.4 GHz products, such as wireless networks (Wi-Fi® routers),
Bluetooth™ systems, or microwave ovens, may cause interference with this
product. Keep the parent and baby (camera) units at least 5 feet away from
these types of products, or switch them o if they appear to be causing
interference.
Lost connection
Check your Wi-Fi® settings and reconnect your Wi-Fi® if necessary. Ensure
the baby (camera) unit is switched on. Wait for a few minutes for the baby
(camera) unit to connect with the Wi-Fi® system.
System Reset
When problems such as lost connection, no sound and no video cannot be
fixed based on the above guides, you can try to do a system reset. Note
that after system reset, you will need to do the pairing to the app again.
system reset for the parent unit: on the left hand side of the parent unit
and on the top of the DC socket, there is a small hole. Use a small pin to
insert and press into it. The parent unit will go through system reset.
system reset of the camera unit: follow the procedure as described in
section 4.4 of this user guide.
For more support, you can reach us at: motorolanursery.com/support or
+1-800-763-2207 (United States and Canada).
10. Technical Specifications
RF frequency bands 2400 MHz to 2483.5 MHz
RF transmission power < 20dBm (only for CE)
Camera unit battery
information
Mass Power Electronic Ltd.
Model : NBS10B050200VUU for USA/Canada
Model : NBS10B050200VEU for Europe
Model : NBS10B050200VKU for UK
Input 100-240V AC 50/60Hz, 300mA Output
DC5V 2.0A
OR
Baijunda Electronic Co. Ltd.
Model : UT-681A-5200ZCY for USA/Canada
Model : UT-681E-5200ZCY for Europe
Model : UT-681B-5200ZCY for UK
Input 100-240V AC 50/60Hz, 350mA
Output DC5V 2.0A
Parent unit battery
information Amperex Technology Limited
3.8V, 2800mAh Lithium-Ion Polymer
rechargeable battery pack
Note
Specifications are subject to change without prior notice.
Power adapter for the
parent units and the
camera units
WARNING
Do not attempt to replace the battery, but contact customer service if it needs
replacing.
WARNING
Use only with provided power adapters as tabulated in the above.
Amperex Technology Limited, LR50, 3.87V,
4500mAh Lithium-Ion Polymer rechargeable
battery pack
  • Page 1 1
  • Page 2 2
  • Page 3 3
  • Page 4 4
  • Page 5 5
  • Page 6 6
  • Page 7 7
  • Page 8 8
  • Page 9 9
  • Page 10 10
  • Page 11 11
  • Page 12 12
  • Page 13 13
  • Page 14 14
  • Page 15 15
  • Page 16 16
  • Page 17 17
  • Page 18 18
  • Page 19 19
  • Page 20 20
  • Page 21 21
  • Page 22 22
  • Page 23 23
  • Page 24 24
  • Page 25 25
  • Page 26 26

Motorola PIP1700CPU User guide

Category
Baby video monitors
Type
User guide

Motorola PIP1700CPU, a smart video baby monitor, lets you keep an eye on your little one from anywhere in your home or even remotely via a smartphone app. Equipped with a high-definition camera, it provides crystal-clear video and audio transmission, allowing you to see and hear your baby in real-time.

Ask a question and I''ll find the answer in the document

Finding information in a document is now easier with AI