Page is loading ...

(4)
(4)
Caster
with brake
Caster
without brake
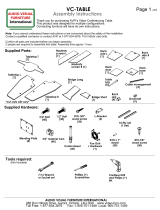
Assembly Instructions
5104DE Desk End for PD51 Series
This document shows assembly and installation of the 5104DE Desk End.
This Desk End fits PD51 Series main components only.
Parts are reversible for left or right-hand applications.
Note: If you cannot understand these instructions or are concerned about safety of the
installation contact a qualified contractor or contact AVFI at 1-877-834-3876
288 Don Hillock Drive |Aurora |Ontario|L4G 0G9 | 1.877.834.3876
Supplied Hardware
5104DE assembled for
Left-hand application
1/4”x3/4” Bolt (18)5/8” Screw (36)Caster with brake Cover cap (2)Caster without brake Corner brace (9)
Supplied Parts
Top Skirt
Page 1 of 3
www.video-furn.com
Tools required
7/6” (11mm) Wrench or SocketPhillips screwdriver 5/16” (8mm) drill bitPower Drill
1
End
Support
5104DE assembled for
Right-hand application
End Support assembly
for Left-hand application:
(4)
(4)
Caster
with brake
Caster
without brake End Support assembly
for Right-hand application:
(2)
(2)
Once it’s determined on which side of the main component the 5104DE will be installed on, install hardware to the End Support panel
as shown below for Left-hand or Right-hand application.
Do Not overtighten the bolts, all parts will be reinforced with screws at the end of assembly.
Push casters into stem
until you hear a ‘click’.

Assembly Instructions
www.video-furn.com 288 Don Hillock Drive |Aurora |Ontario|L4G 0G9 | 1.877.834.3876
2Locate the four required 2.5mm pilot holes covered by thermowrap film shown below. These holes are available on both sides of the
PD51 Series main components, PD51, PD5107, PD5103, RK5105 & RK5106 (Installation with RK5105 is used as an example).
Page 2 of 3
3After drilling, install corner braces with bolts needed to attach the Skirt and Top panels as shown below.
Do Not overtighten the bolts, all parts will be reinforced with screws at the end of assembly.
5104DE Desk End for PD51 Series
Do not drill more than 1/8” (3mm) deep to avoid damaging the T-nut.
Drill using a 5/16” (8mm) bit
just far enough to allow the
1/4” bolt go through and
catch the T-nut.
T-nut
2.5mm
hole
Installation for
Left-hand application:
Installation for
Right-hand application:
(4)
(4)
Installation for Left-hand application: Installation for Right-hand application:

Top
Left-hand
End Support
(7)
Top
Right-hand
End Support
(7)
Assembly Instructions
www.video-furn.com 288 Don Hillock Drive |Aurora |Ontario|L4G 0G9 | 1.877.834.3876
Page 3 of 3
5104TP Bridge Top for PD51 Series
Assembly and installation
completed, enjoy!
(1)
Installation for Left-hand application: Installation for Right-hand application:
4Attach Skirt panel to the side of the component and install a corner brace that will attach the Top panel as shown below.
Do Not overtighten the bolts, all parts will be reinforced with screws at the end of assembly.
Two people are required to complete the installation.
(3)
3Complete installation by attaching the End support and Top panels with bolts as shown below.
Two people are required to complete the installation.
Installation for Left-hand application: Installation for Right-hand application:
Skirt
(36)
Once all parts are in place and bolts are tightened,
drive in the 5/8” screws provided to all corner braces to reinforce.
/