Page is loading ...

VF
I
Assembly Instructions
BKT-CT10 Enclosure
Thank you for purchasing AVFI’s BKT-CT10 enclosure.
This product is designed to have many mounting configurations.
Confirm all hardware is included before you begin assembly.
Read these instructions start to finish before beginning installation.
Note: If you cannot understand these instructions or are concerned about safety
of the installation contact a qualified contractor or contact AVFI at 1-877-834-3876.
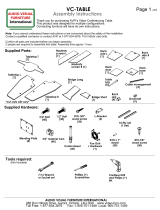
Supplied Parts Supplied Hardware (Installed on bracket)
1
www.video-furn.com 288 Don Hillock Drive |Aurora |Ontario|L4G 0G9 | 1.877.834.3876
8-32 Nut
(4)
1/4-20” Bolt
(1)
1Remove face panel by removing nuts behind
it. 8-32 nuts x4
BKT-CT10

VF
I
Assembly Instructions
www.video-furn.com 288 Don Hillock Drive |Aurora |Ontario|L4G 0G9 | 1.877.834.3876
2
BKT-CT10 Enclosure
Choose from many mounting methods. ( Hardware not included)
2
Wall mount to stud.
Attach to wall using appropriate hardware
VESA mount. 100x100mm
M4 x12mm Monitor screws
Attach to Vesa monitor bracket or mount.
Tripod mount. 1/4-20 Bolt
Attach to tripod ,tabletop or Shelf
Cart/Stand mount.
8mm Machine screws w nuts.
Attach to front of Rolling stand.
Foam not shown for visibility.

VF
I
Assembly Instructions
www.video-furn.com 288 Don Hillock Drive |Aurora |Ontario|L4G 0G9 | 1.877.834.3876
3
BKT-CT10 Enclosure
3Once box is mounted , Run cables.
Insert Cisco touch 10.
reinstall 8-32 nuts x4.
Finished unit.
/