Page is loading ...

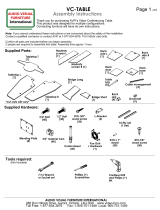
Assembly and Setup Instructions
version 0.0
Note:
If you cannot understand these instructions or are concerned about safety of the installation
Contact a qualified contractor or contact AVFI at 1-877-834-3876.
Confirm all hardware is included before you begin assembly.
Not all hardware supplied will be used depending on the manufacturer of your display/s.
Page 1
of 6
AUDIO VIDEO FURNITURE INTERNATIONAL
288 Don Hillock Drive Aurora , Ontario L4G 0G9 www.video-furn.com
Toll Free: 1-877-834-3876 Fax: 1-905-751-1488 Local:905-751-1459
T526 Collaboration
Table
TWO (2) PEOPLE ARE REQUIRED TO UNPACK AND ASSEMBLY THIS PRODUCT

#2 Phillips (+)
Screwdriver
7/16 and 13mm
Wrench or Socket
Panel Bolt
1.5"
(6)
Cam Pin
(16)
Cam
Stickers
(20)
8-30mm
Wooden dowel
(6)
Base 1
(1)
Base 2
(1)
T526-Top
(1)
Island Large
*cut outs not shown*
(1)
Back
assembly
(1)
PM2 MOUNT S/D/XL
(1)
*SINGLE SHOWN*
1.00" Mat
Cam
(8)
Page 2
of 6
SUPPLIED PARTS
SUPPLIED HARDWARE
REQUIRED TOOLS (not included)
Cordless drill
w/ #2 Phillips (+)
bit
.75" Mat
Cam
(12)
TV32-52 / TV52 - 70
Hardware bag
(1)
TP-1000
Hardware bag
(1)

8
.75"
12
4
1"
8
4
x4
16
In order to
TIGHTEN
the cams, turn the
screwdriver and the cam
CLOCKWISE
In order to
LOOSEN
the cams, turn the
screwdriver and the cam
COUNTER CLOCKWISE
The T526 Series table will require you to use this
type of operation throughout the assembly
process
Page 3
of 6
Direction of
pieces
Required to go under the
table
43
1
2

x20
16 6
5
6
Page 4
of 6

Optional Spacer mounting
Spacer is used when the back of TV is
not flat or the mount holes are sunk into
the back of the TV. (Rarely used)
M8 X 40
M6 X 40
Spacer
TV Bracket
Multi
M8 x 20
Multi
Washer
M6 x 25
OR
M5 x 25
Page 5
of 6
AUDIO VIDEO FURNITURE INTERNATIONAL
288 Don Hillock Drive Aurora , Ontario L4G 0G9 www.video-furn.com
Toll Free: 1-877-834-3876 Fax: 1-905-751-1488 Local:905-751-1459
TV
Hardware Bag
Attaching TV Brackets
1. Place TV face down on blanket or non abrasive surface such as cardboard.
2. Check to see if your TV came with mounting hardware or not.
If not,we have supplied the most common hardware.
Most displays under 42" will use the M6 bolt. Most 42"+ will use the M8 bolts.
See which bolt length you need by hand tightening only.
3. Place TV brackets so you can see the TV mounting holes through the bracket
and insert bolt through a multi washer.
4. Hand tighten until there is resistance, then give a half turn with hex key.
DO NOT OVER TIGHTEN AS THIS CAN DAMAGE OR PUNCTURE THE TV
Notes
.
Have 2 people lift the TV as it can be very heavy and awkward.
•
Some TV's require non standard hardware. This bracket was made to
•
accommodate up to M10 bolts which can be found at your local hardware
store along with longer versions of the included hardware.

4
6
4x M8
2
x4
2x 5/16
USE TP-1000
HARDWARE BAG
PLACE IN HIGHEST
POSITION AND ADJUST
AFTER TV HAS BEEN INSTALLED
7
8
Page 6
of 6
DONE !
/