K60 and KT60 OWNER'S MANUAL
4209-37 04/27/17 Page 1 Technical support: 1-951-1120 1-800-363-0251 [email protected]
K60 & KT60 STEAM BATH CONTROLS
FOR USE WITH AMEREC
AK STEAM GENERATORS
SAVE THIS MANUAL
FOR THE SAFETY OF YOU AND YOUR FAMILY PLEASE READ THE WARNINGS TO
THE RIGHT AND ALL INSTRUCTIONS BEFORE USING YOUR STEAMBATH.
POST "WARNING" LABEL OUTSIDE STEAMBATH FOR SAFETY WARNINGS. RE-
QUIRED POSTING ON DOOR OF STEAM ROOM OR ADJACENT TO DOOR FOR ALL
COMMERCIAL INSTALLATIONS.
Thank you for purchasing your new AMEREC steam generator. If we can be of any assistance do not hesitate
to call our Service Department at 1-800-363-0251 or 1-425-951-1120.
The K60 and KT60 controls provide automatic temperature control with AK steam generators.
These controls allow the user to set steam bath time and to adjust the bath operating temperature.
Note: For a temperature controlled steam bath, the AK generator requires either a KT60 with built
in temperature sensor or a K60 with separate temperature sensor. Another K60 may be added to
allow two controls for a steam bath, such as one inside the room and one outside, but if a KT60 is
installed it must be inside the steam room. A maximum of two controls may be installed.
1. Ensure that both the power circuit and water supply to the generator are ON.
2. To activate the steam, press the K60 (or KT60) control's On/Off switch. In 10 to 20 minutes
the room should be comfortable enough to begin taking a steam bath. The unit will turn off
automatically in 30 minutes. Note: other bath times and temperature may be set by the user.
3. Remove clothing and jewelry.
4. Enter the steam room and close the door to prevent steam from escaping.
5. Relax and enjoy the warm steam releasing tense muscles and refreshing the entire body. The
average time spent taking a steam bath is approximately 10 minutes
6. Pressing the control's on/off switch while the steam generator is operating will shut it off.
7. If your steam room has a shower, a pleasant experience can be achieved by taking a warm
shower while in the steam. You will fi nd the contrast from water to steam quite invigorating.
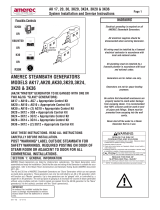
SECTION 1: USING THE K60/KT60 WITH An AMEREC GENERATOR
AK STEAM GENERATOR
K60 and KT60
WARNING
Electrical grounding is required
on all Steam Generators.
All electrical supplies should be
disconnected when servicing a
Steam Generator.
All wiring must be installed by a
licensed electrical contractor in
accordance with local and
national codes.
All plumbing must be installed
by a licensed plumber in
accordance with all applicable
local and national codes.
Steamers are for indoor use only.
Steamers are not for
space-heating purposes.
Be certain that steam bath
enclosures are properly sealed
to avoid water damage from
escaping steam. It is
recommended that 100%
silicone caulk be used to seal
all pipes and fi ttings. Steam
must be prevented from
escaping into the wall cavity.
Never shut off the water to an
appliance that is in use.
Electric Shock Hazard
High Voltage exists within this equipment.
There are no user serviceable parts
in this equipment.
REDUCE THE RISK OF
1. Exit immediately if uncomfortable, dizzy or sleepy. Staying too long in
a heated area is capable of causing overheating.
REDUCE THE RISK OF
Use care when entering or exiting the steam room, floor may be slippery.
NOTE: For additional safety instructions, see owner's manual.
CAUTION!
Do not contact steam head. Stay at least 12" away
from hot steam escaping from the steam outlet.
OVERHEATING AND SCALDING
2. Supervise children at all times.
3. Check with a doctor before use if pregnant, diabetic, in poor health or
under medical care.
4. Breathing heated air in conjunction with consumption of alcohol, drugs
or medication is capable of causing unconsciousness.
SLIPPING AND FALL INJURY
WARNING
4110-79
05-21-07
113°

K60 and KT60 OWNER'S MANUAL
4209-37 04/27/17
Page 2
Technical support: 1-951-1120 1-800-363-0251 [email protected]
IMPORTANT SAFETY INSTRUCTIONS
1. READ AND FOLLOW ALL INSTRUCTIONS.
2. WARNING - To reduce the risk of injury, do not permit children to use this product unless they
are closely supervised at all times.
3. WARNING - To reduce the risk of injury:
a. The wet surfaces of steam enclosures may be slippery. Use care when entering or leaving.
b. The steam head is hot. Do not touch the steam head and avoid the steam near the steam head.
c. Prolonged use of the steam system can raise excessively the internal human body temperature
and impair the body’s ability to regulate its internal temperature (hyperthermia). Limit your use
of steam to 10 - 15 minutes until you are certain of your body’s reaction.
d. Excessive temperatures have a high potential for causing fetal damage during the early months
of pregnancy. Pregnant or possibly pregnant women should consult a physician regarding correct
exposure.
e. Obese persons and persons with a history of heart disease, low or high blood pressure, circulatory
system problems, or diabetes should consult a physician before using a steambath.
f. Persons using medication should consult a physician before using a steambath since some medi-
cation may induce drowsiness while other medications may aff ect heart rate, blood pressure and
circulation.
4. WARNING - Hyperthermia occurs when the internal temperature of the body reaches a level several
degrees above the normal body temperature of 98.6 °F (37°C). The symptoms of hyperthermia include
an increase in the internal temperature of the body, dizziness, lethargy, drowsiness and fainting. The
eff ect of hyperthermia include:
a. Failure to perceive heat:
b. Failure to recognize the need to exit the steambath:
c. Unawareness of impending risk:
d. Fetal damage in pregnant women:
e. Physical inability to exit the steambath: and
f. Unconsciousness.
WARNING - The use of alcohol, drugs or medication can greatly increase the risk of hyperthermia.
SAVE THESE INSTRUCTIONS

K60 and KT60 OWNER'S MANUAL
4209-37 04/27/17
Page 3
Technical support: 1-951-1120 1-800-363-0251 [email protected]
SECTION 2: OVERVIEW
SECTION 3: SETTING BATH TIME AND TEMPERATURE
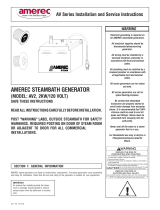
The K60 and KT60 steam generator controls feature adjustable bath time and temperature controls with a
digital display. The actual room temperature and time remaining are alternately displayed every 5 seconds.
The display also indicates error codes, if needed.
• The temperature can be adjusted from 100 to 125 °F (38 to 52°C) with an initial default of 120 °F (49°C).
The temperature display preference may be set using a jumper on the steamer circuit board to select either
°F (default) or °C.
• The maximum bath time may set to 60 minutes (default) or 24 hours (for light commercial use) using a
jumper on the steamer circuit board.
If a KT60 is installed: The KT60 control must be mounted inside the steam room, approximately 4 feet up
from the fl oor, as it contains the temperature sensor. A K60 control may be installed outside the steam room
as a second control. Either control my be used to control the steam bath. The KT60 can be identifi ed by a
small black "bump" in the keypad area, above the right side of the TIME switch pad.; this is the temperature sensor.
If a K60 is installed without a KT60: The K60 control may be mounted inside or outside the steam room, approximately 4 feet up from the fl oor. A second K60
control may be installed so one is inside and the other outside the steam room. Either control my be used to control the steam bath. Note: when a K60 controls
the steam bath without a KT60 installed, a separate temperature sensor must be installed in the steam room.
During a steam bath: The ''sequential steam'' feature automatically changes heating levels depending on how close the room temperature is to the set point.
When very close to the set point, heating is cut back to about 1/3 full power so the temperature remains more constant during use. If the temperature drops a few
degrees, the heating goes up to about 60% of full power and if the temperature drops more full power is applied until the room heats enough to start reducing
power again.
The K60 and KT60 controls operate identically.
Bath Time: The default bath time is 30 minutes, adjustable from 5 to 60 minutes in 5 minute increments. A jumper on the steamer board may be set for a bath time
settable up to 24 hours max. in 1 hour increments. To check the time setting, turn on the steam bath then press the TIME switch. The set time will immediately be
displayed. Continue holding the switch for 5 seconds and the setting will begin to change. Continue pressing the switch and the TIME setting will step up until the
highest set point is reached then step down to the lowest, then step up again. Release the TIME switch once the desired setting is reached. Whenever the TIME
switch is pressed for more than 5 seconds, it will change to set mode and start to increase.
Bath Temperature: The default bath temperature is 120°F (49 °C), adjustable from 100 to 125 °F (38 to 52°C), adjustable in 1° increments. A jumper on the steamer
board may be set to provide either a °F (default) or °C temperature display. To check the temperature setting, turn on the steam bath then press the TEMP switch.
The set temperature will immediately be displayed. Continue holding the switch for 5 seconds and the setting will begin to change. Continue pressing the switch
and the TEMP setting will step up until the highest set point is reached then step down to the lowest, then step up again. Release the TEMP switch once the desired
setting is reached. Whenever the TEMP switch is pressed for more than 5 seconds, it will change to set mode and start to increase.
Settings will be kept until manually changed or until power is lost to the steam generator. If power is lost, the setting will return to factory defaults but the
60 min/24 hr and °F/°C choices will not change unless the shunts are moved.
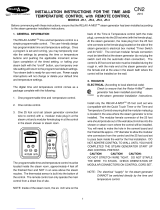
The shunts for new model AKs (built since March, 2017) are shown in Figure 2A, below. This model has the steamer circuit board mounted on the back of the steamer.
The shunts for older model AKs (built before March, 2017) are shown in Figure 2B, below. This model has the steamer circuit board mounted on the steamer shelf.
113°
TIME
TEMP
ON/OFF
FIGURE 1
FIGURE 2A
PLACE ON BOTH PINS FOR
PLACE ON ONE PIN FOR
BATH TIME
DISPLAY
60 MIN
24 HR
°C
°F
FIGURE 2B
24HR
EXT
˚C
60m
NORM
˚F
/
/
/
W-D COM
DRAINWATER
SVC
S30B
J4
S30A
S60 A S60 B
123
H
R
L
G1 G2
AK IN
60m/24HR
NORM/EXT
°F/°C
AK IN

K60 and KT60 OWNER'S MANUAL
4209-37 04/27/17
Page 4
Technical support: 1-951-1120 1-800-363-0251 [email protected]
1. TEMPERATURE SENSOR CABLE ROUGH-IN Required if using only a K60 (KT60 not installed) The low voltage temperature sensor must be mounted in
the steam room if a KT60 will not be used. Do not mount directly over the steam dispersion head or near the door. The sensor should be located in a wall 6” (150
mm) below the ceiling but no more than 7ft (2,1 m) above the fl oor. String the sensor cable from the sensor location through 1/2:” (12 mm) holes in the wall studs
or ceiling joists to the generator location. Drill a clean 7/8: (22 mm) hole through the steam room wall at the sensor location. Leave 12” (305 mm) of slack at the
sensor location. See Figure 3.
Note: Do not staple through or damage cable. Use factory supplied cables only.
INSTALL THE TEMPERATURE SENSOR ASSEMBLY inside the steam room. A 7/8” (22 mm) hole
should already be in the steam room wall with the cable ready.
a) Carefully connect the sensor cable to the sensor. The cable end should slide into place and lock.
b) Run a light bead of silicone around the back surface of the sensor and slide it into the wall with the
metal sensor tube pointed down. Tape the sensor to the wall until the silicone has set-up.
c) Connect the steam generator end of the cable to the sensor jack on the steamer’s circuit board. See Figure 4 for the sensor jack location.
2. K60 or KT60 ROUGH-IN The low voltage K60 and KT60 controls can be mounted up to 25ft (7,6 m) from the generator. The K60 controls may be mounted
either inside or outside the steam room. The KT60 must be mounted inside the steam room so its built in temperature sensor will function.
Use a 2” (50 mm) hole saw to drill a hole in the fi nished wall where the control is to be mounted. String the 25ft (7,6 m) cable from the control location through ½”
(13mm) holes in the wall studs or ceiling joists to the generator. Optional for tile rooms: a rough-in box may be installed at the desired control mounting location.
Instructions and a mounting plate with the proper diameter mounting hole are included with the control kit. Tile up to the hole in mounting plate as indicated in
Figure 5.
Note: Do not staple through or damage cable. Use factory supplied cables only.
INSTALL K60 or KT60 CONTROL The low voltage K60 control can be mounted directly to a fi nished wall either inside or outside the steam room. The low volt-
age KT60 control must be mounted inside the steam room. See step 2 above. The control cable should already be roughed-in to this location.
a) With the decorative cover removed from the control switch assembly, insert the two control mounting screws through the control housing (you may need to
punch through skinned holes) and screw a few turns into the mounting bracket. Locate the control cable and plug it into the back of the control housing. See
Figure 5. Optionally, you may use silicone to mount the control.
b) Run a bead of 100% silicon caulk in-between the 2 ridges around the perimeter on the back of the control housing. See Figure 5.
c) If a bracket is not being used, insert the control in the wall hole, level it and tape in place until the silicone sets up. Go to step e.
If a bracket is being used, insert the mounting bracket into the wall cavity by fi rst pushing with the control housing and then with a hard fl at surface on the
control housing mounting screws which extend out through the control face. See Figure 5
If the mounting bracket is being used or if the screw holes are open, add a small amount of silicone to the screw holes to ensure they are sealed water tight.
d) Once the mounting bracket has been inserted into the fi nished wall, center the control and tighten the mounting screws to draw the control housing securely
against the fi nished wall. Do not over tighten the mounting screws. Add a little silicone over the screw heads to seal the screw holes.
e) Install the decorative cover plate by sliding the top of the cover plate over the tab on the top of the control housing and pushing on the bottom of the cover plate
to complete the snap fi t. See Figure 5.
f) Route the generator end of the control cable through a knockout in the end of the generator using the strain relief provided. Plug the control cable into the S60A
or S60B connector on the steamer’s circuit board. See Figure 4.
Note: for steam bath temperature control, a K60 and a wall mounted sensor or a KT60 (with built in sensor) must be installed. Only one KT60 may be
installed. You may combine two K60s or a K60 with a KT60.
OPTIONAL SECONDARY CONTROL : As an option, a second K60 control may be installed with a K60 or KT60 to provide controls both inside and outside the
steam room. The second control should be installed as described in above, with the second K60 control cable plugged into the second S60 connector.
SECTION 4: INSTALLATION
FIGURE 3
WALL
SEAL BACK WITH
SILICONE
TIP MUST
POINT DOWN
SENSOR
CABLE
7/8" (22 MM)
HOLE

K60 and KT60 OWNER'S MANUAL
4209-37 04/27/17
Page 5
Technical support: 1-951-1120 1-800-363-0251 [email protected]
SECTION 5: MAINTENANCE OF YOUR AK STEAM GENERATOR
The steam generator, steam head, fi ttings and plumbing connections should be inspected regularly for water leaks and damage. The AK steam generator is supplied
with a manual drain valve for fl ushing sediments from the generator tank; an optional automatic electronic drain is available as an option. The autodrain option drains
and rinses the bath after each us. If only a manual drain is available, the steam generator should be manually drained periodically following the Flushing Procedure
shown here. This procedure should be scheduled monthly or more often depending on local water conditions and steam bath usage.
Flushing Procedure: The generator should be cool before starting.
1. Use the control to start a bath. Immediately go to the generator and open the manual drain (open is with the handle in line with the drain pipe, closed has the
handle pointing straight out over the side of the pipe).
2. Allow the tank to drain for a couple minutes then close the drain and allow the tank to fi ll for about 1 minute.
3. Open the drain again and allow the water to run with the drain open for a full 10 minutes with the bath turned on.
4. Use the control to turn the bath off then go to the generator. When the water stops fl owing out the drain, close the manual drain valve.
W-D COM
DRAINWATER
SVC
S30B
J4
S30A
S60 A S60 B
123
H
R
L
G1 G2
AK IN
W-D COM
DRAINWATER
SVC
S30B
J4
S30A
S60 A S60 B
123
H
R
L
G1 G2
AK IN
W-D COM
DRAINWATER
SVC
S30B
J4
S30A
S60 A S60 B
123
H
R
L
G1 G2
AK IN
FIGURE 4
K60 ONLY
KT60 ONLY
K60 + KT60
NEW STYLE AK OLD STYLE AK
FIGURE 5
WALL
HOUSING
SILICONE
COVER
PLATE

K60 and KT60 OWNER'S MANUAL
4209-37 04/27/17
Page 6
Technical support: 1-951-1120 1-800-363-0251 [email protected]
SECTION 6: TROUBLE SHOOTING GUIDE
The troubleshooting guide is meant as a general aid only. There are no user serviceable parts in the generator. All repairs should be performed by a qualifi ed service
person. For additional assistance or the factory authorized service person nearest you call: AMEREC's Service Department at 1-800-363-0251.
SYMPTOMS PROBABLE CAUSES ACTION TO BE TAKEN
Control won't turn ON
(Display is Off)
Improper or no power supplied
or
Control improperly connected
or
Control cable faulty
or
Control is faulty
1. a. Make sure circuit breaker for generator is on
b. Use a voltmeter to check the voltage across the two fuses on
the Printed Circuit Assembly (PCA) in the generator.
c. Check fuses; if a fuse is blown, replace. If the fuse blows again,
contact Support.
2. Check that controls are installed per installation instructions.
3. Replace control cable. Contact support.
4. Replace control. Contact support.
Control OFF
(Unit still makes steam)
Generator faulty Turn off the circuit breaker then contact Support.
Water runs out of steamhead Generator Faulty 1. Turn off the breaker
2. Turn off the water supply
3. Contact Support.
Steam room too hot or cold Temperature setting needs changing 1. See section 3: Setting Time and Temp
2. Contact Support
Control ON, Displays >>>° Steambath temperature
over 132°F (55°C)
or
Sensor faulty
1. If the bath is too hot, turn off the circuit breaker and contact Support
2. Treat as E002
Control won't turn OFF
(Display is ON)
Control faulty Replace the control. Contact Support
Control ON (Display ON)
(Time & Temp display properly)
Unit Won't steam
Unit has not fi lled completely
or
Generator is faulty
1. Wait at least 10 minutes after turning on the control
2. Contact Support
Unable to adjust TIME or TEMP Control faulty
or
Generator faulty
1. Replace control. Contact Support
2. Replace generator's PCA. Contact Support
Sudden increases in rate water
sputters out of steam head
Contaminants in the water
supply causing foaming
Flush tank at least 3 time - refer to Section 5: Maintenance
Control displays E001 Steam room temperature error code Open sensor or sensor cable. Contact Support
Control displays E002 Steam room temperature error code Shorted sensor or sensor cable. Contact Support
Control displays E055 Steam room temperature error code Room too hot. Contact Support
Control displays E007 Warm Start temperature error code Open temperature sensor (Warm Start option). Contact Support
Control displays E008 Warm Start temperature error code Shorted temperature sensor (Warm Start option). Contact Support
Control displays E044 Warm Start temperature error code Possible burnt/failed heating element (Warm Start option). Contact Support
17683 128th Place NE, Bldg C
Woodinville, WA 98071 USA
Phone 1-425-951-1120
1-800-363-0251
email [email protected]
/