Page is loading ...

Electric Shock Hazard
High voltage exists within this equipment.
There are no user serviceable parts in this
equipment. All installation and service to
this equipment should be performed by
qualifi ed licensed personnel.
Do not exceed 30 minutes in a steam
bath. Excessive exposure can be harmful
to your health. Excessive exposure can
produce a rapid pulse, light-headedness,
weakness or fainting. If you become
uncomfortable or experience any of the
above conditions exit the steam bath
immediately.
Steam baths can put stress on the body.
Therefore a steam bath should be used
only under a doctor's direction if you:
Are pregnant
Have a heart condition
Have high blood pressure
Have circulatory problems
Are under the infl uence of alcohol
Are under the infl uence of drugs
Have diabetes
Are under the care of a physician
Are in generally poor health
Children should use the steam bath only
under close adult supervision.
Scald Hazard: Do Not Touch the steam
head or trim during operation as they are
HOT. Stay at least 12 inches (305 mm)
away from the hot steam escaping from
the steam head.
Be careful when entering a steam bath.
Escaping steam from an overheated
steam room may cause injury.
AMEREC STEAMBATH GENERATORS
(AK and 3K Series Warm Start Option)
TO BE USED WITH KT60, K60 OR K30 CONTROLS
FOR WARM START WITH K200i CONTROL SEE DOCUMENT #4209-51
CAUTION: THIS OPTION KEEPS WATER IN THE STEAM
TANK JUST BELOW THE BOILING POINT FOR AS LONG
AS THE CONTROL IS LEFT "ON". IF YOU ARE PLANNING
NOT TO USE YOUR STEAM GENERATOR OR TO LEAVE
YOUR HOME FOR AN EXTENDED PERIOD OF TIME IT IS
RECOMMENDED THAT THE WARM START CONTROL BE
TURNED OFF.
FOR THE SAFETY OF YOU AND YOUR FAMILY PLEASE
READ THE WARNINGS TO THE RIGHT AND ALL INSTRUC-
TIONS BEFORE USING YOUR STEAMBATH.
POST "STEAMBATH INSTRUCTIONS" LABEL OUTSIDE
STEAMBATH FOR SAFETY WARNINGS.
SAVE THIS MANUAL
Thank you for purchasing your new Amerec steam generator. If we can be of any
assistance do not hesitate to call Steam Technical Support at 1-800-363-0251.
WARNING
4209-36 08-03-12
AK Series Warm Start Option Installation & Owners Manual
WARM START
ON/OFF

4209-36 05/01/14
AK Series Warm Start Option Installation & Owners Manual
page 2
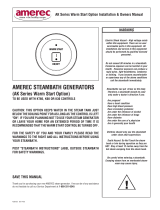
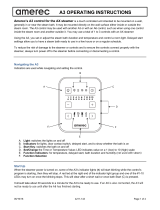
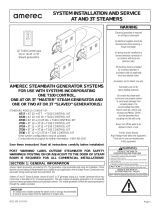
DIAGRAM 4
DIAGRAM 1
DIAGRAM 2
DIAGRAM 3
THIS LOW VOLTAGE CONTROL CAN BE LOCATED
INSIDE OR OUTSIDE THE STEAM ENCLOSURE
WARM START
ON/OFF
WARM START
ON/OFF
1-3/4" DIAMETER HOLE
IN FINISHED WALL
APPLY SEALANT
(100% SILICONE CAULK)
BUSHING B
HOLE A
18 TO 22 AWG WIRE (SOLID REQUIRED)
RATED 300V 75°C FROM GENERATOR TO
CONTROL. STRIP LENGTH = 1/4" (6mm)
PRESS ON
ORANGE TAB
INSERT WIRE
WARM START
CONTROL
1
2
3
LOW VOLTAGE CONTROL WIRE (25' (7,6M)) IS PROVIDED FOR 5 VOLT DC SWITCH CONNECTION
TO THE STEAM GENERATOR. NO ADDITIONAL ELECTRICAL SUPPLY OR WIRING REQUIRED.
1 WHITE
2 RED
3 BLACK
BLACK
RED
WHITE
(A) CIRCUIT BOARD WITH JACK J9
(B) CIRCUIT BOARD (WITHOUT JACK J9)
REAR VIEW
SW LOW HI
TANK
JP3
WS
12
3
TB1
JP3
JP3
REAR VIEW
PLACE JUMPER ON LEFT TWO
PINS FOR USE AT ALTITUDES
ABOVE 2500 FEET (760m)
PLACE JUMPER ON RIGHT TWO
PINS FOR USE AT ALTITUDES
BELOW
2500 FEET (760m)
PLACE JUMPER ON LEFT TWO
PINS FOR USE AT ALTITUDES
ABOVE 2500 FEET (760m)
PLACE JUMPER ON RIGHT TWO
PINS FOR USE AT ALTITUDES
BELOW
2500 FEET (760m)

4209-36 05/01/14
AK Series Warm Start Option Installation & Owners Manual
page 3
SECTION 1: INSTALLATION
SECTION 2: OPERATION
SECTION 3: TEMPERATURE SETTING ADJUSTMENT
1. Assure that both the power circuit and water supply to the generator are on.
2. To activate "Warm Start" press the Warm Start control "ON" and the LED should light up. As long as the led is lit the water in the steam generator
tank will remain heated to just below the boiling point.
3. To turn the "Warm Start" off press the Warm Start control a second time and the LED on the control should now turn off.
1. Two temperature settings for the water temperature are available, selected using a jumper on a 3 pin header (see diagram 4). In the low position,
the water is heated to about 180°F (82°C), which should provide preheat without boiling the water in installations up to 2500 feet (760 m) above
sea level. In the high position, the water is held at about 170°F (77°C) which should perform well 5000 feet (1500 m). These temperatures should
prevent the generator from creating steam while in Warm Start operation. The default factory setting is for low altitude.
2. As shown in diagram 4, there are two steamer control boards available.
(A) If there is a phone type jack next to the header, the jumper is placed on the center and right pins for low altitude operation.
(B) If there is no jack next to the header, the jumper is placed on the center and left pins. If higher altitude settings are required, the installer will
need to change the jumper position as needed.
SECTION 4: SERVICE
If the LED on the Warm Start Control or Digital Control is fl ashing or an "E" error code message is displayed on the Digital Control, contact Technical
Support at 1-800-363-0251 or [email protected]. The symptoms described above indicate a fault condition has occurred.
P.O. Box 2258
Woodinville WA 98072
Phone: 425-951-1120 or 1-800-363-0251
Fax: 425-951-1130
email: support @ amerec .com
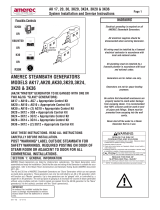
1. Control Cable Rough-In: The low voltage control can be mounted up to 75 feet (23 m) from the generator either inside or outside the steam
room. We recommend the control be located outside the steam room and in an out of the way location so it won't be confused with a steam bath
control. Warm Start is generally turned on then left alone for days or months at a time. Run the 25 feet (7,6 m) control cable (provided) from the
control location through 1/2" (12 mm) holes in the wall studs or ceiling joists to the generator.
Note: 1) Do not staple through or damage wires.
2) Label or color code wires for proper circuit board to Control connection orientation. (See diagram 3)
2. Control Cable at the Generator: To prepare the steam generator
A. Make certain that power is disconnected.
B. Remove cover.
C. Feed wire through hole A and connect to the Warm Start terminal block on the circuit board (See diagram 3). The three wires must be
connected to corresponding terminals on the Warm Start and the steamer circuit board ( 1 to 1, 2 to 2 and 3 to 3).
D. Locate strain relief bushing approximately 9" (230 mm) from stripped end of cable jacket. Snap strain relief bushing into hole A. There
must be no strain on the control cable or its wires.
E. Replace cover.
3. Install Warm Start Control: The low voltage control can be installed using a single switch wiring box with the supplied rough-in adapter plate
or mounted directly to a fi nished wall
A. Using a 1-3/4" (44 mm) hole saw, drill a hole in the fi nished wall where the control is to be mounted (the control wires should already
be roughed-in to this location).
B. Locate the control wires, pull them out through the 1-3/4" (44 mm) hole and plug the 3 wires into the connector on the back of the control,
as shown in diagram 3.
C. Run a bead of 100% silicone caulk around the perimeter on the back of the control housing. (See diagram 2). Insert the control into the
wall cavity. Tape the control to the wall while the silicone dries.
/