Page is loading ...

STP_TOUCH CONTROL (En0414)
Subject to change without notice.

INSTRUCTIONS MANUAL
TOUCH CONTROL INTERFACE
STEAM GENERATOR
FOR
STP

IMPORTANT
Factory Reset is a must after
installing steam generator for the
first time. Refer to point 3.5.13,
page 6.
Table of Contents
1. Introduction
2. Installing the Control Unit
3. OFF Mode
3.1 ON/OFF Button
3.2 Current Day & Time
3.3 Light
3.4 Hidden Button
3.5 Settings Menu
3.5.1 Day & Time
3.5.2 Kilowatt Value
3.5.3 Counters
3.5.4 Autodrain
3.5.5 Decalcifying
3.5.6 Blackout Memory
3.5.7 Temperature Scale
3.5.8 Standby Temperature Setting
3.5.9 Auto Set Light
3.5.10 Auto Set Fan
3.5.11 Software Version
3.5.12 LCD Contrast
3.5.13 Factory Reset
3.5.14 Save and Exit
3.6 Preset Time Settings
4. ON Mode
4.1 Steam ON
4.2 Day and Session Time
4.3 Temperature Setup
4.4 Optional Features
4.4.1 Aroma
4.4.2 Dimmer
4.4.3 Fan
1
2
3
3
3
3
3
4
4
4
4
5
5
5
5
5
5
6
6
6
6
6
7
8
8
8
8
9
9
9
9
5. Standby Mode
4.1 Current Day and Standby Time
4.1 Pause Button
6. Drain Mode
7. Easy Mode
7.1 Hidden Button
7.2 Steam ON
8. Steam Generator DIP Switches
8.1 Standby Time
8.2 Session Time
8.3 First Block of 8 Switches
8.4 Dip switches for Naming Slaves
8.5 Dip switches for Other Functions
9. Control Panel DIP Switches
10. Remote and Alarm Connections
10.1 Emergency Alarm
10.2 Remote ON
11. Maintenance
11.1 Decalcification
12. Troubleshooting
12.1 For Tandem Connection
12.2 Error Codes
10
10
10
10
11
11
11
12
12
12
12
12
12
13
14
14
14
15
15
16
16
16

Indicators
1. Introduction
There are five different operation modes in the unit: OFF, ON, Standby, Easy
Mode and Drain. The user can easily switch between different modes making
the steam bathing more convenient.
To use the steam room, the control unit needs to be in ON Mode. In the ON
mode, the steam generator is producing steam and temperature in the steam
room is kept in preferred set temperature with occasional discharge of steam.
However, if the steam room is not used constantly, the generator can be set to
Standby Mode. During the Standby Mode, water and steam room are kept
warm with minimal energy consumption. The generator is able to produce
steam shortly after the unit is switched back to ON mode for the user’s
convenience.
Steam ON (Animated) Light ON (Animated)
Dimmer - optional feature
Fan ON (Animated)
- optional feature
Aroma ON (Animated)
- optional feature
1
Indicators
Keylock is on.
Preset time is activated. Refer to point 3.5.14.
Heating element error icon shows if there is a problem with
the heating elements. Refer to Factory Reset point 3.5.13.
{

Run the Factory Reset after installing the steam
generator for the first time or after changing the
control panel. Refer to point 3.5.13.
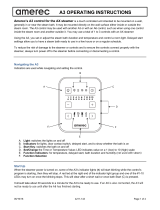
2. Installing The Control Unit
152 mm
77 mm
Check the most suitable area to place your steam generator control. The control and
the steam generator should be accessible for the user and for maintenance. Do not
install the control unit inside the steam room! The cable connecting the control
unit and the steam generator is 7.5 meters long.
Never attempt to modify or fix the steam control. Contact your licensed technician or
your nearest service center for repair.
Before installation, main power supply of the generator must be switch off from the
circuit breaker.
Mount the control unit in the wall according to the specifications given below. Follow
the illustrations.
2
Insert the metal casing
into the hole. Bend the
locks on the sides to
hold the casing still. If
not possible because of
a thick wall, screw the
casing into the wall.
Snap-in the control panel into
the metal casing to lock.
For maintenance, pull out the
control panel using a flat screw
driver or similar.
Locks
1
2
Metal
Casing
Control
Panel
(Cut)
1 3
2 4

ON
Current Day and Time Light
FanSettings Menu
3.1 ON/OFF
Button
3.3 Light Button
3. OFF Mode
Pressing shortly the ON button will switch the steam generator
ON. Temperature and session-time setting is automatically set
based on the saved settings from the previous session. To
change the settings, press the Settings Menu.
Switch OFF the display by pressing for the ON/OFF button 3
seconds. Tap the display to turn it on.
3.2 Current Day
& Time Button Day and Clock button is displayed in the OFF Mode. It shows the
current day and time.
Long press the button to jump into Pre-Set Time setup. Refer to
Pre-set time setting at point 3.6.
Toggle the light button to switch ON/OFF your steam room lights.
When your steam generator has a dimmer feature you can adjust
the brightness from 0-100%. Dimmer setting appears when you
turn on the light or long press the light button while light is on.
Hidden Button
3.4 Hidden
Button The hidden button is the gateway to Easy Mode. Long press 10
seconds to activate the Easy Mode. 3

Confirm to reset
Long press Reset button
3.5 Settings Menu and Keylock
3.5.1 Day and Time
The Settings Menu is only available in the OFF State.
Press not less than 5 seconds and release the button to enter
setup. A beeping sound will signal the change of menu status.
Here you may preset session time, temperature, fan, light,
perform steam generator maintenance and access to useful
information about your steam control system.
To lock/unlock screen, press more than 10 seconds the Settings
Menu button. Lock icon will appear on the display.
Select the day and time by pressing the day, hour
and minute button. Change values by short or
long pressing the buttons. Long pressing hour or
minute button will change numbers faster.
3.5.2 Kilowatt Value Set the correct kilowatt value of the steam
generator to the control (see kilowatt information
on your steam generator). Press the arrow up or
down to select. The default kilowatt value setting
at 7.5.
3.5.3 Counters Counters display the usage of time and kilowatt of
the steam generator. This information is very
necessary to evaluate the need of a preventive
maintenance and compute electricity
consumption.
Pressing the Reset button will reset the ON hours
and kWh counters. Previous data cannot be
retrieved after resetting the counter.
Press reset button for 10 seconds to display the
actual usage information. This usage counter
cannot be erased. It shows usage of the control
panel since the manufacturing date.
ACTUAL USAGE
4

3.5.4 Autodrain
The autodrain is set to ON by default. For manual
drain, select OFF to deactivate the function.
When autodrain is ON, it will automatically drain the
water inside the steam generator tank after use. In
case of power interruption, it will continue to drain
when detecting a high water level in the tank.
Bold outline means selected.
3.5.5 Decalcifying
Decalcifying function is very useful for maintenance.
This function requires autodrain.
Read more information on how to decalcify your
steam generator tank in page 15.
Active Blackout Memory restores control to its
previous state before power failure. For example, if
steam generator was on before power failure, the
steam generator will automatically continue from the
previous state.
You may set the temperature scale either Celsius or
Fahrenheit.
Steam room temperature will be maintained during
Standby Mode. Standby temperature can be set from
00C to 450C.
5
The light can be set as auto ON or OFF. When the
light is set to auto ON the light will switch ON when
the steam generator is in ON or Standby mode.
3.5.9 Auto Set Light
3.5.6 Blackout Memory
3.5.7 Temperature Scale
3.5.8 Standby Temperature Setting

3.5.11 Software Version
Software version has two parts, Interface Software
Version and the Controller Board Version.
3.5.12 LCD Contrast Setting
You can adjust the contrast of the display between 0
and 100.
Press the HeE RESET to remove heating element
error after checking or fixing the heating elements. If
steam generator’s kW is changed, press reset button
instead.
Pressing the RESET button will revert all settings to
factory default. This is used when there is a
malfunction on the machine or you wish to clear
previous settings. Factory reset does not reset on
hours and kWh counters.
Once everything has been set, you may press SAVE
to save all the setup or ESC if you wish to abort the
settings.
Auto fan turns on the fan once control goes to Off
Mode to dry out the steam room. Fan will remain on
for selected time. You may adjust the time from 0 - 24
hours with 15minute intervals. Auto fan is activated
only when the animated Auto button is displayed on
the screen.
01:15
6
3.5.10 Auto Set Fan
3.5.13 Factory Reset
3.5.14 Save and Exit

3.6 Preset Time Settings
This can be switched OFF/ON. A small icon appears on
the screen indicating that the Preset Time is activated.
Press ON to set preset time. When presetting time, you
can set the day and time for your steam session.
Long press to activate the Preset Settings
Preset activated
Darkened area is the active area that can be modified.
Press arrows left or right to change settings. Tap the
active area to jump into next setting. When start time
and end time are same, there is no steam session.
Maximum session time depends on the dip switch
setting on the steam generator. (See Steam Generator
DIP switches at page 12).
Three-arrow button copies settings from the day on the
left to the day on the right. Press OK when all is set.
7
Current Day and Time
Preset Time

Steam ON
Day and Session Time Light - Dimmer (Optional)
Fan (Optional)
Room Temperature
4.1 Steam ON The steam generator produces steam during ON mode. In
this mode, you will find the steam button animated,
indicating that the steam session is ongoing.
Short press the Steam ON button to switch on Standby
Mode. Long press the steam button to switch OFF. If
autodrain is present, steam generator goes to Drain Mode
and turns off after draining.
4.2 Day and Session Time The day indicates current day which can be set in the Day
and Time setup in Settings Menu.
Session time is the remaining time of using the steam room.
The session time can be set until 24hours and it counts
down.
When Day and Session button is pressed, a setup screen
will appear. Use arrows up and down to change the session
time and hit OK when values are set.
Maximum length of the session time can be set on the DIP
switches. (See Steam Generator DIP switches on page 12).
4.3 Temperature Setup The temperature button indicates either the actual or target
steam room temperature (refer to Control Panel DIP
switches page13). Press the up and down arrow keys to
change the temperature settings inside the steam room.
8
4. ON Mode
Aroma
(Optional)

4.4.1 Aroma This icon appears when aroma feature is present and only in the
On Mode.
Short press this animated button to switch on or off the aroma
pump. Long press the button to adjust the settings.
Aroma can be set from 0-20. Hold-press set to 20 for a full aroma
pump, otherwise when released, it goes down to 19. This
function operates only in ON mode.
In case if aroma setting is switched off or the Session Time
expires, on the next steam session, previous settings apply.
Check your steam generator if these features are included.
4.4.2 Dimmer
When your steam generator has a dimmer feature you can
adjust the light brightness from 0-100%. Dimmer setting appears
when you turn on the light or long press the light button while
light is on.
4.4.3 Fan
Short press the fan button to turn fan on or off. Animated button
means fan is switched on.
Auto fan turns on the fan once control goes to Off Mode. Fan will
remain on for selected time. Refer to Autofan settings point
3.5.10.
4.4 Optional Features
9

5.1 Current Day and
Standby Time This button displays the remaining standby time. You can
change the standby time by pressing it. Use the up and down
arrows to change settings.
The maximum standby time is set by dip switches in the steam
generator. Refer to page 12.
Short press the pause button to switch to On Mode.
Long press it to switch to Off Mode. If autodrain is present, long
press pause button to switch to Drain Mode.
6. Drain Mode
Standby Mode is activated when Steam ON button is pressed or Session Time
has expired. Optional features such as Dimmer and Fan can be set at this state.
In the Standby Mode, steam room temperature will be maintained at a certain level
(refer to standby temperature setting 3.5.8.) Also water inside steam generator will
be kept hot to give user fast steam when starting steam session.
The autodrain feature automatically drains the water
after every use. The tank is flushed and will remain
empty until the steam generator is used again.
After the Standby Time expires, control unit
automatically switch to Autodrain mode. During the
drain cycle, the steam generator’s tank is filled with
cold water so that the valve can be opened safely.
The draining process will take about 10 minutes. You
can press the OK button to cancel the draining.
Only applicable when
autodrain is enabled by the
Steam Generator DIP
switches (refer to page 12)
and in the Settings Menu
(refer 3.5.4).
10
5.2 Pause Button
Pause
Current Day and Standby Time Light
5. Standby Mode

11
Press the hidden button for 10 seconds to switch to Off Mode.
Hidden button is active in Off and in Easy Mode.
Animated Steam ON button indicates that steam generation is
ongoing. Short pressing this button will switch off the steam
generator.
If autodrain is on, long press of the Steam ON button activates the
Drain Mode. If autodrain is not present, long press of the Steam
On button will switch off the steam generator.
See how to switch OFF Mode to Easy Mode. Refer to page 3.
The Easy mode is a simplified ON State version. It
displays the basic important functions of steam
operation such as; Session Time, Temperature and
Lights.
Press the session time, temperature and lights buttons
to change their settings.
7. Easy Mode
7.1 Hidden
Button
7.2 Steam ON
ON
Light
Hidden Button

12
8. Steam Generator DIP Switches
8.1 Standby time
Standby
Duration
Mode Switch
6Switch
7Switch
8
4h 0 0
6h 0 0
12h 0 1
18h 0 1
0
1
0
1
Unlimited 1 0 0
4h 1 0 1
4h 1 1 0
4h 1 1 1
Slave
No. Switch
1Switch
2
100
201
310
411
8.5 Dip switches for Other Functions
8.4 Dip switches for Naming Slaves
8.2 Session Time
Session
Time Switch
2Switch
3Switch
4
10min 0 0
15min 0 0
20min 0 0
30min 0 0
0
0
1
1
45min 0 1 0
1h 0 1 0
2h 0 1 1
4h 0 1 1
Switch
5
0
1
0
1
0
1
0
1
6h 1 0 0 0
8h 1 0 0 1
12h 1 0 1 0
18h 1 0 1 1
Unlimited 1 1 0 0
10min 1 1 0 1
10min 1 1 1 0
10min 1 1 1 1
Dipswitch
No.: Function On Off
8Cabin Light
7
6
5
4
3
2
1
30-55°C
Dimmer option
enabled Dimmer option
disabled
Present
Present
Connected
Yes 30-50°C
Not Present
Not Present
Not Connected
No
Fan
Scent Pump
Auto Drain
Temperature range
Slave Unit
Slave Number
Slave Number
Standby time can be set according to
user preferences by setting dip
switches on the power controller board
Session time can be set according to user
preferences by session dip switches on the
power controller board.
DIMMER
FAN
SCENT PUMP
DRAIN
TEMP
SLAVE
STANDBY
SESSION
1=
=
ON
OFF 0
STAND-BY ON/OFF
FIRST BLOCK SECOND BLOCK
8.3 First Block of 8 Switches
DIP No. Function
8 Standby mode duration
7
6
5
4
3
2
1
Standby mode duration
Standby mode duration
Maximum session time
Maximum session time
Maximum session time
Maximum session time
Disable standby mode
/ Enable standby mode
(See Steam Generator model)
230V 1N~
3,0 kW
KATSO OHJEISTA
TÄRKEÄT LISÄOHJEET
LÄGG MÄRKE TILL DE
VIKTIGA
TILLÄGGSANVISNINGARNA
BEACHTEN SIE DIE
ZUS
ÄTZLICHEN WICHTIGEN
ANWEISUNGEN IN DER
BEDIENUNGSANLEITUNG
READ THE MANUAL FOR
ADDITIONAL IMPORTANT
INSTRUCTIONS

13
Back of Touch Control PCB
Dipswitch no.:
Start up logo SW2 SW3 SW4
8
7
6
-
-
-
5 Temperature Actual temperature will be
shown in display Set temperature will be
shown in display
4 Start up logo
Start up logo
Start up logo
Easy mode UI is set to Easymode,
Normal mode cannot be
activated by user
Start default in normal mode.
Easy mode can be activated
by user.
3
2
1
No Logo 0 0 1
Sawo Logo 0 0 0
Function On=1 Off=0 (Default)
9. Control Panel DIP Switches
TEMPERATURE
EASY MODE
1=
=
ON
OFF 0
START UP
LOGO
DIP ON
123456 78

14
Used for automated households. The remote signal is a
potential free contact. The steam generator switches on
when contact is closed and remains on until contact is
opened.
When the steam generator is remotely controlled,
settings used from previous session are applied. Other
buttons are locked. Only the Light, Fan and Aroma
buttons can be set.
10.2 Remote On
The steam generator control has a provision for
emergency alarm system. Alarm button must have
potential free momentary or latching contacts.
Long press OK button if alarm has been settled.
10.1 Emergency Alarm
10. Remote and Alarm Connections
(Back of the user’s panel)
(Alarm) (Remote)
0.5 mm2
WIRE:
Insert RJ Cable
0.5 mm2
WIRE:

11. Maintenance
Tap water contains impurities like lime, that can cause calcium deposit and
block the internal parts of the steam generator. To prevent this and prolong the
lifetime of steam generator it is recommended to have a water filter and a water
softener. Those are connected to the water source of the steam generator’s
water inlet.
SAWO Decalcifying Solution can be used for decalcification. Follow these
guidelines to perform preventative maintenance of the steam generator.
Go to the Settings Menu. Under the Decalcifying menu, press Start button to
initialize the decalcifying process. A confirmation button will appear to continue.
The next process shows that water is filled in the tank in preparation of the
activity. After water has been filled, open carefully the top cover of the angled
tube and pour slowly the decalcifying solution.
See table below regarding the amount of the solution that is needed for your
steam generator. Return the cap of the angled tube when done.
Hit OK to start decalcifying process. The screen will go back to OFF state when
decalfying is done. Decalcifying Solution
Cap
Never add the Decalcifying Solution
when the generator is on, it can
cause serious burns!
WARNING
Use Decalcifying Solution as follows:
3-7.5
9-15 250
500
Decalcifying
Solution
(ml)
Steam
Generator
(kW)
15
11.1 Decalcification

12. Troubleshooting
12.2 Error Codes:
Temperature sensor 1
not connected. Check the wire between the sensor and the
control unit.
If there is no problem with the wires and they
are correctly installed, check the sensor.
If no problem can be found, contact the
retailer.
E1
Temperature sensor 1
short circuit.
E2
Temperature sensor 2
not connected.
E3
Code Problem Solution
Temperature sensor 2
short circuit.
E4
If an error occurs the steam generator will
automatically switch off. A warning beep will alarm
the user every 2 seconds. The error code will be
displayed blinking in the control panel, see the table
below.
Please note, only a qualified electrician or
maintenance personnel are allowed to make service
operations and repairs! Long press OK button to
switch OFF Mode.
If an error occurs in one of the slave units, error
message is followed by slave number. For example:
E1 -> S2 -> E1 ->S2... Pressing the ON/OFF button
disables the slave and rest of the generators can
operate normally.
See steam generator manual for tandem connection.
12.1 For Tandem Connection:
< 3 0dH = very soft water, decalcification every 500 operation hours
3-6 0dH = soft water, decalcification every 100 operation hours
6-9 0dH = hard water, decalcification every 50 operation hours
9-18 0dH = very hard water, decalcification every 30 operation hours
Frequency for decalcification:
Unit dH where 1 dH is 10 mg calcium in 1 liter of water
For steam generators in commercial use (over 5 hours of continuous use daily)
additional service plan is recommended twice a year. Please contact your
service center for details.
16

Temperature fuse defect.E5
Code Problem Solution
Drain failureE10
Communication failure.E11
Temperature is greater than
the maximum temperature.
E12
No master steam generator
connected
Dip switch setting is incorrect. Check dip
switch settings.
Check RJ12 for loose contact. Replace RJ12.
If no problem can be found, contact the retailer.
E13
Check the RJ12 cable. If the area where
cable is located has many other cables, it
can cause EMC problems.
If no problem can be found, contact
the retailer.
Check that the drain valve is connected and
not blocked. Clean the level probes. If no
problem can be found, contact the retailer.
Water level too high and
operation not permitted.
E6
Water level too low and
operation not permitted. Check that water supply is open and there is
enough pressure. Check solenoid valve.
Clean level probes. If no problem can be
found, contact the retailer.
E7
Illogical combination of
water level measurements. Clean level probes. If no problem can be
found, contact the retailer.
E8
Fill failure Check that water supply is open and there is
enough pressure. Check solenoid valve.
Clean level probes. If no problem can be
found, contact the retailer.
E9
Check that the drain valve is not blocked.
Clean the level probes. If no problem can be
found, contact the retailer.
Contact qualified electrician or maintenance
personnel before using the steam generator
again.
17
Check the wire between the fuse and the control
unit. Fuse has probably overheated. The reason
for overheating must be discovered before using
the steam generator again. A new fuse is
needed.
If no problem can be found, contact the retailer.
/