BrickHouse Security GPS-LWKIT-REF Owner's manual

Type
Owner's manual

This manual is also suitable for

Livewire Micro 2.0 GPS Vehicle Tracker
User’s Guide
What’s Inside
1. Wiring Harness
2. Livewire Micro 2.0 Base Unit
1
2
Livewire Micro 2.0 Wiring Diagram
2/2/2016 GNX-3 Wiring Schematic ver 1.0
GNX-3
Module
GPS
UP
FUSE
3A
RED POWER (+12v/24v constant)
BLACK GROUND
WHITE IGNITION input (+12v/24v)
WHITE/BROWN Relay 1 Output (-)
YELLOW Relay 2 Output (-)
GREEN/YELLOW SW1 Input (+)
Pin
Harness
Wire Color
Description
1 Red (bundle) Power input (+8 to +30v constant)
2 Not used
3 Black (bundle) GND
4 Black GND
5 LED Output (+20mA max)
6 Not used
7 White (bundle) Ignition Input (+)
8 Yellow
Relay 2 output (-)
9
MFG Test /Prog (do not connect)
10 Blue
Switch 3 Input (-)
11 Green/Yellow
Switch 1 Input (+) / Analog Input (0-16v)
12 White/Brown
Relay 1 output (-)
13
Not used
14
Not used
15
GND
16
Not used
17
RxD (RS-232 input)
18
TxD (RS-232 output)
GNX-3 Wiring Schematic
Applies to HW 303Axx/303Gxx only
Pin 1
Pin 18
Pin 2
BLUE SW3 Input (-)
POWER / IO CONNECTOR
Pin 17
2/2/2016 GNX-3 Wiring Schematic ver 1.0
GNX-3
Module
GPS
UP
FUSE
3A
RED POWER (+12v/24v constant)
BLACK GROUND
WHITE IGNITION input (+12v/24v)
WHITE/BROWN Relay 1 Output (-)
YELLOW Relay 2 Output (-)
GREEN/YELLOW SW1 Input (+)
Pin
Harness
Wire Color
Description
1 Red (bundle) Power input (+8 to +30v constant)
2 Not used
3 Black (bundle) GND
4 Black GND
5 LED Output (+20mA max)
6 Not used
7 White (bundle) Ignition Input (+)
8 Yellow Relay 2 output (-)
9 MFG Test /Prog (do not connect)
10 Blue Switch 3 Input (-)
11 Green/Yellow Switch 1 Input (+) / Analog Input (0-16v)
12 White/Brown Relay 1 output (-)
13 Not used
14 Not used
15 GND
16 Not used
17 RxD (RS-232 input)
18 TxD (RS-232 output)
GNX-3 Wiring Schematic
Applies to HW 303Axx/303Gxx only
Pin 1
Pin 18
Pin 2
BLUE SW3 Input (-)
POWER / IO CONNECTOR
Pin 17
Getting Started
Your Livewire Micro 2.0 GPS Tracker is usually activated within 24 hours of
the unit being installed. You should have received an email containing your
default login information prior to the arrival of the unit; if you did not receive
your login information, contact our support team at 800-654-7966 or by email
at techsupport@brickhousesecurity.com.
Installation of the Livewire Micro 2.0 is similar to that of a car stereo. If you are
not confident in your ability to install the device, we suggest that you contact
a local car stereo/alarm installer. The Livewire Micro 2.0 is powered by your
vehicle; to install the device, connect the wiring harness to the base unit as
indicated in the diagram above. Once that’s done, connect the Red wire to the
vehicle’s power. Connect the Black wire to Ground. Connect the White wire to
the vehicle’s ignition or accessory power.
The Livewire Micro 2.0 features an internal antenna is needed to ensure GPS
communication. When installing the unit in the dash of the vehicle, place the
unit with the BHS logo facing up with as little metallic obstruction above it as
possible. Because of differences in vehicle manufacturer, best placement will
vary by vehicle. If signal strength seems to be weak, move the device to a
different position and check the platform to see if the device has connected
and is reporting.
Once the unit has been installed and the activation time has elapsed, take
the car for a drive for 15-20 minutes so the device can register on the GPS
network and begin reporting. The Livewire Micro 2.0 is motion activated; it
will only attempt to communicate with the platform when motion is detected,
which will update the tracker’s position on the map.
LEDs
The Red and Green LEDs on the back panel of the device are intended to
help you troubleshoot problems with your tracker. When the car’s ignition is
first turned on, the device will power up. The Green LED will show solid for
approximately 30 seconds (there may be some brief flickers initially while the
processor initializes). At no other time should the Green LED remain solid for
such a long period.
The Red LED flashes 2-digit codes to help you troubleshoot issues with your
Livewire Micro 2.0. Roughly speaking, the first digit tells you what general area
is having a problem (hardware, modem, GPS, et al). The second digit gives
specific error information. Since there can be more than one error condition
at a time, the device rotates through the error codes (for example, both the
GPS is not tracking a satellite and the modem is not registered). Example: 3
Flashes followed by 4 Flashes would be code 3-4. If you’re having trouble with
your device, be sure the check the pattern of flashing lights on your tracker;
this information will be crucial when you contact technical support.
Tracking Your Device
By default, the Livewire Micro 2.0 reports every 1 minute when your car
ignition is turned on while moving and will report every hour when the ignition
is off. If you plan on tracking a vehicle that will remain idle for extended periods
of time, we recommend unplugging the Livewire Micro 2.0 to alleviate any risk
of draining the car’s battery.
To track your Livewire Micro 2.0, open a browser window and go to http://
BrickHouseSecurity.com. Hover your cursor over the Login tab on the top
right of the website and click on GPS Tracking. Enter your login information
and press the Submit button. If you have multiple devices on your account,
the first 3 that were registered will be automatically selected and appear on
the map. Along the bottom of your screen will be your dashboard.
Tracking information is displayed using Google Earth Maps, so navigation
is similar to what most people have grown used to in using internet-based
mapping solutions. You can use the Navigation arrows and Zoom Bar to move
around the map, or drag the map using your mouse and zoom using a click-
wheel mouse.
Navigation Arrows
Zoom Bar Dashboard Last Known Location
Change Map View
At the bottom of the pop-up window are the Zoom, Street View, and Live Tracker
buttons.
Zoom will perform the same task as using the Zoom bar on the left side of
the map; zooming in on the icon you have selected.
Street View will open up a separate window displaying Google’s Street
View, if available.
The White Target icon will appear where a tracker transmitted most recently.
Click on an icon to bring up a pop-up box. This will show your tracker’s
name, the distance it has traveled on this trip, what direction it was moving
in, speed, battery information, and start and stop locations. Start will display
the beginning location of the current trip, and the time it was recorded. Stop
will display the most recent location from the device, as well as the time it was
reported.
The More tab is not currently active. Future updates to the platform will utilize
this tab.
The Geofence tab allows you to create quick geofences, based on the
location you are currently viewing and route the device was following. Use the
Circular GeoFence radio button to create a perimeter around the location you
are clicked on. Use the Route GeoFence radio button to create a boundary
that will follow the entire trip your device was on.
Give the GeoFence a name in the GeoFence Name window, and add a short
description in the Description box (optional).
Use the Action dropdown box to choose if you would like an alert created
when the device enters the chosen area, exits the area, or both. Use the
Radius box to choose how large the area will be. You can enter values below
a mile as decimals. For example: A half-mile radius geofence would be
entered as .5.
When you’re done, press the Create Geofence button to save.
The Alerts will display the most recent Geofence, Speed, Panic, or Power
alerts that have been triggered.
The Video Links tab is not currently active. Future updates will take advantage
of this tab.
Live Tracker will open up a separate window displaying your devices’
locations, and allows you to see past locations. Using the drop-down boxes
on the bottom right of the window, you can adjust how often your screen
refreshes and how many locations will appear on the screen. The counter on
the bottom left of the window displays how long it will be until your screen
refreshes. You can email a link to this page, allowing other users to view
your tracker’s location by click on the Share This icon in the upper right hand
corner of the window. When doing so, you may choose how long the link will
be active before expiring using the Link Expiration dropdown.
Using the Dashboard
The Calendar allows a user to choose from which dates information can
display. Any date that has tracking information will be highlighted. Simply
click on that date to display information. To choose multiple days, click on the
Date Range button, input a start and end date, and press Search. Press the
Current Date button to return to viewing the current day’s information. When
searching by date, all locates generated in the chosen timeframe will display
as breadcrumbs.
Under the Display section you can see a list of all devices currently displaying
information on the map. Click on the View/Change Device button to choose
which of your devices will display on the map. This button only serves a
purpose if there are multiple devices on your account.
Breadcrumb Trail will display all locates, or breadcrumbs, generated on
the date you currently have displayed, connected by a line. Click on any
individual breadcrumb to see detailed information. The BrickHouse shield icon
represents the start and stop of a trip, green circles mean the device was
moving with the arrow indicating direction, and red octagons indicate stops.
Click on the Street View button to open a Google Street View window from
the most recent location of the device. This function will only work if Google
Street View is available in that location.
The Alerts section lets you manage what kinds of alerts your device will create
and how you will be notified.
Click the Geofence button to manage your geofences. The Geofence Alert
Configuration tab lets you choose when and where alerts will be sent. Select
the device you would like to edit by checking the box next to it.
Highlight which days you would like to configure by clicking on each. You
may choose to enter certain hours during which alerts will be active, or
leave these fields blank to have them sent all the time.
Choose if duplicate alerts will not be created if the device stays inside or
outside a geofence for a certain period of time using the slider bar.
Choose what icon will appear where a geofence alert was created using the
Alert Image dropdown box.
Enter Email Address allows you to choose where alert notifications will be
sent. Click on the + icon to add phone numbers you want to have texted.
In the Create New Geofence tab you can create geofences around any area
in different shapes. Navigate to the area on the map you would like to create
a geofence. Click on the Circle, Polygon, or Route button. It is suggested that
all geofences be in at least a .2 mile radius, or at least 1 city block around an
area to allow for GPS drift.
To create a circular geofence around an area, click on Circle and then click on
the spot on the map you want to create your geofence around. Hold down
the left mouse button and drag the cursor until your geofence is the size you
want, and release the mouse button.
The Polygon button allows you to create geofences in different shapes. Each
point you click on will be a corner of your perimeter.
A Route geofence will be straight lines. You must choose how far a device will
need to be away from the route before a report is generated.
Once you have created a geofence, assign it a name in the Geofence field and
hit Save. You may also choose to enter a short description for your geofence.
The Assign Geofence tab allows you to activate and deactivate geofences.
Select a device from the dropdown menu to see what geofences are currently
active. Click on an Assigned Geofence to view and edit its configuration. Click
the Remove link to deactivate a geofence. Hit Save once you have finished
making changes.
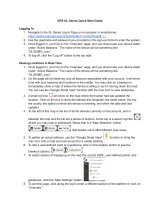
Click on the check box for any Available geofence to edit its configuration and
press the Save button to implement it.
The View Geofence tab allows you to view your geofences.
Click the Speed button on the dashboard to set up speed alerts. Simply
select your device and enter a speed which, when exceeded, will generate an
alert. Choose the days and times you would like the alert to be active, if you
would like duplicate alerts to be ignored, and enter an email address where
you wish to receive your notifications. If you would prefer to receive alert
notifications via text message, click on the + button and enter your phone
information. Hit Save once you have finished configuring your alerts.
Click the Panic button to set up panic alerts. Choose a device and whether
you would like to ignore duplicate alerts (not suggested for the panic feature),
and choose the icon you would like to appear on the map to denote a panic
alert. If you would like to receive emailed alerts, enter your email address into
the Email Address bar. If you would prefer to receive alerts via text message,
press the + button and enter your phone information. Hit Save once you have
finished configuring your alerts.
  • Page 1 1
  • Page 2 2
  • Page 3 3
  • Page 4 4
  • Page 5 5
  • Page 6 6
  • Page 7 7
  • Page 8 8
  • Page 9 9
  • Page 10 10
  • Page 11 11
  • Page 12 12
  • Page 13 13
  • Page 14 14
  • Page 15 15
  • Page 16 16
  • Page 17 17
  • Page 18 18
  • Page 19 19
  • Page 20 20
  • Page 21 21
  • Page 22 22
  • Page 23 23
  • Page 24 24
  • Page 25 25

BrickHouse Security GPS-LWKIT-REF Owner's manual

Type
Owner's manual
This manual is also suitable for

Ask a question and I''ll find the answer in the document

Finding information in a document is now easier with AI