Page is loading ...

INSTALLER'S GUIDE
Autronica Fire and Security AS

Installer's guide
INSTALLER'S GUIDE
On the following pages we have presented some basic
elements and principles regarding the choice and
installation of fire detection. Note that this is only a
simple introduction, for more detailed information, be
sure to read the manuals for each product, which can
be found at www.autronicafire.com.
We recommend anyone who install our products
attend installation courses arranged by Autronica,
providing the level of knowledge needed to perform
the vast majority installations for us. Additionally,
you will be better prepared to communicate more
eectively with our support personnel to ensure that
the systems function optimally at all times.
SERVICE & SUPPORT
+47 915 09 753
08:00 – 16:00 CET

Index
INDEX
Installation Tips and Rules .....................................................4
Choosing a Detector .........................................................4
Key Points in Norwegian Norms ................................ 6
AS2000 Loop Diagnostic Tool ....................................10
Autroprime .................................................................................12
Connection Example Autroprime ............................. 14
Configuring autroprime ...............................................16
Changes on Loop After Config Save ........................17
AutroSafe 4 ................................................................................20
AutroSafe Loop Panels .................................................24
Connecting Modules AutroSafe ........................................ 26
Connecting Loop Units ........................................................34
Connecting In/Output Units (I/O) .................................... 37
Connecting Control Units ...................................................46
Connecting Special Detectors ............................................ 47
Extinguishant Control Panel AutroXT BA-51/1 ............. 54
Choosing Cable........................................................................ 56
Alarm Units ............................................................................... 59
Addressable Alarm Units ............................................. 59
Alarm Units on Alarm Output ...................................60

4 Installation Tips and Rules
FIRE DETECTION
INSTALLATION TIPS AND RULES
CHOOSING A DETECTOR
A detector is selected based on the goal of earliest and
safest detection possible. When choosing a detector,
the following criteria is important:
v What is to be detected (smoke / heat / flame / gas)
v Type of fire / fire development
v Environment / surroundings
v Location
v Coverage area
v Acceptable degree of nuisance alarms.
AUTROGUARD MULTICRITERIA PROTECTORS are
the new generation allround detectors that utilize
MultiAngle/MultiWavelength optical smoke sensing
technology. The type of operation is configurable
to Heat, Optical or Multisensor, covering several
applications. AutroGuard provides three certified
smoke sensitivity settings and six certified heat
response categories. The protector can be delivered
with an optional integrated sounder and visual alarm
device (VAD).
STANDARD POINT DETECTORS LEGACY DETECTORS
Smoke detectors are standard in most areas. It has an
optical chamber with a light source that is reflected
towards a light sensitive receiver. In the event of
smoke supply, light reflection will increase, and the
detector will go into alarm.

Installation Tips and Rules 5
Heat detectors are used in rooms where smoke
detectors are unsuitable, for example, where smoke
normally occurs. The heat detector reacts when
the temperature sensor in the detector reaches a
certain temperature. The detector can either react if
the temperature reaches a certain level, or by rapid
temperature rise over a given period.
MultiSensors are a combination of heat and smoke
detectors, and can be used where there is danger of
flaming fires, such as in kitchens. They can also be
used as pure heat detectors by disconnecting the
smoke part during periods when smoke will occur.
SPECIAL DETECTORS
Aspirating detectors are suitable in areas where early
detection is required, and in particularly dusty, damp
or clean rooms. In an aspiration system, air samples
are taken from the monitored area via a pipeline to a
centralized detection unit. The pipes are perforated
with holes that make up the detection points.
Beam detectors are used in wide-open spaces instead
of an array of smoke detectors. The detector protects
a given area by sending signals (IR beam) between a
transmitter and receiver, and detects the attenuation
or changes in frequency by heat or smoke.
Flame detectors are particularly suited for use in
connection with general protection of large open
areas where fire is expected to spread very rapidly.
They detect radiation from fires, by detection based
on UV radiotherapy, IR radiation or a combination
of the two. Autronica oers an optimal solution for
facade protection using flame detection.

6 Installation Tips and Rules
FIRE DETECTION
KEY POINTS IN NORWEGIAN NORMS
Local regulations will apply
Naturally, the rules concerning fire detection are
many and elaborate. Here are some golden rules:
v Detectors should not be placed closer to a wall than
0.5 m.
v If circumstances permit it, detectors should be
placed at least 1 meter away from air-conditioning
inlets or ventilation.
v The closest manual call point should be no more
than 30 metres walking distance away from any
point in the protected area.
v Stairwells should always be equipped with detectors
on the top floor. Additionally, there should be
detectors on at least every third floor.
For details, see the Norwegian Standard NS 3960:2019
Fire alarm systems design, installation, operation and
maintenance.

Installation Tips and Rules 7

8 Installation Tips and Rules
FIRE DETECTION
< 18 m
< 15 m
7,5 m
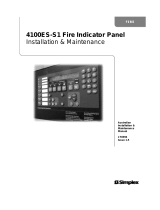
Standard installation of smoke detectors/multisensors
Ceiling height below 6 meters
Ceiling height above 6 meters
9 m
AUTROGUARD AND SMOKE DETECTORS/MULTISENSORS
NORWEGIAN NORMS
Ceiling height Area of
coverage
Monitoring
distance
Under 6 meters 80 m27,5 meters
6 – 12 meters 100 m29 meters
Over 12 meters See NS-3960:2013
Both requrements of area of coverage and monitoring distance
must be met. Local rules will apply.

Installation Tips and Rules 9
AUTROGUARD AND HEAT DETECTORS NORWEGIAN
NORMS
Ceiling height Area of
coverage
Monitoring
distance
Under 6 meters 20 m23,5 meters
Over 6 meters Not permitted
Both requrements of area of coverage and monitoring distance
must be met. Local rules will apply.
< 7 m< 7 m < 7 m< 7 m
3,5 m
Standard installation of heat detectors

10 Installation Tips and Rules
FIRE DETECTION
AS2000 LOOP DIAGNOSTIC TOOL
AS2000 is a PC-based installation and service tool,
irreplaceable when installing or maintaining loops;
it gives both detailed static and dynamic point
information. The system downloads information
from all units connected to the loop and presents
the gathered information on-screen. Hence, you
don't have to carry out the complex and often time-
consuming task of registering every point and unit
connected to loops. .
AS2000 has three main advantages;
v Loop data is collected quickly and eciently
v Faults and errors are localized
v The collected data can form the basis for the fire
alarm system’s configuration. .
Connecting the system to a loop will automatically
result in a graphical representation of the entire loop.
This on-screen map is 100% true-to-life, presenting
the actual installed loop. You can also retrieve lists
containing loop information for documentation
purposes..
Time and cost saving quality assurance – in a small
case.

Installation Tips and Rules 11
The tool comes in a handy WAS box, that you can
easily bring with you on the job. Then all you have to
do is connect the equipment to the loop in question
and a PC with the AS2000 software, and you are good
to go.
You can find more information about the procedure in
the manual that comes with the box.

12 Autroprime
FIRE DETECTION
AUTROPRIME
Autroprime – our simple, reliable and flexible
fire detection system – is a financially beneficial
alternative for fire detection in small and medium-
sized applications. The system provides eective and
reliable detection our customers expect, and also
includes a number of specially developed features.
Autroprime is configured from the front panel or
using PC tools.
The system is standalone, but can be networked with
an AutroMaster top system.
MAXIMUM CAPACITY
Panels per system: 8
Detection loops per panel (standard*): 2(4)*
Addresses per loop: 127**
Alarm units per loop: 40**
Loop units per panel: 508
Serial ports: 1
USB ports: 1
Ethernet RJ45: 1
* The standard panel is prepared for two detection loops, but it can
accommodate up to a maximum of four detection loops using the loop
extension pack BSD-200A/PACK.
** Depending on cable choice, see page 56

Autroprime 13
Fire alarm
control panel
Fire brigade
panel
Repeater
panel
Information
panel
Standard
loop units
AL_Com Panel bus
* The standard panel is prepared for two detection loops, but it can
accommodate up to a maximum of four detection loops using the loop
extension pack BSD-200A/PACK.
** Depending on cable choice, see page 56

14 Autroprime
FIRE DETECTION
CONNECTION EXAMPLE AUTROPRIME
R395R394
Z23
Z29 Z28
Z24 Z27 Z26
K2
K1
U32
F3
F1
F2
D141
J3
J7
R79
Z18
Z19
S1
Z7
Z12
Z15
Z9
Z10
12345
ON
S2
D3
D9
D2
12345
ON
S4
Z14
Z16
Z17
Z11
Q43M19
M20
M27
Z44
Z43
J13
Z5
C174
1
12
J4
S3
L21
111
J6
Z2
J10
J2
Z13
R127
R129
BSA-200
7212-385.0008
Week
20/11
1 2 3 4 5 6 7 8 9 10 11 12 13 14 15 16 17 18 19 20 21 22 23 24 25 26 27 28 29 3230 31

Autroprime 15
R395R394
Z23
Z29 Z28
Z24 Z27 Z26
K2
K1
U32
F3
F1
F2
D141
J3
J7
R79
Z18
Z19
S1
Z7
Z12
Z15
Z9
Z10
12345
ON
S2
D3
D9
D2
12345
ON
S4
Z14
Z16
Z17
Z11
Q43M19
M20
M27
Z44
Z43
J13
Z5
C174
112
J4
S3
L21
1
11
J6
Z2
J10
J2
Z13
R127
R129
BSA-200
7212-385.0008
Week
20/11
1 2 3 4 5 6 7 8 9 10 11 12 13 14 15 16 17 18 19 20 21 22 23 24 25 26 27 28 29 3230 31
– in
+ in
– out
+ out
– in
+ in
– out
+ out
0 V
+ 24 V
0 V
+ 24 V
0 V
input 2
input 1
0 V
+ 24 V
Loop 2
Loop 1
Alarm loop 1
External equipment supply
If the relay output 22, 23, 24 is used as
a fault output (FWRE, default), terminal
23 is NC and 24 is NO when power is
supplied (opposite of Power OFF state).
19, 20, 21:
Default -
Fire Alarm Routing Equipment (FARE)
Monitored
inputs
Alarm loop 2
2 kΩ
910 2 kΩ910
2 kΩ
2 kΩ
NO
NC
Com
NC
NO
Com
FWRE (default)

16 Autroprime
FIRE DETECTION
CONFIGURING AUTROPRIME
TRANSFERING A CONFIGURATION VIA A USB STICK
Configurations can be transfered to an Autroprime
panel via a USB stick (applies to all software versions).
If the panel has software version 2.1.1 or later,
configurations can be transfered only via a USB stick.
From the Service Menu, perform the following:
• Use the arrow down button to scroll downwards
to Export and Import, then press Enter
• Press the arrow down button to select Select
Configuration & Restart System, then press Enter
twice
The following message will appear:
• ”Restart the system by using one of the
configurations available”
If several configurations are available, use the left/
right arrow buttons to select the configuration in
question.
• Press Enter twice
• To execute the command, press Enter once more

Autroprime 17
CHANGES ON LOOP AFTER CONFIG SAVE
If the work involves wiring, we recommend to always
disconnect the loop.
REMOVE A UNIT AND INSERT THE SAME UNIT
For example, remove an optical smoke detector
BH-300 from its base, and reinsert the same one into
the base.
1. Remove the detector from its base
Observe two fault warnings: “Loop Cable Fault”
and “Loop Unit not responding”
2. Acknowledge all faults. Buzzer o, indicator to
steady
3. Insert the same detector. No change
4. Operate reset. Panel to quiescent condition
REMOVE A UNIT AND INSERT ANOTHER UNIT OF THE
SAME TYPE
For example, remove an optical smoke detector
BH-300 from its base and insert another optical
smoke detector BH-300 into the same base
1. Remove the detector from its base
Observe two fault warnings: “Loop Cable Fault”
and “Loop Unit not responding”
2. Insert another detector of same type in the
base. Observe fault warning “Loop Unit has been
replaced”. Acknowledge the fault warning and the
panel will enter normal operation.

18 Autroprime
FIRE DETECTION
18
REMOVE A UNIT AND INSERT ANOTHER UNIT OF
DIFFERENT TYPE
For example, remove an optical smoke detector BH-300
from its base and insert a heat detector BD-300.
1. Remove the detector from its base. Observe two fault
warnings: “Loop Cable Fault“ and “Loop Unit not
responding”
2. Insert a detector of a dierent type in the
base. Observe fault warning: “Loop unit has been
replaced”
3. In service menu, select System Settings/Save
Configuration, then Restart System. After restart of
system observe quiescent condition on panel
ADD A NEW UNIT TO THE DETECTION LOOP
For example, an optical smoke detector BH-300 is added
to the detection loop.
1. Enter service mode and disable the detection loop in
question
2. Mount a new base on the detection loop
3. Insert the new detector in its base
4. Enable the detection loop. Observe fault messages:
“Topology has Changed” and “Configuration
Mismatch”
5. From the menu check the loop topology. Observe
that the topology is in accordance with the new
detector added
6. Add the appropriate properties to the new unit
(Service Menu/Unit Configuration/Points).
7. In service menu, select System Settings/Save
Configuration-Restart System. Accept restart of
system. After restart of system observe quiescent
condition on panel.

Autroprime 19
REMOVE A LOOP UNIT FROM THE DETECTION LOOP
For example, an existing heat detector BD-300 is
removed from the detection loop.
1. Enter service mode and disable the detection loop in
question.
2. Remove the detector from its base and repair the
cable break.
3. Enable the detection loop.
Observe fault messages: “Topology has Changed”,
“Loop Cable Fault” and “Loop Unit is Not
Responding”
4. From the menu check the loop topology.
Observe that the topology is in accordance with the
new detector added. An “X” sign is indicated at the
position of the removed unit
5. In service menu, select System Settings/Save
Configuration. Accept to view list of units to be
removed.
The removed unit is presented in the list
6. Mark the unit by pressing the Select button an then
the Function button. Press the Enter button to start
the command “Remove Unit From Configuration”,
and finally accept the command. Complete
parameters to save the configuration.
7. In service menu, select System Restart System.
Accept restart of system.
After restart of system observe quiescent condition
on panel.

20 AutroSafe 4
FIRE DETECTION
AUTROSAFE 4
/