Page is loading ...


Page <2> V1.024/04/20
Newark.com/multicomp-pro
Farnell.com/multicomp-pro
Element14.com/multicomp-pro
Table of Contents
1. Introduction . . . . . . . . . . . . . . . . . . . . . . . . . . . . . . . . . . . . . . . . .3
2. Safety Instructions . . . . . . . . . . . . . . . . . . . . . . . . . . . . . . . . . . . . .3
3. Structure . . . . . . . . . . . . . . . . . . . . . . . . . . . . . . . . . . . . . . . . . . .3
4. Display . . . . . . . . . . . . . . . . . . . . . . . . . . . . . . . . . . . . . . . . . . . .4
5. Menu Introduction and Operation . . . . . . . . . . . . . . . . . . . . . . . . . . . . .4
6. USB Communication . . . . . . . . . . . . . . . . . . . . . . . . . . . . . . . . . . . 10
7. Specications . . . . . . . . . . . . . . . . . . . . . . . . . . . . . . . . . . . . . . . 10
8. Maintenance . . . . . . . . . . . . . . . . . . . . . . . . . . . . . . . . . . . . . . . . 11
9. Appendix . . . . . . . . . . . . . . . . . . . . . . . . . . . . . . . . . . . . . . . . . . 11

Page <3> V1.024/04/20
Newark.com/multicomp-pro
Farnell.com/multicomp-pro
Element14.com/multicomp-pro
1. Introduction
The MP780429 thermal imager is a pocket sized and lightweight device. This device is able to nd hidden hot spots, energy
loss, structural defects, pipe jams, HVAC faults and other problems through analyzing the thermal image of a surface. It can
measure temperatures up to 400°C and quickly displays the result on the LCD screen. With data recording, analysing, and
report generating functions, the MP780429 is an ideal measurement tool for professional elds requiring temperature analysis.
2. Safety Instructions
To ensure accurate measurement results, please read the instructions carefully. Please be sure to use this product in accordance
with the instructions, otherwise the free warranty will be voided if the product is damaged. Please do not use this product in
ammable, explosive, steamy, wet or corrosive environments. Please stop using the product if it is damaged or modied to
avoid inaccurate test results. Please use the correct emissivity value in order to obtain accurate temperature readouts. To
ensure the accuracy of the product, please warm it up for 10 minutes before measuring if it has not been used for a long lime.
When being charged, the internal temperature of the product will rise, which will lead to inaccurate temperature measurement.
So, it is not recommended to be used for testing during or directly after the product has being charged.
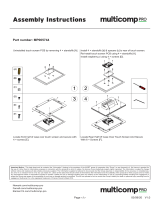
3. Structure
Item Description
1 Left button/Temperature calibration button
2OK/Menu button
3Right button/ Fast thermal tracking toggle
4LCD
5lnfrared thermal image window
6USB interface
7 Micro SO card slot
8Power button (long press to turn on/off)
9Picture taking/Back button

Page <4> V1.024/04/20
Newark.com/multicomp-pro
Farnell.com/multicomp-pro
Element14.com/multicomp-pro
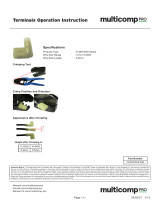
4. Display
Display size: 2.4″ (495mm × 377mm)
Display resolution: 320 × 240 pixels
Item Description
1 Measured temperature
2Thermal image display area
3Battery level
4"Temperature" option
5"Cursor" option
6"Colar palette" option
7"Picture playback" option
8 "Settings" option
5. Menu Introduction and Operation

Page <5> V1.024/04/20
Newark.com/multicomp-pro
Farnell.com/multicomp-pro
Element14.com/multicomp-pro
a. Picture Taking
1. Press the picture taking button to photograph the current image.
2. Press the right button to save the picture.
3. Press the left button to discard the picture.
Note: It is recommended to store no more than 5000 images, so as not to affect the image storage speed.
b. Temperature Unit Selection
1. Press the OK button to pop-up the main menu.
2. Press the left/right button to select the i option.
3. Press the OK button to enter the temperature submenu.
4. Press the left/right button to select °C or °F.
5. Press the back button to exit the current menu.
c. Centre Point and High/Low Temperature Tracking
To track the temperature of centre point:
1. Press the OK button to pop up the main menu.
2. Press the left/right button to select the option.
3. Press the OK button to enter the submenu.
4. Press the left/right button to select the option.
5. Press the OK button to conrm it.
6. Press the back button to exit the current menu.
To track high/low temperatures:
1. Press the OK button to pop up the main menu.
2. Press the left/right button to select the option.
3. Press the OK button to enter the submenu.
4. Press the left/right button to select the option.
5. Press the OK button to conrm it.
6. Press the back button to exit the current menu.

Page <6> V1.024/04/20
Newark.com/multicomp-pro
Farnell.com/multicomp-pro
Element14.com/multicomp-pro
Note:
In the image display page, the temperature value displayed in the top left corner of the LCD is the temperature of the center
point, and the temperature value displayed in the top/ bottom area of the colour bar on the right side of the LCD is the high/
low temperature.
d. Colour Palette Selection
1. Press the OK button to pop up the main menu.
2. Press the left/right button to select the option.
3. Press the OK button to enter the colour palette submenu.
4. Press the left/right button to select the desired colour from iron red, rainbow and grey.
5. Press the back button to exit the current menu.
In addition, in the image display page, press the right button to switch between the current colour image and fast thermal
tracking image.
Note:
The fast thermal tracking image cannot be switched to iron red, rainbow or grey image by colour selection.
e. Picture Playback
To playback a picture:
1. Press the OK button to pop up the main menu.
2. Press the left/right button to select the picture playback option.
3. Press the OK button to enter the submenu.
4. Press the left/right button to select the picture to view.
5. Press the back button to exit the current menu.

Page <7> V1.024/04/20
Newark.com/multicomp-pro
Farnell.com/multicomp-pro
Element14.com/multicomp-pro
To view detailed information of the picture:
1. Enter the picture playback submenu.
2. Press the OK button to pop up and .
3. Press the left/right button to select the option.
4. Press the OK button to display detailed picture information.
5. Press the back button to exit the current menu.
To delete the picture:
1. Enter the picture playback submenu.
2. Press the OK button to pop up and
3. Press the left/right button to select the option.
4. Press the OK button to pop up the dialogue box asking whether to delete the picture.
5. Press the left/right button to select √ or ×.
6. Select √ to delete the picture and return to the picture playback submenu.
7. Select × to return to the picture playback submenu.
8. Press the back button to exit the current menu.
f. Settings
To enter the Settings menu:
1. Press the OK button to pop up the main menu.
2. Press the left/right button to select the option.
3. Press the OK button to conrm the option.
i. Language
To change the language:
1. Select the Language option (left/right button) from settings menu.
2. Press the OK button to enter the Language submenu.
3. Press the left/right button to select the desired language (Chinese or English).
4. Press the OK button to conrm it.
5. Press the back button to exit the current menu.

Page <8> V1.024/04/20
Newark.com/multicomp-pro
Farnell.com/multicomp-pro
Element14.com/multicomp-pro
ii. Date and Time
To set the date and time:
1. Select the Time & date option (left/right button) from settings menu.
2. Press the OK button to enter the Time & Date submenu.
3. Press the left/right button to select the time or date parameter to be adjusted.
4. Press the OK button to enter the parameter adjustment state.
5. Press the left/right button to add or subtract the value.
6. Press the OK button to save the settings.
7. Press the back button to exit the current menu.
iii. Emissivity
To set the emissivity:
1. Select the Emissivity option (left/right button) from settings menu.
2. Press the OK button to enter the emissivity submenu.
3. Press the OK button again.
4. Press the left/right button to adjust the emissivity.
5. Press the OK button to save the settings.
6. Press the back button to exit the current menu.
Note:
The emissivity value can be adjusted from 0 to 0.99.
The default value is set to 0.95.
Selecting the correct emissivity value is very important for accuracy of temperature measurement, as the emissivity has a
signicant impact on the measured surface temperature.
For emissivity values of common materials, please refer to the common emissivity table in the appendix.
iv. Auto Power off
To set auto power off:
1. Select the Auto Power Off option (left/right button) from settings menu.
2. Press the OK button to enter the Auto Off submenu.
3. Press the left/right button to select the desired auto power off time.
4. Press the OK button to conrm it.
5. Press the back button to exit the current menu.

Page <9> V1.024/04/20
Newark.com/multicomp-pro
Farnell.com/multicomp-pro
Element14.com/multicomp-pro
v. Display Brightness
To set the display brightness:
1. Select the Brightness option (left/right button) from settings menu.
2. Press the OK button to enter the Brightness submenu.
3. Press the left/right button to select the desired brightness.
4. Press the OK button to conrm it.
5. Press the back button to exit the current menu.
vi. High/Low Temperature Alarm
To set the high/low temperature alarm:
1. Select the High/Low Temperature Alarm option (left/right button) from settings menu.
2. Press the OK button to enter the High/Low Temperature Alarm submenu.
3. Press the left/right button to select the desired option.
4. Select High/Low to adjust the temperature parameter.
5. Select other options to turn the alarm on or off.
6. Press the back button to exit the current menu.
vii. Device Information
To view the device information:
1. Select the Device Information option (left/right button) from settings menu.
2. Press the OK button to view the detail information of the device.
3. Press the back button to exit the current menu.
viii. Restore Settings
To restore settings:
1. Select the Recovery option (left/right button) from settings menu.
2. Press the OK button to enter the Recovery submenu.

Page <10> V1.024/04/20
Newark.com/multicomp-pro
Farnell.com/multicomp-pro
Element14.com/multicomp-pro
3. Press the left/right button to select Yes or No.
4. Press the OK button to conrm it.
5. Press the back button to exit the current menu.
ix. Format SD Card
To format the SD card:
1. Select the Format SD option (left/right button) from settings menu.
2. Press the OK button to enter the Format SD submenu.
3. Press the left/right button to select Yes or No.
4. Press the OK button to conrm it.
5. Press the back button to exit the current menu.
6. USB Communication
1. Download and install the PC software (refer to Documents Download Operation Guide).
2. After opening the PC software, connect the USB cable to the computer.
3. Users can browse pictures and analyse data through the PC software. Regarding the use of the computer software, users
can retrieve the Software User Manual from the Help option of the operation interface.
7. Specications
Temperature Range : -10°C ~ 400°C
Basic Accuracy : -10°C ~ 400°C: ±2.0°C or ±2% of reading, whichever is greater (room temperature: 25°C)
Emissivity : 0.95 default (0.1 ~ 0.99 adjustable)
Measurement Resolution : 0.1°C / 0.1°F
Response Time : ≤500ms
IR Resolution : 4800 pixels (80×60)
Pixel Size : 17μm
Colour Palette : Rainbow, iron red, grey, fast thermal tracking
Wavelength Range : 8μm ~ 14μm
Field of View (FOV) : 51°(H) × 38°(V)
Thermal Sensitivity : ≤150mk
Frame Rate : ≤9Hz
Image Format : Bitmap (BMP) image (320 × 240 pixels)
General Parameters
Product Size (L × W × H) : 76mm × 76mm × 24mm
Display Type : 2.4” TFT LCD
Display Resolution : 320×240 pixels

Page <11> V1.024/04/20
Newark.com/multicomp-pro
Farnell.com/multicomp-pro
Element14.com/multicomp-pro
Important Notice : This data sheet and its contents (the “Information”) belong to the members of the AVNET group of companies (the “Group”) or are licensed to it. No licence is granted for
the use of it other than for information purposes in connection with the products to which it relates. No licence of any intellectual property rights is granted. The Information is subject to change
without notice and replaces all data sheets previously supplied. The Information supplied is believed to be accurate but the Group assumes no responsibility for its accuracy or completeness,
any error in or omission from it or for any use made of it. Users of this data sheet should check for themselves the Information and the suitability of the products for their purpose and not make
any assumptions based on information included or omitted. Liability for loss or damage resulting from any reliance on the Information or use of it (including liability resulting from negligence or
where the Group was aware of the possibility of such loss or damage arising) is excluded. This will not operate to limit or restrict the Group’s liability for death or personal injury resulting from its
negligence. Multicomp Pro is the registered trademark of Premier Farnell Limited 2019.
Battery : 3.7V/1300mAh rechargeable lithium battery
Auto power off : √
Battery Life : ≥3.5 hours
Charging Time : 2 to 2.5 hours
Certication : CE
Storage Card : 16GB Micro SD card
Storage Temperature : -20°C ~ 60°C (-4°F ~ 140°F)
Operating Temperature : 0°C ~ 50°C (32°F ~ 122° F)
Drop Test : 1m
Standard Accessories : User manual, USB cable, 16GB Micro SD card
Altitude : ≤2000m
8. Maintenance
Use a wet cloth or weak soap solution to clean the outer shell of the device. Do not use abrasives, isopropyl alcohol or solvents
to clean the lens and window.
Note: The inherent temperature drift of the sensor will occasionally cause inaccurate measurement. In this case, press the left
button under the temperature measurement interface to display “Calibrating” and automatically calibrate the temperature.
9. Appendix
Emissivity of common objects
Material Emissivity Material Emissivity
Wood 0.85 Black paper 0.86
Water 0.96 Polycarbonate 0.8
Brick 0.75 Concrete 0.97
Stainless steel 0.14 Copper oxide 0.78
Tape 0.96 Cast iron 0.81
Adhesive tape 0.09 Rust 0.8
Copper plate 0.06 Gypsum 0.75
Dark Aluminium 0.95 Paint 0.9
Human skin 0.98 Rubber 0.95
Asphalt 0.96 Soil 0.93
PVC Material 0.93 - -
Note:
This manual can be downloaded from the ofcial website of Multicomp-pro (refer to Documents Download Operation Guide).
/