Page is loading ...

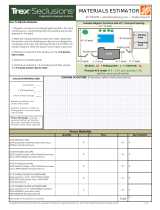
ide:

each line by dividing the length f
each line in inches by 96.
nd any
remainder
.
2

3
Stakes
String Line
Marking Paint
Hammer
Ta e Meas re
Sh vel
P st H le Digger
Digging Bar
Circ lar Saw
Drill
Pencil
Wheelbarr w
4’ Level
12” Miter Saw
S eed Sq are
inish N n
T Needed
y dig.
Check al HOA and z ning laws
which may reg
late the height and
lacement f y r fence.
A ly al ermits as directed
by l
cal de.
eyes and ears.
Bef re y begin
3
* For standard single gates: (1) small Trex gate panel, (1) steel post insert, and (1) Trex single gate hardware kit.
* For standard double gates: (2) large Trex gate panels, (2) steel gate post inserts, and (1) Trex double gate hardware kit.

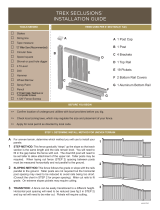
E ed View
A. 1 P st
B. 1 P
st
C. 4
ckets
D. 1 T
Rail
E. 19 Pickets
.
4
A
B
C
C
C
C
D
E
F
F
G

5
St 1: Determine Install Met
1. S M d: This
meth d grad ally “ste s”
the sl e and the rails
remain level. This may
leave ga
s nder the fence.
The d
nhill st will need
t
be set taller. nger
sts may be req ired.
When laying
t the fence
st s acing, meas re n a level line ne st t
an ther.
2.
ll wing the de:
This meth d f ll s the
grade
r sl e with the
rails
arallel t the
gr
. The st acing
may need t
be red ced
t
av id rails being t
sh rt beca se f the angle.
3.
The fence can
di rent height.
P
st acing will need t be
re
ced. Pickets will need
t
be c t t height.
5

ins s that stakes will n t be d rbed when digging h les, and r x.
4-5 inches inside
r erty ns t ins re n encr aching n neighb rs.
N tes: Laying t sts 96”
96” centers.
90.2” (68 x 12” = 812” / 9 =
90.2” )
n center.
2.
string every 96” 2”
in fr
m the string t mark center f h
St 2: Stake and String
ig. 1
o
6

7
St 3: Dig es
I height begin all end, ere grade
changes) be 74 1/2” inches high**. String a line the
set the the string. (see ig. 4)
4: Set
1. mb and level each st t the string line
4’ level* that
the
are next string
line.
with brace if
necessary
dry 24-
.
1. Dig the the
stakes
the string. The string may be and
are be 12”
diameter and 30”
be that they
all sides (
ee ig. 2)
This line is lled
set line
is lled t kee the
in line.
7

St 5: P sts
Reve l If greater
reve
l is desired increase height.
1.
set
height
ark all end,
at 74 1/2”* **
grade and
string
a line
these
( ig. ) ark
and height the
string
a .
8

9
Using 1 5/8” fence screws, the brackets
a bracket* 5 3/4”
the the a
bracket 73 5/8” ** the
(see
ig. ) If the fence
a brackets the
be
that the rails
angles angle
ada
t rs with the fence brackets.
Each
a 22.5°
9
5 3/4 “
73 5/8”
74 1/2”

Mark the rail, rail and
length by them next the ig. )
the rail with a metal blade.
the 1/2” rail
scratching the If the dis-
tance between
is 91”
the rail will be
and rail with miter saw
Slide the rail the rail as
the rail the
rackets
10
5.
4.

11
St 8: Install Pickets
Insert the the rail, and it the
at 8’ center, the and last
the rail, their
they 1 )
If the last t may be easier the
last and reinsert it by sliding it the last
is the (see ig. 1 )

11
12
St 9: Install T R
by at
end and the rail
fence bracket
the
the rail the fence
brackets
1 5/8”
screws the rail
at each end (see
1
)
1
the (see ig 1 ). the
third
the last the and rails with nails
screws (see
1 )

12
3 . venly the last (see ig. 1 ) and it the
rails
4. Place
1
13

Tre s (all heights)
14

Care And Maintenance
Dirt and Debris Clean fence dirt and water and a are all that
needed
Water s, Leaf
Staining and W
d
Tannins
Sc s & Abras ns
R st Stains, nd-In
Dirt and rime and
Pigment Staining
Oil and grease Stains
M d & Mildew
Pre re Washer
Sanding
Tre
m any es n t rec mmend sanding. Sanding will change the a earance f the
s
rface f Trex Material and will void the warranty.
Dis
sal
Do
not burn Trex
d cts.
15
TM

012419
/


