Page is loading ...

Fence Distributors
YourNextFence.com
ide:

each line by dividing the length of
each line in inches by 96. Round any
remainder up.
2
Plan Your Fence
Fence Distributors

3
Stakes
String Line
Marking Paint
Hammer
Tape Measure
Shovel
Post Hole Digger
Digging Bar
Circular Saw
Drill
Pencil
Wheelbarrow
4’ Level
12” Miter Saw
Speed Square
Finish Nail gun
Tools Needed
you dig.
Check local HOA and zoning laws
which may regulate the height and
placement of your fence.
Apply for local permits as directed
by local code.
eyes and ears.
Before you begin
3
* For standard single gates (46 1/4” opening) : (1) small Trex gate panel, (1) steel post insert, and (1) Trex single gate hardware kit.
* For standard double gates (130 3/4” opening) : (2) large Trex gate panels, (2) steel gate post inserts, and (1) Trex double gate hardware kit.
Calculate Materials
Fence Distributors
https://www.yournextfence.com/seclusions/installation

Exploded View
A. 1 Post
B. 1 Post Cap
C. 4 Fence Brackets
D. 1 Top Rail
E. 19 Pickets
F.
4
A
B
C
C
C
C
D
E
F
F
G
Fence Distributors

5
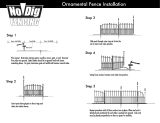
Step 1: Determine Install Method
1. Step Method: This
method gradually “steps”
up the slope and the rails
remain level. This may
leave gaps under the fence.
The downhill post will need
to be set taller. Longer
posts may be required.
When laying out the fence
post spacin measure on a level line from one post to
another.
2.
Following thede:
This method follows the
grade or slope with the
rails parallel to the
ground. The post spacing
may need to be reduced
to avoid rails being too
short because of the angle.
3.
The fence can
dirent height.
Post spacing will need to be
reduced. Pickets will need
to be cut to height.
5
Fence Distributors

pins so that stakes will not be disturbed when digging hod approx.
4-5 inches inside of property pins to insure no encroaching on neighbors.
Notes: Laying out posts 96”
96” centers.
90.2” (68 x 12” = 812” / 9 =
90.2” ) on center.
2.
string every 96” 2”
in from the string to mark center of hole (see Fig. 1).
Step 2: Stake and String
Fig. 1
o
6
Fence Distributors

7
Step 3: Dig Holes
7
Fence Distributors
*Note: Iposts to height begin all corner and (post w ere grade
changes) posts should be 74 1/2” inches high**. String a line from the top of these posts
set the remainder of the posts to the height of the string. (see ig. 4)
Step 4: Set Posts
1. Plumb and level each post to the string line
using a post level or 4’ level* Make sure that
the posts are next to but not pushing the string
line. Fill the hole with concrete and brace if
necessary concrete is cured.
low
concrete to dry 24-48 hours (depending on
temperature) before building
.
Fig. 4
1. Dig holes for the posts making sure not to disturb the
stakes for the string. The string may be removed and replaced
holes are dug. The holes should be approximately 12”
diameter and 30” deep (depending on local codes). Holes
should be dug so that they allow equal
amounts of concrete on all sides of posts (
ee ig. 2)
Fig. 2
This line is pulled
posts to set line post
is pulled to keep the
post
in line.
Fig.
The lower string line

Step 5: Cut Posts
8
Fence Distributors
Typical Post Reve l If greater
reve
l is desired increase post height.
1. Cut the tops of the posts
f posts not set to
height
ark corner and
posts at 74 1/2”* **
above grade and
string
a line from these post
( ig. ) ark all posts
and cut to the height of the
string using a circular saw.
Fig. 5

9
9
Fence Distributors
Using 1 5/8” fence the Fence brackets
to the post as follows: a bracket* 5 3/4”
down from the top of the a
bracket 73 5/8” ** down from the top
of the post (see
ig. ) If the fence
is on a brackets on the
downhill side will need to be low-
ered so that the rails smoothly.
Fig.
*Note: For angles use angle
adaptors with the fence brackets.
Each adapter provides a 22.5°
of adjustment
5 3/4 “
73 5/8”
74 1/2”

Mark the aluminum rail and top for
length by holding them next to the post.* (see ig. )
Cut the aluminum rail with a nonferrous metal blade.
Cut the aluminum 1/2” shorter (do not cut the rail covers
shorter) to avoid scratching the post during If the dis-
tance between posts is 91”
the aluminum rail will not need to be cut.
Cut top rail and rail covers with miter saw
Slide the rail covers over the aluminum rail as shown
(see Fig. 8). Place the rail over the
with the deeper channel facing down.
Fig.
deeper channel
rackets
Fig.
10
5.
Set the top rail in place over the brackets. Leave the rail in place while
4.
Fence Distributors

11
Step 8: Install Pickets
top bracket (see Fig. 9).
Insert the picket into the aluminum and secure it to the
post using three 1 5/8” exterior screws (see Fig. 10). If the posts are set
at 8’ on the and last
Insert pickets into the their
they
of fence.
If the last
t may be easier to remove the second to
last picket and reinsert it by sliding it down from above the last
picket is screwed to the post (see
ig. 1 )
Fig. 1
Fig. 1
Fig.
Fig. 1
Fence Distributors
4.

11
12
Step 9: Install Top Rail and Secure Pickets
by at
one end and the rail over
one fence bracket
gradually
lowering over the pickets.
Secure the top rail to the fence
brackets using 1 5/8” exterior
screws through the top of the rail
at each end (see Fig. 1
)
Fig. 1
Fig. 1
Fig. 1
ull all of the pickets towards one post (see ig 1 ). Secure the
third to the last picket through the top and rails with nails
or composite screws (see Fig
1 )
Fence Distributors

12
Fig. 1
Fig.
3 . venly space the last picket (see ig. 1 ) and secure it through the top and
rails
4. Place po
Fig. 18).
Fig. 1
13
Fence Distributors
https://www.yournextfence.com/seclusions/installation

Trex Seclusions (all heights)
14
Fence Distributors

10
Fence Distributors
Install Single ate
A. Fence posts
B. ate Panel
C.
D. ate Hinge
E. ate Latch
F. ate Striker
ate Handle
15
Fence Distributors

Step 1: Set the Single ate Posts
A.
faces away from gate opening.
B. Set posts into post holes. Hole Dimensions for standard
gate openings are 30” deep by 12” wide. However con-
C. The opening (measuring from the inside face of one post
to inside face of the other post) for a standard size Trex
Seclusionste panel should be 46 1/4”. Inside faces of
posts should be parallel with each other. (**The opening
for a standard
Large Size Trex ate panel is 65 3/4” wide)
Custom heights and widths are available.
Note: Due to concrete cure
-3
days before gate is installed.
*Note: If the Hinge Post is not
connected to a fence panel or if
a large gate panel is used it may
be necessary to use a Heavy
*
16
Fence Distributors

8
Step 2: Install tate Panel
A. Using a 3/8”
6” 1/2” self-
drilling screws. Pre-drilling with a 3/16”
B. Place the gate panels in the opening. Adjust the gates so that the top rail
lines up with the top rail of the fence.
C. Using the supplied 1 1/2” self-
D.
hinge bracket to the hinge post.
A
B
C
D
17
Fence Distributors

1.
11/16” wrench.
2.
3.
4. Due to weather and temperature changes periodic hinge adjustment may be necessary to as-
1. 36” from the ground (or to de-
sired height) using the supplied 1 1/2” self-drilling screws. The latch should be ori-
ented so the catch is on the gate-swing side of the post. The catch will face up or
2. Using the supplied 1 1/2” self-
to the gate pane lining the strik-
er rod up with the catch on the
post latch.
3.
gate panel upright using the sup-
plied 1” self-drilling screws. Han-
3/4”
from the edge of the gate panel.
The height must be staggered.
Step 4: Make any Final Adjustments
T
18
Fence Distributors

6
Install Doubleate
A. Fence posts
B. ate Panel
C.
D. ate Hinge
E. ate Latch
F. ate Striker
ate Handle
H. Drop Rod
19
Fence Distributors

Step 1: Set the Double ate Posts
A.
opening.
B. Set posts into post holes. Hole Dimensions for standard gate
openings are 30” deep by 12” wide. However consult local con-
depth.
C. The opening (measuring from the inside face of one post to in-
side face of the other post) for a standard size Trex Seclusions
ate panel should be 91 1/2” wide**. The Inside faces of posts
should be parallel with each other. (**The opening for a double
gate using standard Large Size Trex te panels is
130 1/2” wide) Custom heights and
widths are available.
Note: Due to concrete cure
-3
days before gate is installed.
*Note: If the Hinge Post is not
connected to a fence panel or if
a large gate panel is used it may
be necessary to use a Heavy
.
*
20
Fence Distributors
/