Workrite Ergonomics | 800.959.9675 www.workriteergo.com 1 of 2
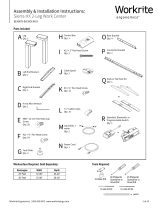
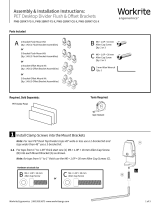
ID Part Name Qty
A #10-32 Zinc Nylon Lock Nut 4
B#10-32 ˣ ½” Phillips Drive Flat Head Screws 4
C#10 × ¾” Phillips Pan Head Screws 4
D Left Bracket 1
E Right Bracket 1
F Front Stud Brackets 2
G Rear Standoff Brackets 2
H Acrylic Panel 1
Cordless Drill
Tools Required:
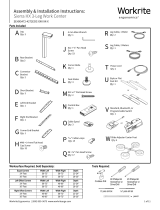
SIDE VIEW
Included:
⅛” Drill Bit #2 Phillips Bit
Screwdriver or
Driver/Drill
⅜” Wrench
Socket
A B C
D
E
G
GB
FG
H
B
H
F
H
#2 Phillips Screwdriver
Assembly & Installation Instructions:
Acrylic Privacy & Modesty Panels
SM-ACR-XX-XXX
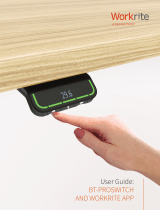
Align Rear Standoff Brackets (G)
with holes on outside edge of
Acrylic Panel (H)
• Align Front Stud Brackets (F) with holes
on opposite side of Acrylic Panel (H)
• Insert #10-32 × ½” Phillips Flat Head Screws (B)
1 2

2 of 2 Workrite Ergonomics | 800.959.9675 www.workriteergo.com
1500429 Rev A
F
C
F
A
A
D
E
⅜” Wrench Socket
Cordless Drill with ⅛ Drill bit
EQ EQ
#2 Phillips Screwdriver
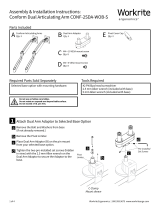
Attach Left and Right Mounting Brackets (D & E) to the Standoff Brackets (F)
using #10-32 Zinc Nylon Lock Nuts (A) to securely fasten
Use #10 × ¾” Pan Head Screws (C) through Left & Right
Mounting Brackets into the pilot holes to securely fasten
both brackets and panel to the bottom side of the worksurface
Drill Four Pilot Holes from
Underside of Worksurface
DO NOT DRILL DEEPER THAN ¾”
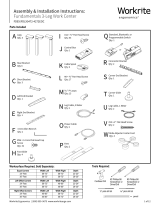
Center and attach Acrylic Privacy Panel
to underside of worksurface
Use Keyhole slot to align the #10 × ¾”
Phillips Pan Head Screws (C)
underneath the top if preferred
Predrill pilot screw holes
underneath the worksurface
using ⅛ Drill bit
3
4
/