Page is loading ...

TOOLS NEEDED FOR INSTALL:
1. T50 Torque Wrench
2. Phillips Screwdriver
3. Prying Tool
STEP 1: By hand, remove upper window trim.
Note: be mindful of the clips on the back
of the trim.
STEP 2: Use screwdriver to remove access
tab and remove seat belt cover with torque
wrench.
STEP 3: Use torque wrench to remove bit
from the top of the seat belt.
STEP 4: Remove ash tray from armrest. Use
Phillips screwdriver to remove the two screws
in the ash tray compartment.
PN: 99-8316-000
QP: RW-WI-007
Chevy Truck Extended Cab 1988-98
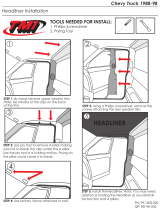
Headliner Installation

STEP 8: Use pry tool to remove A pillar. Be mindful
of the clips on the backside. Use pry tool in a
twisting motion.
STEP 5: Use pry tool to pry off the top part of the
arm rest. Note: Be mindful of the clips underneath.
STEP 6: Use a Phillips screwdriver to unscrew
and remove the side panels.
STEP 9: Install TMI Headliner. Note: You may need
assistance holding the Headliner as you reinstall
factory trim and pillars.
HEADLINER
STEP 7: By hand, remove top trim.
Note: Be mindful of the clips on back of trim.
PN: 99-8316-000
QP: RW-WI-007
/