Page is loading ...

Tools Needed:
1.Awl Scratch Tool
2.Plasc Trim Tool
3.Phillips Screwdriver
4.Spring Clamps
5.Plasc Puddy Knife
6.Needle,tack, or
small pointed object
1.
2.
3.
4.
5.
6.
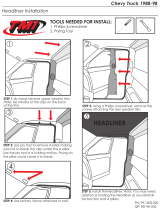
Step 1 Remove Headliner
Before you begin to install your new Headliner, you must rst remove all old hardware . This includes
the removal of your:
- Sun Visors -Rear View Mirrors -Coat Hanger Hooks -Door Sill Plates
-Windlace -Back Seat -Rear Quarter Panels -Package Tray
1.Pull material away from Front & Rear
windshield windlace
Table of Contents
I. Tools Needed..........................................................................................................................1
II. Factory Headliner Removal & Spacer Placement.....................................................................1
III. Install TMI Headliner..............................................................................................................2
IV. Locate Factory Visor Mounng Holes.....................................................................................3
V. Install Mirror Bracket/Visor Retaining Clip..............................................................................3
VI. Install Sail Panels...................................................................................................................3
VII. Install A-Pillar Cover..............................................................................................................4
IX. Re-Install Windlace/Package Tray..........................................................................................4
1967 - 69 CAMARO HEADLINER INSTALL
2. Match your holes on your spacer to your original visor
mount holes so they align correctly, use double sided tape
and sck them on the top of your ceiling between headliner.
THIS STEP IS FOR 1969 ONLY.
Part #99-8069-000
QP 09-270 / Rev. 01

1. Make sure you pull
headliner through the
driver’s side over the top
of the steering wheel.
Cauon: Once headliner is removed, it is highly recommended to not dispose of your
bow rods. Bow Rods are not reproduced and can only be replaced by originals.
Before installing the headliner, make sure you have a second person to help. To begin installaon, roll all four
side windows completely down. Starng from the driver’s side, slide the headliner into the vehicle. Make sure
to pull headliner up and over the steering wheel. Locate the pre-drilled rearview mounng holes in the head-
liner and poke through the material of one hole with your scratch awl tool. From here, use the scratch awl
tool as a guide to nd the factory mounng holes for the rearview mirror. Once you have found one hole, nd
the remaining holes using the same method. This will ensure the headliner is posioned properly from front
to rear along with side to side. It is recommended that you DO NOT mount your rearview mirror at this point.
Have your second person use the spring clamps to hold the headliner in place.
Step 2 Install Headliner
This picture
displays
the careful
installaon
of the head-
liner with
the help of
an extra
person.
Once centered,
use Spring Clamps
to hold headliner
in place.
Note: Spring Clamps are very important
when installing your headliner.They are
the main tool you will ulize to hold your
headliner in place once you are nished
centering the headliner. Spring Clamps
will ensure proper alignment of your
headliner installaon.
3. You will need
to remove the
front and rear
metal wind-
shield frame
and trim-lock,
This step is
REQUIRED or
your headliner
will not t.
Part #99-8069-000
QP 09-270 / Rev. 01

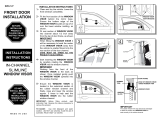
Step 3 Locate Factory Visor Mounng Holes
Using a small sharp
tool such as a tack or
needle,locate the factory
visor mounng holes in
the roof of your vehicle.
Locate these holes in the
front corners of the
headliner on the
le and right side.
Once located, you can
now begin installing the
screws for your visors.
Once the holes have been located, begin to install
the visors .
Step 4 Install Mirror Bracket/Visor Retaining Clip
This picture illustrates the
installaon of the mirror
bracket
and/or visor
retaining clip.
Note: It is recommended to use a tack
or needle to poke through the material
rst, this avoids leaving large holes.
Step 5 Install Sail Panels
To eciently install your Sail Panels (C-Pillar Covers), remove the tack strip with a phillips screwdriver.
Posion the sail panel by sliding it backward so that the tab goes under the headliner, then easily push the
panel in unl it ts in place. Repeat this step for the other side.
Slide the sail
panel up so
that the TAB
goes under-
headliner,
slide the sail
panel into
posion.
Cauon: When installing your sail panels, please make sure YOU DO NOT TUCK SAIL PANELS
UNDER THE HEADLINER. This will prevent proper installaon.
Part #99-8069-000
QP 09-270 / Rev. 01

Step 6 Install A-Pillar Cover
Locate the
A-Pillar Cover
starng from
the dashboard
to the Headliner.
You will need to
drill about a 1/4
inch into pillar
to hold it into
place.
Step 8 Install Package Tray
Once your Headliner is in
place, you can now re-
install your Package Tray
or purchase a completely
new TMI Package Tray.
Once the Package Tray is
placed back properly, you
can also re-install your
rear quarter corner panels.
Step 7 Re-install your Windlace
1.This picture displays the proper re-in-
stallaon of your Package Tray back into
the vehicle.
2.Re-Install your Rear Corner Panels.
You can now re-install your windlace.
You will need a razor or scissors to trim the
excess headliner material for the windlace to t
properly. BE CAREFUL you do not trim too short.
See pictures on the right for refrence.
Thank you for choosing TMI, for more informaon on our product line, please visit
our website at , www.tmiproducts.com or feel free to call us at (800)624-7960
You may need to trim the excess headliner material to t
with windlace, aer doing so, process for applying
windlace is much smoother and ts easier.
Part #99-8069-000
QP 09-270 / Rev. 01
/