Page is loading ...

Hard Top Door Panels
A professional is recomened for
all TMI Products installs
Chevy Bel Air 55-57
Tools needed:
Page 1
PN 99-0162-000
QP 09-334 REV.01
DRILL
SHARPIE
Template
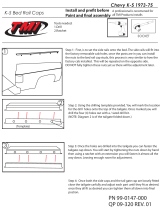
Step 1:
Remove the factory door panel, window crank, door trim, and door handle. Keep all these pieces as they may be
re-installed or used for comparison later.
Step 2:
Line up the supplied drill template with key features on the door. Mark and
drill the ve hole locations on the bottom of the door with a 9/32 drill bit,
these will be for the new door clips on the back of the TMI Products door
panel. Make sure to mark the two upper holes. These will be the door cup
mounting holes.
Step 3:
Installing the door panel cup kit. Install the angled bracket onto the door
structure where you made the two markings. It fastens down with self
tapping screws. Leave the cups o the brackets as they will go on in a
later step.
3
2
RAZOR BLADE

Hard Top Door Panels
A professional is recomened for
all TMI Products installs
Chevy Bel Air 55-57
Page 2
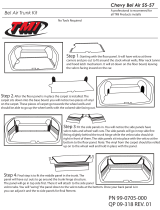
Step 4:
Install the door panel by dropping it down into the window recess just like the
chrome trim it replaces. Then push the door clips into the previously drilled
holes on the bottom of the door.
Step 5:
Installing the door cup you will sit the cup down into the pull handle cut
out. Line up the door cup holes with the door cup bracket and fasten
the two black sheetmetal screws.
Step 6:
There will be a bulge at the window crank and door handle areas. Cut a small “X”
over the center of the bulge and push the vinyl back over the mounting points for
the window crank and door handle. You can the install your handle and crank like
factory.
Step 7:
Follow steps 1-6 for the opposite side.
4
6
5
/