Radio Shack 120-2130A User manual
- Category
- Car media receivers
- Type
- User manual
This manual is also suitable for

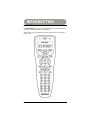
RadioShack
Guide Remote™
Cat No. 15-2130
Owner’s Manual
Please read before using this equipment

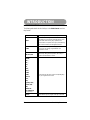
Table of Contents
Table of Contents
Table of Contents.......................………… .......................………… ..........…. 1
Introduction.....................………… .......................………… ............………… 3
Features.....................………… .......................………… ...........……………. 3
Key Layout.....................………… .......................………… .............. ............ 4
Basic Key Functions.....................………… .......................………… .............5
Mode Key Functions.....................………… .......................………… .......…. 6
Install Batteries…………………………………………………………………….. 7
Battery Saver………………………………………………………………………. 7
Adjust Contrast…………………………………………………………………….. 7
Remote Setup……………………………………………………………………… 8
Program Setup Codes…………………………………………………………. 8
Manual Code Search………………………………………………………….. 9
Auto Code Search……………………………………………………………… 9
View Device Codes……………………………………………………………. 10
Viiewing Codes………………………………………………………………… 10
Reassigning Device Keys…………………………………………………….. 10
Programming Macros…………………………………………………………….. 11
Recording Macro………………………………………………………………. 11
Playing Macro………………………………………………………………….. 11
Punch-Through……………………………………………………………………. 11
Volume Lock……………………………………………………………………….. 12
Turn Off Volume Lock…………………………………………………………..12
Volume Unlock – CBL/SAT…………………………………………………….12
Volume Unlock – VCR………………………………………………………….12
Volume Unlock – DVD Player………………………………………………….12
Turn On Volume Lock…………………………………………………………..13
Volume Lock – Cable Converter or SAT/DSS Receiver…………………….13
Volume Lock – VCR…………………………………………………………….13
Volume Lock – DVD Player…………………………………………………… 13
DVD/VCR Keys………………………………………………………………….13
Priority-Press………………………………………………………………………..14
Priority-Press Key Classes……………………………………………………. 14
Priority-Press Key Class Table………………………………………………. 14
Turn On Power Key Priority-Press…………………………………………… 15
Turn On Channel Key Priority-Press………………………………………… 15
Channel Key Priority-Press Setup – TV……………………………………... 16
Channel Key Priority-Press Setup – CBL/SAT……………………………… 16

Table of Contents
Channel Key Priority-Press Setup – VCR…………………………………… 16
Volume Key Priority-Press……………………………………………………..17
Volume Key Priority-Press Setup – TV……………………………………….17
Volume Key Priority-Press Setup – CBL/SAT………………………………. 17
Volume Key Priority-Press Setup – VCR……………………………………. 17
Volume Key Priority-Press Setup – DVD ………………………………………. 17
Turn On Transport Key Priority-Press…………………………………………… 17
Turn On Menu Keys Priority-Press………………………………………………. 18
Punch-Through vs Priority Press…………………………………………………18
Toggle Punch-Through and Priority-Press………………………………….. 18
Backlight……………………………………………………………………………. 19
Factory Reset………………………………………………………………………. 19
Computer Requirements………………………………………………………….. 20
Install USB Drivers………………………………………………………………… 20
Install RemoteLinker II* Software………………………………………………. 20
Activating Guide…………………………………………………………………… 21
Download TV Listings…………………………………………………………….. 23
Updating TV Listings………………………………………………………………. 23
Navigating Guide Screen………………………………………………………….23
Using Guide key…………………………………………………………………… 24
Accessing Guide Screens…………………………………………………….. 24
Title Screen…………………………………………………………………….. 25
Detail Screen…………………………………………………………………… 25
Guide Expiration……………………………………………………………….. 25
Manufacturers’ Codes…………………………………………………………….. 26
TV Codes……………………………………………………………………….. 26
Cable Codes……………………………………………………………………. 32
Satellite Codes…………………………………………………………………. 35
VCR Codes…………………………………………………………………….. 36
DVD Codes……………………………………………………………………... 41
PVR Codes……………………………………………………………………… 43
Video on Demand Codes……………………………………………………… 43
DVD/VCR Combo Codes……………………………………………………… 43
Miscellaneous Codes……………………………………………………………… 43
Troubleshooting……………………………………………………………………. 44
Frequently Asked Questions……………………………………………………... 45
Specifications………………………………………………………………………. 47
Declaration of Conformity……………………………………………… 47
Warranty……………………………………………………………… 48

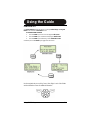
INTRODUCTION
3 Introduction / Features
Introduction
Your new Guide Remote* allows you to control your TV, VCR, cable/SAT/DSS
converter, and DVD player, all in one easy to use remote control. The design includes
the functions used most often to operate TV, VCR, Cable converters and Satellite
receivers and DVD Players.
This manual includes a list of 4-digit manufacturer’s codes for TVs, VCRs, Cable and
Satellite converters and DVD players.
The screen on your Guide Remote can provide you instant access to the TV programs
listing, including a brief description of the TV show.
FEATURES
TV Listings – screen on remote provides access to TV program listings.
Program Details – press the GUIDE key to view program details.
Pre-Programmed Code Setup – contains the control codes for most
available brands, including some discontinued devices.
Auto Code Search – select the type of device you need to set up and Guide
Remote will search for the right code.
Code Verification – lets you recall the codes for each device in setup.
Programmable Macro Keys – each macro keys let you send a set of
commands containing up to 32 steps with a single key press.
Punch-Through – gives you the ability to control specific functions of two
different devices without being in the active mode for each device.
Priority-Press – gives you the ability to control the functions for each device
exclusively in the active device mode.
Record Safety – requires a double press of key to prevent accidental
recording.
Battery Saver – remote stops sending IR signal after 30 seconds if a key is
stuck to save battery power.
Code Saver – if batteries are removed or power runs out codes are stored in
memory.

INTRODUCTION
Key Layout 4
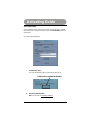
KEY LAYOUT
Your Guide Remote* controls the four most used functions in your home entertainment
center, the TV, VCR/PVR, Cable/SAT and DVD player.
After the initial set up, the command keys will work similar to the keys on your original
remote control.

INTRODUCTION
5 Basic Key Functions
BASIC KEY FUNCTIONS
The following table details the list of all keys on the Guide Remote* and how
they function.
P Use to program the remote to control your devices.
LIGHT
Use to turn the backlight on or off. When the
backlight key is pressed, the backlight will turn on for
5 seconds. Each time any key is pressed, the 5-
second timer is re-primed. If no key is pressed during
the 5-second interval, the backlight will turn off.
GUIDE
Press the GUIDE key near the display screen to
access the TV Listings, Program Details and
Information screen.
TV, VCR,
CBL/SAT, DVD
Use to set up the remote to control your devices. Use
these keys during normal operation, after setup, to
select a desired device to control.
POWER,
VOL+,
VOL-,
CH +,
CH-,
LAST,
MUTE,
GUIDE,
MENU,
SELECT,
INFO,
EXIT,
Digit Keys (0-9),
TV/VCR (A/B)
100+,
ENTER and
VCR & DVD Keys
(Transport Keys)
Use these keys the same as the corresponding keys
on your original remote control.
MACRO Use MACRO keys to program multi-step commands.

INTRODUCTION
Mode Key Functions 6
MODE KEY FUNCTIONS
The table below details the function of selected keys in the various modes.
KEY TV CBL/SAT VCR DVD
GUIDE
Guide Guide Guide, Program Guide
MENU
Menu Menu Menu Menu
INFO
Display Information Display Information
CH +
Channel Up Channel Up Channel Up Channel Up
CH -
Channel Down
Channel Down
Channel Down Channel Down
VOL +
Volume Up
Volume Up
Volume Up Volume Up
VOL -
Volume Down
Volume Down
Volume Down Volume Down
LAST
Last Channel
Last Channel
Last Channel
MUTE
Mute Mute Mute Mute
ENTER
Enter Enter Enter Enter
DIGIT
Enter Enter Enter Enter
TV/VCR
TV/VCR A/B TV/VCR TV/DVD
REW
Punch-through
to VCR
Punch-through
to VCR
Rewind Rewind
PLAY
Punch-through
to VCR
Punch-through
to VCR
Play Play
FFWD
Punch-through
to VCR
Punch-through
to VCR
Fast Forward
Fast Forward
REC
Punch-through
to VCR
Punch-through
to VCR
Record Record
STOP
Punch-through
to VCR
Punch-through
to VCR
Stop Stop
PAUSE
Punch-through
to VCR
Punch-through
to VCR
Pause Pause
MACRO
Learn Macro Learn Macro Learn Macro Learn Macro
Note: On some Cable and Satellite systems with VOD (Video on Demand) the Transport
(VCR/DVD) keys will not punch through to VCR. They will have the VOD function.

INTRODUCTION
7 Install Batteries
INSTALL BATTERIES
The battery cover is located on the back of the remote. Pay close attention to the
direction of the batteries. Align the poles (+ and -) as indicated in the battery
compartment. Remove battery case cover to install the batteries in the remote control.
1. Press firmly on the arrow on the back of the remote to remove the battery
cover.
2. Insert four new 1.5-volt AA alkaline batteries, taking care to align the polarity
symbols ( + and - ) as marked inside the battery case.
3. Replace the battery cover.
Notes:
• Use only fresh AA alkaline batteries.
• Do not use rechargeable batteries.
• Do not mix old and new batteries.
• Promptly remove old or weak batteries since they can leak chemicals that can
destroy electronic parts.
BATTERY SAVER
If a key on the remote becomes stuck or held for an extended period, the remote will stop
sending IR signal after 30 seconds.
ADJUST CONTRAST
Adjust the contrast on the screen of your new Guide Remote. Each time batteries are
removed and replaced in the Guide Remote; you can adjust the contrast on the display
screen to your desired level.
To adjust the contrast level, repeatedly press the left or right arrow keys located
directly below the display screen.

Remote Control
Remote Setup 8
REMOTE SETUP
You can use the remote control’s device keys to control the following devices:
TV (television), VCR (Video Cassette Recorder), CBL/SAT (Cable converter or
Satellite/Digital Satellite System receiver) or DVD (Digital Video Device) Player.
The default brands and codes preset in the remote are as follows:
• RCA TV (0200),
• RCA SAT receiver (0496),
• RCA VCR (0817) and
• RCA DVD player (0450)
To control devices other than the default brands perform the following steps. Skip this
section if you use the default brands.
• Refer to the Manufacturers Codes on page 26 and write down the codes(s) for
the brand of each device you want to program.
• Turn on all your home entertainment devices.
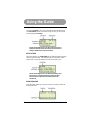
PROGRAM SETUP CODES
To set up the remote to control other devices or to change the set up of the default TV
perform the following steps. For this example
we will set up the remote to control a
Curtis Mathis TV using manufacturers’ code 0 5 9 1.
1. Press the TV key. The red light blinks one time.
2. Press the P key. The red light blinks two times.
3. Enter 0 5 9 1 using the digit keys. The red light blinks one time for each digit
entered.
4. Press the P key. If the device is in the library the red light will blink three times
indicating acceptance of the code. If the device does not exist, the red light
will not blink on the remote.
Repeat the above steps to program codes into remote to control other devices.
For some combo devices (e.g. TV/VCR, DVD/VCR, etc.), you may need to set up each
device type. Press TV key to set up TV and enter manufacturers’ code. Then press the
VCR key and use the VCR code listed.

Remote Control
9 Manual Code Search
MANUAL CODE SEARCH
If the Guide Remote* does not operate your device, when set up, you may not
have entered the correct 4-digit code. You may manually search for codes in each
device category to locate one that operates your brand of device. See page 26 for
list of Manufacturer’s codes. To manually search for a codes that works on your
device perform the following steps.
1. Press device key (TV, VCR, CBL/SAT or DVD). The red light blinks one
time.
2. Press the P key. The red light blinks two times.
3. Press the 0 0 0 0 digit keys. The red light blinks one time.
4. Press the P key. The red light blinks three times.
5. Press any IR key (POWER, CH+, CH-, VOL+, VOL-, etc.). The red light
blinks one time for each key pressed.
6. If the device operates the desired function, press the device key (TV,
VCR, CBL/SAT or DVD to exit and save the code. The red light blinks
one time.
7. If the device does not operate the desired function, press the P key then
the desired IR key(s), (POWER, CH+, CH-, VOL+, VOL-, etc.) again.
Repeat the process until you find a code that operates your device.
8. Once you find a code that works press the device key (TV, VCR,
CBL/SATor DVD) to exit and save the code.
AUTO CODE SEARCH
The remote can perform an auto-search to locate a code that operates your
devices. To allow the remote to perform an auto-search for a code perform the
following steps.
1. Press the desired device key (TV, VCR, CBL/SAT or DVD) on which to
perform a code search. The red light blinks one time.
2. Press the P key. The red light blinks two times.
3. Press the 7 digit key. The red light blinks one time.
4. Press the P key. The red light blinks three times.
5. At 2.5-second intervals, the remote will send POWER key commands. If the
device does not have a power code, the remote will send the following
commands in order, PLAY, CH+ and MUTE IR. If none of these commands
exists for the device, the device is skipped.
6. Press the device key (TV, VCR, CBL/SAT or DVD) to stop auto-search and
save the code. Press any other key except device key to terminate the
search without saving a code.
The P key is ignored if pressed to terminate
auto search.
Note: It may take up to several minutes to locate a code that operates the device.

Remote Control
View Device Codes 10
VIEW DEVICE CODES
To determine the 4-digit code for each device set up in your remote perform the following
steps:
VIEWING CODES
1. Press the desired device key (TV, VCR, CBL/SAT or DVD). The red light blinks
one time.
2. Press P key. The red light blinks two times.
3. Press number 1 digit key. Press P key. Count the blinks (for example, if the red
light blinks five times the first digit in the code is 5). Write down the number.
Note: The red light will not blink if the digit in the code is the number 0.
4. Press number 2 digit key. Press P key. Count the blinks. Write down the number.
5. Press number 3 digit key. Press P key. Count the blinks. Write down the number.
6. Press number 4 digit key. Press P key. Count the blinks. Write down the number.
You can re-verify the number of blinks to identify either the first, second, third or fourth
digit in the code by repeating any of the above steps.
Press any device key (TV, VCR, CBL/SAT or DVD) to exit this mode. The remote
automatically exits this mode after 20 seconds of inactivity.
REASSIGNING DEVICE KEYS
You can reassign a device key (TV, VCR, CBL/SAT or DVD) to control any type device.
For example, the VCR key can be set up to control a second TV, or the DVD key can be
set up to control a second VCR.
Note: You must use the device category assigned to the key to perform an Auto Search
and Manual Search.

Remote Control
11 Programming Macros
PROGRAMMING MACROS
The Guide Remote* has two hard keys for programming macros. Program each macro
key to send one command containing up to 32 keystrokes.
RECORDING MACRO
Perform these steps to program macros.
1. Press any device key (TV, VCR, CBL/SAT or DVD). The red light blinks one time.
2. Press the P key. The red light blinks one time.
3. Press Macro Key 1 or 2. The red light blinks 3 times.
4. Press the desired keys (TV, VCR, POWER, CH +, PLAY, etc.) associated with the
macro you want the remote to execute. The red light blinks one time for each key
press.
5. Press the P key. The red light blinks three times.
NOTES:
• Press the LIGHT key to add ½ second delays. Each press of the LIGHT adds a ½
second delay.
• If your original remote control requires you to press Enter, Select or any other command,
press ENTER after entering the channel number.
• Repeat Steps 1-4 above to assigning a new macro to either MACRO key. The previous
macro will be overwritten.
PLAYING MACRO
To play a macro, press the appropriate MACRO key.
If you want to add another macro to the second macro key, repeat the above steps and
substitute the desired key sequence for the macro you wish the remote to perform.
PUNCH-THROUGH
The Punch-Through feature lets you control two or more different devices without having
to press the device keys for each one. For instance, with Punch-Through enabled, you
can control the TV and/or VCR volume through your Cable converter. Punch-Through is
always on unless you disable it.

Remote Control
Volume Lock 12
VOLUME LOCK
Your remote’s Volume Lock is preset to ON, so the volume and mute keys only control
the TV volume, no matter which device is selected. If your device (CBL, VCR or SAT)
has volume keys, the remote will ignore them and control volume through your TV. If you
want to control the volume of other devices through your TV, skip the next section.
Note: TV/VCR Combo devices do not use this feature.
If you want to control the volume through each of your devices, perform the following
steps:
TURN OFF VOLUME LOCK
Volume Unlock – CBL/SAT
1. Press CBL/SAT key. The red light blinks one time.
2. Press P key. The red light blinks two times.
3. Press number 5 digit key. The red light blinks one time.
4. Press P key. The red light blinks 2 times.
Volume lock to CBL/SAT is now turned off. If you want to control volume through
Cable/SAT, you must be in the Cable/SAT mode.
Volume Unlock – VCR
1. Press VCR key. The red light blinks one time.
2. Press P key. The red light blinks two times.
3. Press number 5 digit key. The red light blinks one time.
4. Press P key. The red light blinks two times.
Volume lock to VCR is now turned off. If you want to control volume through your
VCR, you must be in the VCR mode.
Volume Unlock – DVD Player
1. Press DVD key. The red light blinks one time.
2. Press P key. The red light blinks two times.
3. Press number 5 digit key. The red light blinks one time.
4. Press P key. The red light blinks two times.
Volume lock to DVD is now turned off. If you want to control volume through your
DVD, you must be in the DVD mode.

Remote Control
13 Turn On Volume Lock
TURN ON VOLUME LOCK
You can turn on or reset Volume Lock to control volume through your TV by performing
the following steps:
Note: If no device is set up in the selected mode, the remote will punch-through and
attempt to find one. If none is found, it will not send the volume lock command.
Volume Lock – Cable Converter or SAT/DSS Receiver
1. Press CBL/SAT key. The red light blinks one time.
2. Press P key. The red light blinks two times.
3. Press number 5 digit key. The red light blinks one time.
4. Press P key. The red light blinks one time.
Volume to cable converter or satellite receiver is now controlled through TV.
Volume Lock – VCR
1. Press VCR key. The red light blinks one time.
2. Press P key. The red light blinks two times.
3. Press number 5 digit key. The red light blinks one time.
4. Press P key. The red light blinks one time.
Volume to VCR is now controlled through TV.
Volume Lock – DVD Player
1. Press DVD key. The red light blinks one time.
2. Press P key. The red light blinks two times.
3. Press number 5 digit key. The red light blinks one time.
4. Press P key. The red light blinks one time.
Volume to DVD is now controlled through TV.
DVD/VCR KEYS
DVD/VCR (transport) keys that have no function in the current device "punch-through" to
the VCR device. Example: Specific VCR keys (Play, Stop, Fast Forward, Rewind, Pause,
Record) will transmit these VCR IR codes in the Cable, Sat and TV mode.
The default setting in the Guide Remote is for the transport keys to Punch-Through to the
default VCR. If you have a VCR set up in the remote but want the transport keys to
punch-through to be controlled by your DVD player, turn on Priority-Press and map
the transport keys to the DVD player.
The transport keys will also punch-through to the DVD Player if you set up a DVD player
under the VCR key.
Transport keys will not punch-through to VCR, Cable and Sat if device has Video on
Demand feature. VOD functions are maintained.

Remote Control
14 Priority-Press
PRIORITY-PRESS
Priority-Press gives you the ability to assign common functions to keys associated with
your entertainment devices, regardless of which mode you are in, with the press of one
key.
Once set up, priority-press keys will only control the assigned device, regardless of the
currently active mode.
Example: You can set up the volume keys to only control the TV, the channel keys to
control the cable box, the transport keys to control the DVD and the power key to only
operate the cable or satellite box.
PRIORITY-PRESS KEY CLASS
There are four priority-press key classes, Channel (CH up and CH down), Volume (VOL
up and VOL down) and Transport (Play, Stop, FAST Forward, Rewind, Pause and
Record) and Power.

Remote Control
Priority-Press Key Class Table 15
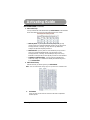
PRIORITY-PRESS KEY CLASS TABLE
The table below details the classification of Priority-Press keys (See Page 14 for
more information on Priority-Press).
PRIORITY-PRESS
KEY CLASSES
KEY LABEL
Power
POWER
CH +
CH -
LAST
ENTER
Channel
Digit Keys (0-9)
VOL +
VOL -
Volume
MUTE
REW
PLAY
FFWD
REC
STOP
Transport
(VCR/DVD Keys)
PAUSE
GUIDE
MENU
SELECT
INFO
EXIT
Menu
(Navigation Keys)
NAVIGATION ARROWS

Remote Control
16 Turn On Power Key Priority-Press
TURN ON POWER KEY PRIORITY-PRESS
The Power key class is the POWER key. To setup Power class key perform the following
steps:
Power Key Priority-Press Setup
1. Press a device key (TV, VCR, CBL/SAT or DVD). The red light
blinks one time.
2. Press P key. The red light blinks two times.
3. Press Power Key. The red light blinks three times.
When the POWER key is pressed, power on/off will only work for the selected device.
CHANNEL KEY PRIORITY-PRESS
The Channel class keys are CH+, CH- Last and the digit keys. To setup and turn on
channel class key to various devices perform the following steps:
Channel Key Priority-Press Setup – TV
1. Press TV key. The red light blinks one time.
2. Press P key. The red light blinks two times.
3. Press number CH+, CH- or Last key. The red light blinks three
times.
When the CH+, CH-, Last or digit keys are pressed the remote will only change channels
through TV.
Channel Key Priority-Press Setup – CBL/SAT
1. Press CBL/SAT key. The red light blinks one time.
2. Press P key. The red light blinks two times.
3. Press number CH+, CH- or Last key. The red light blinks three
times.
When the CH+, CH-, Last or digit keys are pressed the remote will only change channels
through the CBL/SAT box.
Channel Key Priority-Press Setup – VCR
1. Press VCR key. The red light blinks one time.
2. Press P key. The red light blinks two times.
3. Press number CH+, CH- or Last key. The red light blinks three
times.
When the CH+, CH-, Last or digit keys are pressed the remote will only change channels
through the VCR.
Note: Digit keys cannot be used to program the channel class. To remove Channel Key
Priority-Press repeat the set up steps for the appropriate device.

Remote Control
Volume Key Priority-Press 17
VOLUME KEY PRIORITY-PRESS
The Volume class keys are VOL+, VOL- and MUTE. To set up volume class key perform
the following steps:
Volume Key Priority-Press Setup – TV
1. Press TV key. The red light blinks one time.
2. Press P key. The red light blinks two times.
3. Press VOL+, VOL- or MUTE key. The red light blinks three times.
When the VOL+, VOL- or MUTE keys are pressed, the volume will only be controlled through
the TV.
Volume Key Priority-Press Setup – CBL/SAT
1. Press CBL/SAT key. The red light blinks one time.
2. Press P key. The red light blinks two times.
3. Press VOL+, VOL- or MUTE key. The red light blinks three times.
When the VOL+, VOL- or MUTE keys are pressed, the volume will only be controlled through
the CBL/SAT box.
Volume Key Priority-Press Setup – VCR
1. Press VCR key. The red light blinks one time.
2. Press P key. The red light blinks two times.
3. Press VOL+, VOL- or MUTE key. The red light blinks three times.
When the VOL+, VOL- or MUTE keys are pressed, the volume will only be controlled through
the VCR.
Volume Key Priority-Press Setup – DVD
1. Press DVD key. The red light blinks one time.
2. Press P key. The red light blinks two times.
3. Press VOL+, VOL- or MUTE key. The red light blinks three times.
When the VOL+, VOL- or MUTE keys are pressed, the volume will only be controlled through
the DVD.
To remove Volume Key Priority-Press repeat the setup steps for the appropriate device. Two
blinks of the red light indicate Volume Lock is turned off.
TRANSPORT KEYS PRIORITY-PRESS
The Transport class keys are REW, PLAY, FFWD, REC, STOP, and PAUSE. To setup
and turn on transport class keys to devices perform the following steps:
Transport Key Priority-Press Setup
1. Press VCR or DVD key. The red light blinks one time.
2. Press P key. The red light blinks two times.
3. Press a Transport Class Key. The red light blinks three times.
When a Transport Class key is pressed, transport keys will only work for the selected device.

Remote Control
Turn On Menu Key Priority-Press 18
TURN ON MENU KEY PRIORITY-PRESS
The Menu class keys are MENU, SELECT, GUIDE, INFO, EXIT and Navigation arrows.
To setup and turn on menu class key to various devices perform the following steps:
Menu Key Priority-Press Setup
1. Press device key (TV, VCR, CBL/SAT or DVD). The red light blinks one time.
2. Press P key. The red light blinks two times.
3. Press Menu Class Keys. The red light blinks three times.
When a Menu Class key is pressed, the menu will only work for the selected
device.
PUNCH-THROUGH VS PRIORITY PRESS
Punch-Through and Priority-Press are mutually exclusive features. If Priority-Press is
turned on, Punch-Through is turned off. If Priority-Press is turned off, Punch-Through is
turned on.
Note: If you enable priority-press with no class key priorities programmed the remote does not sent
either Punch-Through or Priority-Press command.
TOGGLE PUNCH-THROUGH AND PRIORITY-PRESS
To toggle between Punch-Through and Priority-Press perform the following steps:
1. Press any device key (TV, VCR, CBL/SAT or DVD). The red light will blink
one time.
2. Continue to press and hold the device key for 3.5 seconds.
• If the red light blinks three times, Punch-Through is OFF and Priority-
Press is ON.
• If the red light blinks two times, Punch-Through is ON and Priority-Press
is OFF.

Remote Control
19 Backlight / Factory Reset
BACKLIGHT
• Press the LIGHT key to turn on the backlight. When the LIGHT key is
pressed, the backlight is preset to stay on for 5 seconds.
• Each time any key is pressed, the 5 second timeout is reset. If no key is
pressed for 5 seconds, the backlight will turn off.
• If the LIGHT key is pressed while the backlight is on, it will turn off.
The backlight on your remote can be set to turn on and stay on for up to 10
seconds. To change the backlight setting to a 10-second timeout perform the
following steps:
1. Press any device key (TV, VCR, CBL/SAT or DVD). The red light blinks 1 time.
2. Press the P key. The red light blinks 2 times.
3. Press the number 9 digit key. The red light blinks 1 time.
4. Press the P key. The red light blinks 2 times. The backlight will now remain on
for up to 10 seconds after the last key is pressed.
Repeat steps 1-4 to change the backlight setting back to a 5 second timeout. The
red light blinks 1 time in step four to indicate a 5 second backlight timeout.
FACTORY RESET
The Guide Remote* can be reset to the factory default settings. Once reset, all macros
and setup devices revert to default settings and devices. To reset remote to factory
settings, perform the following steps.
1. Press any device key. The red light blinks 1 time.
2. Press the P key. The red light blinks 2 times.
3. Press the number 8 digit key. The red light blinks 1 time.
4. Press and hold the P key for 3 seconds. The red light blinks 2 times.
Page is loading ...
Page is loading ...
Page is loading ...
Page is loading ...
Page is loading ...
Page is loading ...
Page is loading ...
Page is loading ...
Page is loading ...
Page is loading ...
Page is loading ...
Page is loading ...
Page is loading ...
Page is loading ...
Page is loading ...
Page is loading ...
Page is loading ...
Page is loading ...
Page is loading ...
Page is loading ...
Page is loading ...
Page is loading ...
Page is loading ...
Page is loading ...
Page is loading ...
Page is loading ...
Page is loading ...
Page is loading ...
Page is loading ...
-
 1
1
-
 2
2
-
 3
3
-
 4
4
-
 5
5
-
 6
6
-
 7
7
-
 8
8
-
 9
9
-
 10
10
-
 11
11
-
 12
12
-
 13
13
-
 14
14
-
 15
15
-
 16
16
-
 17
17
-
 18
18
-
 19
19
-
 20
20
-
 21
21
-
 22
22
-
 23
23
-
 24
24
-
 25
25
-
 26
26
-
 27
27
-
 28
28
-
 29
29
-
 30
30
-
 31
31
-
 32
32
-
 33
33
-
 34
34
-
 35
35
-
 36
36
-
 37
37
-
 38
38
-
 39
39
-
 40
40
-
 41
41
-
 42
42
-
 43
43
-
 44
44
-
 45
45
-
 46
46
-
 47
47
-
 48
48
-
 49
49


Radio Shack 120-2130A User manual
- Category
- Car media receivers
- Type
- User manual
- This manual is also suitable for
Ask a question and I''ll find the answer in the document
Finding information in a document is now easier with AI
Related papers
-
Radio Shack Light and Learn Remote User manual
-
Radio Shack 15-2103 User manual
-
-
-
-
-
-
Radio Shack Video Gaming Accessories AT8400 User manual
-
-
