Page is loading ...

Cat. No. 15-1925
OWNER’S MANUAL
6 in 1 IR/RF
Remote Control
Please read before using this equipment.
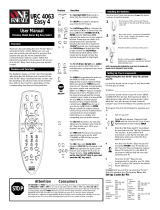
SET UP
CD VCR CBL TV
PWR
AUX 1 AUX 2
LASTENTER
PROG
All Lts
On
On
Off
All
Off
Brt
Dim
AUDIO SEQ
SURROUND
RECORD
PAUSE
VIDEO SEQ
SHIFT
SLEEP DISPLAY
FRONT
REAR
RIGHTLEFT
MUTE
TV/VCR
CH
CH
VOL
VOL
SCAN
Plug'n
Power
123
456
78
PLAY
STOP
FFREW
9
0
15-1925.fm Page 1 Monday, July 19, 1999 12:59 PM

Need help? Call
1-800-950-7044
2
FEATURES
Your RadioShack 6 in 1 IR/RF Remote Control
comes with an RF command console that allows
you to send commands to most IR (infrared)-con-
trolled devices from any room in your home, up to
100 feet away. You can use it to control your TV,
VCR, cable box, and even lights and appliances
with Plug ’n Power modules (not supplied).
The 6 in 1 IR/RF Remote Control is prepro-
grammed. All you have to do is tell it which TV,
VCR, or other component’s remote controls you
want to replace (by entering 3-digit codes), and it
is automatically ready to operate most of the
same functions as the original remotes.
This manual includes a list of 3-digit manufactur-
er’s codes for TVs, VCRs, cable converters, com-
pact disc players, satellites, and other popular re-
mote-controlled devices.
The 6 in 1 IR/RF Remote Control’s features in-
clude:
IR (Infrared) and RF (Radio-Frequenc
y
) Com-
mands
— use the remote control with the sys-
tem’s RF command console to control your IR re-
mote-controlled devices from up to 100 feet
away, even through walls.
Reassi
g
nable Device Ke
y
s
— so you can con-
trol more than one of the same type of device (two
VCRs, for example).
Fast Search
— when you control more than one
of the same type of device, lets you quickly
search all programmed manufacturers’ codes for
that type of device until you find the code for the
specific device you want to use.
©
1997 Tandy Corporation.
All Rights Reserved.
RadioShack is a registered trademark used by
Tandy Corporation.
X-10 is a registered trademark of X-10 (USA) Inc.
15-1925.fm Page 2 Monday, July 19, 1999 12:59 PM

Need help? Call
1-800-950-7044
3
Channel Scan
— lets you scan through all the
available channels on your TV, VCR, or cable
box, stopping at each one for about 3 seconds.
Favorite Channel Scan
— lets you set up the re-
mote to scan through a list of up to 10 channels
you select.
Programmable Sequence Command
— lets
you press a single key to send a set of com-
mands.
Lighted Keypad
— lets you use the 6 in 1 even
in a dark or dimly lit room.
Plug ’n Power Functions
— allow you to oper-
ate your Plug ’n Power modules with your remote
and an optional IR controller (RadioShack Unlim-
ited No. 10037703).
Powerful Infrared Beam
— uses UHF radio fre-
quencies to go through walls, so you can operate
your remote-controlled devices from a greater
distance than many original remote controls — up
to 100 feet!
Convenient Keypad Design
— each key is in
the perfect position for easy operation.
Handy Reference Label
— provides a conve-
nient place for you to write down the manufactur-
ers’ codes for your remote-controlled devices.
Toll Free Support and Telephone Program-
ming
— you can get expert help for your 6 in 1 IR/
RF Remote Control by calling
1-800-950-7044
.
You can even have the manufacturer’s codes for
your remote-controlled devices pro- grammed
into your remote control by phone!
Note:
You need four AAA batteries (not supplied)
to power your 6 in 1 IR/RF Remote Control.
15-1925.fm Page 3 Monday, July 19, 1999 12:59 PM

Need help? Call
1-800-950-7044
4
CONTENTS
How the System Works .......................................... 5
Preparation ............................................................. 7
Installing Batteries .............................................. 7
Setting Up the 6 In 1’s RF Command Console .. 8
Lighting the Keys ............................................... 8
Setting Up Your Remote Control ........................ 9
Using Two or More Similar Devices ................. 10
Operation .............................................................. 12
Using the 6 In 1’s RF Command Console ........ 12
Channel Scan .................................................. 12
Favorite Channel Scan .................................... 13
Setting Favorite Channel Scan ................ 13
Using Favorite Channel Scan .................. 14
Clearing Favorite Channel Scan .............. 14
Command Sequences ..................................... 15
Setting a Sequence ................................. 15
Erasing a Sequence ................................ 15
Punch-Through ............................................... 16
Using Punch-Through .............................. 16
Turning Punch-Through On and Off ......... 16
Using the Sleep Timer ...................................... 17
Controlling Lights and Appliances .................... 17
If You Have Problems .......................................... 20
Manual Code Search ....................................... 20
Determining the 3-Digit Code ................... 21
Troubleshooting ............................................... 22
Downloading Updated Code Information ......... 22
Fast Search ............................................ 24
Manufacturers’ Codes .......................................... 26
Audio Amplifiers ............................................... 26
Audio Amp/Tuners ............................................ 27
Audio Cassette ................................................. 29
Cable Converters ............................................. 31
CD Players ....................................................... 32
Home Automation ............................................ 36
Laser Disc Players ........................................... 36
Miscellaneous Audio ........................................ 37
Satellite Receivers ........................................... 37
Televisions ....................................................... 38
TV/VCR Combinations ..................................... 43
VCRs ................................................................ 43
Video Accessories ........................................... 49
FCC Caution .......................................................... 50
Care and Maintenance ......................................... 51
Specifications ....................................................... 52
15-1925.fm Page 4 Monday, July 19, 1999 12:59 PM

Need help? Call
1-800-950-7044
5
HOW THE SYSTEM WORKS
Your RadioShack 6 in 1 IR/RF Remote Control
was designed with the functions used most often
to operate TV, VCR, cable converter, CD player,
satellite receiver, and audio equipment.
The 6 in 1 IR/RF Remote Control comes with an
RF command console, which receives radio fre-
quency signals from the 6 in 1 and converts them
into infrared signals to control your devices. The
console is set up in the same room as the devices
you want to control, but you can take the remote
farther away, even into another room.
When you set up the 6 in 1 IR/RF Remote Con-
trol, its command keys work like the keys on your
original remote controls. For example, the 6 in 1
IR/RF Remote Control’s
PWR
key works like a key
on your original remote control which might be la-
beled POWER ON/OFF.
Ke
y
Function
SET UP
Used in setting up your
devices.
Lights your keypad for use in
dark or dimly lit rooms.
PWR,
digit keys,
CH,
VOL, ENTER, LAST,
PROG, SLEEP, DIS-
PLAY, MUTE
Operate the same as the keys
on your original remote con-
trol.
CD, VCR, CBL, TV,
AUX1, AUX2,
Plug’n Power
Use these device keys when
you set up the 6 in 1 to
replace your original remote
controls. You also use the
device keys during normal
operation to tell the 6 in 1
which device you want to con-
trol.
TV/VCR
Operates the same as the TV/
VCR key on your original
remote control.
SCAN
Allows you to easily browse
through channels on your TV,
VCR, or cable box.
15-1925.fm Page 5 Monday, July 19, 1999 12:59 PM

Need help? Call
1-800-950-7044
6
Notes:
• The remote control’s red light turns on when
you press a key, and blinks when you have
entered a feature or manufacturer’s code.
• Whenever you use
RECORD
on the remote
control, you must press it twice. This safety
feature helps you avoid accidentally record-
ing over tapes.
• If you use the 6 in 1 IR/RF Remote Control to
replace extremely complex remote controls,
the 6 in 1 might not be able to duplicate
some of your original remote control’s sel-
dom-used functions, but it can duplicate all
of the original’s most commonly used func-
tions.
AUDIO SEQ, VIDEO
SEQ
These keys are for special
sequences that you set up.
SURROUND, SHIFT
These keys are for controlling
your Surround Sound system
and other similar devices.
RECORD, PAUSE,
PLAY , REW ,
FF , STOP
n
These keys control VCR func-
tions. In addition, these keys
are used to select options and
navigate in your Surround
Sound system, satellite sys-
tem, or other similar devices.
Key Function
15-1925.fm Page 6 Monday, July 19, 1999 12:59 PM

Need help? Call
1-800-950-7044
7
PREPARATION
INSTALLING BATTERIES
You need four AAA batteries to power your re-
mote control. We recommend alkaline batteries,
such as RadioShack Cat. No. 23-555.
1.Press the battery
compartment cover
tab and lift off the
cover.
2.Install four AAA alka-
line batteries as indi-
cated by the polarity
symbols marked in-
side the compart-
ment.
3.Replace the cover.
Note:
Do not place objects on top of the remote
control after you have installed the batteries. This
can press keys for an extended period of time and
reduce battery life.
When the 6 in 1 IR/RF Remote Control’s range
decreases or it operates erratically, replace the
batteries.
Note:
Although the 6 in 1 has a built-in memory
backup, we recommend you have fresh batteries
ready to install as soon as you remove the old
ones.
15-1925.fm Page 7 Monday, July 19, 1999 12:59 PM

Need help? Call
1-800-950-7044
8
SETTING UP THE 6 IN 1’S RF
COMMAND CONSOLE
After you install batteries in the 6 in 1, just plug the
RF command console’s power cord into any stan-
dard AC outlet in the same room as your IR re-
mote-controlled devices (TV, VCR, cable box,
and so on) and fully extended its antenna. Be
sure the command console is pointed at the de-
vices you want to control.
The command console has a 4-foot IR signal ex-
tension cord for use with devices that are not in
the command console’s line of sight. If you have
such a component, plug the extension cord into
the back of the command console and use the
supplied double-sided tape to attach the exten-
sion cord’s LED over or next to the device’s IR
sensor.
Note:
The 6 in 1 transmits both IR and RF signals
at the same time. When testing the command
console, be sure the 6 in 1 is not pointed at your
devices.
LIGHTING THE KEYS
Press to light the keys on the remote. Now,
every time you press a key, the 6 in 1 lights up
and stays lit for about 5 seconds.
To turn off the light, press again.
15-1925.fm Page 8 Monday, July 19, 1999 12:59 PM

Need help? Call
1-800-950-7044
9
SETTING UP YOUR REMOTE
CONTROL
1. Refer to “Manufacturers’ Codes” on Page 26
and write down the codes for your original
remote controls.
Note:
Some manufacturers have several
possible codes listed. Try each until you find
the correct code. See “If You Have Prob-
lems” on Page 20 if you need help.
2. Press the device key for the type of remote
you are replacing (
CD
,
VCR
,
CBL
,
TV
,
AUX1
or
AUX2
).
Hold down
SET UP
until the red light blinks
twice, then release it. Enter the 3-digit code.
For example, to replace a TV’s remote con-
trol (manufacturer’s setup code 154), press:
TV
–
SET UP
–
1– 5
–
4
3. When the red light blinks twice again, the 6
in 1 has accepted the code.
4. Point the 6 in 1 IR/RF Remote Control at
your device and press
PWR
(or
CH
s
for
some cable boxes). Your device should turn
off (or on, if it was off).
If the remote does not operate your device,
try the other codes listed in the “Manufac-
turer’s Codes” section for your brand of TV,
VCR, cable converter, or other device.
Repeat Steps 2–5 for additional devices.
15-1925.fm Page 9 Monday, July 19, 1999 12:59 PM

Need help? Call
1-800-950-7044
10
Note:
The punch-through feature (see “Punch-
Through” on Page 16) is automatically turned on
for the TV’s volume and mute controls. This
means that when you select cable, for example,
and press one of the volume keys or the mute
key, the remote sends that function to the televi-
sion instead of the cable converter. If you want to
use your cable converter’s volume and mute con-
trols, disable the punch-through feature for these
keys.
USING TWO OR MORE SIMILAR
DEVICES
Each of the 6 in 1 IR/RF Remote Control’s device
keys are preset to control a particular type of de-
vice:
TV
— TVs only
CBL
— Cable converters, satellite receivers and
video accessories
VCR
— VCRs, TV/VCR combinations, laser disc
players, cassette decks and digital audio tape
decks
CD
— CD players, amplifiers, tuners, receivers,
and miscellaneous audio products
AUX1
— VCRs, laser disc players, cassette
decks, and digital audio tape decks
AUX2
— Cable converters, satellite receivers, and
video accessories
Plug ’n Power
— Plug ’n Power or X-10 home au-
tomation devices
15-1925.fm Page 10 Monday, July 19, 1999 12:59 PM

Need help? Call
1-800-950-7044
11
Normally, you program each key for one of its list-
ed devices. However, if you have two or more of
the same type of device (two TVs, two VCRs, and
so on) you can convert any unused key (
TV
,
CBL
,
CD
,
VCR
,
AUX1
, or
AUX2
) to control another type
of device by following these steps.
1. Press
SET UP
until the red light blinks twice.
2. Press
9
–
9
–
2
. The red light blinks twice.
Press the key for the type of device you have
two of, then the unused device key you want
to convert. The red light blinks twice again.
For example, to convert an unused
CBL
key
into a second
VCR
key:
SET UP
–
9
–
9
–
2
–
VCR
–
CBL
To change the
CBL
key back to its original
function:
SET UP
–
9
–
9
–
2
–
CBL
–
CBL
15-1925.fm Page 11 Monday, July 19, 1999 12:59 PM

Need help? Call
1-800-950-7044
12
OPERATION
1. Press the device key for the device you want
to operate, then point the 6 in 1 at the device
and press
PWR
(or
CH
s
for some cable con-
verters) to turn the device on.
2. Repeat Step 1 for all other devices you want
to operate.
3. Point the 6 in 1 IR/RF Remote Control
toward the device you want to control, then
press the appropriate device key and the
desired command keys.
Note:
The command keys on the 6 in 1 IR/
RF Remote Control work the same as the
keys on the original remote control; however,
the labeling might differ slightly.
4. To turn off the last device you selected, press
PWR
. To turn off other devices, press the
device key for the device you wish to turn off,
then press
PWR
.
USING THE 6 IN 1’S RF
COMMAND CONSOLE
To operate your IR remote-controlled devices
from anywhere in your house, make sure the front
of the RF command console points toward the de-
vice(s) that you want to control, and fully extend
the console’s antenna. Press the appropriate de-
vice key on your 6 in 1, then the desired function
keys.
CHANNEL SCAN
Channel Scan lets you scan through all available
channels on your TV, VCR, or cable converter,
stopping at each for about 3 seconds.
1. Press the device key (
TV
,
VCR
, or
CBL
).
15-1925.fm Page 12 Monday, July 19, 1999 12:59 PM

Need help? Call
1-800-950-7044
13
2. Aim the 6 in 1 IR/RF Remote Control at the
device and press
SCAN
. The 6 in 1 scans
through the channels.
Note:
The 6 in 1 must be pointed at the
device the entire time you are using the
Channel Scan feature.
3. To stop scanning, simply press any key
(other than
SCAN
) on the remote control.
FAVORITE CHANNEL SCAN
The Favorite Channel Scan feature lets you set
up your 6 in 1 IR/RF Remote Control to scan
through a list of up to 10 pre-selected channels,
stopping at each for about 3 seconds.
Setting Favorite Channel Scan
Note:
Favorite Channel Scan can only be set up
for one device. Once the Favorite Channel Scan
feature has been set up for one device, you must
clear it before you can set it up for another device.
1. Press the desired device key (
TV
,
VCR
, or
CBL
).
2. Hold down
SET UP
until the red light blinks
twice, then release it.
3. Press
9
–
9
–
6
. The red light again blinks
twice.
4. Enter the 2-digit number of the first channel.
(Enter a
0
before a single-digit channel num-
ber.)
5. After you have entered a channel number,
press and release
SET UP
. The red light
blinks twice.
For example:
0
–
9
–
SET UP
(for channel 9)
15-1925.fm Page 13 Monday, July 19, 1999 12:59 PM

Need help? Call
1-800-950-7044
14
Note:
If your device requires the use of an
ENTER key to change channels, you must
press
ENTER
instead of
SET UP
after each
channel you enter into the 6 in 1 IR/RF
Remote Control’s memory.
6. Repeat Steps 4–5 to enter the channels you
want to include in your favorite channel list.
After you have entered the last channel num-
ber, hold down
SET UP
until the red light
blinks twice.
Using Favorite Channel Scan
To scan through your favorite channels, press
SCAN
and keep the 6 in 1 IR/RF Remote Control
aimed at your device. The remote control scans
through your selected channels.
The 6 in 1 IR/RF Remote Control stops scanning
after it reaches the last channel in your Favorite
Channel Scan list. To stop scanning earlier, sim-
ply press any key on the remote control.
Clearing Favorite Channel Scan
To clear the favorite channel feature of all entries:
1. Hold down
SET UP
until the red indicator light
blinks twice.
2. Press
9
–
9
–
6
. The red light again blinks
twice.
3. Press and release
SET UP
, then hold down
SET UP
until the red light blinks twice again.
15-1925.fm Page 14 Monday, July 19, 1999 12:59 PM

Need help? Call
1-800-950-7044
15
COMMAND SEQUENCES
You can set up your 6 in 1 IR/RF Remote Control
to issue a set of up to 15 commands at the press
of a key. Any sequence of commands you regu-
larly perform can be reduced to a single key
press.
Setting a Sequence
Here is an example of how to set up a sequence
of commands that turns on your cable box and
your TV and puts the TV on Channel 3, and how
this sequence works when you press
VIDEO SEQ
.
Note:
The 6 in 1 must be pointed at the device.
1. Hold down
SET UP
until the red light blinks
twice, then release it.
2. Press
9
–
9
–
5
. The red light blinks twice
again. Then press
VIDEO SEQ
.
3. Press
CBL
–
PWR
–
TV
–
PWR
–
TV
–
0
–
3
–
CBL
.
Note:
If your device requires the use of an
ENTER key to select a channel, you must
also use
ENTER
in your sequence.
4. To end the sequence, hold down
SET
UP
until the red light blinks twice.
Whenever you press the selected sequence key,
your 6 in 1 IR/RF Remote Control issues the se-
quence of commands you entered.
Erasing a Sequence
1. Hold down
SET UP
until the red light blinks
twice.
2. Press
9
–
9
–
5
. The red light blinks twice.
Press the sequence key you want to erase.
15-1925.fm Page 15 Monday, July 19, 1999 12:59 PM

Need help? Call
1-800-950-7044
16
3. Press and release
SET UP
, then hold down
SET UP
until the red light blinks twice. This
means that your sequence is erased.
PUNCH-THROUGH
Using Punch-Through
The punch-through feature lets you alternately
control two different devices without pressing the
device selection keys for each one. Here’s how it
works.
Not all of the 6 in 1 IR/RF Remote Control’s keys
are used by every device. For example, a TV is
often the only device that uses the volume keys.
After you press
TV
, then press
VCR
, the volume
control not used by the VCR retains its TV func-
tion.
Note:
The punch-through feature does not work if
the last two devices you selected have the same
(or similar) features. For example, most TVs and
some cable converters have PWR keys on their
remote controls. In this case, you must press the
desired device key before you use the remote
control’s
PWR
key.
Turning Punch-Through On and Off
If your cable converter or VCR has a volume con-
trol, you can turn off the punch-through feature to
allow the 6 in 1 to control the volume of those de-
vices. This allows your cable converter or VCR to
control the volume of your TV set (if it can already
do so). Once you turn off punch-through, you
must press the device key for the device (cable
converter or VCR) you want to use to control the
volume.
15-1925.fm Page 16 Monday, July 19, 1999 12:59 PM

Need help? Call
1-800-950-7044
17
Follow these steps to turn off punch-through.
1. Press the device key (
CBL
or
VCR
) for the
device you want to use to control the volume,
for example. Then press
SET UP
until the red
light blinks twice.
2. Press
9
–
9
–
3
. The red light blinks twice.
Press the device key (
CBL
or
VCR
) for the
device you want to use to control the volume.
The red light blinks twice to indicate punch-
through is turned off.
To turn on the punch-through feature, press
SET
UP
–
9
–
9
–
3
–
TV
. The red light blinks twice to
indicate that punch-through is on.
USING THE SLEEP TIMER
If your original remote control had a sleep timer
function, your 6 in 1 IR/RF Remote Control’s
SLEEP
key operates the same as on your original
remote.
Follow the instructions for the sleep timer function
in the owner’s manual from your original remote
control. Press
SLEEP
in the exact same manner
as the original remote control’s SLEEP key was
pressed.
CONTROLLING LIGHTS AND
APPLIANCES
The Plug ’n Power feature allows you to control
lights and appliances, using the supplied RF com-
mand console along with an optional IR com-
mand console (RadioShack Unlimited No.
10037703). You also need Plug ’n Power light
modules and appliance modules (available
through your local RadioShack store) to use this
feature.
15-1925.fm Page 17 Monday, July 19, 1999 12:59 PM

Need help? Call
1-800-950-7044
18
Follow these steps to control Plug ’n Power mod-
ules.
1. Position the IR command console within the
RF command console’s line of sight.
Note:
For the best operation, position the
controllers at least 2 feet apart.
2. Plug the IR command console’s power cord
into any standard AC outlet.
3. Set the house code dial on top of the IR com-
mand console to the same letter as your
Plug ’n Power modules.
4. Set the selector switch on the IR command
console for the group of modules you want to
control (1–4 or 5–8).
5. Press
Plug ’n Power
on the 6 in 1 IR/RF
Remote Control.
6. To turn on all light and appliance modules set
to the same code as the IR command con-
sole, press
All Lts On (PWR)
on the 6 in 1 IR/
RF Remote Control, or ALL LIGHTS ON on
the IR command console.
To turn off all light and appliance modules set
to the same house code as the IR command
console, press
All Off
(
MUTE
) on the 6 in 1
IR/RF Remote Control, or ALL UNITS OFF
on the IR command console.
7. To turn on or off specific lights and appli-
ances using the 6 in 1 IR/RF Remote Con-
trol, press the digit key (
1
,
2
,
3
,
4
,
5
,
6
,
7
, or
8
)
for the module you want to control. Then
press
ON
or
OFF
(
CH
s
or
CH
t
).
To control specific lights and appliances
directly from the IR command console, press
the button on the console that corresponds
to the number of the module you want to
control (1/5, 2/6, 3/7, 4/8). Then use the
function keys on the IR command console to
control the device.
15-1925.fm Page 18 Monday, July 19, 1999 12:59 PM

Need help? Call
1-800-950-7044
19
8. To brighten or dim lights connected to lamp
and appliance modules, press the digit key
for the module you want to control. Then
hold down
Brt
or
Dim
on the remote control
(or BRIGHT or DIM on the IR command con-
sole). Release the key when the desired
brightness is reached.
Note:
You must select the individual light to
brighten or dim even if you used
All Lts On
or
ALL LIGHTS ON to turn on all the lights at
the same time.
15-1925.fm Page 19 Monday, July 19, 1999 12:59 PM

Need help? Call
1-800-950-7044
20
IF YOU HAVE PROBLEMS
MANUAL CODE SEARCH
If the 6 in 1 IR/RF Remote Control does not oper-
ate your remote-controlled devices when you first
set it up, you might have to find the correct code
for your devices. You can try all the codes listed
in the “Manufacturer’s Codes” section on Page 26
for the brand of your device, or you can follow
these steps to search the 6 in 1 IR/RF Remote
Control’s entire library.
1. Manually turn on the device you want to set
up and press the corresponding device key
on your 6 in 1 IR/RF Remote Control (
TV
,
VCR
,
CBL
,
CD
, and so on).
2. Aim the 6 in 1 IR/RF Remote Control at the
device you want to operate.
3. Hold down
SET UP
until the red light blinks
twice. Release
SET UP
and press
9
–
9
–
1
.
The red light blinks twice again.
4. Slowly alternate between
PWR
and the
device key.
For example, if you are searching for a code
to operate your TV, use the following
sequence.
SET UP
–
9
–
9
–
1
–
PWR
–
TV
–
PWR
–
TV
–
PWR
...
Each time you press the TV key, the remote
control advances to the next manufacturer’s
code in the library.
5. When your device responds by turning off (or
on, if it was off), immediately press
SET UP
to
lock in the manufacturer’s code.
Note:
Because of the large number of codes in
the 6 in 1 IR/RF Remote Control’s library, this pro-
cedure can take several minutes. If your device
turns off during the search, but does not operate
after you lock in the code, begin the search again,
pausing longer between key presses.
15-1925.fm Page 20 Monday, July 19, 1999 12:59 PM
/