DJI Avata User Manual
15 © 2023 DJI All Rights Reserved.
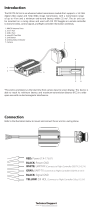
DJI FPV Remote Controller 2
1. Power Button
Press once to check the current battery level.
Press, and then press and hold to power the
remote controller on or o.
2. Battery Level LEDs
Displays the current battery level of the
remote controller.
3. Lanyard Attachment
4. C1 Button (Customizable)
The function of this button can be adjusted in
the goggles. By default, press once to enable
or disable ESC Beeping.
5. Control Sticks
Used to control the movements of the
aircraft. The control sticks mode can be set in
the goggles. The control sticks are removable
and easy to store.
6. USB-C Port
For charging and connecting the remote
controller to your computer.
7. Control Sticks Storage Slots
For storing the control sticks.
8. Flight Pause/RTH Button
Press once to make the aircraft brake and
hover in place (only when GNSS or Vision
System is available). Press and hold to initiate
RTH.
When the aircraft is performing RTH or auto
landing, press the button once to cancel RTH
or landing.
9. Gimbal Dial
Controls the tilt of the camera.
10. Flight Mode Switch
Switch between Normal, Sport, and Manual
mode. Manual mode is disabled by default and
must be enabled in the goggles.
11. C2 Switch (Customizable)
The function of this switch can be adjusted in the
goggles. By default, toggle the switch to recenter
the gimbal and adjust up and down.
12. Start/Stop Button
When using Manual mode, press twice to start or
stop the motor.
When using Normal or Sport mode, press once
to cancel Low Battery RTH countdown when the
prompt appears in the goggles, and the aircraft
will not enter the lower battery RTH.
13. Shutter/Record Button
Press once to take photos or start or stop
recording. Press and hold to switch between
photo and video mode.
14. Antennas
Relay aircraft control wireless signals.
1
3
4
5
2
6
7
8 13
10
912
14
11
1
611
2
7
12
3
813
49
14
5
10