Page is loading ...

1
EVO Manufacturing
Jeep Wrangler JL/JT Gladiator
Front Vented/Non Vented Inner Fender Liner
EVO-3097/V, EV0-3098/V, EVO-3099/V

2
Before starting installation procedure please read http://evomfg.com/Returns-Warranties-Shipping
CAREFULLY READ AND FOLLOW ALL INSTRUCTIONS IN THIS MANUAL AND KEEP FOR FUTURE
REFERENCE. IF YOU HAVE ANY QUESTIONS ABOUT THE PRODUCT CALL EVO MANUFACTURURING.
FAILURE TO FOLLOW GUIDELINES COULD RESULT IN MALFUNCTION OF PARTS OR INJURY. PLEASE HAVE
A TRAINED PROFESSIONAL ASSIST WITH OR INSTALL ALL PRODUCTS. INSTALLING EVO MFG PRODUCTS
OR KITS DEMANDS SPECIFIC KNOWLEDGE, TOOLS AND EXPERIENCE. GENERAL KNOWLEDGE OF HOW
TO USE LATER SPECIFIED TOOLS AND/OR LIMITED EXPERIENCE WITH EVO MFG PRODUCTS MAY NOT BE
ENOUGH TO PROPERLY COMPLETE THESE TASKS. SOME OF EVO MFG PRODUCTS MAY REQUIRE TWO
OR MORE PEOPLE TO INSTALL SAFELY AND CORRECTLY. DO NOT ATTEMPT ALONE, ALWAYS ENLIST THE
HELP OF TRAINED PROFESSIONAL WHEN NEEDED.
Notes: Set Up Before installation
These instructions involve how to install Inner Liners with factory fenders.
This installation process will vary with aftermarket fenders.
If installing with aftermarket fenders work around these steps to install.
Inner fenders must mount to all body connections directly and then install all other fender
parts or supports to the inner fender section. Sandwiching inner fenders between.
Do not mount inner fenders to outside of other parts.
Some adjustments may be needed to secure liner properly per individual vehicle setup.
Keep all mounting bolts loose (installed but not torqued) we will torque later at the end of
complete installation
READ BEFORE INSTALL:
It is generally a good idea to apply Loctite to all threaded bolts.
ALWAYS wear safety glasses and other approved safety gear when working on a vehicle.
All supplied bolts torqued according to chart at end of instruction.
It is recommended all installation be performed by a trained professional. Some modification may have
to be done.
Paint all unfinished surfaces after install is complete if preferred.

3
Parts included: Table below shows JL/JT Front Inner Fender Liners.
Product Prt. #
Description
#
Part #
Quantity
EVO-3097/V
Driver Front Panel
1
EVO-12444/
EVO-12472
1
Driver Middle Panel
2
EVO-12445
1
Driver Middle Rear Panel
3
EVO-12446
1
Driver Rear Panel
4
EVO-12447
1
Passenger Front Panel
(Vented/Non-Vented)
5
EVO-12448/
EVO-12473
1
Passenger Middle Panel
6
EVO-12449
1
Passenger Middle Rear Panel
7
EVO-12450
1
Passenger Rear Panel
8
EVO-12451
1
Front Aluminum Backing Panel
9
EVO-12460
2
Inner Fender Hardware
10
EVO-770090
1
EVO-3098/V
Driver Front Panel
(Vented/Non-Vented)
1
EVO-12444/
EVO-12472
1
Driver Middle Panel
2
EVO-12452
1
Driver Middle Rear Panel
3
EVO-12453
1
Driver Rear Panel
4
EVO-12447
1
Passenger Front Panel
(Vented/Non-Vented)
5
EVO-12448/
EVO-12473
1
Passenger Middle Panel
6
EVO-12454
1
Passenger Middle Rear Panel
7
EVO-12455
1
Passenger Rear Panel
8
EVO-12451
1
Front Aluminum Backing Panel
9
EVO-12460
2
Inner Fender Hardware
10
EVO-770090
1
EVO-3099/V
Driver Front Panel
(Vented/Non-Vented)
1
EVO-12444/
EVO-12472
1
Driver Middle Panel
2
EVO-12456
1
Driver Middle Rear Panel
3
EVO-12457
1
Driver Rear Panel
4
EVO-12447
1
Passenger Front Panel
(Vented/Non-Vented)
5
EVO-12448/
EVO-12473
1
Passenger Middle Panel
6
EVO-12458
1
Passenger Middle Rear Panel
7
EVO-12459
1
Passenger Rear Panel
8
EVO-12451
1
Front Aluminum Backing Panel
9
EVO-12460
2
Inner Fender Hardware
10
EVO-770090
1
For all NON-VENTED Inner Fender Liners, EVO-12460 will not be included.


5
Recommended Tools:
o Allen set
o Wrench with standard sockets
o Drill and 3/16”, ¼” bits
o Plastic fastener clip removal tool
o Impact Driver
Safety Steps for installation
o For installing EVO MFG products always use
wheel chokes to block rear tires from rolling.
o Always make sure you have everything
necessary ready before install.
o If you have to, carefully lift front of vehicle
by front frame rails extending suspension
until tires leave the ground, place frame on
approved jack stands for vehicle. Verify all
lines/wires are not over extended.
o Remove tires if needed for easier install.
o Make sure to wear safety equipment (eye
protection, hand protection, foot protection
etc.) at all times during installation.
o Make sure all safety precautions have been
taken.
o Always check and replace any part of vehicle
that is warn or broken before starting install.
o Do not mix anything EVO with weaker
alternatives.
o It is generally a good idea to apply liquid
threadlock to all bolts.
o Tighten included hardware to torque
specifications in bottom table unless it is
otherwise specified, factory bolts should be
torqued to factory Jeep specifications.

6
INSTALL
*Pictures are for reference only, product may vary. *
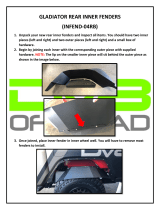
Each inner fender liner is comprised of 4
main pieces (front, middle, mid rear and
rear) and a mesh vent if you have vented
Inner Fender Liners.
All pieces are etched with a part number
for ease of assembly.

7
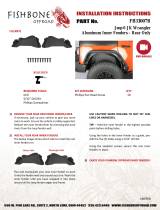
1. Using three #10 bolts and
lock nuts supplied in kit,
place front piece overtop of
the center piece and bolt
together at bolt hole
locations.
2. If you have the vented Inner
Fenders, mesh insert should
be placed behind both front
and middle pieces. Use two
more #10 bolts and lock
nuts, assemble as pictured.
3. Using four more of the
supplied #10 bolts and lock
nuts (2 for coilover and
double throwdown) attach
the mid-rear piece overtop
of the middle piece then bolt
together.

8
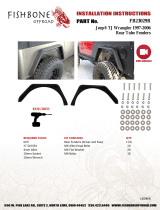
4. Attach the rear piece
behind the mid rear piece
using 2 of the #10 bolts
and corresponding nuts (at
locations circled in black).
The crossed out hole leave
open, you will install a bolt and
nut there later.
5. Repeat previous steps on
opposite side inner liner.
Park vehicle on flat ground, chalk wheels, put in park and engage parking brake.
Turn off vehicle.
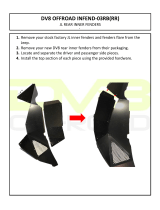
6. Using a ¼” drill, drill center of all 8
button clips from outside lip of factory
fender.
Use pictures A and B for reference.

9
Once all 8 button clips have been
drilled, remove all the clips
completely.
Use Picture A and B for reference.
7. Using a plastic fastener clip
removal tool remove the 4 button
clips located just inside of the
clips removed in the previous
step.

10
8. Remove the 2 button
clips on the bottom
rear of the factory inner
fender liner.
9. Remove ALL bolts using
a 10mm socket located
in center section of
factory fender liner.
Use picture as reference.

11
10. Remove button clip located at
front body mount.
11. Remove inner liner from Jeep,
then remove plastic lower body
seam insert (pictured). You will
not be needing them anymore.

12
12. On the passenger side, remove
the top plastic clip from pinch
seam and plastic wire retainer
using a clip removal tool.
Use picture as reference.
13. Remove wire fasteners from all
locations referenced in picture
on both driver and passenger
sides.
Replace wire fasteners with zip ties
if preferred.

13
14. On driver side slip one of the
supplied clip nuts onto top hole in
pinch seam positioned as pictured.
15. On passenger side pinch seam, insert
clip nut over hole in the plastic wire
retainer (behind the pinch seam),
where push clip used to be.
(pictured)

14
16. Using the forwardmost hole in inner
fender, loosely install EVO MFG inner
fender liner onto Jeep mounting
location using a ¼-20 bolt and nut.
(Pictured)
Manipulate inner fender liner until front
hole lines up with mounting hole.

15
17. Using the rearmost hole in inner fender,
loosely install EVO MFG inner fender
liner onto the Jeep using a #10 bolt and
nut. (Pictured)
Manipulate inner fender liner until
front/rear holes line up to body panel holes.
Some grinding of ground wire stud or liner may
be needed.

16
18. Insert a ¼”-20 bolt
into hole in the rear
panel. Once the bolt
grabs onto the
previously installed
clip nut, tighten down
to snug.
19. Manipulate EVO
MFG liner to a
position where
fitment meets your
personal preference.
20. Using an impact, drill
self-tapping screws
through holes in
liner and into the
sub frame.
DO NOT OVER TIGHTEN

17
21. Once everything is
bolted up, check for
proper fitment, you
may have to
manipulate part until
preferred placement
is achieved. Be sure
not to pinch, cut or
damage any wires.
Repeat all previous steps on opposite side.
After Install:
o Tighten all bolts securing purchased parts to specified locations.
o After completing installation using provided instructions, go through all steps again to make sure
nothing was missed, not tightened or improperly assembled.
o Some components may need to be purchased separately.
o Check turn signals, headlights, fog lights (if applicable), taillights, blinkers and windshield wipers.
o Adjust mirrors, speedometer and headlights if needed.
o Make sure all gauges are fully operational.
o Drive the vehicle slowly for a couple minutes, looking and listening for abnormal noises while
driving. After modification of a vehicle there will be differences in driving experiences and
capabilities, be mindful of that.
o Inspect and Retorque all Bolts after 500 miles of competed installation and regularly thereafter.
o Some modification may be required.

18
Recommended Torque:
Size
Grade 2
Grade 5
Grade 8
18-8 S/S
Coarse
Fine
Coarse
Fine
Coarse
Fine
Coarse
Fine
#4*
-
-
-
-
-
-
5.2
-
#6*
-
-
-
-
-
-
9.6
-
#8*
-
-
-
-
-
-
19.8
-
#10*
-
-
-
-
-
-
22.8
31.7
1/4
4
4.7
6.3
7.3
9
10
6.3
7.8
5/16
8
9
13
14
18
20
11
11.8
3/8
15
17
23
26
33
37
20
22
7/16
24
27
37
41
52
58
31
33
1/2
37
41
57
64
80
90
43
45
9/16
53
59
82
91
115
129
57
63
5/8
73
83
112
128
159
180
93
104
3/4
125
138
200
223
282
315
128
124
7/8
129
144
322
355
454
501
194
193
1†
188
210
483
541
682
764
287
289
/


