Page is loading ...

Q:\Hyline Offroad, LLC\Installation Instructions\400.300.140 & 400.300.160-JK Inner Fender Liners\400.300.140 & .160 JK Inner Fender Liner Installation Instructions.doc Page 1 of 4
REV 1 09/08/16
Proudly Made In USA
Installation Instructions:
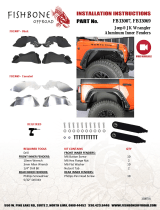
JK Inner Fender Liners Part
Number(s): 400.300.140 & 400.300.160
Vehicle Fitment:
2007 - Present Jeep Wrangler
& Unlimited
Parts List
Qty:
1 Driver Side Inner Fender Liner
(A,B,C,D)
1 Passenger Side Inner Fender
Liner (A,B,C,D)
14 ¼”-20 Button Head Screws x ½”
14 ¼”-20 Nylon Lock Nuts
16 10-32 Button Head Screws x ½”
16 10-32 Nylon Lock Nuts
65/16”-18 Button Head Screws x 1”
2 5/16”-18 Clip Nut
Tools Needed
Ratchet
10mm, 3/8” & 7/16”
Sockets
7/16” Wrench
1/8”, 5/32” & 3/16”
Allen Wrenches
Drill & 9/32”Bit
Congratulations on your purchase of the Hyline Offroad Inner Fender Liners. Our Inner Fender Liners
are completely manufactured in our facility located in Perkasie, PA. They are designed and
engineered by enthusiasts just like you. Hyline Offroad would like to thank you for your recent
purchase and look forward to serving you in the future as part of the Hyline Nation.
Hyline Offroad Staff
Utility Knife
(For Stock Fender
Only)
Pliers
(For Stock Fender
Only)
IMPORTANT: BEFORE INSTALLING, PLEASE READ THIS INSTALLATION PACKAGE COMPLETELY

Q:\Hyline Offroad, LLC\Installation Instructions\400.300.140 & 400.300.160-JK Inner Fender Liners\400.300.140 & .160 JK Inner Fender Liner Installation Instructions.doc Page 2 of 4
REV 1 09/08/16
Inner Fender liner Install (Drivers Side)
Step 1 –Remove the factory plastic inner fender liner by unscrewing
(3) bolts along the top side and (1) bolt by the front edge of the
factory fender using a 10mm socket. Also, remove the clip nut
from the one bolt you removed from the front edge location
(you will NOT reuse this). Once bolts are removed the factory
inner fender liner can be removed. Retain the (3) top side bolts
as you will need these for installation of the new fender liners.
(See Figure 1 & 4)
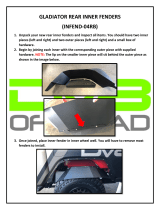
Step 2 –If you have factory fenders you will need to remove the (2)
body clips that hold on the factory fender. Figure 2 is shown
without the fender flare installed. You will also have to
remove a long threaded stud from the bracket shown in Figure
2. This can be done easily by using pliers to unscrew the stud
and remove from inside engine bay. (See Figure 2)
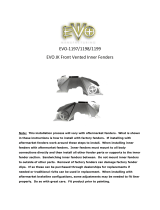
Step 3 –Assemble panel A (Perforated Mesh)
onto the back of panel B using (8)
10-32 button head screws and nuts.
(See Figure 3- drivers side shown).
Step 4 –Assemble panel B to C and C to D to
form one unit (See Figure 3). All the
panels are fastened together using the
¼”-20 button head screws and nuts.
PLEASE READ INSTRUCTIONS BEFORE BEGINNING INSTALLATION
B
A
C
D
Figure 3
Figure 2
Remove long
threaded
stud
Remove
Clips from
Stock Fender
Figure 1

Q:\Hyline Offroad, LLC\Installation Instructions\400.300.140 & 400.300.160-JK Inner Fender Liners\400.300.140 & .160 JK Inner Fender Liner Installation Instructions.doc Page 3 of 4
REV 1 09/08/16
Step 5 – Install the supplied 5/16”-18 clip nut onto the front edge hole
location that was referenced in Step 1. (See Figure 4)
Step 6 –Install the inner fender assembly into the wheel well, panel B will
be closest to the front of the Jeep. Loosely install the (3)
top side factory bolts you retained in Step 1 to hold the inner
fender liner in place. The pressed in clinch nuts on panel D
should be behind the outer fender sheet metal.
Note: If you are using factory fenders some of the hard plastic rib substructure
will need to be trimmed here for a tight fit (See Appendicies on Page 4)
Step 7 –Install the supplied 5/16”-18 button head screw that is closest
to the grille into the 5/16”-18 clip nut you previously installed
in Step 5.
Step 8 – Install (2) supplied 5/16”-18 button head screws through the
body panel and into the pressed clinch nuts on panel D.
Step 9 –Tighten all of the bolts to secure the fender in place.
Step 10 –Using the drill and 9/32”bit, drill a hole into the metal
body mount flange through the yet unused hole in panel B,
closest to the grille (See Figure 5). Use touch up paint on
the drilled hole to protect from rusting.
Step 11 –Install one of the ¼”-20 bolts through the hole you just drilled,
followed by a ¼” nylon lock nut. Use the 7/16” Wrench and
5/32” allen wrench to tighten.
Figure 4
Figure 5

Q:\Hyline Offroad, LLC\Installation Instructions\400.300.140 & 400.300.160-JK Inner Fender Liners\400.300.140 & .160 JK Inner Fender Liner Installation Instructions.doc Page 4 of 4
REV 1 09/08/16
Step 12 –Check to make sure all wiring for the lights is protected from
chaffing on the inner fenders, and has enough slack.
Step 13 –Repeat steps 1-12 for the passenger side.
Appendicies:
Factory Fender Modification Notes:
1. Once the factory inner fender liner is removed score the plastic
areas shown in Figure A1 and Figure A2 with a utility knife.
Then using a pair of pliers break the plastic to remove. Trim
as needed to fit the new sheet metal fender liners.
Bushwacker Fender Modification Notes:
1. Before installing the Hyline Inner Fender Liners
you’ll need to remove the fender flares by removing all
screws and pulling off the fender flare.
2. If present, remove the (2) bolts from locations shown in
Step 2 and Figure 2 above.
3. Grind or cut plastic flange on the Bushwacker fender flare
as shown in Figure B. This will allow the fender flares to
sit flush on the front fender liner panel.
4. Install Hyline Inner Fender Liners, Then reinstall the fender flares.
Send your pictures to pics@HylineOffroad.com . If we choose any one
of your pictures to be used on our website, we’ll send you some Hyline
swag!
Figure B
Figure A1
Figure A2

** IMPORTANT: PLEASE READ BEFORE INSTALLING
HYLINE OFFROAD, LLC WARRANTY
HYLINE OFFROAD, LLC. LIMITED WARRANTY Hyline Offroad, LLC, warrants all products against manufacturer’s defects in workmanship and material for a period of one (1) year
from the date of sale. This warranty applies to manufacturer’s defects only and does not cover damage or failure caused by natural causes or third parties.
If product failure does occur within the time period specified according to the provisions of this Warranty, then Hyline Offroad, LLC agrees to provide the replacement product free of
charge, F.O.B. factory. This Warranty is valid only so long as the product is installed on the original vehicle. Removal of the product from this vehicle automatically invalidates this
Warranty.
As described above, this warranty is expressly limited to the material cost of the product and does not extend to labor costs. Hyline Offroad, LLC will not be responsible for any costs
incurred in the removal or reinstallation of the product furnished by manufacturer under this warranty.
CLAIMS PROCEDURE Submit Warranty claim in writing, by certified mail to Hyline Offroad, LLC, 1507 C West Park Avenue, Perkasie, PA 18944. The Claim Notice must state the date
of this Notice, the nature of the defect, date of purchase and if already installed, the date of installation, if installed the name of installer and include Proof of Purchase.
This Warranty shall be for the benefit of the original owner only, and is non-transferable. This Warranty is valid in those states where permitted. Some states do not allow limitations on
the length of an implied warranty, so the above limitation may not apply to you. Some states do not allow the exclusion or limitation of incidental or consequential damages, so the
above limitation or exclusion may not apply to you. You should check your local state laws to determine this. This Warranty gives you specific legal rights, and you may also have other
rights, which vary from state to state.
THE WARRANTIES SET FORTH IN THE FOREGOING PROVISIONS ARE LIMITED TO THEIR PRECISE TERMS AND PROVIDE EXCLUSIVE REMEDIES EXPRESSLY IN LIEU OF
ALL OTHER WARRANTIES. THERE ARE NO WARRANTIES, EXPRESS OR IMPLIED, WHICH EXTEND BEYOND THE DESCRIPTION IN THE FOREGOING PROVISIONS.
HYLINE OFFROAD, LLC EXPRESSLY DISCLAIMS ANY IMPLIED WARRANTY OF MERCHANTABILITY WITH REGARD TO THE PRODUCTS. HYLINE OFFROAD, LLC IS NOT
LIABLE TO ANYONE FOR INCIDENTAL OR CONSEQUENTIAL DAMAGES FOR BREACH OF ANY WARRANTY, EXPRESS OR IMPLIED. HYLINE OFFROAD, LLC IS NOT LIABLE
FOR DAMAGES TO PERSON OR PROPERTY, CONSEQUENTIAL LOSES, LOSS OF PROFIT, LOSSES OF PRODUCT IN STORE, OR THE LIKE, UNDER ANY CIRCUMSTANCES
AND HYLINE OFFROAD, LLC's LIABILITY IN ANY CIRCUMSTANCE IS SPECIFICALLY LIMITED BY THE TERMS OF THIS WARRANTY.
HYLINE OFFROAD, LLC HOLD
HARMLESS
AGREEMENT
1. In purchasing a Hyline Offroad, LLC Product™ I release, waive, discharge and covenant not to sue Hyline Offroad, LLC’s officers, servants, agents, or employees (hereinafter
referred to as Releasees) from any and all liability, claims, demands, actions and causes of action whatsoever arising out of or related to any loss, damage, or injury, including
death, that may be sustained by me (or anyone else), any property belonging to me (or anyone else), whether caused by the negligence of the releasees or otherwise,
while working on, using or any activity related to this product.
2. I am fully cognizant of any risks and/or hazards connected with the use of a this product and I elect to willingly engage in such use of this product knowing that the use may be
hazardous to me and my property. I willingly assume full responsibility for any risks of loss, property damage or personal injury, including death, that may be sustained by me
(or anyone else), or any loss or damage to property owned by me (or anyone else), as a result of using this product, whether caused by the negligence of releasees or otherwise.
3. I further agree to indemnify and hold harmless the releases from any loss, liability, damage or costs, including court cost and attorney fees, that they may incur due to my use of
a this product, whether caused by negligence of releasees or otherwise.
4. It is my express intent that this Release and Hold Harmless Agreement shall bind the members of my family and spouse, if I am alive, and my heir’s assigns and personal
representative, if I am deceased, and shall be deemed as a release, waiver, discharge, and covenant not to sue the above named releasees. I further agree that this Waiver
of Liability and Hold Harmless Agreement shall be construed in accordance with the laws of the State of Pennsylvania.
By accepting and installing this product, I acknowledge and represent that I have read the above Warranty and Hold Harmless Agreement, understand it and accept it willingly as my
own free act and deed; no oral presentations, statements, or inducements, apart from the foregoing written agreement, have been made; I am at least eighteen (18) years of age
and fully competent; and I execute this Release for full, adequate and complete consideration fully intending to be bound by same.
If you do not agree with the preceding Hold Harmless Agreement, you may return the product and receive a full refund. Please, contact a Hyline Offroad sales representative and they will
issue a call tag for the product in question. Once the product has been received by Hyline Offroad, inspected and accepted for return, a full refund will be issued.
/