Page is loading ...

VN2000 Flow Meters
Hot Tap Insertion Meter
VRX-UM-02217-EN-04 (June 2018)
User Manual

VN2000 Flow Meters, Hot Tap Insertion Meter
VRX-UM-02217-EN-04Page 2 June 2018

User Manual
VRX-UM-02217-EN-04 Page 3 June 2018
CONTENTS
Purpose of this Document. . . . . . . . . . . . . . . . . . . . . . . . . . . . . . . . . . . . . . . . . . . . . . . . . . . . . . . . . . . . . . . . .5
Unpacking and Inspection . . . . . . . . . . . . . . . . . . . . . . . . . . . . . . . . . . . . . . . . . . . . . . . . . . . . . . . . . . . . . . . . 5
Storage . . . . . . . . . . . . . . . . . . . . . . . . . . . . . . . . . . . . . . . . . . . . . . . . . . . . . . . . . . . . . . . . . . . . . . . . . . 5
Safety . . . . . . . . . . . . . . . . . . . . . . . . . . . . . . . . . . . . . . . . . . . . . . . . . . . . . . . . . . . . . . . . . . . . . . . . . . . . . .5
Safety Symbol Explanations . . . . . . . . . . . . . . . . . . . . . . . . . . . . . . . . . . . . . . . . . . . . . . . . . . . . . . . . . . . . .5
Safety Precautions . . . . . . . . . . . . . . . . . . . . . . . . . . . . . . . . . . . . . . . . . . . . . . . . . . . . . . . . . . . . . . . . . . . 5
Product Label . . . . . . . . . . . . . . . . . . . . . . . . . . . . . . . . . . . . . . . . . . . . . . . . . . . . . . . . . . . . . . . . . . . . . . . . .6
Introduction. . . . . . . . . . . . . . . . . . . . . . . . . . . . . . . . . . . . . . . . . . . . . . . . . . . . . . . . . . . . . . . . . . . . . . . . . .7
Principles of Operation . . . . . . . . . . . . . . . . . . . . . . . . . . . . . . . . . . . . . . . . . . . . . . . . . . . . . . . . . . . . . . . .7
Sensor Operation . . . . . . . . . . . . . . . . . . . . . . . . . . . . . . . . . . . . . . . . . . . . . . . . . . . . . . . . . . . . . . . . . . . 7
Calibration Factor . . . . . . . . . . . . . . . . . . . . . . . . . . . . . . . . . . . . . . . . . . . . . . . . . . . . . . . . . . . . . . . . . . . 7
Installing a VN2000 Meter . . . . . . . . . . . . . . . . . . . . . . . . . . . . . . . . . . . . . . . . . . . . . . . . . . . . . . . . . . . . . . . . . 8
Preinstallation Considerations . . . . . . . . . . . . . . . . . . . . . . . . . . . . . . . . . . . . . . . . . . . . . . . . . . . . . . . . . . . 8
Installation Procedure. . . . . . . . . . . . . . . . . . . . . . . . . . . . . . . . . . . . . . . . . . . . . . . . . . . . . . . . . . . . . . . . .9
Using the Optional Insertion/Extraction Tool . . . . . . . . . . . . . . . . . . . . . . . . . . . . . . . . . . . . . . . . . . . . . . . . . . . . 11
Using the Tool to Install a Meter . . . . . . . . . . . . . . . . . . . . . . . . . . . . . . . . . . . . . . . . . . . . . . . . . . . . . . . . . 11
Using the Tool to Remove a Meter . . . . . . . . . . . . . . . . . . . . . . . . . . . . . . . . . . . . . . . . . . . . . . . . . . . . . . . . 13
Wiring a Remote Transmitter . . . . . . . . . . . . . . . . . . . . . . . . . . . . . . . . . . . . . . . . . . . . . . . . . . . . . . . . . . . . . . 14
Troubleshooting . . . . . . . . . . . . . . . . . . . . . . . . . . . . . . . . . . . . . . . . . . . . . . . . . . . . . . . . . . . . . . . . . . . . . . 15
Specications . . . . . . . . . . . . . . . . . . . . . . . . . . . . . . . . . . . . . . . . . . . . . . . . . . . . . . . . . . . . . . . . . . . . . . . .16
Parts List . . . . . . . . . . . . . . . . . . . . . . . . . . . . . . . . . . . . . . . . . . . . . . . . . . . . . . . . . . . . . . . . . . . . . . . . . . . 17
VNF O-Ring Kit PN VNA-RNG-VNF Contents . . . . . . . . . . . . . . . . . . . . . . . . . . . . . . . . . . . . . . . . . . . . . . . . . . 17
Part Number Conguration . . . . . . . . . . . . . . . . . . . . . . . . . . . . . . . . . . . . . . . . . . . . . . . . . . . . . . . . . . . . . . . 18
Metric Pipes . . . . . . . . . . . . . . . . . . . . . . . . . . . . . . . . . . . . . . . . . . . . . . . . . . . . . . . . . . . . . . . . . . . . . . 19

VN2000 Flow Meters, Hot Tap Insertion Meter
VRX-UM-02217-EN-04Page iv June 2018

Purpose of this Document
Page 5 June 2018 VRX-UM-02217-EN-04
PURPOSE OF THIS DOCUMENT
The purpose of this document is to provide you with an overview of the installation and wiring of the VN2000 Hot Tap
Insertion Meter. For information on basic configuration, see the VN2000 Transmitter User Manual supplied with the meter or
download the manual at www.badgermeter.com.
MPORTANTI
Read this manual carefully before attempting any installation or operation.
Keep the manual in an accessible location for future reference.
UNPACKING AND INSPECTION
Upon opening the shipping container, visually inspect the product and applicable accessories for any physical damage such
as scratches, loose or broken parts, or any other sign of damage that may have occurred during shipment.
OTE:N If damage is found, request an inspection by the carrier’s agent within 48 hours of delivery and file a claim with the
carrier. A claim for equipment damage in transit is the sole responsibility of the purchaser.
Storage
If the meter is not scheduled for installation soon after delivery and must be stored:
• After inspection, re-pack the meter into its original packing.
• If the meter being stored has been previously installed, remove all process fluids and corrosives.
• Store in a clean, dry site free of mechanical vibration, shock and chemical corrosives.
SAFETY
Safety Symbol Explanations
DANGER
INDICATES A HAZARDOUS SITUATION, WHICH, IF NOT AVOIDED IS ESTIMATED TO BE CAPABLE OF CAUSING DEATH OR
SERIOUS PERSONAL INJURY.
INDICATES A HAZARDOUS SITUATION, WHICH, IF NOT AVOIDED COULD RESULT IN SEVERE PERSONAL INJURY
OR DEATH.
INDICATES A HAZARDOUS SITUATION, WHICH, IF NOT AVOIDED IS ESTIMATED TO BE CAPABLE OF CAUSING MINOR OR
MODERATE PERSONAL INJURY OR DAMAGE TO PROPERTY.
Safety Precautions
IF THE EQUIPMENT IS USED IN A MANNER NOT SPECIFIED BY THE MANUFACTURER, THE PROTECTION PROVIDED BY
THE EQUIPMENT MAY BE IMPAIRED.

Product Label
Page 6 June 2018VRX-UM-02217-EN-04
PRODUCT LABEL
Figure 1: VN2000 meter label

Introduction
Page 7 June 2018 VRX-UM-02217-EN-04
INTRODUCTION
The VN2000 Hot Tap Insertion Vortex Flow Meter measures the volumetric flow rate, mass flow rate or BTU/energy of
steam, gas or liquids over a large flow range. The meter is a heavy duty design engineered to stand up to the most abusive
environments inside and outside the pipe.
Principles of Operation
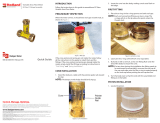
An everyday example of a vortex shedding phenomenon is a flag waving in the breeze: the flag waves due to the vortices
shed by air moving across the flagpole. Within the flow meter, as flowing fluid moves across the tiny strut or “bluff bar”,
vortices are shed on a smaller scale. The frequency of the vortices shedding is proportional to the fluid velocity.
Through the use of an internal RTD, the flow meter software compensates for changes in temperature, to achieve an accurate
mass flow measurement.
FLOW
Small Strut
Shed Vortices
Dual
Piezo-
electric
Sensors
Figure 2: Vortex shedding
Sensor Operation
Two piezoelectric pressure-sensing crystals are mounted internally in the insertion vortex meter in proximity to the
vortex-generating element, called the shedder bar. Two sensors sense the vortex signals. The crystals convert the pressure
pulses created by the vortices into voltage signals without the need of excitation current or voltage. The sensor crystals are
never in contact with the fluid. The piezo crystals are encapsulated in a stainless steel module.
Calibration Factor
The frequency at which vortices are shed is a linear function of fluid velocity, and therefore, a measure of flow. In the range
covered by the particular flowmeter, vortex frequency is insensitive to specific gravity, viscosity, and temperature of the fluid,
and depends only upon the width (d) in inches and shape of the flow element, and the inside diameter (D) of the pipeline
in inches.
The frequency is F = SV/d
Where:
F = Karman vortex frequency
S = constant (Strouhal Number)
V = fluid velocity at the flow element
D = face width of the element

Installing a VN2000 Meter
Page 8 June 2018VRX-UM-02217-EN-04
INSTALLING A VN2000 METER
The Badger Meter VN2000 Insertion Vortex Meter is designed to operate under a wide variety of conditions. To ensure its
longevity of operation, precautions should be taken before and during its installation.
Preinstallation Considerations
Selecting the Installation Site
The meter requires a minimum of 10 straight diameters upstream and 5 straight unobstructed diameters of downstream
piping. One diameter is equal to the internal pipe diameter. This is necessary to ensure regulated formation of vortices.
• Choose a site with minimal mechanical vibrations.
• Do not install the transmitter and cables in close proximity with large transformers, arc-welding equipment, large electric
motors, or similar industrial equipment that emits excessive electromagnetic interference
• Avoid areas of extreme temperature change. The signal conditioner works ideally between temperatures of 32…140° F
(0…60° degrees C ).
• Avoid areas of high humidity or corrosive atmosphere, where possible.
• When installing the meter, choose a site that is accessible and allows ease of wiring and maintenance.
Piping Guidelines
Straight Run Piping Requirements Upstream Pipe Diameters Downstream Pipe Diameters
One 90° elbow before flow meter 10 5
Two 90° elbows before flow meter 15 5
Two 90° elbows out of plane before flow meter 30 5
Reduction before flow meter 10 5
Regulator, valve or header before flow meter 30 5
Tee connection before flow meter 30 5
Table 1: Piping requirements
If the minimum straight run is not possible, install the meter with 80% of the straight run upstream and 20% downstream.
To provide the high accuracy of flow measurement specified on the identification sheet, piping and installation instructions
must be followed carefully.
• The pipe immediately upstream and downstream of the flow meter must be straight, of sufficient length and free of
obstructions. See Table 1 for exact dimensions.
• If recommended piping cannot be found, use straightening vanes on vortex meters.
• Locate any valves downstream of the meter.
• Before installing the meter, make sure nothing (such as weld beads or flange gaskets) protrudes from the internal wall of
the pipe that could interrupt the flow stream and affect the reading.
Temperature Taps
For BTU/Energy Meters: Install temperature transducers in accordance with the manufacturer’s specifications and
2.5…3.5 diameters from the downstream side of the meter body.
Orientation
The VN2000 insertion meter uses dual piezoelectric sensing elements with no moving parts. This eliminates wear and allows
for vertical or horizontal pipe installation. For vertical pipes, the meter can be located in any position.
For horizontal pipe orientations, install the meter above the centerline of the pipe. To prevent condensate from running into
the pipe assembly, mount the flow meter at 0…80° off of the top center of the pipe. For high temperature applications, avoid
mounting the transmitter over the pipe to keep it out of the path of heat rising from the pipe. Insulate all pipes surrounding
the meter.

Installing a VN2000 Meter
Page 9 June 2018 VRX-UM-02217-EN-04
Installation Procedure
The hot-tap method involves inserting the flow meter through a full port valve and requires greater clearance space for
removal and installation.
OTE:N For pipes under pressure, use the Insertion/Extraction Tool. See “Using the Optional Insertion/Extraction Tool” on
page11.
The flow meter is shipped completely assembled, tested and ready to install and operate in its permanent location. These
instructions assume the pipe has been fitted with a 1-1/2 in. hole, a Weldolet®, nipple and valve. The valve must be threaded
full bore.
When the flange version is used, a flange is supplied. This flange has an overall height of 3 in. This must be taken into account
when installing the nipple.
MPORTANTI
There is a sensor mounted on the end of the insertion probe. Do not stand the meter on its end. Be careful not to hit or push this end,
or damage to the sensor may occur.
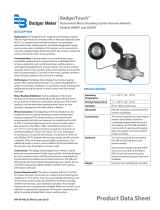
FLOW
30 in.
(762 mm)
A
Arrow must point
downstream in
direction of ow.
Large hex nut secures
the bar in place.
Small machined
hex nut tightens
meter into the valve.
H
Alignment ag
Sensing element
Figure 3: Calculate insertion depth
The probe must be inserted until the shedder bar in the sensing element is at the midpoint of the pipe.
1. Calculate the required insertion depth of the vortex meter by dividing the pipe diameter (H) by 2.
2. Calculate how far the alignment ag at the top of the insertion shaft should be from the outside of the pipe wall, for
proper insertion depth: A = 30 inch – (1/2 * H)
3. Fully retract the probe until the insertion end is within the sealing unit.
4. Hand-tighten the large hex nut to hold the meter shaft in place during installation.
THE NUT IS NOT A SEALING NUT. THE NUT IS ONLY DESIGNED TO HOLD THE BAR IN PLACE DURING PRESSURIZED
APPLICATIONS. DO NOT OVER TIGHTEN THE NUT BECAUSE GALLING WILL OCCUR. TIGHTEN THE NUT BY HAND, THEN
TIGHTEN WITH A 24 IN. WRENCH AFTER THE BAR IS INSERTED TO THE DESIRED INSERTION DEPTH.

Installing a VN2000 Meter
Page 10 June 2018VRX-UM-02217-EN-04
5. Apply plumber’s tape to the threaded ends of the meter shaft.
6. Align the meter to the valve and turn the machined hex of the seal assembly to screw the meter into the valve.
OTE:N When screwing the 1-1/2 in. NPT threads into the valve, do not use the large nut on the top of the seal assembly. Use
the machined hex on the seal assembly. The large nut is only used to tighten down on the split ring, which holds the
bar in place, keeping it from being pushed out of the line under pressure. It is not a sealing nut.
7. After the meter is sealed into the valve, slowly open the valve and check for possible leaks between the valve and meter
seal assembly. If there are any leaks, close the valve and retry sealing the valve and meter seal assembly.
8. After the valve is completely opened, you are ready to insert the meter sensing element.
9. Loosen the large hex nut to allow the meter shaft to move.
DO NOT LOOSEN THE NUT UNLESS THE LINE IS DEPRESSURIZED OR A HOT-TAP MECHANISM HAS BEEN INSTALLED
PROPERLY ON THE METER SHAFT.
10. Insert the meter shaft until the distance from the alignment ag at the top of the insertion shaft to the top of the pipe = A.
Check the Alignment
After installing the meter, check for alignment. There is an arrow on the flats on the top of the bar nearest to the electronics,
which should point EXACTLY DOWNSTREAM.
This arrow is aligned with the element and will give proper alignment of the element. If this arrow does not point downstream
after installing the meter, rotate the bar.
1. The ats on the top of the bar next to the electronics will accommodate a 1 in. open-ended wrench. Rotate the bar until
the arrow faces downstream. If the assembly is too tight to rotate the bar, loosen the large nut on the seal assembly. The
bar will not slide out.
2. After aligning the arrow, keep the 1 in. open-ended wrench on the ats on top of the bar. Hold it in place and tighten
down on the larger nut on the seal. This will prevent the bar from turning when completing the nal tightening on the
split-ring nut.
MPORTANTI
For a final check, make certain that the meter has not come loose from its 1-1/2 in. NPT connection and that the split ring nut and
seal assembly are firmly in place.
STAY CLEAR OF THE METER WHEN THE LINE IS BEING PRESSURIZED. THIS IS GOOD SAFETY PROCEDURE FOR THE
INSTALLATION OF ANY EQUIPMENT IN A PRESSURIZED LINE.

Using the Optional Insertion/Extraction Tool
Page 11 June 2018 VRX-UM-02217-EN-04
USING THE OPTIONAL INSERTION/EXTRACTION TOOL
The insertion/extraction tool is an optional, separate device that can be used on any VN2000 Hot Tap Insertion Vortex meter,
regardless of whether it is metering liquids, gases or steam. The purpose of the tool is to aid in installing or removing a meter
from flow that is under pressure. Attach the tool to the meter before making any adjustments to the meter itself.
The tool has two clamp assemblies:
• The clamp assembly with the larger cradle, located at the bottom of the tool, secures the meter’s seal assembly and
prevents it from moving.
• The clamp assembly with the smaller cradle, located at the top of the tool, secures the meter’s shaft.
Figure 4: Insertion tool attached to VN2000 meter and seal assembly
Using the Tool to Install a Meter
1. Lay the tool on its side with the threaded spindle facing you and the cradles of the clamp assemblies facing up.
2. Lay the insertion meter into the clamp cradles, with the bottom (larger) clamp assembly around the meter’s seal assembly,
just below the machined step on the seal, and the upper (smaller) clamp assembly around the meter shaft, 2 in. down
from the top of the shaft.
3. Secure the tops of the clamp assemblies to the cradles with the bolts provided. Make sure both bolts are tightly secured.
4. Loosen the large hex nut to allow the probe to move. Make sure the large hex nut is completely o the threads of the
seal assembly
5. Use a standard 1-1/8 in. socket wrench to turn the nut on the end of the threaded spindle to retract the probe until the
insertion end is within the sealing unit.
6. Apply plumber’s tape to the threaded end of the meter shaft.

Using the Optional Insertion/Extraction Tool
Page 12 June 2018VRX-UM-02217-EN-04
1 in.
(25 mm)
28 in.
(711 mm)
FLOW
1 in. (25 mm) connection
to insertion shaft.
1.5 in. (38 mm) connection
to seal assembly xed to pipe.
Figure 5: Insertion tool attached to VN2000 meter and seal assembly
MPORTANTI
The tool bolts must be securely tightened onto the meter shaft and seal assembly.
7. After installing the tool, completely remove the seal assembly nut from the threads.
WTRNING
FOLLOW THE NEXT STEP CAREFULLY TO PREVENT LEAKAGE, WHICH COULD CAUSE INJURY.
8. When the insertion tool is securely fastened, loosen the nut on the top of the seal assembly, making sure not to loosen
the entire seal assembly that is connected to the piping. (The larger of the hex nuts houses the split-ring assembly.) This
should be completely loosened o the top of the seal assembly with NO threads engaged. This can be done by holding
the seal assembly in place and then loosening the large hex nut on the split-ring assembly. The split-ring nut should be
loosened completely (you may have to tap the nut with a hammer to free the split ring).

Using the Optional Insertion/Extraction Tool
Page 13 June 2018 VRX-UM-02217-EN-04
Using the Tool to Remove a Meter
BURN HAZARD. THE PROBE MAY BE HOT TO THE TOUCH IF THE FLUID IS HOT.
Attach the tool to the insertion meter:
1. Holding the back of the tool, place the tool behind the meter with the bottom (larger) clamp assembly in line with the
meter’s seal assembly.
2. Place the clamp cradles, with the bottom (larger) clamp assembly around the meter’s seal assembly, just below the
machined step on the seal, and the upper (smaller) clamp assembly around the meter shaft, 2 in. down from the top of
the shaft.
3. Secure the tops of the clamp assemblies to the cradles with the bolts provided.
MPORTANTI
To make sure the seal assembly does not turn while the large hex nut is loosened, use two wrenches. Turn the wrench on the seal
assembly clockwise as you turn the wrench on the hex nut counterclockwise.
Figure 6: Removing the hex nut
4. Loosen the large hex nut and split ring (you may have to tap the nut with a hammer to free the split ring).
5. Completely back off the hex nut from the threads.
WTRNING
AFTER THE NUT IS COMPLETELY REMOVED, THE PRESSURE IS AGAINST THE INSERTION TOOL. DO NOT STAND IN THE
DIRECTION OF EXTRACTION AS PERSONAL INJURY COULD OCCUR.
7. Attach a wrench or a 1-1/8 in. socket wrench to the top of the threaded spindle of the insertion tool and turn the spindle
until the sensing element is extracted from the pipe and retracted up into the seal assembly.
MAKE SURE THE METER IS WELL PAST THE VALVE AND INTO THE SEAL ASSEMBLY BEFORE TRYING TO CLOSE
THE VALVE. IF FLOW METER SENSOR IS STILL IN THE VALVE WHILE IT IS BEING CLOSED, DAMAGE CAN OCCUR TO THE
SENSOR ELEMENT.
8. Close and purge the valve.
9. Remove the seal assembly slowly. There may be an amount of pressurized uid in the nipple, or the valve may not be
sealing properly.

Wiring a Remote Transmitter
Page 14 June 2018VRX-UM-02217-EN-04
WIRING A REMOTE TRANSMITTER
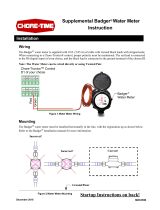
To wire remote electronics, use the supplied cable with the multi-pin connectors. The cable is a double-sided, molded
cordset with a single-keyway, threaded connection. The cable ends are the same. See the VN2000 Transmitter user manual for
instructions on installing, wiring and troubleshooting the transmitter.
MPORTANTI
Do not hook up electronics with the power on.
Insertion Tool
Sensor Element
Remote
Transmitter
Figure 7: Remote version

Troubleshooting
Page 15 June 2018 VRX-UM-02217-EN-04
TROUBLESHOOTING
Screen is blank (No display) Verify that you have 24V DC.
Verify that power polarity is correct (Black +24V DC & Blue -24V DC).
Screen shows no flow rate
during flow
Check arrow and alignment hole on the top of the probe. They must be pointing down the
pipe in the direction of flow.
Take a measurement from the top of the stainless steel probe to the top hole in the center
of the pipe. The overall length of the meter from the shedder bar to the hole is XX. The
length of XX minus the length measured is the distance the meter is in the pipe. Make sure
the meter is in the center of the pipe and not sitting inside the valve assembly or close to
the inside wall of the pipe.
Flow rate is erratic Check to see what is installed upstream of the flow meter. Other instruments or devices
before the flow meter can shed vortices of their own causing a disruption in flow reading.
Check to see if there are any valve, tees or elbows upstream of flow meter. If these items are
too close to the flow meter then they can cause disruption in flow reading.
Check to see what size hole is drilled into the pipe for insertion. If an existing hole larger
than 1.5 inch was used, the larger hole can create turbulence directly above the flow sensor.
Flow rate seems incorrect Review the program settings and make sure the correct line size is chosen for your
application. If this is a multi-variable MASS unit, make sure the correct pressure and
temperature is being displayed on the screen. If this is a fixed MASS unit, make sure the
correct operating pressure is entered into the electronics for calculations.
Table 2: Troubleshooting

Specications
Page 16 June 2018VRX-UM-02217-EN-04
SPECIFICATIONS
Uncertainty
Volumetric Flow Repeatability
Liquids ±1.0% of reading ±0.25% of reading
Steam ±1.0% of reading ±0.25% of reading
Gas ±1.0% of reading ±0.25% of reading
Mass or Heat Flow Repeatability
Liquids ±1.0% of reading ±0.25% of reading
Steam ±1.0% of reading ±0.25% of reading
Gas ±1.0% of reading ±0.25% of reading
Velocity – Liquid 1.32…32 ft/s (0.402…9 m/s)
Velocity – Gas cube root (140/ρ) ft/s… 300 ft/sec (91 m/sec)
Reynolds Range 10,000…7,000,000 depending on fluid density
Straight Run Pipe Upstream 10 diameters; downstream 5 diameters with one 90° elbow before the meter
Pipe sizes 2…36 in. (50…900 mm)
Fluid temperature –250…400° F (–120…204°C)
Maximum Pressure 1000 psi (68.9 bar)
Wetted Materials Stainless steel 304L
Hot Tap Connections
1-1/2 in: NPT, ASME/ANSI 150, 300 flanges
Sealing assembly: Two ethylene propylene O-rings
Optional removable extractor
Measurement Options Sensors
Volumetric flow rate Dual piezo vortex sensors
Mass flow rate based on
velocity and temperature
Dual piezo vortex sensors
RTD embedded in sensor: 100 Ohm, 3 wire
BTU/Energy
Dual piezo vortex sensors
RTD embedded in sensor: 100 Ohm, 3 wire
External 100 Ohm RTD input
Units of measure
Steam Gases Liquids
Energy (Any Fluid)
Pounds Pounds Pounds BTU
Kilograms Kilograms Kilograms
Tons Tons Tons
Metric Tons Metric Tons Metric Tons
Cubic Feet Cubic Feet Cubic Feet
Cubic Meters Actual Cubic Feet Cubic Meters
Gallons Natural Cubic Meters Gallons
Liters Actual Cubic Meters Liters
U.S. Gallons
Natural Liters
Actual Liters
Units of measure are used for flow rate, mass flow rate, heat/energy flow rate; volume total, mass total, heat/energy total
Measurement interval Second, minute, hour, day
Figure 8: Specifications

Parts List
Page 17 June 2018 VRX-UM-02217-EN-04
PARTS LIST
If the meter was installed, then removed, replace the O-rings before reinstalling the meter. Instructions are included with the
O-Ring Replacement Kit.
VNF O-Ring Kit PN VNA-RNG-VNF Contents
O-ring, ethylene propylene with 90
durometer (quantity 2)
22650-077
Silicone grease 68559-001
Table 3: Parts list

Part Number Conguration
Page 18 June 2018VRX-UM-02217-EN-04
PART NUMBER CONFIGURATION
- - - - - - - - - - -
VN2000 Hot Tap Insertion Vortex Meter VF
Pipe Line Size (used for meter conguration only)
2 inch A020
3 inch A030
4 inch A040
6 inch A060
8 inch A080
10 inch A100
12 inch A120
14 inch A140
16 inch A160
18 inch A180
20 inch A200
24 inch A240
26 inch A260
28 inch A280
30 inch A300
32 inch A320
36 inch A360
Material
Stainless Steel, Commerical
C
End Fittings
1-1/2 inch NPT NTS
1-1/2 Flange ANSI 150 FAS
1-1/2 Flange ANSI 300 FBS
Process Temperature & Pressure
Standard S
Reserved
None W
Measurement
Volumetric ow rate
V
Mass ow, temperature
T
Heat energy/BTU (not available for sensor replacement)
1
E
Transmitter Type
E
F
Integral, 24V DC
Remote, 24V DC
Cable Length
None (integral/meter mount or replacement sensor)
WW
10 feet/3 m (remote transmitter)
2
AB
30 feet/15 m (remote transmitter)
2
AF
Fluid & Pipe Type
C
H
L
S
G
Liquid-Chilled (not available with Measurement option V)
Liquid-Heating (not available with Measurement option V)
Liquid (available with Measure option V only)
Steam
Gas
Display
S
Standard
Communication/Output
S
M
4-20 mA and Pulse Output
Modbus RTU
Testing & Tagging
Standard Testing G
One internal temperature sensor and one external temperature sensor included.
Specify cable length from sensor to transmitter. Transmitter power 10 foot cable included.
Model
5 inch A050
1
2
BACnet MS/TP
B

Part Number Conguration
Page 19 June 2018 VRX-UM-02217-EN-04
Metric Pipes
- - - - - - - - - - -
VN2000 Hot Tap Insertion Vortex Meter VF
Pipe Line Size (used for meter configuration only)
50 mm D050
80 mm D080
100 mm D100
150 mm D150
200 mm D200
250 mm D250
300 mm D300
350 mm D350
400 mm D400
450 mm D450
500 mm D500
550 mm D550
600 mm D600
650 mm D650
700 mm D700
750 mm D750
800 mm D800
850 mm D850
900 mm D900
Material
Stainless Steel, Commerical C
End Fittings
DN40 Flange PN16 PAS
DN40 Flange PN40 PCS
Process Temperature & Pressure
Standard S
Certification
None W
Measurement
Volumetric flow rate V
Mass flow, temperature T
Heat energy/BTU
1
E
Transmitter Type
Integral, 24VDC E
Remote, 24VDC F
Cable Length
None (integral/meter mount or replacement sensor) WW
10 feet/3 m (remote transmitter)
2
AB
30 feet/15 m (remote transmitter)
2
AF
Fluid & Pipe Type
Liquid-Chilled (not available with Measurement option V) C
Liquid-Heating (not available with Measurement option V) H
Liquid (available with Measurement option V only) L
Steam S
Gas G
Display
Standard S
Communication/Output
4-20 mA and Pulse Output
S
Modbus RTU M
BACnet MS/TP B
Testing & Tagging
Standard Testing G
1 One internal temperature sensor and one external temperature sensor
2 Specify cable length from sensor to transmitter. Transmitter power 10 foot cable included.
Model

VN2000 Flow Meters, Hot Tap Insertion Meter
www.badgermeter.com
Trademarks appearing in this document are the property of their respective entities. Due to continuous research, product improvements and enhancements, Badger Meter reserves
the right to change product or system specications without notice, except to the extent an outstanding contractual obligation exists. © 2018 Badger Meter, Inc. All rights reserved.
Control. Manage. Optimize.
The Americas | Badger Meter | 4545 West Brown Deer Rd | PO Box 245036 | Milwaukee, WI 53224-9536 | 800-876-3837 | 414-355-0400
México | Badger Meter de las Americas, S.A. de C.V. | Pedro Luis Ogazón N°32 | Esq. Angelina N°24 | Colonia Guadalupe Inn | CP 01050 | México, DF | México | +52-55-5662-0882
Europe, Eastern Europe Branch Oce (for Poland, Latvia, Lithuania, Estonia, Ukraine, Belarus) | Badger Meter Europe | ul. Korfantego 6 | 44-193 Knurów | Poland | +48-32-236-8787
Europe, Middle East and Africa | Badger Meter Europa GmbH | Nurtinger Str 76 | 72639 Neuen | Germany | +49-7025-9208-0
Europe, Middle East Branch Oce | Badger Meter Europe | PO Box 341442 | Dubai Silicon Oasis, Head Quarter Building, Wing C, Oce #C209 | Dubai / UAE | +971-4-371 2503
Slovakia | Badger Meter Slovakia s.r.o. | Racianska 109/B | 831 02 Bratislava, Slovakia | +421-2-44 63 83 01
Asia Pacic | Badger Meter | 80 Marine Parade Rd | 21-06 Parkway Parade | Singapore 449269 | +65-63464836
China | Badger Meter | 7-1202 | 99 Hangzhong Road | Minhang District | Shanghai | China 201101 | +86-21-5763 5412
Switzerland | Badger Meter Swiss AG | Mittelholzerstrasse 8 | 3006 Bern | Switzerland | +41-31-932 01 11
/