Page is loading ...

BadgerMeter, Inc.
®
Installation &
Operation Manual
Model 340BN
BACnet
®
Energy Transmitter
PN# 941700-0012
3-07

2
TABLE OF CONTENTS
Introduction . . . . . . . . . . . . . . . . . . . . . . . . . . . . . . . . . . . . . . 2
Installation . . . . . . . . . . . . . . . . . . . . . . . . . . . . . . . . . . . . . . . 3
Programming the Transmitter . . . . . . . . . . . . . . . . . . . . . . . . 6
Diagnostic Utility . . . . . . . . . . . . . . . . . . . . . . . . . . . . . . . . . . 8
Property Map . . . . . . . . . . . . . . . . . . . . . . . . . . . . . . . . . . . . 9
Factory Default Settings . . . . . . . . . . . . . . . . . . . . . . . . . . . . 9
Implementation Conformance Statement . . . . . . . . . . . . . . 10
Specifications . . . . . . . . . . . . . . . . . . . . . . . . . . . . . . . . . . . 11
INTRODUCTION
The Badger Meter Model 340BN Btu transmitter is an economi-
cal, compact device for sub-metering applications that utilizes the
BACnet
®
communications protocol.
The Model 340BN calculates thermal energy using the signal from
a flow sensor installed in a hydronic heating or chilled water sys-
tem, and signals from two 10 kΩ temperature thermistors, 100Ω
RTD’s, or 1000Ω RTD’s installed in the system’s inlet and outlet
points. The flow input may be provided by any Badger Meter
sensor and many other pulse or sine wave signal flow sensors.
The onboard microcontroller and digital circuitry make precise
measurements and produce accurate, drift-free outputs. The
Model 340BN is configured using Badger Meter Windows
®
based
programming software. Calibration information for the flow sen-
sor, units of measurement, and type of temperature sensor may
be preselected or entered in the field. Btu transmitter information
is available when connected to a PC or laptop computer. This
information includes flow rate, flow total, both T1 and T2 tem-
perature probe information, energy rate, and energy total.
The Model 340BN transmitter features two LED’s to verify BACnet
and flow sensor input activity.
The BACnet communications protocol allows the Model 340BN
transmitter to be assigned an address, and allow all measure-
ment parameters to be transmitted on a single 3-wire RS-485
bus.
The Model 340BN Btu transmitter operates on AC or DC power
supplies ranging from 12 to 24 volts.
The compact cast epoxy body measures 3.65”(93mm) x
2.95”(75mm) and can be easily mounted in panels, enclosures or
on DIN rails.

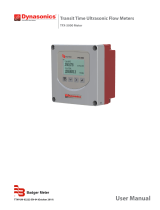
3
1.60”
(40.6mm)
3.65”
(92.7mm)
2.95”
(74.9mm)
.88”
(22mm)
.60”
(15mm)
Model: 340BN
S/N 340BN-XXXXXX
Comm LED
Data
Industrial
MS/TP
Sensor Input
Shield
Signal
Signal +
Power Out
-
REF
+
_
®
BACnet
Factory Port
NT PDPU
D.I.C.
Comm
Port
+
-
Power In
AC C /DC
AC L /DC
1
2
3
Temp 1
1
3
Temp 2
2
Input LED
.20”
(5mm)
INSTALLATION
Mechanical Installation
The Model 340BN transmitter may be surface mounted onto a
panel, attached to DIN rails using adapter clips or wall mounted
using optional enclosures.
Location
Although the Model 340BN device is encapsulated, all wiring con-
nections are made to exposed terminals. The unit should be pro-
tected from weather and moisture in accordance with electrical
codes and standard trade practices.
In any mounting arrangement, the primary concerns are ease of
wiring and attachment of the programming cable. The unit gener-
ates very little heat so no consideration need be given to cooling
or ventilation.
Surface Mount Installation
The Model 340BN may be mounted to the surface of any panel
using double-sided adhesive tape or by attaching fasteners
through the holes in the mounting flanges of the unit.
DIN Rail Mounting
Optional clips snap onto the mounting flanges allowing the Model
340BN to be attached to DIN 15, 32, 35 mm DIN rail systems.
Wall Mounting
Optional metal and plastic enclosures are available for the Model
340BN. The enclosure is first attached to the wall using fasteners
through its mounting holes.
After wiring, the transmitter may be attached to the enclosure
with the terminal headers facing inwards using the slots in the
mounting flanges. As an alternate mounting arrangement, the
Model 340BN may be fastened to the box cover using double-
sided adhesive tape.
Temperature Sensor Installation
The location of the temperature sensors with respect to the flow
sensor is important to the accuracy of the energy calculation. The
temperature sensor installed closest to the flow sensor will be
considered as Temperature Sensor T1. Temperature sensors
should not be installed closer than a distance equal to 10 pipe
diameters upstream or 5 pipe diameters downstream from the
flow sensor. Irregular velocity profiles caused by improperly lo-
cated valves, fittings, and thermowells, etc. can lead to inaccu-
rate flow indication and therefore affect accuracy of the energy
calculation.
Figure 2: Model 340BN Metal Box Dimensions
4.5”
4.50”
2.00
”
Side
To p
Side
4.60”
4.60”
2.25
”
Side
Top
Side
3.25”
5.125”
Figure 3: Model 340BN Plastic Box Dimensions
Figure 1: Model 340BN Dimensions

4
Figure 4:
Side View - Typical 300 Series Removable Connector Wiring
3/32” Flathead
Screwdriver
Series 300
Connector
Wire
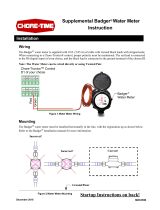
Figure 5: Sample Power Supply Wiring Diagram
Electrical Installation
All connections to the Model 340BN are made to screw terminals
on removable headers.
Power Supply Wiring
The Model 340BN requires 12-24 volts AC or DC to operate. The
power connections are made to the ORANGE header. The con-
nections are labeled beside the header. Observe the polarity
shown on the label.
If a Badger Meter plug in type power supply (Model A-1026 or A-
503) is used, connect the black/white striped wire to the terminal
marked positive (+) and the black wire to the terminal marked
negative (-).
Note:
Connect the earth ground lug of the Model 340BN to a solid
earth ground with a wire which is as short as possible. This
will help prevent electrical interference from affecting the
Model 340BN’s normal operation.
Sensor Wiring
All flow sensor types connect to the four terminal header labeled
Sensor Input.
Series 200
Connect the flow sensor red wire to Model 340BN Sensor Input
Signal (+) terminal, and connect the flow sensor black wire to
Model 340BN Sensor Input Signal (-) terminal. The bare wire con-
nects to the Sensor Input Shield terminal.
SDI Series (standard pulse output option)
Connect SDI terminal number 3 to the Model 340BN transmitter
Sensor Input Signal (+) terminal, and SDI terminal number 2 to
the Model 340BN transmitter Sensor Input Signal (-) terminal.
Connect the shield terminal of the SDI sensor tot he Sensor Input
Shield terminal of the Model 340BN transmitter.
Other Sensors
The Sensor Input Power Out terminal on the 340BN transmitter
supplies nominal 12VDC excitation voltage for 3-wire sensors.
Connect the signal (+) and signal (-) terminals on the sensor to
corresponding terminals on the 340BN transmitter.
Note:
The green input LED flashes on and off as sensor pulses are
received.
Industrial
®
AC C /DC
-
Data
AC L /DC
Power In
-
+
BACnet
MS/TP
DC+
or
AC Load
Earth
Ground
DC -
or
AC Common
AC or DC
Power Supply
Signal +
Signal
Sensor Input
Model: 340BN
S/N 340BN-XXXXXX
Power Out
Comm LED
MS/TP
Shield
-
+
®
BACnet
1
2
3
Temp 1
1
3
Temp 2
2
Input LED
Series 200
or
SDI
Shield
(if applicable)
Red Wire
or
Signal +
Black Wire
or
Signal -
Figure 6: Sample Sensor Wiring Diagram

5
Figure 9: Sample Wiring Diagram to BACnet Network
Note 1: Biasing, circuitry, and resistors for PU, PD, and NT terminals are integral part of 340BN transmitter.
Note 2: For the final 340BN transmitter in a given BACnet network, NT, PU, and PD jumpers should be in “open” position. Otherwise,
NT, PU, and PD should be in the “closed” position.
Note 3: For the final 340BN transmitter in a given BACnet network, all three network terminals (+), (-), and REF should be connected
to the BACnet buss. Otherwise, connect only terminals (+), (-) to the BACnet buss.
Temperature Element Wiring
Thermistors
Badger Meter thermistors are not polarity sensitive. The ther-
mistor located closest to the flow sensor, termed temperature
sensor T1, should be connected to terminals 2 and 3 on terminal
block Temp 1. The thermistor located farthest from the flow sen-
sor, termed temperature sensor T2, should be connected to ter-
minals 2 and 3 on terminal block Temp 2. As shown in the ther-
mistor wiring diagram, it is strongly recommended to install a
jumper between terminals 1 and 3 for both thermistors. This is
considered good practice for all unused inputs to limit electro-
magnetic interference.
Resistance Temperature Detectors (RTD’s)
Badger Meter RTD’s are three-wire devices. Two of these wires
are the same color, and one of these two wires is used for lead
compensation. The lead compensation wire is attached to termi-
nal 1. The other common color lead is attached to terminal 3.
The single color lead is attached to terminal 2. The RTD located
closest to the flow sensor, termed temperature sensor T1, should
be connected to terminal block Temp 1. The RTD located far-
thest from the flow sensor, termed temperature sensor T2, should
be connected to terminal block Temp 2.
Connecting the BACnet
®
Buss
As shown in the BACnet Sample Wiring Diagram, the position of
jumpers on each 340BN transmitter and wiring between each
340BN transmitter and the BACnet network are different depend-
ing on where the transmitter is installed, i.e. its nodal position.
For all but the final 340BN transmitter in a BACnet network, the
three jumpers NT, PU, and PD should be in the open position,
and only the (+) and (-) network terminals should be connected
to the BACnet buss. For the final 340BN transmitter in a BACnet
network, the three jumpers NT, PU, and PD should be in the closed
position, and all three network terminals (+), (-), and REF should
be connected to the BACnet buss.
Note: The Model 340BN transmitter default polling address
must be changed before it is introduced into an existing net-
work to avoid possible address conflicts. Please refer to
programming instructions in the next section.
Figure 8: RTD Wiring Diagram
Supply
Return
Temp 2
1
2
3
Temp 1
1
3
2
Ω
10k
Thermistors
Jumpers
1
2
3
Temp 1
1
3
Temp 2
2
Supply
Return
100
Ω
RTD’s or 1000
Ω
RTD’s
+5 VDC
Ω
Ω
Ω
Ω
Ω
Ω
Node "n" Node 1
Comm LED
REF
PU PDNT
_
+
47k
120
47k
Comm LED
REF
PU PDNT
_
+
+5 VDC
47k
120
47k
REF
-
+
MS/TP
®
BACnet
PU
Note 2
Note 1
Note 2
Note 3
NT
PD
PU
NT
PD
Figure 7: Thermistor Wiring Diagram

6
Programming the Model 340BN Transmitter
Prior to introducing the Model 340 BN onto a BACnet
®
network, it
must be configured for the type of input signal, pipe size, desired
units of measure, filter coefficient, and temperature sensor. The
default network address should be assigned to an unused ad-
dress to avoid conflicts with other instruments on the BACnet
network. To change settings in the 340BN transmitter, Windows
®
based Badger Meter software must be installed and new values
entered as outlined below:
1. Install the Badger Meter Combo PC Software.
2. Connect the PC to the Model 340BN transmitter using the
Badger Meter Model A301 communications cable. Plug the
Model RS232 connector on the Model A301 cable to the Model
340BN socket labeled “D.I.C. Comm port”, taking care to prop-
erly align the tab on the plug and socket to maintain polarity.
Plug the Model DB9 connector on the opposite end of the
Model A301 cable to an available PC communications port. If
a cable with a Model DB9 connector is not available, a USB to
DB9 adapter (e.g. IOGEAR GUC232A) can be used.
3. Connect the Model 340BN transmitter to a power supply.
4. Open the Badger Meter Combo PC Software.
5. From the main screen, select Configuration and open the Set
Comm Port screen to assign the correct communications port
for the Model A301 cable as shown in the dialog boxes below.
Press the OK button to return to the Main screen.
6. Select Device and 340 from the menu bar as shown below.
7. Open the Device Type pull-down menu and select BACnet
protocol as shown below.
8. Select Configuration from the menu bar and open the Param-
eters screen as shown below.
To go to the
calibration
settings screen
select
Parameters
from either
place shown

7
9. Program the Model 340BN transmitter using the diagram
below as a reference.
Note #1:
Badger Meter sensors are pulse type sensors. The K and Offset
information is printed in the owners manual shipped with the prod-
uct. This information is also available on our website. Calibration
constants for other sensors must be supplied by the manufac-
turer.
Note #2
Typically the temperature measured by T1 will be greater than T2
in a heating application and less than T2 in a cooling application.
The selection of one of these choices will determine if energy
calculations are made for heating only (T1>T2), cooling only
(T1<T2), or both (absolute).
Note #3
The filter coefficient screen allows adjustment of the flow and
energy filters. Filter settings determine how the Series 340BN
responds to actual changes in flow and energy. A scale of 0 -10 is
used with 10 providing the greatest degree of smoothing.
Step 1
Select the flow
sensor type and
enter the K and
Offset values.
See Note 1.
Step 6
Select the desired
units for energy
rate and energy
total.
Step 7
Press Send to
transmit calibration
data to the
transmitter.
Step 8
Press Exit to close
the Parameters Screen
and return to the main screen.
If required, press to view
current programming
of the transmitter.
If required, press to
enter factory default
programming.
Note: This will
overwrite all settings.
Step 5
Select the filter
coefficients for
flow and energy.
See Note 3.
Step 4
Select the type of
temperature sensor.
Step 3
Select the method of
computing the temperature
differential. See Note 2.
Step 2
Select the desired unit
for the temperature sensor.
10. After setting Model 340BN parameters, press Exit and re-
turn to the Main screen.
11. Select Configure MS/TP to open the MS/TP Setup screen as
shown below.

8
12. To set the MS/TP address for the 340BN transmitter, open
the New Address pull-down menu and select the correct poll-
ing address which matches the polling address entered into
the master controller for this node of the BACnet network.
Press the Assign New Address button to transmit polling in-
formation to the 340BN transmitter.
13. To set the MS/TP baud rate for communication from the
BACnet
®
buss to the Model 340BN transmitter, open the New
Baud Rate pull-down menu and select the desired value. The
most common baud rate is 9600. Press the Assign New Baud
Rate button to transmit the symbol rate to the Model 340BN
transmitter. Press the Close button to return to the Main screen.
BACnet Diagnostic Utility
The MS/TP ReadBack diagnostic utility is provided as a helpful
tool to verify connection between the Model 340BN transmitter
and BACnet
network when installing a transmitter or while trouble-
shooting faulty communication between an individual node and
the master controller. To use this utility, the Model 340BN trans-
mitter must be connected to a PC or laptop and the BACnet
network as outlined below.
1. Connect the PC to the Model 340BN transmitter using
the Badger Meter Model A301 communications cable.
Plug the RS232 connector on the Model A301cable to
the 340BN socket labeled D.I.C. Comm Port, taking care
to properly align the tab on the plug and socket to main-
tain polarity. Plug the DB9 connector on the opposite
end of the Model A301 cable to an available PC com-
munications port. If a cable with a DB9 connector is
not available, a USB to DB9 adapter (e.g. IOGEAR
GUC232A) can be used.
2. If not already installed, connect the Model 340BN trans-
mitter to the BACnet network. Connect all three Model
340BN network terminals (+), (-), and REF to the
BACnet buss if the transmitter is the final node in a
given network. Otherwise, connect only terminals (+)
and (-) to the BACnet buss. Confirm the correct posi-
tion of jumpers on the Model 340BN transmitter. For
the final transmitter in a given BACnet network, NT, PU,
and PD jumpers should be in “open” position. Other-
wise, NT, PU, and PD should be in the “closed” posi-
tion. Please refer to the Sample Wiring Diagram to
BACnet Network found on page 5.
3. Open the Badger Meter Combo PC Software.
4. Follow steps 5 through 7 found on page 6 to open the
Model 340BN Main screen.
5. From the Main screen, select MS/TP ReadBack.
This will open the MS/TP Check screen as shown below.

9
Press the Retrieve Parameters button which should display
340BN transmitter object data as shown below.
The LED located next to the 340BN network port, labeled “Comm
LED”, will flash once to visually confirm communication between
the 340BN transmitter and BACnet
®
master controller.
Use the scroll bar to view all object data.
If the 340BN transmitter fails to communicate with the BACnet
master controller, check that the correct polling address was
entered in step 12 found on page 8, the integrity of the network
port connection and, if necessary, settings in the BACnet mas-
ter controller.
Press the Close button to return to the Main Screen.
NETWORK SET-UP
The following Property Map is provided to assist in the program-
ming of the BACnet network.
MODEL 340BN OBJECT MAP
Description ID Name Out of Service Units
Analog
Input
AN1 TempIn FALSE °C, °F
" AN2 TempOut FALSE °C, °F
" AN3 FreqIn FALSE Hz
" AN4 VolFlow FALSE
gpm, gph, lps, lpm, lph, ft
3
/s,
ft
3
/m, f
t
3
/h, m
3
/s, m
3
/min, m
3
/h
" AN5 EnrgyFlow FALSE
kBTU/min, kBTU/h,
kW, MW, HP, Tons
Analog
Value
AV1 TotalVol FALSE
gallons, liters,ft
3
, m
3
" AV2 TotEnergy FALSE
BTU, kBTU, MBTU,
kWh, MWh, kJ, MJ
" AV3 Kfactor FALSE dimensionless
" AV4 Offset FALSE dimensionless
" AV5 TempMode FALSE dimensionless
" AV6 FFilterCoef FALSE dimensionless
" AV7 TFiltCoef FALSE dimensionless
" AV8 SpHtCapac FALSE BTU/lb-F
" AV9 Density FALSE lb/gallon
" AV10 InTACoef FALSE dimensionless
" AV11 InTBCoef FALSE dimensionless
" AV12 InTCCoef FALSE dimensionless
" AV13 InTOffset FALSE °C, °F
" AV14 OutTACoef FALSE dimensionless
" AV15 OutTBCoef FALSE dimensionless
" AV16 OutTCCoef FALSE dimensionless
" AV17 OutTOffset FALSE °C, °F
MODEL 340BN FACTORY DEFAULT SETTINGS
The table below is a list of factory default setting for all 340BN
variables. These settings can be changed by accessing the pa-
rameters sensor (page 7) or Configure MS/TP screen (page 8) to
best fit your application. As new valves are assigned, they can be
written in the blank provided next to each variable for future refer-
ence.
Description Default Value Customer Value
Flow Sensor Type Pulse
"K" Value 1
"Offset" Value 0
Flow Rate gpm
Flow Total gallons
Temperature °F
Energy Calculation absolute
Temperature Sensor Type 10 kȍ thermistor
Energy Rate kBTU/hr
Energy Total BTU
Flow Filter Coefficient 5
Energy Filter Coefficient 1
MS/TP Address 1
MS/TP Baud Rate 9600
Model 340BN Factory Default Settings

10
Products
Product Model Number Protocol Revision Software Version Firmware Version
340BN 8340BN 135-2001 Rev. 1.00
Vendor Information
Badger Meter Inc.
6116 E 15
th
St.
Tulsa, Ok 74112
www.badgermeter.com
Product Description
The Series 340 BTU Transmitter is a low cost, flow and temperature sensor interface used in sub-metering
applications. An additional communication design feature provides connectivity for BACnet MS/TP
BACnet Standardized Device Profile
Product Device Profile Tested
340BN BACnet Smart Sensor (B-SS)
Supported BIBBs
Product Supported BIBBs BIBB Name Tested
DS-RP-B ReadProperty-B
340BN
DS-WP-B WriteProperty-B
Standard Object Types Supported
Product Object Type Creatable Deletable Tested
340BN Analog Input No No
340BN Analog Value No No
340BN Device No No
Data Link Layer Options
Product Data Link Options Tested
340BN MS/TP Slave
Baud rates: 9600, 19200,
38400, 76800
Segmentation Capability
Product Segmentation Type Supported
Window Size
(MS/TP product limited to 1)
Tested
340BN Able to transmit segmented messages No N/A
Device Address Binding
Product Static Binding Supported Tested
340BN No N/A
Character Sets
Product Character Sets supported Tested
340BN ANSI X3.4
BACNET
®
PROTOCOL
IMPLEMENTATION CONFORMANCE STATEMENT

11
Communication Port
RS-485 with termination, pull up and
pull down jumpers
Operating Temperature
0° C to +70° C
32° F to +158° F
Storage Temperature
-40° C to +85° C
-40° F to +185° F
Weight
4.8 oz. with connector headers
installed
SENSOR CALIBRATION
Badger Meter
Use K and Offset provided in sensor
owner’s manual
Other Sensors
Check with factory
UNITS OF MEASURE
Flow measurement
Rate:
gpm, gph, l/sec, l/min, l/hr, ft3/sec,
ft3/min, ft3/hr, m3/sec, m3/min, m3/hr
Total:
gallons, liters, cubic feet, cubic
meters
Energy measurement
Rate
kBtu/min, kBtu/hr, kW, MW, hp, tons
Total
Btu, kBtu, MBtu, kWh, MWh, kJ, MJ
Temperature Units
Fahrenheit, Centigrade
PROGRAMMING
Requires PC or laptop running
Windows
®
2000, XP
Badger Meter Model A-301
programming kit containing 340BN
software and Model A-301
programming cable is required for
programming and setup
SPECIFICATIONS
Power
Power supply options:
12-24 VAC rms Tolerance
12-24 VDC Tolerance
Current draw:
< 70mA @ 12 VDC
Flow Sensor Input
Pulse type sensors:
Signal amplitude:
2.5 VDC threshold
Signal limits:
Vin < 35V (DC or AC peak)
Frequency:
0-10kHz
Pull-up:
15 VDC @ 2 k
Ω Source Impedance
Sine wave sensors:
Signal amplitude:
30 mV p-p threshold
Signal limits:
Vin < 35V (DC or AC peak)
Frequency:
0-10kHz
Power out terminal
Excitation voltage 3 wire sensors:
15 VDC @ 500
Ω Source Impedance
Temperature Sensor Input
2 required:
10 k
Ω thermistor, 2 wire, type II,
10 k
Ω @ 25°C
100
Ω platinum RTD, DIN
calibration curve, conforms to
IEC-751 Standard
1000
Ω platinum RTD, DIN
calibration curve, conforms to
IEC-751 Standard
calibration range 0-150°C
Metal Enclosure Dimensions
Plastic Enclosure Dimensions

®
Due to continuous research, product improvements and enhancements, Badger
Meter reserves the right to change product or system specifications without notice,
except to the extent an outstanding contractual obligation exists.
BadgerMeter, Inc.
6116 E. 15th Street, Tulsa, Oklahoma 74112
(918) 836-8411 / Fax: (918) 832-9962
www.badgermeter.com
Please see our website at www.dataindustrial.com
for specific contacts.
Copyright © Badger Meter, Inc. 2007. All rights reserved.
Windows
®
is a registered trademark of Microsoft Corporation.
BACnet
®
is a registered trademark of American Society of Heating, Refrigerating and Air-Conditioning Engineers (ASHRAE).
/