Page is loading ...

VN2000 Flow Meters
Transmitter
VRX-UM-02233-EN-02 (June 2017)
User Manual

VN2000 Flow Meters, Transmitter
Page ii June 2017VRX-UM-02233-EN-02

User Manual
Page iii June 2017 VRX-UM-02233-EN-02
CONTENTS
Purpose of this Document. . . . . . . . . . . . . . . . . . . . . . . . . . . . . . . . . . . . . . . . . . . . . . . . . . . . . . . . . . . . . . . . 5
Unpacking and Inspection . . . . . . . . . . . . . . . . . . . . . . . . . . . . . . . . . . . . . . . . . . . . . . . . . . . . . . . . . . . . . . . 5
Storage . . . . . . . . . . . . . . . . . . . . . . . . . . . . . . . . . . . . . . . . . . . . . . . . . . . . . . . . . . . . . . . . . . . . . . . . . 5
Introduction. . . . . . . . . . . . . . . . . . . . . . . . . . . . . . . . . . . . . . . . . . . . . . . . . . . . . . . . . . . . . . . . . . . . . . . . . 5
Product Label . . . . . . . . . . . . . . . . . . . . . . . . . . . . . . . . . . . . . . . . . . . . . . . . . . . . . . . . . . . . . . . . . . . . . . . . 5
Installing the Transmitter . . . . . . . . . . . . . . . . . . . . . . . . . . . . . . . . . . . . . . . . . . . . . . . . . . . . . . . . . . . . . . . . 6
Rotating the Display. . . . . . . . . . . . . . . . . . . . . . . . . . . . . . . . . . . . . . . . . . . . . . . . . . . . . . . . . . . . . . . . . 6
Wiring. . . . . . . . . . . . . . . . . . . . . . . . . . . . . . . . . . . . . . . . . . . . . . . . . . . . . . . . . . . . . . . . . . . . . . . . . . . . . 7
Grounding . . . . . . . . . . . . . . . . . . . . . . . . . . . . . . . . . . . . . . . . . . . . . . . . . . . . . . . . . . . . . . . . . . . . . . . 7
Analog Version, 4…20 mA . . . . . . . . . . . . . . . . . . . . . . . . . . . . . . . . . . . . . . . . . . . . . . . . . . . . . . . . . . . . . 7
Connecting Cables . . . . . . . . . . . . . . . . . . . . . . . . . . . . . . . . . . . . . . . . . . . . . . . . . . . . . . . . . . . . . . . . . . . . 8
Operating the VN2000 Transmitter . . . . . . . . . . . . . . . . . . . . . . . . . . . . . . . . . . . . . . . . . . . . . . . . . . . . . . . . . . 9
Control Panel Keys . . . . . . . . . . . . . . . . . . . . . . . . . . . . . . . . . . . . . . . . . . . . . . . . . . . . . . . . . . . . . . . . . . 9
Display Modes . . . . . . . . . . . . . . . . . . . . . . . . . . . . . . . . . . . . . . . . . . . . . . . . . . . . . . . . . . . . . . . . . . . 10
Programming Mode Level 1 . . . . . . . . . . . . . . . . . . . . . . . . . . . . . . . . . . . . . . . . . . . . . . . . . . . . . . . . . . . 12
Programming Mode Level 2 (A1-SS78MB-C). . . . . . . . . . . . . . . . . . . . . . . . . . . . . . . . . . . . . . . . . . . . . . . . . 15
Programming Mode Level 3 (A1-SS78MB-S). . . . . . . . . . . . . . . . . . . . . . . . . . . . . . . . . . . . . . . . . . . . . . . . . 18
Specications . . . . . . . . . . . . . . . . . . . . . . . . . . . . . . . . . . . . . . . . . . . . . . . . . . . . . . . . . . . . . . . . . . . . . . . 21
Alarm Messages . . . . . . . . . . . . . . . . . . . . . . . . . . . . . . . . . . . . . . . . . . . . . . . . . . . . . . . . . . . . . . . . . . . . . 22
Troubleshooting . . . . . . . . . . . . . . . . . . . . . . . . . . . . . . . . . . . . . . . . . . . . . . . . . . . . . . . . . . . . . . . . . . . . . 23
Removing VN2000 Transmitter Electronics . . . . . . . . . . . . . . . . . . . . . . . . . . . . . . . . . . . . . . . . . . . . . . . . . . . . 23
North American Pipe Schedules . . . . . . . . . . . . . . . . . . . . . . . . . . . . . . . . . . . . . . . . . . . . . . . . . . . . . . . . . . . 24

VN2000 Flow Meters, Transmitter
Page iv June 2017VRX-UM-02233-EN-02

Purpose of this Document
Page 5 June 2017 VRX-UM-02233-EN-02
PURPOSE OF THIS DOCUMENT
The purpose of this document is to provide instructions the installation, wiring and operation of the VN2000 Transmitter.
MPORTANTI
Read this manual carefully before attempting any installation or operation.
Keep the manual in an accessible location for future reference.
UNPACKING AND INSPECTION
Upon opening the shipping container, visually inspect the product and applicable accessories for any physical damage such
as scratches, loose or broken parts, or any other sign of damage that may have occurred during shipment.
OTE:N If damage is found, request an inspection by the carrier’s agent within 48 hours of delivery and file a claim with the
carrier. A claim for equipment damage in transit is the sole responsibility of the purchaser.
Storage
If the meter is not scheduled for installation soon after delivery and must be stored:
• After inspection, re-pack the meter into its original packing.
• If the meter being stored has been previously installed, remove all process fluids and corrosives.
• Store in a clean, dry site free of mechanical vibration, shock and chemical corrosives.
INTRODUCTION
The VN2000 Transmitter is supplied with all vortex flow meters. It is designed to be located on the head of the meter or
remotely mounted from the meter, for easy viewing and access. Three configurations are available:
• The VN2000 Volumetric Flow Transmitter has a large, easy-to-read LCD indicator that displays flow rate and accumulated
total flow.
• The VN2000 Mass Flow Transmitter also displays temperature compensated flow rate.
• The VN2000 Energy Flow Transmitter also displays compensated flow rate (BTU/hr or kBTU/hr), total flow (total BTU),
operating temperature, and outgoing and returning temperature.
The control panel keys used to program parameters including engineering units, line sizes (insertion only), 4…20 mA span
adjustments and to recalibrate for new flow conditions.
All internal parameters of the flow meter can be read via the VN2000 Transmitter.
The transmitter has a built-in non-volatile memory for setup and calibration data with the ability to field-calibrate. All
transmitters are factory-tested and programmed.
PRODUCT LABEL
Figure 1: VN2000 transmitter label

Installing the Transmitter
Page 6 June 2017VRX-UM-02233-EN-02
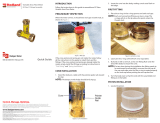
INSTALLING THE TRANSMITTER
The remote transmitter enclosure has a mounting bracket for wall mounting. Locate the enclosure within 30 feet of the
pipeline sensor and at eye level for easy viewing and access to the control panel keys for programming.
Insertion Tool
Sensor Element
Remote
Transmitter
External
RTD Input
(energy
meter only)
To Power
and Outputs
To Sensor
(remote only)
Figure 2: Remote installation
Rotating the Display
To adjust the orientation of the display for easier viewing:
1. Unscrew and remove the faceplate cover.
2. Gently lift and turn the faceplate to the desired orientation.
3. Return the faceplate into the enclosure.
4. Replace the faceplate cover.

Wiring
Page 7 June 2017 VRX-UM-02233-EN-02
WIRING
The transmitter ships with a cable that has a connector on one end and flying leads with 4 or 5 wires on the other end. Use
this cable to wire the power and outputs. The transmitter is available with two output options:
• 4…20 mA/pulse output; uses a 4-wire cable
• Modbus RTU; uses a 5-wire output
Display Only (No Output) Black wire 24 VDC
Blue wire Ground
Pulse Output Black wire 24 VDC
Blue wire Ground
Brown wire Pulse DC power
White wire Pulse output
Modbus Output Black wire 24 VDC
Blue wire Ground
Gray wire Data +
Pink wire Data -
White wire Signal Ground (only connect if needed)
4…20 mA Output, Loop Powered Black wire 10…36 VDC
Blue wire 4…20 mA signal
Table 1: Wiring
Grounding
Ground the power supply to DC ground or good earth ground. DO NOT connect to AC ground.
Analog Version, 4…20 mA
To wire for power, use 24 gauge with multi-pin power connector supplied with meter. Do not run the wire over transformers,
motors, or any other magnetic field generating devices. Connect the end of wire to 24V DC for loop powering the device.
24V DC
Power Supply
Data Logger or PLC
4 . . . 20 mA
Analog Input
Positive Negative
Input
Negative/
Common
+
_
_ _
BLACK Wire (Positive)
BLUE Wire
Flow Meter
+
-
Figure 3: Analog version wiring diagram

Connecting Cables
Page 8 June 2017VRX-UM-02233-EN-02
CONNECTING CABLES
Connecting to the flow meter is easy using our plug-and-play design. No internal wiring is required. All cables are included
with the meter.
Cable Description Replacement
Part Number
Transmitter power, 4…20 mA 4-pin cable, 9 ft (3 m) VNA-CBL-PWR-AA-09
Transmitter power, Modbus RTU 5-pin cable, 9 ft (3 m) VNA-CBL-PWR-MA-09
Transmitter-sensor or external RTD cable, 9 ft (3 m) VNA-CBL-SNR-09
Transmitter-sensor or external RTD cable, 30 ft (9 m) VNA-CBL-SNR-30
Table 2: Transmitter cables
1. Connect the wired end of the cordset to the power supply and outputs.
OTE:N DO NOT USE 110…220V AC without using an optional AC-to-DC power supply, available as an accessory.
2. Connect the other end of the cordset into the remote transmitter. Find the matching keyway between the plug and the
connector in the enclosure. When the key nds the grooved slot, push the plug into the connector.
3. Slowly tighten the threaded connection. Make sure the plug is tightened all the way down into the plug socket.
4. If the transmitter is mounted remotely, use the cordset with connectors on both ends to connect to the sensor.
5. If the meter is an energy meter with an external RTD, use the cordset with connectors on both ends to connect to the
external RTD. The external RTD and remote sensor cable are identical.
6. Apply power to the power supply.
7. The screen displays the version of the operating software.
8. After approximately 5 seconds, the rate and total display (if ow is present).

Operating the VN2000 Transmitter
Page 9 June 2017 VRX-UM-02233-EN-02
OPERATING THE VN2000 TRANSMITTER
VN2000
Figure 4: VN2000 transmitter
Control Panel Keys
To access the control panel keys, unscrew and remove the faceplate cover.
In Password or Program mode, press the Up Arrow key to increment the selected digit by one.
In an idle state with the temperature adjustment enabled, press to toggle the display between
Totalizer and Temperature.
Press the Menu key to move the control panel keys from an idle state to the Password mode.
Press the Reset key to reset the totalizer.
In Password or Program mode, press the Left Arrow key to move the cursor one digit to the left. If the cursor is
already in the left-most position, press to move the cursor to the right-most position.

Operating the VN2000 Transmitter
Page 10 June 2017VRX-UM-02233-EN-02
Display Modes
The VN2000 Transmitter has a 32-character display that is organized as two rows of 16 characters each.
The display software is designed to operate in one of three modes.
OTE:N The options available in the Programming mode will vary, depending on the media (steam, gas or liquid) for which
the transmitter was configured:
• Startup
• Operational
• Programming (Three Levels)
Startup Mode
The Startup mode begins when the system is first powered on or when the system transitions from the programming mode.
The initial screen displays for about 10 seconds. The top line of the display shows the company name. The bottom line shows
the product name and the hardware revision number. The display cannot be changed during this mode.
BADGER METER
VN2000 REV 1
Operational Mode
The Operational mode is the main mode of the transmitter. The top line of the display shows the Flow Rate. The bottom line of
the display shows the Totalizer value.
0.0000 LB/HR
0000000000 LB
The bottom line of the display can also have alternate uses in this mode. For example, if the transmitter detects an event, it
displays an alarm message alternating with the Totalizer value. See “Alarm Messages” on page 22 for a list of possible alarms
and how to clear them.
0.0000 LB/HR
BAD TEMPERATURE
In the Operational mode, the transmitter displays the Temperature and Pressure values alternating with the Totalizer value.
The Temperature and Pressure values are available only if they have been configured to be read and they are not being
overridden with manual values. This portion of the display shows either Temperature, Pressure or both. The table below shows
what displays.
Temperature Pressure
Displayed
Enabled Manual Override Enabled Manual Override
yes no yes no Temperature and Pressure
yes no yes yes Temperature
yes no no — Temperature
yes yes yes no Pressure
no — yes no Pressure
Table 3: Temperature and pressure values

Operating the VN2000 Transmitter
Page 11 June 2017 VRX-UM-02233-EN-02
In all other cases, the option to display Temperature or Pressure is not available.
To activate the option to display Temperature or Pressure, press Up Arrow to scroll through three display patterns:
• Totalizer value only
• Temperature and Pressure only
• Alternating the display between the Totalizer and the Temperature/Pressure display
OTE:N Independent of the active display pattern, any event alert message automatically alternates with the display or is
included in the alternating pattern.
OTE:N When the system is powered ON, the warning messages, display pattern, remote message suppression and any
remote messages are cleared.
Reset Total
Press Reset to reset total.
Programming Mode
The transmitter automatically exits the programming mode after 20 seconds with no key presses.
The three levels of the Programming Mode are detailed in the following sections.

Operating the VN2000 Transmitter
Page 12 June 2017VRX-UM-02233-EN-02
Programming Mode Level 1
OTE:N Currently, the word “Pressure” displays on the screen, but the Pressure feature is not yet supported.
OTE:N The options available in the Programming mode will vary, depending on the fluid type (steam, gas or liquid) and
function (Mass, Volumetric or Energy) for which the transmitter is configured:
With power ON and Flow Rate and Flow Total displayed, press Menu to cycle through the Level 1 programming options:
• Pipe Size (Insertion meters only)
• Units of Measure
• Flow Measurement Time Interval
• K-Factor (Inline meters only)
• Low Flow Cutoff (4 mA)
• Max Flow (20 mA)
• Pulse Rate
• Pulse Width
Pipe (Line) Size (Insertion Only)
The transmitter automatically calculates the flow rate from the pipe dimensions and fluid velocity. The K-Factor Source option
in Programming Mode Level 3 determines which type of pipe dimension entry appears.
Line Size DN Pipe ID
Select pipe size in inches for ASME pipe.
To set the pipe schedule, select the
Schedule in Programming Mode Level 3
Select pipe size in millimeters nominal
diameter (DN) pipe
Enter the pipe size in inches for the
inner diameter (ID)
Press Up Arrow to increase the size. The
list will wrap around and start with the
smallest pipe size
Press Up Arrow to increase the size. The
list will wrap around and start with the
smallest pipe size
Press Left Arrow to select the digit to
change. Press Up Arrow to increase the
number
Table 4: Pipe size settings
LINE SIZE
6 in

Operating the VN2000 Transmitter
Page 13 June 2017 VRX-UM-02233-EN-02
Units of Measure (Engineering Units)
Press Up Arrow to scroll through the engineering units. Stop pressing when the proper unit is displayed. That unit is now the
unit of measure. When the units are changed, the Flow Total and Flow Rate are automatically adjusted.
ENGINEERING UNIT
GAL
Units Base Steam Liquids Gases
English
Pounds (LB)
Tons (TON)
Cubic Feet (CFT)
Gallons (GAL)
Pounds (LB)
Tons (TON)
Cubic Feet (CFT)
Gallons (GAL)
Pounds (LB)
Tons (TON)
Cubic Feet (CFT)
U.S. Gallons (GAL)
Metric
Kilograms (KG)
Tonns (TNN)
Cubic Meters (CUM)
Liters (LTR)
Kilograms (KG)
Tonns (TNN)
Cubic Meters (CUM)
Liters (LTR)
Kilograms (KG)
Metric Tons (TNN)
Natural Cubic Meters (Nm3)
Natural Liters (Nlt)
Actual English — —
Pounds (LB)
Tons (TON)
Actual Cubic Feet (Acf)
U.S. Gallons (GAL)
Natural Metric — —
Kilograms (KG)
Metric Tons (TNN)
Actual Cubic Meters (Am3)
Actual Liters (Alt)
Table 5: Units of measure

Operating the VN2000 Transmitter
Page 14 June 2017VRX-UM-02233-EN-02
Units of Measure (Time Base)
Press Up Arrow to scroll through the Time Base options. Stop pressing when the proper time is displayed. The options are SEC
(seconds), MIN (minutes), HR (hour) and DAY.
TIME BASE
HR
K-Factor (Inline Meters Only)
The K-Factor is used for VN2000 inline vortex flow meters. The transmitter automatically generates the K-Factor based on the
flow meter model type and bore size.
OTE:N DO NOT change the K-factor that has come with your device without first consulting the factory.
To change the K-Factor, press Left Arrow to move the cursor under the digit to be changed. Press Up Arrow to change the
digit. If the K-Factor does not match the “VN2000 SF” found on the bottom right of your sizing sheet, contact the manufacturer.
Low Flow Cutoff
The Low Flow Cutoff is factory-set to the minimum flow rate of the meter. Below this number, the meter gives 4 mA output and
displays zero flow reading.
LOW FLOW CUTOFF
000000 GAL/HR
The meter reading drops to zero when the flow drops below the minimum setting. To measure flow below the minimum
range of measurement, lower the setting. Press Up Arrow to increment each digit. Press Left Arrow to move the cursor to the
next digit.
Max Flow (20 mA)
Use Max Flow to span and adjust the 4 mA and 20 mA range based on your flow range. The number must represent the 20 mA
setting on the receiving PLC or other analog input device. Once this number matches what 20 mA represents on the receiving
device, the 4…20 mA span will be correct and the meter’s output from Max Flow to zero reading will match what is showing
on the display. For example, if Max Flow is set to 500, then 250 will output 12 mA (12 mA is in the middle of 4…20 and 250 is
the middle of 500).
MAX FLOW (20 MA)
0057000 GAL/HR
Pulse Rate
The Pulse Rate option adjusts the number of pulses for a flow unit and the number of units that are represented by a pulse.
Press Up Arrow to scroll through the pulse rate options:
• 1 Pulse = 1 unit
• 10 Pulses = 1 unit
• 100 Pulses = 1 unit
• 1000 Pulses = 1 unit
• 1 Pulse = 10 units
• 1 Pulse = 100 units
• 1 Pulse = 1000 units
• Off = Turns off pulser
Pulse Width
The pulse width is predefined with 5 widths and directions of pulse.
• 10, 20, 50, 100 or 150 ms negative
• 10, 20, 50, 100 or 150 ms positive

Operating the VN2000 Transmitter
Page 15 June 2017 VRX-UM-02233-EN-02
Programming Mode Level 2 (A1-SS78MB-C)
With the power ON and Flow Rate and Flow Total displayed, press Left Arrow. When the message “A1-SS78MB-C” displays,
press Menu to scroll through the second programming level options.
Level 2 programming options:
• Mass Flow Mode
• Flow Adjust (In-Field Calibration)
• Vortex Threshold
• Change Password
Mass Flow Temperature/Pressure Input (Gas and BTU/Energy Meters Only)
The Mass Flow Mode turns on the other RTD and/or pressure sensors (if present) in the flow meter. It also allows the entry of a
mean pressure and/or temperature for fixed Mas Flow calculations
Press Up Arrow to scroll through the Mass Flow Mode options.
Temperature Input
Auto Uses the internal RTD reading in the Mass Flow calculations
Manual
Uses a fixed temperature in the mass flow calculations. Enter mean temperature
when prompted. For BTU/Energy meters, enter source and return temperature
Pressure Input
Auto (Future)
Manual-Pressure
Uses a fixed pressure in the mass flow calculations. Enter mean pressure when
prompted
Table 6: Mass flow mode options
Flow Adjust (Adjust Flow?)
The Flow Adjust option allows for field calibration of each vortex flow meter without changing core application data, such as
the K-factor.
ADJUST FLOW?
OFF
Use Flow Adjust only as a last resort if there can be no change to the location of the installation or overall flow profile due to:
• Inadequate upstream and downstream piping
• Large piping
• Obstructions
• Overall flow turbulence
The Flow Adjust option only operates—and should only be used—for in-field calibration while the meter is reading
steady flow.
Press Up Arrow to scroll through the in-field calibration options:
Set Flow Calibrates based on flow rate
Set Ratio Calibrates based on total accumulated flow
Reset Removes any calibration previously done and returns the factory settings to the meter
ON Displays when the meter has been calibrated and the calibration option is ON
OFF Displays when no calibration has been done
Table 7: Flow adjust options

Operating the VN2000 Transmitter
Page 16 June 2017VRX-UM-02233-EN-02
Set Flow
1. Press P. The “New Flow Rate” message displays. This is a snapshot of the current ow rate.
NEW FLOW RATE
000000 GAL/HR
2. Press Left Arrow to move the cursor and Up Arrow to change the digits to the desired ow rate.
3. Press Menu and let the meter come back to Flow Rate and Flow Total.
The VN2000 Transmitter adjusts the internal calibration curve, allowing the new flow rate to appear.
Set Ratio
1. When the Set Ratio menu displays, press P. The “Ratio – 1.00” message displays.
2. Press Left Arrow to move the cursor and Up Arrow to change the digits to the desired ratio.
3. Press Menu and let the meter come back to Flow Rate and Flow Total.
The VN2000 Transmitter adjusts the internal calibration curve, allowing the new ratio to appear.
The ratio of one (1) equals the current total in the VN2000 Transmitter totalizer.
Example 1: If the total accumulated flow is 25% higher than it should, change the ratio to 0.75% to lower the internal curve
and all accumulated flow readings by 25%.
Example 2: If the total accumulated flow is 25% lower than it should, change the ratio to 1.25% to raise the internal curve
and all accumulated flow readings by 25% .
OTE:N Brownouts and blackouts do not affect the in-field calibrated settings. Select RESET to completely remove all in-field
calibrated settings.
200.00
181.82
163.64
127.27
109.09
90.91
72.73
54.55
36.36
145.45
0
50
100
150
200
250
300
12345 6789 10
Calibration Points
Flo w U nits m 3/h r
Upper Turbulence
Flow Rate
Lower Turbulence
Current Flow Rate is being aected by poor ow prole,
driving the ow rate lower. This entire curve can be adjusted
upward to the correct Flow Rate by entering the correct Flow Rate
in Flow Adjust mode: 181 m3/hr. The new curve will have
repeatability of ± 0.25%.
Figure 5: In-field calibration points

Operating the VN2000 Transmitter
Page 17 June 2017 VRX-UM-02233-EN-02
Vortex Threshold
The Vortex Threshold feature:
• Is designed to the get the most out of low flow conditions.
• Is meant to be used in high density fluids like liquids where signals are large.
• Is set at the factory and should not be changed unless consulting the factory first.
• Has settings range from 0…7, with 0 being the most sensitive and 7 being the least sensitive.
The typical Vortex Threshold setting for liquid, gases and steam is 3. If the setting is not at 3, consult the factory.
When to use the Vortex Threshold settings:
• The flow meter has been installed and the operating condition is very close or below the meter’s minimum.
• There is zero flow rate at normal operating conditions, or the flow rate is bouncing to zero, or the flow rate is much lower
than expected. In this case, increase the sensitivity of the dual sensors by lowering the Vortex Threshold settings.
◊ To increase the sensitivity of the dual sensors, lower the threshold to 2, 1, or 0.
◊ Zero (0) is the most sensitive settings.
◊ Do not raise the threshold setting above 3, unless the factory recommends it.
Change Password
The Password Security feature lets you create a password to stop any unauthorized user from tampering with settings or
parameters within the VN2000 Transmitter electronics.
Every VN2000 Transmitter does not come with a password. The security password can be created in this program mode. Any
user will be required to enter this password before entering into the Program Mode. If the correct password is not entered, NO
flow meter settings or parameters can be changed.
How to set your password:
1. Press Menu until the Enter Password Setting option appears. The default Password is 000000.
2. Press Left Arrow to position the cursor under each number.
3. Press Up Arrow to select each digit.
4. Confirm the password by repeating steps 2 and 3.
5. Let the program mode sit for 10 seconds until Flow Rate and Flow Total displays.
If any user wants to change flow meter settings, they have to first enter the correct password.
OTE:N If an incorrect password is entered, the VN2000 Transmitter immediately reverts back to the Flow Rate and
Flow Total display.

Operating the VN2000 Transmitter
Page 18 June 2017VRX-UM-02233-EN-02
Programming Mode Level 3 (A1-SS78MB-S)
With the power ON and Flow Rate and Flow Total displayed, press Left Arrow, then Up Arrow. When the message
“A1-SS78MB-S” displays, press Menu to scroll through the Level 3 programming options:
• 4 mA Field Calibration
• 20 mA Field Calibration
• Units Base (English or Metric)
• Dampening
• Meter Type
• K-Factor Source (Insertion meters only)
• K-Factor (Insertion meters only)
• Schedule (Insertion meters only)
• Gas Constant (if Fluid is set to Gas)
• Temperature Calibration
• Application
• Settings
• Vibration Control
4 mA Field Calibrate
The 4 mA Field Calibrate option is a trim function that is factory-calibrated but can be field-adjusted if the equipment is not
seeing exactly 4 mA at zero flow due to ground loops or other equipment issues not relating to the flow meter.
20 mA Field Calibrate
MPORTANTI
Do not change this setting.
The 20 mA Field Calibrate option is used at the factory to calibrate the maximum output of the flow meter. The typical setting
range is 3960…4000.
Units Base
The Units Base option is used at the factory to set up all internal units to English or Metric.
Dampening
The Dampening option allows adjustment of the Flow Rate Averaging or Dampening. The most common use for this feature is
to eliminate high flow variation or to lessen the flow rate change on the display that is due to the flow dynamics in the pipe.
This option allows for stabilization of the flow reading when erratic flow is present in the pipe.
Press Up Arrow to scroll through the Dampening options:
• The Auto Setting is used for steam and gases:
◊ Auto Setting uses mathematical calculations to determine the correct dampening setting.
◊ When the flow rate is steady (not changing more than 15% from one reading to the next), the dampening is set to the
highest setting to provide stable and reliable flow readings.
◊ When the flow rate is fluctuating (changing more than 15% from one reading to the next), dampening is decreased to
provide a quick response time to flow rate changes.
• The 1-5 Setting sets faster response times.
• The 6-9 Setting sets slower response times for steadier instantaneous flow readings.

Operating the VN2000 Transmitter
Page 19 June 2017 VRX-UM-02233-EN-02
MPORTANTI
All liquid applications should be set to a dampening of 8. All steam and gas applications should be set to a dampening of Auto.
OTE:N All totalized flow rate is counted, regardless of the dampening setting. The totalizer NEVER misses any reading based
on the dampening selected.
Meter Type
The Meter Type option adjusts the electronics to work with all meter types in the VN2000 Flow Meter Series (large or small,
inversion or insertion).
Verify that the Meter Type is Large Insertion.
MPORTANTI
DO NOT change this setting. Contact the factory if you suspect this setting has been changed.
K-Factor Source (Insertion Meter Only)
Use the K-Factor Source option to indicate the type of pipe used for flow calculations.
Line Size Use for ASME pipe along with Schedule option. Select the pipe size in Programming Mode Level 1
DN Use for DN pipe. Select the pipe size in Programming Mode Level 1
Pipe ID
Use for non-standard pipes or when the pipe inner diameter (ID) can be measured directly. Enter the pipe
size in Programming Mode Level 1
K-Factor Entry
Use K-Factor only and not pipe dimensions in calculations. When K-Factor Entry is selected, the pipe size
option does not appear in Programming Mode Level 1
Table 8: K-factor source options
K-Factor (Insertion Meter Only)
The K-Factor is used for VN2000 insertion vortex flow meters. The transmitter automatically generates the K-Factor based on
the flow meter model type and bore size.
OTE:N DO NOT change the K-Factor that came with your device without first consulting the factory.
To change the K-Factor, press Left Arrow to move the cursor under the digit to be changed. Press Up Arrow to change the
digit. If the K-Factor does not match the “VN2000 SF” found on the bottom right of your sizing sheet, contact the manufacturer.
Schedule (Insertion Meter Only)
When the K-Factor Source is Line Size, use the Schedule option to select the pipe schedule.
Gas Constant (Gas Only)
Use the Gas Constant option only when the gas has characteristics that require calculations other then the standard formula
for calculating the effects of temperature and pressure on the gas flow rate.
Temperature Calibration
The Temp Calibration option calibrates the internal RTD located in the flow meter body. This is used only for flow meters that
have the Mass Flow Transmitter. The calibration is done at the factory and these settings should NOT be changed unless for
reasons below:
Press Up Arrow to scroll through the options:
• Temp Offset is factory-set and should NOT be changed
• Temp Gain is factory-set and should NOT be changed except to calibrate the operating pressure and temperature in the
steam flow meter.
◊ If the operating internal pressure and temperature of the flow meter must be in-field calibrated, do the following:
• To calibrate to a higher setting, increase the Temp Gain by 10 units at a time until the desired operating pressure
and temperature display on the transmitter
• To calibrate to a lower setting, decrease the Temp Gain by 10 units at a time until the desired operating pressure
and temperature display on the transmitter.

Operating the VN2000 Transmitter
Page 20 June 2017VRX-UM-02233-EN-02
Application
The Application option sets up the flow meter for the desired fluid type and application. The Application is factory-set. The
setting is based on the application fluid type and should NOT be changed. If the incorrect fluid type is selected, please contact
the factory immediately.
Modbus Address
Enter the Modbus RTU address. See the “VN2000 Flow Meters Modbus User Manual.”
Settings
Initially, the meter shows field settings that have been factory-set for your particular application parameters.
This option lets you reset all program settings to factory settings, if required. DO NOT change to factory settings unless
advised to do so by the manufacturer.
Vibration Control
The Vibration Control settings block out unwanted vibration or other frequencies that may affect the flow meter accuracy
or repeatability.
High
The highest vibration control setting helps with no-flow condition and active flow condition. Use in locations
where vibration is present
Medium Good vibration control helps with no-flow condition and active flow. Use this setting for steam and gases
Low Basic vibration control during no-flow condition and active flow. Use this setting for liquids
Off No vibration control activated
\
Table 9: Vibration control settings
/