Page is loading ...

Page 23
IN
S
T
A
LL
A
T
I
O
N:
Page 2
T
h
a
n
k
y
ou
f
o
r
pu
r
c
h
a
s
i
n
g
t
h
i
s
H
a
m
p
t
on
B
a
y
i
n
t
e
r
i
or
m
i
ni
-
p
e
n
d
a
n
t.
T
h
i
s
producthasbeenmanufacturedwiththehigheststandardsofsafetyand
quality.
FEATURES:
1. One-lightinteriormini-pendantinbronze finishwithfrostedwhiteglass.
Thismini-pendantisapartofthe matchingSomersetcollection available
at TheHomeDepot.
2. Thisfixturehasbeenengineeredtosafelyuseuptoa60wattmedium
baseincandescent bulb(do notexceed 60 watts)(notincluded).
3. Forenergysavings,thisfixturehasbeenengineeredtosafelyusea
standardbasecompactfluorescent lightbulb(forequivalent lightoutput,
donotexceed 15 watts)(notincluded).
QUESTIONS, PROBLEMS,MISSINGPARTS:
BeforereturningtoyourlocalHome Depot,please call ourCustomer Service
Teamat1-877-527-0313 orvisitwww.homedepot.com.Pleasereference
your SKU 229-232 orUPC6940500310749.

Page 3
CAU
T
I
O
N:
1. Beforestartinginstallation ofthisfixtureorremovalofapreviousfixture,
disconnectthepowerbyturningoffthecircuitbreakerorbyremovingthe
fuseatthefuse box.
2. CONSULTAQUALIFIEDELECTRICIAN IF YOU HAVEANY
ELECTRICALQUESTIONS.
3.Ifyou haveany non-electrical questionsaboutthisfixture,pleasecontact
our Customer Service Team at 1-877-527-0313 or visit
www.homedepot.com.Pleasereference yourSKU229-232orUPC
6940500310749.
4.KeepyourreceiptandtheseInstructionsforProofof Purchase.
TOOLSREQUIRED FORASSEMBLY&INSTALLATION
(notincluded):
LightBulb Safetygoggles Ladder Gloves Wirestrippers
(60 wattmaximum)
(orCFLequivalent)
Flatheadscrewdriver Phillips screwdriver Electricaltape Wirecutters
Page 22
P
I
EC
E
S
I
NC
L
U
SES
P
O
UR
L
'
I
N
S
T
A
LL
A
T
I
O
N
(
l
e
s
pi
c
e
s
ne
s
o
nt
p
a
s
l'
c
he
l
l
e):
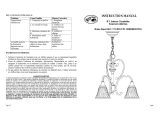
1xVisTerre(#18) 2xVis Bo tedeSortie(#19) 2xVisdeMontage(#22)
1xSangledeMontage(#20) 3xSerre-Fils(#21) 2x crousdeVerrouillage(#2)
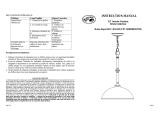
INSTRUCTIONSD'ASSEMBLAGE:
1. Visser lesdeux VisdeMontage(#22)surla SangledeMontage(#20).Fixer laSanglede
Montage(#20)surla Bo tedeSortie(#17) gr ce auxdeux Vis de Bo tedeSortiefournies
(#19). [S'assurer quelefiletagedesVisdeMontage(#22)faitface l'ext rieurquand la
SangledeMontage(#20)estattach e la Bo tedeSortie(#17).]
2. Enroulerle c ble lectriquedeterreduluminaire autourdelaVisdeTerre(#18) pr sente
surl'Entretoise(#20),etpuisconnecter le c ble lectriquedeterre duluminaire celui de
la Bo tedeSortie(#17).Connecter le c bleblancduluminaireau c bleblanc (c ble
neutre) dela Bo tedeSortie(#17).Connecter le c blenoirduluminaire au c blenoir
(c blesoustension)dela Bo tedeSortie(#17).Couvrirlesconnecteurs gr ceauxSerre-
Fils(#21).Envelopperlesconnexionsdes c blesavecdurubanadh sifisolant pourune
meilleure connexion.Placer les c bles l'int rieurdela Bo tedeSortie(#17). Note:Si
vousavezdesquestionsrelatives l' lectricit ,consultezvotrecode lectriquelocal
concernantles m thodesde mise terreenvigueur.
3. Placer lePavillon(#1)contre la Bo tedeSortie(#17)en faisantpasser lesVisde
Montageprotub rantes(#22)parlestrouscorrespondantsdu Pavillon (#1).Fixerle
luminaireauplafond envissantlesdeux crousdeVerrouillage(#2)surlesdeuxVisde
Montageprotub rantes(#22).
4. L'installationest achev e.Remettrelecourantau disjoncteurou la bo te fusible.
Appuyez surl'interrupteurde lumi repourallumerleluminaire.

Page 21
ASSEMBLAGE:
Page 4
P
A
R
T
S
INC
L
UD
E
D
F
O
R
A
S
S
E
M
B
L
Y
(
p
a
r
t
s
a
r
e
n
o
t
t
o
s
c
a
l
e
):
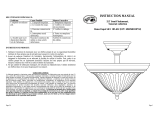
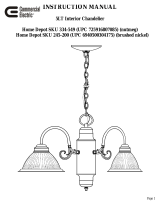
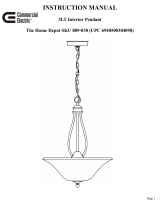
4ea Tubes(#5,#7,#9,#11) 1ea Shade(#14) 1ea SocketRing(#15) 1eaCanopy(#1)
Bushing(#3)
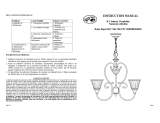
ASSEMBLY INSTRUCTIONS:
1. Carefully unpackthefixture.Lay outallparts on acleansurface.
2. WeavethefixturewiresupthroughTubeA(#11),through TubeB(#9),
through TubeC(#7),through TubeD(#5)and throughtheBushing(#3)
on theCanopy(#1).Theheightofthefixture canbeadjustedbyusing
fewertubes(eachtubeis12incheslong).
3. ScrewTubeA(#11) ontotheNipple(#12). ScrewTubeB(#9) ontoNipple
A(#10).ScrewTubeC(#7)ontoNippleB(#8).ScrewTubeD(#5)onto
NippleC(#6). ScrewtheBushing(#3)ontoNippleD(#4).
4. UnscrewtheSocketRing(#15)fromtheSocket(#13).Place theShade
(#14)overtheSocket(#13).ScrewtheSocketRing(#15)ontotheSocket
(#13)tosecuretheShade(#14).
5. Install uptoa60watt mediumbaseincandescentlightBulb(#16)or
equivalentstandardbasecompactfluorescent lightbulb(neitherprovided)
inthe Socket(#13).

Page 19
AVERTISSEMENT:
1. Avantdecommencer installerceluminaire ou d'enleverl'ancienluminaire,
d connectez lecouranten teignantledisjoncteur ou enenlevantlefusible
correspondant du coffret fusibles.
2.
CONSULTER UN ELECTRICIEN QUALIFIE POUR TOUTE
QUESTION RELATIVEA L'ELECTRICITE.
3.
En casdequestionsnonrelatives l' lectricit proposde ce luminaire,
veuillez contacter notre centredeService laClient leau1-877-527-0313
ouvisiterwww.homedepot.com.Veuillez indiquervotreUGS229-232 ou
UPC6940500310749.
4.
Conservervotre re uet cesInstructionscomme Preuved'Achat.
OUTILSREQUISPOUR L'ASSEMBLAGE&L'INSTALLATION
(noninclus):
Ampoule LunettesdeProtection Echelle Gants D nudeurde
(60 wattsmaxima) c bles lectriques
(ou quivalentLFC)
Tournevis t teplate Tournevis croisillon Rubanadh sifisolant Pince pour c bles lectriques
Page 6
P
A
R
TS
I
NC
L
UD
E
D
F
O
R
I
N
S
T
A
LL
A
T
I
O
N
(
p
a
r
t
s
a
r
e
n
o
t
t
o
s
c
a
l
e):
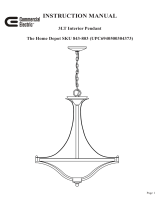
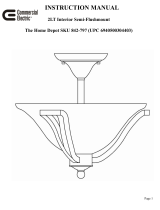
1ea GroundScrew(#18) 2ea OutletBoxScrews(#19) 2ea MountingScrews(#22)
1ea MountingStrap(#20) 3ea WireConnectors(#21) 2eaLockNuts(#2)
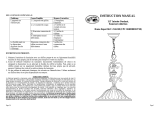
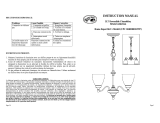
INSTALLATIONINSTRUCTIONS:
1.Screwthetwo MountingScrews(#22)intotheMountingStrap(#20).Mountthe
MountingStrap(#20)tothe OutletBox (#17) usingthetwoOutletBoxScrews(#19).
[Makesure thethreadsoftheMountingScrews (#22) arefacing outsidewhenthe
MountingStrap(#20)isattachedtotheOutletBox(#17).]
2. Wrapthegroundwirefromthefixturearound theGroundScrew(#18)ontheMounting
Strap(#20),andthenconnectthegroundwirefromthefixturetothegroundwire from
the OutletBox(#17).Connectthewhitewire fromthefixture tothewhitewire (neutral
wire) fromtheOutletBox(#17).Connecttheblackwire fromthefixture totheblack
wire (livewire)fromtheOutletBox (#17).Cover theconnectionsusing theWire
Connectors(#21).Wrapthewireconnectionswithelectricaltapeforamoresecure
connection.Positionthewiresbackinsidethe OutletBox(#17). Note:Ifyou have
electricalquestions,consultyourlocalelectricalcode forapprovedgroundingmethods.
3. Place theCanopy(#1)against theOutletBox(#17)byaligningtheprotruding
Mounting Screws(#22)all thewaythrough theholesontheCanopy(#1).Tightenthe
fixturetotheceilingbyscrewingthetwoLockNuts(#2) ontothetwoprotruding
MountingScrews (#22).
4. Installationiscomplete.Turnonthepower atthecircuitbreaker orfusebox.Turnthe
lightswitchontoactivatethefixture.

Page 17
M
A
N
U
E
L
D
'
I
N
S
T
RUC
T
I
O
NS
MiniLampe Suspensiond'Int rieur1LM,
collection Somerset
HomeDepotUGS 229-232(UPC6940500310749)
Page 8
T
R
O
U
B
L
E
SH
O
O
T
I
N
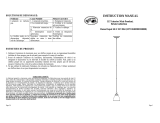
G:
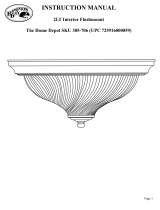
PRODUCTMAINTENANCE:
1. Tocleanthe outsideof thefixture,useadryorslightlydampenedcleancloth(useclean
water,never asolvent)to wipethe glassandsurface ofthefixture.
2. Tocleanthe insideofthefixture,firstdisconnectpowertothefixturebyturning off the
circuit breaker orby removingthefuseatthefusebox.Next,useadryorslightly
dampenedcleancloth(usecleanwater,neverasolvent)towipethe insideglassand
interiorsurface ofthefixture.
3.Do notuseanycleaners with chemicals,solventsorharshabrasives.Useonlyadrysoft
cloth todustor wipe carefully.
LIMITEDWARRANTY
Themanufacturerwarrantsthis lighting fixturetobe free fromdefectsinmaterialsand workmanshipfora
period offive(5)yearsfromdateofpurchase.Thiswarrantyappliesonlytotheoriginalconsumerpurchaser
and onlyto products usedin normal useand service.Ifthisproductisfound to be defective,themanufacturer s
only obligation, andyourexclusiveremedy,istherepairorreplacementoftheproductatthemanufacturer s
discretion, providedthattheproducthasnotbeendamagedthrough misuse,abuse, accident,modifications,
alterations,neglector mishandling. Thiswarrantyshall notapplytoanyproductthatisfoundtohavebeen
improperlyinstalled, set-up, orusedinanywaynotin accordance withtheinstructionssuppliedwiththe
product.Thiswarrantyshall notapplytoafailureoftheproductasaresult ofan accident, misuse,abuse,
negligence,alteration, orfaultyinstallation, oranyotherfailure notrelating tofaultymaterialorworkmanship.
Thiswarrantyshallnotapplytothefinish on any portion oftheproduct,suchassurface and/orweathering, as
thisisconsidered normalwearand tear. Themanufacturerdoesnotwarrantand speciallydisclaimsany
warranty,whetherexpressorimplied,offitness foraparticularpurpose,otherthanthewarranty
containedherein.Themanufacturerspecificallydisclaimsanyliabilityand shall notbe liableforany
consequentialorincidentalloss ordamage,including butnotlimitedtoanylabor/expensecosts
involvedinthereplacementorrepair ofsaidproduct.
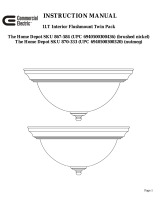
Problem PossibleCause CorrectiveAction
1.Lightbulb isburnedout. 1.Replacelightbulb.
2.Power isoff. 2.Makesurepower
supply is on.
3.Faultywireconnection. 3.Checkwiring.
Light bulb will not
illuminate.
4.Faultyswitch. 4.Testorreplaceswitch.
Fuseblowsorcircuit
breakertrips whenlight
bulbisilluminated.
Crossedwiresorpowerwire
isgroundingout.
Checkwireconnections.
/