Page is loading ...

Page 23
INSTALLATION:
Page 2
T
h
a
n
k
y
ou
f
o
r
pu
r
c
h
a
s
i
n
g
t
h
i
s
H
a
m
p
t
on
B
ay
i
n
t
e
r
i
or
r
e
v
e
r
s
i
b
le
c
h
a
nd
e
li
er
.
Thisproducthasbeenmanufacturedwiththehigheststandardsofsafetyand
quality.
FEATURES:
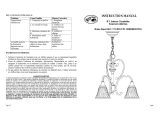
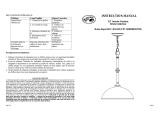
1. Three-lightinteriorreversiblechandelierinnutmegbronze finishwith
tea stainedglass.Thischandelierisapartofthematching Bristol
collectionavailableat TheHomeDepot.
2. Thischandelierisreversible,whichallowsforaquickandeasychange
froman up-lighttoadown-lightfixture.
3. Standard72-inchwireand60-inchchainforopenentry-wayand
cathedral ceilinginstallations.AlsoincludesaQuickLinkto easilyadjust
lengthofchain.
4. Thisfixturehasbeenengineeredtosafelyuseuptothree 60watt
mediumbaseincandescentlightbulbs(do notexceed60watts each)(not
included).
5. Forenergysavings,thisfixturehasbeenengineeredtosafelyuse up to
three standardbasecompactfluorescent light bulbs(forequivalent light
output,do notexceed 15 wattseach)(notincluded).
QUESTIONS, PROBLEMS,MISSINGPARTS:
BeforereturningtoyourlocalHome Depot,please call ourCustomer Service
Teamat1-877-527-0313 orvisitwww.homedepot.com.Pleasereference
your SKU 216-665 orUPC6940500310787.

Page 21
ASSEMBLAGE:
Page 4
P
A
R
TS
I
NC
L
UD
E
D
F
O
R
A
S
S
E
M
B
L
Y
(
p
a
r
t
s
a
r
e
n
o
t
t
o
s
c
a
l
e):
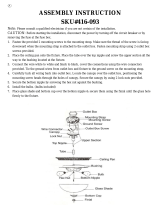
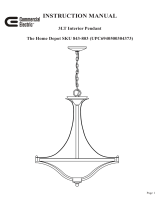
1ea Canopy(#1) 1ea Screw 5feetChain(#25) 1eaRing(#4)
CollarLoop(#2)
1ea Loop(#5) 1ea NippleA(#8) 1ea Washer(#10) 1ea HexNut(#11)
1ea BottomCover(#12) 1ea Finial(#13) 3eaSocketRings ( 15) 3ea Shades(#16)1ea Quick Link (#3)
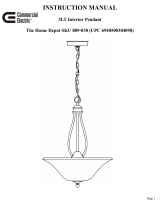
ASSEMBLYINSTRUCTIONS:
1. Carefullyunpackthefixture.Layout all partsonacleansurface.
2. AttachColumnAtoColumnBbyscrewingNippleContoBushingA.ScrewNippleA
(#8)intoBushingB.
3. InsertthePlugfromColumnBintotheSlot on theFixture Body(#9). Toprevent
electricshock,matchthe widebladeofPlugtothe wideSlot. Place theFixture Body
(#9)and thentheWasher(#10) over NippleA(#8).ScrewtheHexNut(#11)ontoNipple
A(#8)tosecure it.Place theBottomCover (#12)around NippleA(#8).Securethe
BottomCover(#12)byscrewingtheFinial(#13)to NippleA(#8).
4. Weavethefixture wiresupthroughtheLoop(#5), through theChain(#25),throughthe
ScrewCollar Loop(#2),through theRing(#4),throughtheCanopy(#1)andthrough the
Nipple(#23)ontheMountingStrap(#22) [as shownon Page7].
5. UnscrewtheSocketRings (#15)fromtheSockets (#17).PlacetheShades(#16) over the
Sockets(#17).ScrewtheSocketRings(#15)ontotheSockets (#17)tosecure theShades
(#16).
6. Install three 60 watt mediumbaseincandescentlight Bulbs(#14)orthreeequivalent
compactfluorescentlightbulbs(neither included)intheSockets(#17).

Page 19
AVERTISSEMENT:
1. Avantdecommencer installerceluminaire ou d'enleverl'ancienluminaire,
d connectez lecouranten teignantledisjoncteur ou enenlevantlefusible
correspondant du coffret fusibles.
2.
CONSULTER UN ELECTRICIEN QUALIFIE POUR TOUTE
QUESTION RELATIVEA L'ELECTRICITE.
3.
En casdequestionsnonrelatives l' lectricit proposde ce luminaire,
veuillez contacter notre centredeService laClient leau1-877-527-0313
ou visiterwww.homedepot.com.Veuillez indiquervotreUGS 216-665 ou
UPC6940500310787.
4.
Conservervotre re uet cesInstructionscomme Preuved'Achat.
OUTILSREQUISPOUR L'ASSEMBLAGE&L'INSTALLATION
(noninclus):
3Ampoules LunettesdeProtection Echelle Gants D nudeurde c bles lectriques
(60 wattsmaxima)
(ou quivalentLFC)
Tournevis t teplate Tournevis croisillon Rubanadh sifisolant Pince pour c blesPincespliantes
lectriques
Page 6
P
A
R
TS
I
NC
L
UD
ED
F
O
R
I
N
S
T
A
LL
A
T
I
O
N
(
p
a
r
t
s
a
r
e
n
o
t
t
o
s
c
a
l
e):
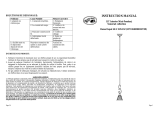
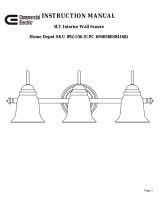
2ea OutletBoxScrews(#24) 1eaHexNut(#21) 1ea GroundScrew(#20)
1ea MountingStrap(#22) 3ea WireConnectors(#19) 1ea Nipple(#23)
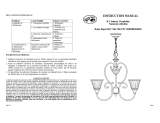
INSTALLATIONINSTRUCTIONS:
1. AttachtheMountingStrap(#22)tothe OutletBox (#18) usingthetwoOutletBox
Screws(#24).
2. AdjusttheChain(#25)torequiredheightbyliftingthefixtureandattachingtheQuick
Link(#3)toalinkofChain(#25)closer totheceiling.Thefixture canberaisedand
loweredin thismanneruntilthedesiredheightisachieved.Next,usepliersto twistopen
(cover thechain withclothtopreventdamage) thefirstunused linkofChain(#25).
Removeandsavetheexcesschain.Pull theexcessfixture wiresthroughtheNipple(#23)
intotheOutletBox(#18).Wires maybeleftatfulllengthorshortenedasdeterminedby
spaceintheOutletBox (#18)to make thewireconnections.
3. Wrapthegroundwire fromthefixturearound theGroundScrew(#20)ontheMounting
Strap(#22),and thenconnecttheground wire fromthefixture tothegroundwire from
theOutletBox(#18).Connectthewirewithoutwriting onit (withraisedribs)fromthe
fixturetothewhitewire(neutralwire) fromtheOutletBox(#18).Connectthewire with
writingonitfromthefixturetotheblackwire(livewire)fromtheOutletBox(#18).
Cover theconnectionsusingtheWireConnectors(#19).Wrapthewireconnections with
electricaltapeforamore secureconnection.Positionthewiresback inside the Outlet
Box (#18). Note:Ifyou haveelectrical questions,consultyourlocalelectricalcode for
approvedgroundingmethods.
4. Place theCanopy(#1) over the Nipple(#23)all thewaytotheceiling.TightentheRing
(#4) ontotheScrewCollar Loop(#2)untiltheCanopy(#1)isheldfirmlyagainst the
ceiling.
5. Installationiscomplete.Turn on the power atthecircuitbreakerorfusebox.Turnthe
lightswitchontoactivatethefixture.

Page 17
MANUELD'INSTRUCTIONS
Chandelier R versible3LM,
collectionBristol
HomeDepotUGS 216-665(UPC6940500310787)
Page 8
TROUBLESHOOTING:
PRODUCTMAINTENANCE:
1. Tocleanthe outsideof thefixture,useadryorslightlydampenedcleancloth(useclean
water,never asolvent)to wipethe glassandsurface ofthefixture.
2. Tocleanthe insideofthefixture,firstdisconnectpowertothefixturebyturning off the
circuit breaker orby removingthefuseatthefusebox.Next,useadryorslightly
dampenedcleancloth(usecleanwater,neverasolvent)towipethe insideglassand
interiorsurface ofthefixture.
3.Do notuseanycleaners with chemicals,solventsorharshabrasives.Useonlyadrysoft
cloth todustor wipe carefully.
LIMITEDWARRANTY
Themanufacturerwarrantsthis lighting fixturetobe free fromdefectsinmaterialsand workmanshipfora
period offive(5)yearsfromdateofpurchase.Thiswarrantyappliesonlytotheoriginalconsumerpurchaser
and onlyto products usedin normal useand service.Ifthisproductisfound to be defective,themanufacturer s
only obligation, andyourexclusiveremedy,istherepairorreplacementoftheproductatthemanufacturer s
discretion, providedthattheproducthasnotbeendamagedthrough misuse,abuse, accident,modifications,
alterations,neglector mishandling. Thiswarrantyshall notapplytoanyproductthatisfoundtohavebeen
improperlyinstalled, set-up, orusedinanywaynotin accordance withtheinstructionssuppliedwiththe
product.Thiswarrantyshall notapplytoafailureoftheproductasaresult ofan accident, misuse,abuse,
negligence,alteration, orfaultyinstallation, oranyotherfailure notrelating tofaultymaterialorworkmanship.
Thiswarrantyshallnotapplytothefinish on any portion oftheproduct,suchassurface and/orweathering, as
thisisconsidered normalwearand tear. Themanufacturerdoesnotwarrantand speciallydisclaimsany
warranty,whetherexpressorimplied,offitness foraparticularpurpose,otherthanthewarranty
containedherein.Themanufacturerspecificallydisclaimsanyliabilityand shall notbe liableforany
consequentialorincidentalloss ordamage,including butnotlimitedtoanylabor/expensecosts
involvedinthereplacementorrepair ofsaidproduct.
Problem PossibleCause CorrectiveAction
1.Lightbulb isburnedout. 1.Replacelightbulb.
2.Power isoff. 2. Makesurepower
supply is on.
3.Faultywireconnection. 3.Checkwiring.
Light Bulb will not
illuminate.
4.Faultyswitch. 4.Testorreplaceswitch.
Fuseblowsorcircuit
breakertripswhenlight
bulbisilluminated.
Crossedwiresorpowerwire
isgroundingout.
Checkwireconnections.
/