Page is loading ...

Page 23
IN
S
T
A
LL
A
T
I
O
N:
Page 2
T
h
a
n
k
y
ou
f
o
r
p
u
r
c
h
a
s
i
n
g
t
h
i
s
H
a
m
p
t
o
n
B
a
y
i
n
t
e
r
i
o
r
c
h
a
nd
e
l
i
er
.
T
h
i
s
p
r
o
du
c
t
hasbeenmanufacturedwiththehigheststandardsofsafetyandquality.
FEATURES:
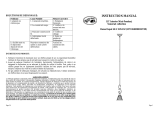
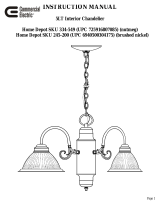
1. Five-lightinteriorchandelierinbronze finishwithfrostedwhiteglass.
Thischandelierisapartofthe matchingSomersetcollection availableat
TheHome Depot.
2. Standard72-inchwireand60-inchchainfor openentry-wayand cathedral
ceilinginstallations.AlsoincludesaQuickLinkto easilyadjustlengthof
chain.
3. Thisfixturehasbeenengineeredtosafelyuse up tofive 60 wattmedium
baseincandescent lightbulbs(do notexceed60watts each)(notincluded).
4. Forenergysavings,thisfixturehasbeenengineeredtosafelyuse up to
fivestandardbasecompactfluorescent light bulbs(forequivalent light
output,do notexceed 15 wattseach)(notincluded).
QUESTIONS, PROBLEMS,MISSINGPARTS:
BeforereturningtoyourlocalHome Depot,please callourCustomerService
Teamat1-877-527-0313 orvisitwww.homedepot.com. Pleasereference your
SKU 166-746 orUPC6940500310695.

Page 3
CAU
T
I
O
N:
1. Beforestartinginstallationofthisfixtureorremovalofapreviousfixture,
disconnectthepowerbyturningoffthecircuit breakerorbyremovingthe
fuseatthefuse box.
2. CONSULT AQUALIFIED ELECTRICIAN IF YOU HAVE ANY
ELECTRICALQUESTIONS.
3. Ifyou haveany non-electricalquestionsaboutthisfixture,pleasecontact
our Customer Service Team at 1-877-527-0313 or visit
www.homedepot.com.Pleasereference yourSKU 166-746 orUPC
6940500310695.
4. Keepyourreceiptand theseInstructionsforProofof Purchase.
TOOLSREQUIRED FORASSEMBLY&INSTALLATION
(notincluded):
5 LightBulbs Safetygoggles Ladder Gloves Wirestrippers
(60 wattmaximum)
(orCFLequivalent)
Flatheadscrewdriver Phillips screwdriver Electricaltape Wirecutters Plier
Page 22
P
I
E
C
E
S
I
NC
L
U
SES
P
O
UR
L
'
I
N
S
T
A
LL
A
TI
ON
:
(
l
e
s
pi
c
e
s
n
e
s
o
nt
p
a
s
l'
ch
e
l
l
e):
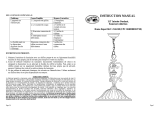
2xVis Bo tedeSortie(#19) 1x crouHex(undertheMountingStrap) 1xVisTerre(#21)
1xSangledeMontage(#20) 3xSerre-Fils(#17) 1x Embout(#18)
INSTRUCTIONSD'ASSEMBLAGE:
1. AttacherlaSangledeMontage(#20) la bo tedeSortie(#16) gr ce auxdeuxVisde Bo tede
Sortiefournies(#19).
2. R glerlaCha ne(#22) lahauteur d sir eensoulevantleluminaireetenattachantl'Attache
Rapide(#3) unanneaudelaCha ne(#22)plusprocheduplafond.Leluminairepeut tre lev
oubaiss de cette fa on lahauteur d sir e.Puis, utiliserdespincespliantes(recouvrirlacha ne
d'untissupournepasl'endommager)pour ouvrirlepremieranneauinutilis delaCha ne(#22).
Oteretmettrede c t lesanneauxsuperflusdelacha ne.Ramenerlalongueursuperfluede c ble
lectriquedansla Bo tedeSortie(#16)enla tirantautraversdel'Embout(#18).Les c bles
peuvent treraccourcis selonl'espace disponibledansla Bo tedeSortie(#16)pourlesbrancher.
3. Enroulerle c ble lectriquedeterreduluminaireautourdelaVisdeTerre(#21) pr sentesur
l'Entretoise(#20),et puisconnecterle c ble lectriquedeterreduluminaire celuidela Bo tede
Sortie(#16).Connecterle c blesansmarque crite(avec desnervuresenrelief) duluminaireau
c bleblancdela Bo tedeSortie(#16).Connecterle c bleavec unemarque criteduluminaire
au c blenoirdela Bo tedeSortie(#16).Couvrirlesconnecteurs gr ce auxSerre-Fils(#17).
Envelopperlesconnexionsdes cblesavec durubanadh sifisolantpourunemeilleure
connexion.Placerles c bles l'int rieurdela Bo tedeSortie(#16). Note:Sivousavezdes
questionsrelatives l' lectricit ,consultezvotrecode lectriquelocalconcernantles m thodes
demise terreenvigueur.
4. PlacerlePavillon(#1)surl'Embout(#18)jusqu'auplafond.Serrerl'Anneau(#4) surlaBouclede
ColViss (#2)jusqu' ce quelePavillon(#1) soitmaintenufermementcontreleplafond.
5.L'installationest achev e.Remettrelecourantaudisjoncteurou la bo te fusible.Appuyez sur
l'interrupteurdelumi repourallumerleluminaire.

Page 21
A
SS
E
M
B
L
A
G
E:
Page 4
P
A
R
T
S
INC
L
UD
E
D
F
O
R
A
S
S
E
M
B
L
Y
(
p
a
r
t
s
a
r
e
n
o
t
t
o
s
c
a
l
e
):
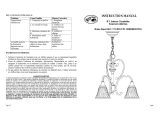
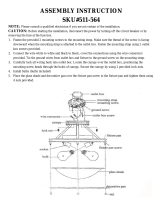
1ea Canopy(#1) 1ea Screw 5feetChain(#22) 1ea Ring(#4) 1ea Quick Link(#3)
CollarLoop(#2)
5ea LockNuts(#8) 5ea DecorativeArms(#9) 5ea SocketRings(#11) 5eaShades(#12) 1ea HexKey
ASSEMBLY INSTRUCTIONS:
1.Carefullyunpackthefixture.Layout all partsonacleansurface.
2. FastentheFixtureBody(#6)onto NippleA(#7).
3. Placetheholelocated on thebottomoftheDecorative Arm(#9) ontoScrewAonthe
CurveArm(#14).Placetheholelocated on thetopoftheDecorativeArm(#9)onto
Screw B, andsecuretheDecorative Arm(#9)byscrewingtheLockNut(#8)ontothe
protrudingScrew B. RepeatfortheotherfourDecorativeArms(#9).[Note:Usethe
HexKeytoloosentheScrewontheRing.ThenrotatetheRingtoensurethe
Decorative Arms(#9)arestraight.]
4. Weavethefixture wires up through theLoop(#5),throughthechain (#22), through the
ScrewCollar Loop(#2),throughtheRing(#4),through theCanopy(#1)andthrough
Nipple(#18)ontheMountingStrap(#20).
5. UnscrewtheSocketRings(#11)fromtheSockets(#13).Place theShades(#12) over the
Sockets(#13). ScrewtheSocketRings(#11)ontotheSockets(#13)tosecure theShades
(#12).
6. Install five 60 wattmediumbaseincandescentlight Bulbs (#10)orfiveequivalent compact
fluorescentlightbulbs (neitherprovided)inthefiveSockets(#13).
Page is loading ...

Page 19
A
V
E
R
T
I
SS
E
M
E
N
T:
1. Avantdecommencer installerceluminaire ou d'enleverl'ancienluminaire,
d connectez lecouranten teignantledisjoncteur ou enenlevantlefusible
correspondant du coffret fusibles.
2.
CONSULTER UN ELECTRICIEN QUALIFIE POUR TOUTE
QUESTION RELATIVEA L'ELECTRICITE.
3.
En casde questionsnonrelatives l' lectricit proposde ce luminaire,
veuillez contacternotre centredeService laClient leau1-877-527-0313
ouvisiter www.homedepot.com.Veuillez indiquer votreUGS 166-746 ou
UPC6940500310695.
4.
Conservervotre re uet cesInstructionscomme Preuved'Achat.
OUTILSREQUISPOUR L'ASSEMBLAGE&L'INSTALLATION
(noninclus):
5Ampoules Lunettes Echelle Gants D nudeurde
(60wattsmaxima) deProtection c bles lectriques
(ou quivalentLFC)
Tournevis tteplateTournevis croisillon Rubanadh sifisolant Pince pour Pincespliantes
c bles lectriques
Page 6
P
A
R
T
S
INC
L
UD
E
D
F
O
R
IN
S
T
A
LL
A
T
I
O
N
(
p
a
r
t
s
a
r
e
n
o
t
t
o
s
c
a
l
e
):
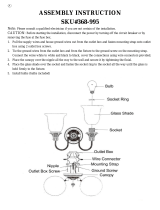
2ea OutletBoxScrews(#19) 1ea HexNut(undertheMountingStrap) 1ea GroundScrew(#21)
1ea MountingStrap(#20) 3ea WireConnectors(#17) 1ea Nipple(#18)
INSTALLATION INSTRUCTIONS:
1. AttachtheMountingStrap(#20)totheOutletBox(#16)usingthetwo OutletBoxScrews
(#19).
2. AdjusttheChain (#22)torequiredheightbyliftingthefixtureandattachingtheQuick
Link(#3)toalinkofChain(#22)closertotheceiling.Thefixturecanbe raisedand
lowered in thismanneruntilthedesiredheightis achieved.Next,usepliersto twist open
(cover thechainwithcloth topreventdamage)thefirstunused linkofChain(#22).
Removeandsave theexcesschain.Pull theexcess fixturewiresthrough theNipple(#18)
intothe OutletBox(#16).Wires maybeleftatfull length orshortenedasdeterminedby
spaceintheOutletBox (#16)to make thewireconnections.
3. Wrapthegroundwire fromthefixture aroundtheGroundScrew(#21) on theMounting
Strap(#20),andthenconnectthegroundwirefromthefixture totheground wire from the
OutletBox(#16).Connectthewire without writingonit(withraisedribs)fromthefixture
tothewhitewire(neutralwire)from theOutletBox (#16).Connectthewirewith writing
onitfromthefixturetotheblackwire(livewire) fromtheOutletBox(#16).Cover the
connections usingtheprovidedWire Connectors(#17).Wrapthewireconnections with
electricaltapeforamoresecureconnection.Position thewiresback insidetheOutletBox
(#16). Note:Ifyouhave electricalquestions,consultyourlocalelectrical code for
approvedgroundingmethods.
4. Place theCanopy(#1) over the Nipple(#18)all thewaytotheceiling.TightentheRing
(#4)ontothe ScrewCollar Loop(#2) untiltheCanopy(#1)isheldfirmlyagainstthe
ceiling.
5. Installation is complete.Turn on thepower atthecircuitbreakerorfusebox.Turnthelight
switchontoactivatethefixture.
Page is loading ...

Page 17
M
ANU
E
L
D
'
I
N
S
T
RU
C
T
I
O
NS
Chandelierd'Int rieur5LM,
collection Somerset
HomeDepotUGS 166-746(UPC6940500310695)
Page 8
T
R
O
U
B
L
E
SH
O
O
T
I
N
G:
PRODUCTMAINTENANCE:
1. Tocleanthe outsideofthefixture,useadryorslightlydampenedcleancloth (useclean
water,never asolvent)to wipethe glassandsurface ofthefixture.
2. Tocleanthe insideofthefixture,firstdisconnectpower tothefixture byturningoff the
circuitbreaker orby removingthefuseatthefusebox.Next,useadryorslightly
dampenedcleancloth (usecleanwater,never asolvent)to wipethe inside glass and
interiorsurface ofthefixture.
3.Do not useanycleanerswithchemicals,solvents orharshabrasives.Useonlyadrysoft
cloth todustor wipe carefully.
LIMITEDWARRANTY
Themanufacturerwarrantsthis lighting fixtureto be freefrom defectsinmaterialsand workmanshipfora period
offive(5)years fromdateof purchase.Thiswarrantyappliesonlytotheoriginalconsumer purchaserandonly
toproductsusedin normaluseandservice.Ifthisproductisfound tobedefective,themanufacturer s only
obligation, and yourexclusiveremedy,istherepairorreplacementoftheproductatthemanufacturer s
discretion, providedthattheproducthasnotbeendamagedthroughmisuse,abuse,accident,modifications,
alterations,neglectormishandling.Thiswarrantyshall notapplytoanyproductthatisfoundtohavebeen
improperlyinstalled,set-up, or usedinanyway notin accordance withtheinstructionssuppliedwiththe product.
Thiswarrantyshallnotapplytoafailureoftheproductasaresultofan accident,misuse,abuse,negligence,
alteration, orfaultyinstallation, oranyotherfailurenotrelating tofaultymaterialorworkmanship. This
warrantyshall notapplytothefinish on anyportion oftheproduct,suchassurface and/orweathering, asthisis
considered normalwearand tear. Themanufacturerdoesnotwarrantand speciallydisclaimsanywarranty,
whetherexpress orimplied,offitness foraparticularpurpose,otherthanthewarrantycontainedherein
.
Themanufacturerspecificallydisclaimsany liabilityand shall notbe liableforanyconsequentialor
incidentallossordamage,including butnotlimitedtoanylabor/expensecostsinvolvedinthe
replacementorrepair ofsaidproduct.
Problem PossibleCause CorrectiveAction
1.Lightbulb isburnedout. 1.Replacelightbulb.
2.Power isoff. 2. Makesurepower
supply is on.
3.Faultywireconnection. 3.Checkwiring.
Light Bulb will not
illuminate.
4.Faultyswitch. 4.Testorreplaceswitch.
Fuseblowsorcircuit
breakertripswhenlight
bulbisilluminated.
Crossedwiresorpowerwire
isgroundingout.
Checkwireconnections.
Page is loading ...
Page is loading ...
Page is loading ...
Page is loading ...
/