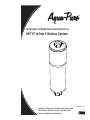
3M Aqua-Pure™ In-Line Water Filtration Systems Operating instructions
- Type
- Operating instructions
This manual is also suitable for
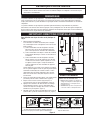
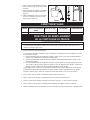
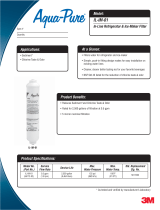
3M Aqua-Pure™ In-Line Water Filtration Systems are designed to provide clean, fresh water for your home. They are easy to install and can be used with 1/4” copper or plastic tubing. The systems come complete with all the necessary hardware, including fittings, tubing, and a wrench. They are also NSF certified to reduce chlorine taste and odor, as well as lead, cysts, and other contaminants.
Here are some of the benefits of using a 3M Aqua-Pure™ In-Line Water Filtration System:
- Improved taste and odor of water
- Reduced levels of lead, cysts, and other contaminants
- Extended life of appliances that use water


-
 1
1
-
 2
2
-
 3
3
-
 4
4
-
 5
5
-
 6
6
-
 7
7
-
 8
8
-
 9
9
-
 10
10
-
 11
11
-
 12
12
-
 13
13
-
 14
14
-
 15
15
-
 16
16


3M Aqua-Pure™ In-Line Water Filtration Systems Operating instructions
- Type
- Operating instructions
- This manual is also suitable for
3M Aqua-Pure™ In-Line Water Filtration Systems are designed to provide clean, fresh water for your home. They are easy to install and can be used with 1/4” copper or plastic tubing. The systems come complete with all the necessary hardware, including fittings, tubing, and a wrench. They are also NSF certified to reduce chlorine taste and odor, as well as lead, cysts, and other contaminants.
Here are some of the benefits of using a 3M Aqua-Pure™ In-Line Water Filtration System:
- Improved taste and odor of water
- Reduced levels of lead, cysts, and other contaminants
- Extended life of appliances that use water
Ask a question and I''ll find the answer in the document
Finding information in a document is now easier with AI
in other languages
Related papers
-
3M IL-IM-01 Operating instructions
-
3M IL-IM-01 Installation guide
-
3M Aqua-Pure AP431 User guide
-
-
-
-
-
-
3M 5528901 Operating instructions
-
Other documents
-
aqua-pure 3MFF100 Installation And Operating Instructions Manual
-
 AquaPure AQUA-PURE-IL-IM-01 User guide
-
 Filtrete 4US-MAXS-F01 User guide
-
 AquaPure AQUA-PURE-AP-MB801 Installation guide
-
Aquasana AQ-7000 Installation guide
-
 Cafe CWE23SSHSS Owner's manual
-
 Filtrete 5627902 WF SYS 4WH-QCTO-S01 CTO Operating instructions
-
Watts Pure H20 Installation guide
-
GE GSS25ETHBB Owner's manual
-
OmniFilter R500 Installation Instructions Manual


