Midmark Procenter Systems Installation guide

Type
Installation guide

Midmark Procenter Systems offer a versatile and efficient solution for dental professionals. With its user-friendly design and advanced features, this system enhances workflow and patient care. The cuspidor bowl provides easy access for rinsing and expectoration, promoting patient comfort. The integrated water and air controls allow for precise adjustments, ensuring optimal oral hygiene. The system's compatibility with various accessories, such as the assistant's unit, further expands its functionality and streamlines dental procedures.

Midmark Procenter Systems offer a versatile and efficient solution for dental professionals. With its user-friendly design and advanced features, this system enhances workflow and patient care. The cuspidor bowl provides easy access for rinsing and expectoration, promoting patient comfort. The integrated water and air controls allow for precise adjustments, ensuring optimal oral hygiene. The system's compatibility with various accessories, such as the assistant's unit, further expands its functionality and streamlines dental procedures.

1
© Midmark Corporation 2003 SF-1663
DA134500i
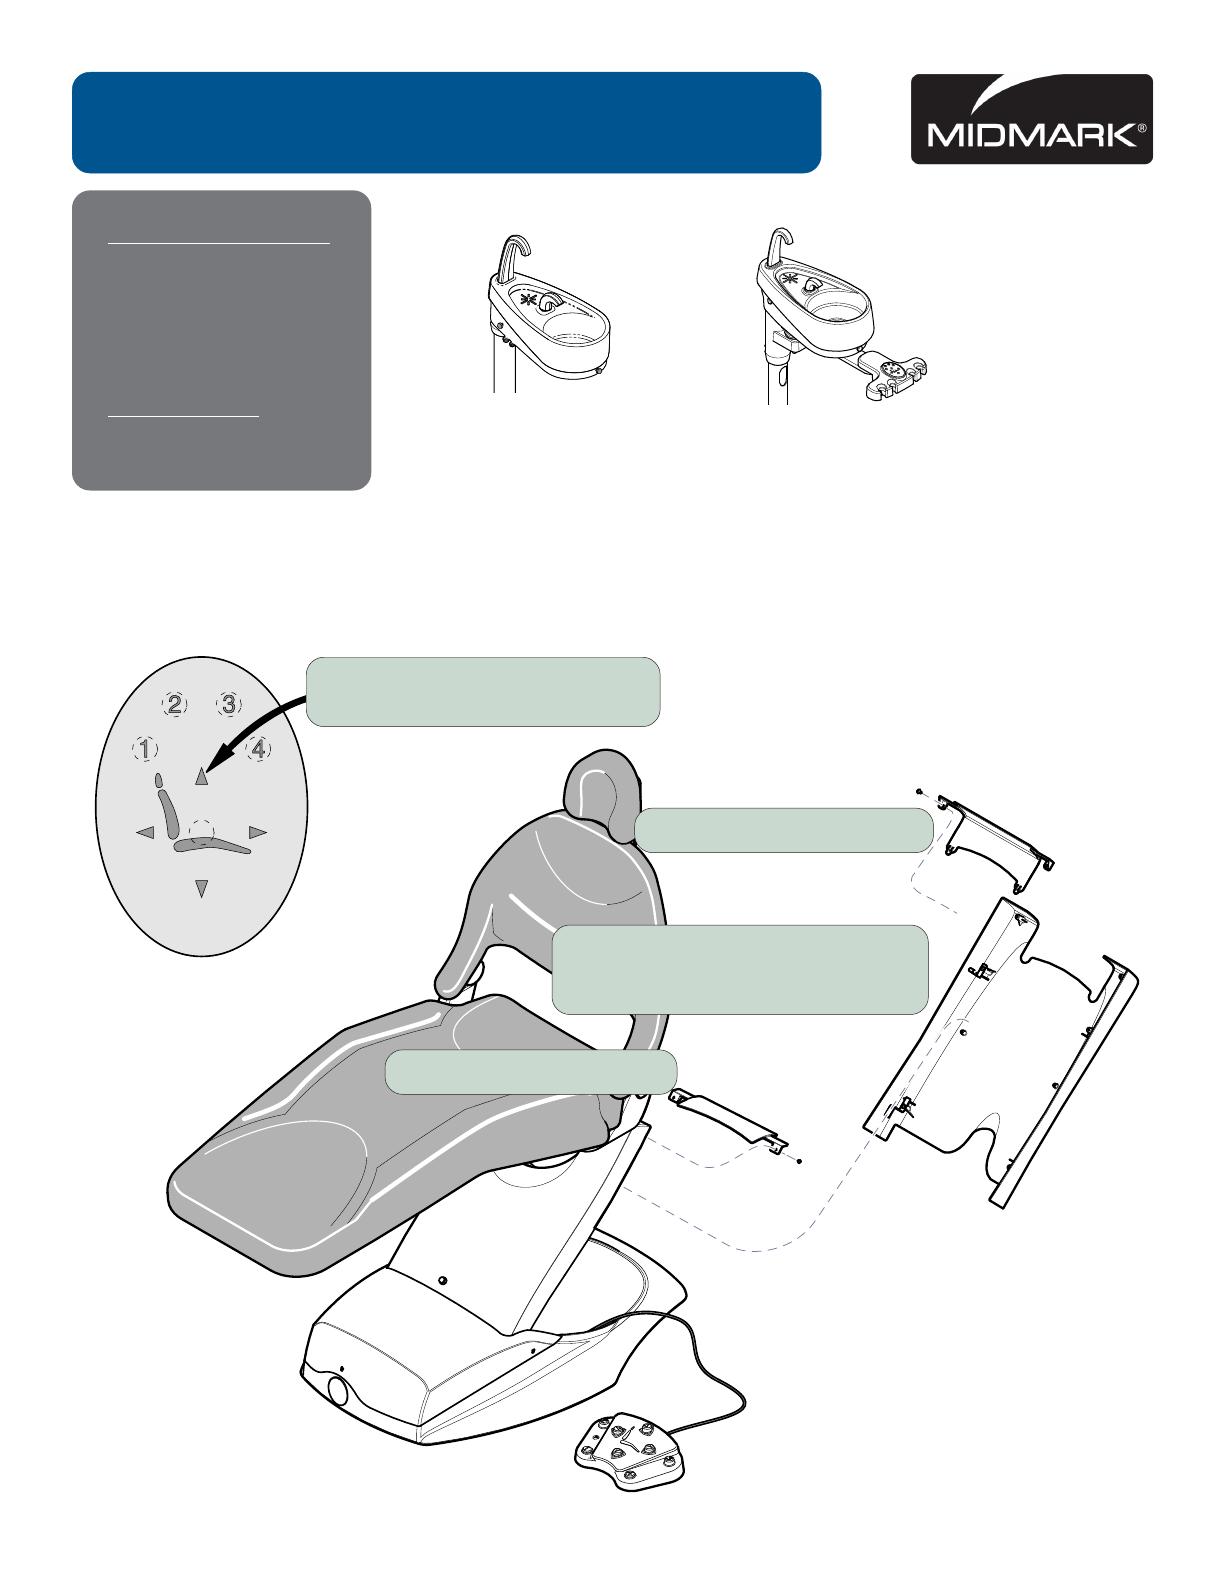
Step 2: Remove safety bail cover.
Tip: Push cover IN & DOWN,
then pull cover OUT & UP.
Step 3: Remove small cover.
Step 4: Remove end cover.
003-1151-00 Rev. AA1 (7/7/2017)
Parts Bag Contents
T-Fitting w/tubing ........ 1
Screw ......................... 2
Lockwasher ................ 2
Cable Tie .................... 2
Clamp ......................... 1
Special Tools
Level
Procenter Cuspidor LR Mtd. Installation
Step 1: Raise chair all the way up;
then unplug the chair.
Standard
Cuspidor
Cuspidor / Asst’s Unit
Combo
2
© Midmark Corporation 2003 SF-1663
Equipment Aler
t
Have an assistant secure the cuspidor arm at all pivot points to prevent damage to equipment.
DA137200i
Step 5: Secure extension plate to chair
with screws and lockwashers.
Step 6: Remove cover.
Adjust leveling screws until arm is level
Replace cover.
Leveling Screws
3
© Midmark Corporation 2003 SF-1663
DA144700i
DA137300i
Step 7: Position cuspidor bowl over
base then press down gently.
Step 8: Install faucet and gasket.
Install bowl flush spout and gasket.
Install gold trap.
Attention!
After completing Step 8:
Standard Cuspidor,
Go to page 4.
Cuspidor / Asst’s Unit Combo,
Go to page 5.
4
© Midmark Corporation 2003 SF-1663
5/8” Smooth
Tubing
Attention!
This page applies to
Standard Cuspidor
onl
y.
For Cuspidor / Asst’s Unit Combo,
Go to page 5.
Standard Cuspidor
Step A: Pull out yellow tubing & cut.
Insert T-fitting w/yellow tubing
.
Standard Cuspidor
Step B: Connect 1/8” yellow tubing.
Connect 1/4” blue tubing.
Note: 1/8” blue tubi
ng
is not used.
Standard Cuspidor
Step C: Connect 5/8” grey tubing from cuspidor
to 5/8” smooth tubing from umbilical.
Note: 5/8” ribbed tubing is for optional assistant’s unit.
Go to Page 6
Vacuum line
to Assistant’s
Unit
Air
Water
5
© Midmark Corporation 2003 SF-1663
Attention!
This page applies to
Cuspidor / Asst’s Unit Combo
onl
y.
For Standard Cuspidor,
Go to page 4.
Cuspidor/Asst’s Combo
Step A: Remove plugged section from 1/8” blue tubing.
Cuspidor/Asst’s Combo
Step B: Pull out 1/8” yellow tubing & cut.
Insert T-fitting w/yellow tubing
.
Go to Page 6
Cuspidor/Asst’s Combo
Step D: Connect cuspidor drain tube
to 5/8” smooth tubing from umbilical.
Cuspidor/Asst’s Combo
Step E: Connect vacuum tube
to 5/8” ribbed tubing from umbilical.
Cuspidor/Asst’s Combo
Step C: Connect 1/8” bluetubing.
Connect 1/8” yellow tubing.
Connect 1/4” blue tubing.
Vacuum line
to console
Vacuum
line to
Assistant’s
Unit
Air
Water
Water
6
© Midmark Corporation 2003 SF-1663
4
0
6
0
80
100
2
0
0
1
2
3
5
6
7
4
0
4
0
6
0
80
100
20
0
1
2
3
5
6
7
4
0
Step 9: Remove plug from water shut-off valve.
Install 1/4” barb fitting.
Connect 1/4” blue tubing from umbilical.
Cuspidor/Asst’s Combo only:
Step 11: Connect 5/8” ribbed tubing
(not shown)
from umbilical to central vacuum unit.
Step 10: Connect 5/8” smooth tubing
from umbilical to facility drain.
Note: Standard Cuspidor, go to page 7.
7
© Midmark Corporation 2003 SF-1663
Chair Umbilical
Assistant’s Unit
Umbilical
Controls
Power
Caution
Connect ground wire to ensure system ground continuity.
Failure to do so may result in electric shock.
Step 12: Connect wiring. Use two or more ties to
bundle wiring and vacuum tubing together
and attached to the chair frame.
Cuspidor Umbilical
8
© Midmark Corporation 2003 SF-1663
DA135200i
Step 14: Install safety bail cover.
Tip: Position bottom “hooks” on lower mounting pins.
Align top “hooks” with upper mounting pins.
Push cover Down, In, then pull Upward
until upper “hooks” engage.
Tabs
“Hooks”
Cable Ties
Step 13: Pull tubing/wiring toward extension plate to minimize slack.
Secure with two cable ties
.
Step 15: Slide extension plate cover over tabs.
9
© Midmark Corporation 2003 SF-1663
KA938902i
Cup Fill Button
Bowl Flush Button
Bowl Flush
Adjustment Knob
Increase
Decrease
Step 16: Adjust water flow if necessary.
Cup Fill
Adjustment Knob
Midmark Corporation
60 Vista Drive
P.O. Box 286
Versailles, OH 45380-0286
937-526-3662
Fax 937-526-5542
www.midmark.com
  • Page 1 1
  • Page 2 2
  • Page 3 3
  • Page 4 4
  • Page 5 5
  • Page 6 6
  • Page 7 7
  • Page 8 8
  • Page 9 9

Midmark Procenter Systems Installation guide

Type
Installation guide

Midmark Procenter Systems offer a versatile and efficient solution for dental professionals. With its user-friendly design and advanced features, this system enhances workflow and patient care. The cuspidor bowl provides easy access for rinsing and expectoration, promoting patient comfort. The integrated water and air controls allow for precise adjustments, ensuring optimal oral hygiene. The system's compatibility with various accessories, such as the assistant's unit, further expands its functionality and streamlines dental procedures.

Ask a question and I''ll find the answer in the document

Finding information in a document is now easier with AI