REMODELER & NEW CONSTRUCTION TRIM
2IN 10W ROUND & SQUARE INSTRUCTIONS
Thank you for buying RAB lighting xtures. Our goal is to design the best quality products to get the job done right. We’d like to hear your comments.
Call the Marketing Department at 888-RAB-1000 or email: marketing@rablighting.com
IMPORTANT
READ CAREFULLY BEFORE INSTALLING FIXTURE. RETAIN THESE INSTRUCTIONS FOR FUTURE REFERENCE.
RAB xtures must be wired in accordance with the National Electrical Code and all applicable local codes. Proper grounding
is required for safety. THIS PRODUCT MUST BE INSTALLED IN ACCORDANCE WITH THE APPLICABLE INSTALLATION CODE BY A
PERSON FAMILIAR WITH THE CONSTRUCTION AND OPERATION OF THE PRODUCT AND THE HAZARDS INVOLVED.
WARNING: Make certain power is OFF before installing or maintaining xture.
RDDLED2R RDDLED2S
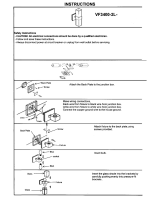
Fig: 1
ROUGHIN MOUNTING FOR
ND2RT & ND2ST
For round ceiling cut out 2-1/2” dia. For square ceiling use
the 2-1/2” sq cut out template from packaging material.
1. Nailer bars are provided for use with wood joist
installations. Insert through nailer bar slots and secure
accordingly.
2. Buttery brackets provided to use C-Channels.
(optionally available, consult factory). Consult local
building codes for nal support of xture.
3. The xture can be adjusted from 1/2” to 1” max ceiling
thickness. For height adjustment, loosen the Wing Nut
and slide the Buttery Bracket. If necessary remove the
Wing Nut and insert in screw in dierent hole provided
on the Buttery Bracket. (Fig: 1)
4. Adjust both the Buttery Brackets such that the
downturn collar of Rough-In Section is ush with the
nished ceiling surface. Tighten the Wing nuts.
5. Drop down Supply Wire must be atleast 9” long to allow
xture removal.
6. Loosen the Junction Box Screw and open the Junction
Box (Fig.2). Attach Supply Wires into Junction Box and
connect to the xture. See wiring section for details.
7. Push up and slide the Junction Box section into the
ceiling. Be sure the Spring Clips is snapped in and Trim
Ring is ush and secure. Allow the Junction Box section
of housing to rest on the Leg support of the Rough-in
Section.
Buttery Brackets
Nailer Bar
Wing Nut
SURFACE PREPARATION
• This xture can be installed with minimum plenum height of 5”.
• The xture can be used to replace an existing unit or for new construction.
• For both round and square xture, cutout must be accurate not undersized or oversized. A hole saw is recommended.
CEILING CUT OUT MUST BE FREE OF ANY DEBRIS AND BURRS.
Downturn Collar
Rough-in
Section
Leg
WARNING: Suitable for wet location with covered ceiling mount.
WARNING: Suitable for installation in Non-Accessible and Accessible Ceilings.
WARNING: Suitable for installation in Non-Insulated Ceilings.
Supply wires
Junction Box
Screw
Junction Box
Fig: 2
Trim Ring
Spring Clip