Page is loading ...

NAVCAM-FHD USER MANUAL
1
NavCam
-
FHD M an u al Ve r 2 .
2
1
2
/2013
(note: Product name is Cr a sh c a m FHD; the Model Number (for warranty,
service and or der ing is Navcam-FHD)

NAVCAM-FHD USER MANUAL
2
NavCam
-
FHD M a n u a l V e r 2 .
2
1
2
/2013
TABLE OF CONTENTS
Important Safety Instructions and Precautions .................................................................................. 2
Pr o du ct Feat u r e s ............................................................................................................................... 3
On scr een di spl ay………………………………………………………………………………………………………………………………4
What’s in the box .............................................................................................................................. 5
FEATURES AND OPERATI ON .............................................................................................................. 5
Memory Card required for operation ............................................................................................. 5
Po w er on / o f f f un ct i o n ( au t o on / o f f ) .............................................................................................. 5
Installation on the car windscreen………………………………………………………………………………………………..5
Re c o r d i n g ...................................................................................................................................... 5
Pl ayb ack ........................................................................................................................................ 6
Video recor di ng set t i ngs…………………………………………………………………………………………………………….….7
Di gi t al St i l l Camer a (DSC) Set t i ngs .................................................................................................. 8
Sy st e m se t t i n g s……………………………………………………………………………………………………………………………..9
USB Data Connect ion ................................................................................................................... 10
Pl ayb ack o n TV…………………………………………………………………………………………………………………………...11
Not e: ........................................................................................................................................... 11
Co n n e c t i n g t h e N A V CA M -FHD in the Car ……………………………………………………………………………………12
Tr oubl e Shoot i ng/ Q & A .................................................................................................................. 13
Pr o du ct Sp eci f i cat i o n s ..................................................................................................................... 14
IMPORTANT SAFETY INSTRUCTIONS AND PRECAUTIONS
- Re a d a l l i n st r u c t i o n s c a r e f u l l y b e f o r e u se .
- Re t a in manuals for future reference.
- Use t his product only in t he manner described.
- Onl y use a wat er -dampened soft-clot h t o clean t he surface of t his product .
- The f o l l ow i ng w i l l damage t hi s pr o duct : any l i qui d such as w at er or moisture, extreme
heat, cold, humidity and dusty or sandy environments.
- The Cr ash Cam is designed t o be mount ed on a vehicle windscreen, as high as possible, t o
ensure t he maximum viewpoint. Please ensure that any attached cables are secured and will
not cause the device t o fall.
- If charging is required, it is recommended to thoroughly charge electronic devices for the
first time overnight. Su b se q u e n t c h a r g e s ca n be as needed. During charging or
extended use, t he product may become warm. This is normal.
- Ther e ar e no user serviceable parts in this product.
- Unaut horised attempt s to dismant le or repair t his product will void the product warranty.

NAVCAM-FHD USER MANUAL
3
NavCam
-
FHD M a n u a l V e r 2 .
2
1
2
/2013
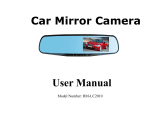
PRODUCT FEATURES
1
O
n
/O
ff
But t o n
.
Hol d f or 3 seconds t o t urn
ON
or OFF
9
Fact or y
reset switch
.
Insert
a small paper
clip
into
this
hole
to reset settings back to default.
2
Menu Button
.
Pr ess t o access m en u f eat u r es
and preferences.
Under Video Mode–adjust Re s o l u t i o n , Lo o p
Re c o r d i n g , M o t i o n De t e ct ion, Record Audio,
Dat e St amp and G-sensor .
Under Camera Mode – adjust Re s o l u t i o n ,
Se q u e n c e , Qu al i t y , Sh a r p n e ss, W h i t e Ba l a n c e ,
Co l o u r , I SO, Ex p o sure, Anti-Sh a k e, Quick
Re v i e w a n d Dat e St amp.
10
Navigate UP through Menu items or Increases Di gi t al
Magnification.
Under Video Mode – Zoom IN before and during recording.
Under Camera Mode – Zoom IN before taking a photo
Under Playback Mode – Scroll UP t o review saved files.
3
Mini USB Interface. Usedfor charging / power
port or PC interface and file transfer
11
Navigate
DOWN
through M
enu
items or
increases
Di git al
Magnification.
Under Video Mode – Zoom OUT bef or e & during recording.
Under Camera Mode – Zoom OUT bef o r e t aki ng a pho t o
Under Playback Mode – Sc r o l l DOW N t o r e v i e w f i l e s.
4
AV-Out put . TV connection via Composite
3.5mm (cable not included).
12
Re cor d
. S
t
art
or stop
recording or enter/c
onfirm
sel ect ion
s
from the menu.
Under Video Mode – Begi n recording
Under Camera Mode – Take a st ill pict ure
Under Playback Mode – Select file for playback
5
Micro SD Card Sl o t . Cards up t o 32GB are
suppor t ed.
13
Mode
.
S
e
lect between
Video/ Camera
/
Pl ayb ack m o des
or
press and hold to mute or un-mute microphone.
Not e: When t he device is muted, t he microphone icon will be
crossed out wit h a red l ine.
6
HDM I
-
Out put.
Hi gh def i ni t i on
TV
c
onnection
via HDM I port . Mini HDMI required. (Ca b l e not
included).
14
Mounting point. Fo r u se w i t h the Windscreen suct i on mount
(included)
7 Microphone. 15
Indicat
or
lamp.
Bl ue
when
Ch a r g i n g ; Re d
when device is
turned on. Bl ue and Red f l ashi ng dur i ng r ecor di ng
Not e: Please note that charging the bat tery via computer
USB is not possible.
8 Ca me r a Le n s. 16 LED Light
2
13
8
11
10
12
6
9
7
1
4
3
5
14
15
16

NAVCAM-FHD USER MANUAL
4
NavCam
-
FHD M a n u a l V e r 2 .
2
1
2
/2013
ON SCREEN DISPLAY
VIDEO RECORD MODE
PHOTO SHOOT
MODE
PLAYBACK
MODE
Re c o r d Ti m e
Re s o l u t i o n
Day or ni ght
mode
Microphone
on/ off
Aut o bump
sensi t ivi t y (set
at Low)
SD c a r d p r e s e n t
Bat t er y l evel
Video recor d
mode
Loo p r eco r d
time
Motion
Det ect i on
+/ - Ex p o s u r e
compensat i on
Dat e and t i me
Ph ot o m o de
Image
st abi l i sat i on
+/ - Ex p o s u r e
compensat i on
Aut o Whit e
Bal ance
Aut o ISO set t ing
Fi l e Nam e
Pi ct ur e
Re s o l u t i o n
Image quality
SD c a r d
Bat t er y l evel
Fi l e Nam e
Re s o l u t i o n
Dat e and t i me
of video or
photo
Bat t er y l evel
Pl ayb ack m o de
Pl ayb ack
cont rol s
Re c o r d i n g ( b l i n k i n g ) Auto Bump rec
ord (Activated)
DIGITAL CAM ERA
MODE
PLAYBACK
MODE

NAVCAM-FHD USER MANUAL
5
NavCam
-
FHD M a n u a l V e r 2 .
2
1
2
/2013
WHAT’S I N T H E BO X
Navig8r Cr a s h Ca m FHD, Windscreen Su c t i o n -cup Mount, USB Cable, 12v DC Ca r Ch a r g e r ,
User M anual
FEATURES AND OPERATI ON
Memory Card required for operation
The CRA SH CA M -FHD requires a Micro SD card (not included) to record video/image content.
(See page 11 for a table showing SD card capacit y and the relevant amount of video/ image
cont ent able t o be st ored). Fo r o pt i m al p er f o r m an ce, w e r eco m m en d u si n g a Cl ass 6or 10
Micro SD card to ensure fast data transfer rates (Class 4 cards will still work however may
result in slower transfer rates).
Power on/ off f unct ion (aut o on/ of f)
To t ur n on t he CRA SHCA M -FHD, press and hold the power button on the top of the device.
To t ur n of f , pr ess and hold the same power button.
When connected t o t he 12v DC socket (cigaret t e socket ) of your car, t he CRA SHCA M -FHD
will turn on and off automatically when t he car’s ignit ion is t urned on or off. If the
CRA SH CA M -FHD does not turn off immediately it means the device is complet ing the file
save process before turning off (usually only a few seconds).
Not e: If the 12v socket is “ constant on” (in some European vehicles), then the CRASHCA M -
FHD will need to be turned on/off manually by the power button or removing the 12v plug.
Whilst connected t o t he car’s 12V DC socket (or from a powered USB hub or PC USB port)
the LED indicator will glow blue (battery is charging) and will be off once the battery is fully
charged. (note – the device’s battery will not charge if connected to a PC USB port)
Installation on the car windscreen
The CRA SH CA M -FHD works best when mounted centrally and high up on the windscreen
(typically behind or close to the rear vision mirror). Use the supplied windscreen suction
mount to affix the CRA SH CA M -FHD to the windscreen and then adjust t he mount until you
can see a clear view of t he road ahead on the LCD.
Recor di ng
Tur n on t he CRA SHCAM-FHD and press t he REC button (unless auto REC on has been set
with ignition on). When recording commences, a flashing RED dot will appear in the LCD
together with separ at e timer readout. The r ecor ded f i l e i s saved onto the Micro SD Ca r d .
Yo u c a n m a n u a l l y stop recording by pressing the REC or turning the car ignition off (stopping
power to the device).

NAVCAM-FHD USER MANUAL
6
NavCam
-
FHD M a n u a l V e r 2 .
2
1
2
/2013
Not e: If mot ion det ect ion is select ed, recording will start automatically when there is
movement in front of the camera. Thi s set t i ng i s i d eal f or w hen the car is parked or
unattended. Note that if left on battery power (car is turned off), the standby time and
record time will be dependent on the level of charge on the battery.
Co n v er s e l y , i f t h e m o t i o n d et ec t i o n f e a t u r e i s s e l e c t e d w h i l s t d r i v i n g , t h e camera will st op
recording when no movement is detected, such as when stopped at a traffic light, but will
recommence recording when the car moves again.
Playback
Use t he MODE button to select Playback of recorded content – either video or photos.
Available Opt ions:
Option
Option Description
Arrow Up
Arrow Down
Pr ess Up and Down arrows to browse files.
Play / Pause
Pr ess REC
Delete
Wit h t he selected file visible on t he screen, press the MENU
button. Then use the up and down the arrows to choose DELETE
and t hen t he REC t o conf irm your choice.
Prot ect
Wit h t he selected file visible on t he screen, press the MENU
button. Then use the up and down the arrows to choose PROTECT
and t hen t he REC t o conf irm your choice. The following opt ions
are: Lock Current, Unlock Current, Lock All and Unlock All.
In the event of an incident/ accident – Use Auto Bump File Save.
- Due t o t he “ cycl e r ecor ding” nat ure of t hi s t echnology, older r ecor ded f il es wil l be over wri t t en (depending on
the chosen resolution settings and the memory capacit y of the Micro SD card).
- Sh o u l d y o u w i s h t o K EEP ( p r o t e c t ) t h e v i d e o f o o t a g e o f an i n c i d e n t f r o m n o t b ei n g o v e r w r i t t e n , p r e ss the
MENU button during recording. A “locked key” confirmation icon will appear on t he scr een.
- Alt ernat ely t he in buil t G sensor wil l t ri gger an aut o save l ock if it senses a bump (sensit ivi t y i s selectable via
the Menu), so that the file being recorded is not overwritten in the cycle record process.

NAVCAM-FHD USER MANUAL
7
NavCam
-
FHD M a n u a l V e r 2 .
2
1
2
/2013
Not e: A locked file must first be unlocked before deleting.
Video Reco r d i n g Se t t i n g
Tur n on t he CRA SHCA M -FHD (and press the REC button to stop recording) then press the
MENU button once (twice to enter syst e m set t ings). Pr ess the ▲/▼buttons to select one of
the setting options and press then REC to select that option.
Available Opt ions:
Option
Se l e ct i o n O p t i o n s
Option Description
Re sol u t i on
Re s o l u t i o n
Se l e ct :
FHD 1920x1080
HD 1440x1080
HD 1280 x 720
WVGA 848x480
VGA 640x480
QVGA 320x240
Fu l l HD 1920x1080 gives higher image
quality, less record time
VGA 640x480 gi ves l onger r ecord t ime,
less image quality
Loo p r e c o r d i ng
Se l e ct [ Of f , 1 or 2 or 3
Minute]
Se l e ct t h e time for each recording
segment . For example, if set to “1”, then
each video recorded is 1minute long. If set
to “off”, then the camera will record until
the SD card is full.
Ex po su r e
+2.0,5/ 3,+4/ 3,+1.0,+2/ 3,+1/ 3
,+0.0,-1/ 3,-2/ 3,-1.0,-4/ 3,
-5/ 3,-2.0
Use t his set t ing t o adjust for varying
lighting condit ions. Usually +0/ 0 is suitable
for most environments
Motion
detection
Se l e ct [ On / O f f ]
When set t o “ On” , t he CRA SH CA M -FHD
will begin recording when it senses
movement. For example, if the
CRA SH CA M -FHD is left on, the camera will
begin recording if the image is disrupt ed
(like a person walking by).
Re co r d Audio Se l e ct [On/Off]
Tur ns t he bui l t -in microphone On or Off.
Fo r p r i v acy t h i s can b e t u r ne d of f so t h at
no audio is recorded.
Date st a mp
Se l e ct [On/Off]
Re c o r d s t h e c u r r e n t d a t e a n d t i m e o n t o
the video file (date/ time is set in the setup
options).

NAVCAM-FHD USER MANUAL
8
NavCam
-
FHD M a n u a l V e r 2 .
2
1
2
/2013
Gravit y se nsi ng
Se l e ct [ Of f /Low /Mid/ High]
Se l e ct t h e level of sensit ivit y for t he aut o
bump file record feature. “Low” would a
BI G bump / knock / shock would trigger
the auto save feature. “High” would mean
a relat ively sma l l knock / bump would
trigger auto save.
But t on sou nds Se l e ct [On/Off]
Tur n On to hear a “beep” sound when the
buttons are pressed
Digital Still Camera (DSC) Settings
Tur n on t he CRA SHCA M -FHD and press the REC button to stop recording then press the
MENU button once (twice to enter system settings). Pr ess the ▲/▼buttons to select one of
the setting options and press then REC to select that option.
Available Opt ions:
Option
Option Description
Ca p t u r e M o d e
Se l e ct si n g l e ( f o r n o d e l ay) or a t ime 2S, 5s, 10s f or a t ime delay
to take the photo. When press the “rec” key, the time will
count down.
Re sol u t i on ( MP)
12M 4032x3024, 10M 3648x2736
8M 3264x2448, 5M 2592x1944
3M 2048x1536, 2MHD 1920x1080
VGA 640x480, 1.3M 1280x960
Se q u e n c e
Take 5 i mages aut omat i cal l y. Sel ect [
On/ Off
]
Quality
Se l e ct [ Fi ne , No r mal , Eco n o my ]. “Fine” will result in a less
compressed image but better image quality however will
consume more space t han “ Economy”
Sha r p n e ss
Se l e ct [ S
t
rong/
N
ormal
/
S
oft
]
White balance
Se l e ct [ A utomatic/ Daylight/Cloudy/ Tungsten (lamp) and
fluorescent (lamp).] Th is set t i ng hel ps t o make w hi t e obj ect s
appear whit e and not “ greyed out ” as inf luenced by
sur r ounding light sources.
Co l ou r
Se l e ct [
Normal/
B
lack
and
W
hite/
Se p i a (
Brown
)
]
ISO
Se l e ct [ A
utomatic/ 100/ 200/ 400
]

NAVCAM-FHD USER MANUAL
9
NavCam
-
FHD M a n u a l V e r 2 .
2
1
2
/2013
Ex po su r e
Se l e ct [ +2.0, +5/ 3, +4/ 3, +1.0, +2/ 3, +1/ 3, +0.0, -1/ 3, -2/ 3,
-1.0, -4/ 3, -5/ 3, -2.0]Use t his set t ing t o adjust for varying
lighting conditions. Usually +0/0 is suitable for most
environments
Ant i-sha ki ng
Se l e ct [ On or Off]. Select this to minimise vibration or shake
when taking a photo to minimise blurring.
Quick review
Se l e ct [ Of f , 2 se co n d s, 5 se co n d s] . Se l e c t t h e am o u n t o f t i m e
to review the picture on the LCD after it has been taken
Date Stamp
Se l e ct [ Of f , Dat e, Dat e/ Time t his wi ll place t he dat e and/ or
time on the recorded video / photo.
System Se t t i n g
Tur n on t he CRA SHCA M -FHD and press the REC button to stop recording then press the
MENU button once (twice to enter system settings). Pr ess the ▲/▼buttons to select one of
the setting options and press then REC to select that option.
Menu Option
Se l e ct i o n O p t i o n s
Option Description
Se t Date/ Time
Adjust fields:
Day/ M ont h/ Year and
Hour / M inut e/ Second
Use t his opt ion t o set t he date
and t ime on t he device. Should
the device not be used for a long
period of time and should the
battery run completely flat, then
the date/time will need to be re-
set .
Aut o power off Se l e c t [ Of f /1 Minute/ 3 Minute]
Used t o adjust t he t ime t o
aut omat ically power off
La ng u a g e
Opt i onal language: Engl ish/ French/
Sp a n i sh / P o r t u g u e se / G e r m a n / I t a l i a n /
Si m p l i f i e d Ch i n e s e / Tr adit i onal
Ch i n e s e / Ru s sian/ Jap a n e s e /Korean
Ch o o s e a l a n g u a g e f o r t h e o n -
screen menu display.
TV Mode Se l e ct [ N T SC/ PAL]
Fo r o l d er t e l e vi si on set s or
monitors which cannot auto
select t he t elevision display
syst em/ colour information,
select “ PAL” (generally not
applicable for newer TVs i n

NAVCAM-FHD USER MANUAL
10
NavCam
-
FHD M a n u a l V e r 2 .
2
1
2
/2013
Aust ralia/ New Zealand)
.
Li g h t
Fr equency
Se l e ct [ 5 0 H Z / 6 0 HZ ]
Fo r o l d er t e l e vi si on se t s o r
monitors which cannot auto
select t he r ef resh rate frequency,
select 50Hz (generally not
applicable for newer TVs in
Aust ralia/ New Zealand).
Scr e e n Sa ve r Se l e ct [ Of f / 3 Mins/5 Mins/10 Mins
To automatically act ivat e t he
screen saver
Image Rotation
Se l e ct [ Off / On]
Use t his feature to flip the screen
180° depending on your
mounting requirements
For mat Fo r m at SD Ca r d [ OK / Ca n c e l ]
Se l e ct “ O K ” t o f o rmat the Micro
SD c a r d .
Warning: formatting the card will
erase all of the content on t he
card.
Default Setting Se l e ct [ OK / Ca n c e l ]
Se l e ct OK t o r e t u r n t h e d e v i c e
set t ings back t o t he origi nal
factory settings.
Fi r mw ar e Version
View t he cur r ent car DVR
sof t ware ver sion.
USB Data Co n ne c t i o n
Co n n e c t the CRA SH CA M -FHD to a Windows (XP or 7) PC with the USB cable (included). The
LED i ndi cat or will t urn blue and t he LCD screen will display MASS STORAGE and PC CAMERA.
Se l e ct M A SS ST ORA G E. M A SS ST ORA G E w i l l t h e n a p p e a r o n t h e sc r e e n .
Under “ My computer” or “ Windows Explorer” you should see a drive which will resemble a
“Removable Disk (?:)” (like a USB Flash Dr ive or Har d Drive). Recorded files are st or ed in the
DCIM \xxx\folder. These files can be played back using Windows Media player or a
compatible .avi media player or an image viewer (for images).

NAVCAM-FHD USER MANUAL
11
NavCam
-
FHD M a n u a l V e r 2 .
2
1
2
/2013
Pl ayb ack on TV
RCA Cable Connection
Connect the CRA SH CA M -FHD to a TV or AV monitor with an AV cable (3.5mm phone plug
one end, RCA composite connectors on the other end).
Turn on the CRA SHCA M -FHD and select Pl ay back m o de (as described above in Playback
mode setting).
HDM I Cable Connection
Connect the CRA SH CA M -FHD to a TV or AV monitor with a HDMI cable.
Tur n on t he CRA SHCA M -FHD and select Playback mode (as described above in Playback
mode setting). Yo u w i l l n e e d a M i n i H D M I t o ( n o r m a l ) H D M I c a b l e ( n o t i n c l u d e d )
Note:
1) A Micro SDHC card must be inserted into the device before recording.
2) The CRA SHCA M -FHD support s cycle recording in increments of 1/ 2/ 3 minutes. It will
overwrite the oldest video files with new ones. Depending on the size of the Micro SDHC
card and t he speed rat ing of t he card, t here may be as much as a 3 second pause whilst old
files are overwritten with the newer files. This pause time will not be recorded.
3) As the CRA SH CA M -FHD has a DC5V input , please use the original car charger which will
st ep down t he car ’ s 12/24VDC to 5VDC and f use the circuit in the event of an overload. The
inline fuse is contained within the 12v DC plug and is replaceable.
Video/ Photos Storage Capacity
Re sol u t i on
8GB
16GB
32GB
Video
1
920
*
1080
(
1080p
)
6
0min
1
2
0min
240
min
1280
*
720
(
720p
)
8
0min
16
0min
32
0min

NAVCAM-FHD USER MANUAL
12
NavCam
-
FHD M a n u a l V e r 2 .
2
1
2
/2013
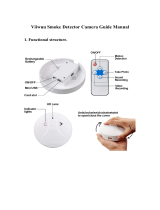
Co n ne c t i n g t h e N A V CA M -FHD in the Car
• The above wiring diagram shows a left hand drive vehicle. Wiring path is only
a suggestion.
1. CRASHCAM-FHD device mounted behind the rear vision mirror.
2. 12v DC cable routed behind rear vision mirror.
3. Cable hidden behind roof headlining.
4. Cable hidden behind “A” pillar – beware of airbag equipped cars.
5. Cable is routed beside the dashboard/near the door hinges.
6. Cable is passed under the passenger carpet (or under the dashboard).
7. 12v DC plug is connected to the car’s 12v “cigarette socket”.
Once the wiring and installation of the CRASHCAM -FH D h a s been completed, please ch eck t he
following:
- Wit h t he car’s ignition on (or engine st art ed), the Bl u e LED i n d i cat o r on the CRASHCAM-FHD will light up and
the LCD screen should turn on. Recording should start automatically. This will indicate a successf ul installation.
- When t he car’s ignition is t urned off, the device should t urn off within 20 seconds wit h the “ Navig8r” logo
appearing on t he LCD screen. If this doesn’t happen then power is still being supplied to the car’s 12v socket.
and t he device will need t o be swit ched off manually.

NAVCAM-FHD USER MANUAL
13
NavCam
-
FHD M a n u a l V e r 2 .
2
1
2
/2013
TROUBLE SHOOTING/ Q & A
Faul t
Su gge st i o n
Device does not t urn
off
If in vehicle: check that the 12V socket is not still powered (on) when the key is
removed (as with some European cars).
Wait 20 seconds for file finalisation/ closure.
Di sconnect power l ead t o devi ce.
Pr ess “ o k” t o st op r eco r d i n g, t h en p r ess p ow er t o t u r n o f f .
Ca n t p l a yb a c k t h e . a vi
video files
Upgrade
your
windows media player
version
or use an alternate media player
such as VLC medi a pl ayer .
M
y video/ pictures of an
incident are NOT there
Ch e c k t h e c a p a c i t y o f y o u r SD c a r d , t h e f i l e s m a y h a v e b e e n o v e r w r i t t e n i n t h e
record cycle process.
The device has
frozen/stopped
working
Ch e c k t h e s p e e d o f y o u r M i c r o SD c a r d . W e r e c o m m e n d c l a ss
6
for faste
r
transfer rates, especially if the record file size is bigger
Pr ess t h e “ r ese t ” b u t t o n w i t h a p ap er cl i p t o r eset t h e set t i ngs b ack t o def au l t .
If the ambient temperature is excessive, you may need to wait for a few
minutes.
The dat e/ t ime is
incorrect
R
eset the date
/time in the settings menu. If the battery runs completely flat,
then the date/time will need to be reset.
The suct ion cup keeps
comi ng of f
En s u r e t h e w i n d s c r e e n a n d s u r f a ce a r e a o f t h e s u ct i o n c u p
is
clean.
In wet or very hot weather, the suct ion cup mount may need t o be reapplied.
Do not appl y t he suct i on mount on t he por t ion of a w i ndscr een whi ch i s not
glass (eg; some vehicles may have a coat ing)
Ca n ’ t
se e t h e d e vi ce i n
my computer
Ch e c k t h e U SB c a b l e c o n n e c t i o n t o t h e d e v i c e a n d U SB p o r t
. Try another USB
port, possibly directly to the PC/ notebook (rather than through a USB hub).
No
v
ideo displayed on
TV
-
Ch e c k t h e c a b l e c o n n e c t i o n s a n d t h a t p l a y b a c k m o d e i s se l e c t e d
on the
Cr a s h c a m
- Ch e c k t h e A V i n p u t s e l e c t i o n o n t h e TV
The capt ured
image is
not stored
Yo u r M i c r o SD c a r d m i g h t b e f u l l o r t h e f i l e m a y n o t h a v e b ee n s a v e d b e f o r e
power was turned off to the unit. Make sure to stop recording before shutting
down.
None of the buttons
work
Pr ess t h e
factory reset button.
I
cannot
turn
my device
on
Tr y char gi ng t he bat t er y f or 10 mi n ut es and t r y agai n. The bat t er y may b e
complet ely exhaust ed.
My screen keeps
turning off
Ei t h e r t r y c h a r g i n g t h e b a t t e r y o r ad j u st t h e s c r e e n s a v e r s e t t i n g s
.
I
cannot
take any
photos
Yo u r M i c r o SD m i g h t
be full. Try removing some files.
Re cor di ng see ms t o
st op by i t se l f
Make sure you are using the right class SD card as noted in this user manual
.
I get an error message
when I try to play back
files
Yo u m i g h t h a v e s o m e c o r r u p t s e ct o r s o n y o u r SD c a r d . T
ry re
-
formatting it and
trying again.
The video images are
hazy
Make sure the lens is clean and free from debris
.
There are horizont al
st r i p e s i n t e r f e r e n ce on
the image
S
et
the frequency setting
according t o t he local power supply
–
50Hz

NAVCAM-FHD USER MANUAL
14
NavCam
-
FHD M a n u a l V e r 2 .
2
1
2
/2013
PRODUCT SPECI FICATIONS
USB Port Fo r Po w e r / ch ar gi ng o r sy n c w i t h a PC
TV St andar d PAL o r NTSC sel ect ab l e
AV Out put Opt ions Via (mini) HDM I out or 3.5mm phono composit e out
Audio Recording Su p p o r t e d
Sc r e e n si ze 2.7” Diagonal. Co l o u r LCD
Dat e / Time st amp Su p p o r t e d – on video and on photos
Motion Detection Su p p o r t e d – whilst stationery as well as moving
Po w er Of f Fi l e Reco ver y Su p p o r t e d
Video Resol ut ion
FHD 1920x1080, FHD 1440x1080, HD 1280 x 720, WVGA
848x480, VGA 640x480, QVGA 320x240
Aut o Bump Record (G sensor)
Su p p o r t e d . A d j u st a b l e se n si t i v i t y ( l o w / m e d i u m / h i g h )
Lens Vi ew i n g angl e
120 degrees
Cy c l e r e c o r d i n g t i m e s
1 or 2 or 3
Minute
s
Fi l e Fo r m at Image: JPG Video : .AVI (.mov for Crashcam FHD Wide)
Memory Card
Micro SD cards supported. Class 6 or 10 recommended. Maximum
capacit y is 32GB
St i l l I m a g e Re so l u t i o n Up t o 12MP
Bat t er y Re c h a r g e a b l e Li t h i u m I o n
Adjust able Image set t ings ISO; Colour; White Balance; Exposure
Lan gu age Syst em
En gl i sh/ Fr ench/ Spani sh/ Por t uguese/ German/ It al i an/ Si m p l i f i e d
Ch i n e s e / Tr adi t i onal Chi nese/ Russi an/ Japanese

NAVCAM-FHD USER MANUAL
15
NavCam
-
FHD M a n u a l V e r 2 .
2
1
2
/2013
Fo r f u r t h er p r o d uct i n f o r mat i o n on this and other products please visit our product web
page at www.navig8r.com.au or email support@navig8r.com.au
Navig8r is a brand sold and marketed by La ser Co r p o r a t i o n Pt y Lt d (“Laser”). Laser hereby warrants your new product to be
free from defects in materials and workmanship for 12 months, from the date of purchase, provided t hat t he product is
used in accordance with accompanying recommendations or inst ructions where provided. The benefit of this warranty is in
addition t o your right s under t he Aust ralian Consumer Law and t o ot her right s and remedies of t he consumer under a law
in relation to the goods or services to which the warranty relates.
Thr ough a net w ork of r et ai l er s and resel lers, Laser w il l provide you wi t h your choi ce of a r ef und, r epair or exchange (where
possible) for this product if it becomes defective within the warranty period. This warranty will no longer apply where the
defect is a result of alteration, accident, misuse, abuse, normal wear and tear, neglect or improper storage.
Pl ease r et ai n yo ur r ecei p t as pr oof o f pu r ch ase
How t o make a product war ranty claim:
St e p 1 : Fi n d y o u r r e ce i p t w h i c h p r o v e s t h e d a t e o f p u r c h as e . W h e r e t h e d a t e o f p u r c h a s e c a n n o t b e verified, your place of
purchase or Laser w i l l make an assessment based on the dat e of manufact ure, t he condit ion of the Laser Product and the
type of defect.
St e p 2 a ) : C o n t a c t y o u r p l a c e o f p u r c h a s e . T h e y w i l l a sse s s t h e n a t u r e o f t h e f a u l t an d r e f u n d o r replace the product as per
their store refund or warranty policy.
St e p 2 b ) : I f y o u r p l a c e o f p u r c h a se c a n n o t b e c o n t a c t e d , t h e n y o u can cont act Laser . Cu st o m e r Se r v i c e w i t h d e t a i l s o f y o u r
defective Laser Product: Phone: (02) 9870 3355; or Email: ser vi ce@l aser co.com. au or online
www.laserco.net/ support/ warranty (click on “Consumers (End Users)”). Our business address is at 1/ 6-8 Byfield St reet ,
North Ryde, NSW 2113
St e p 3 : La s e r w i l l i ssu e y o u w i t h a R et u r n Au t h o r i s a t i o n ( RA ) n u m b e r w i t h i n 4 8 h o u r s. W h e n r e q u e s ted, send us the
defective Pr od uct and a co py of your recei p t . Laser w i l l co ver t h e co st of t h e ret ur n del i v er y.
St e p 4 : W ai t f o r u s t o c o n t a c t y o u . On c e w e h a v e r e c e i v e d y o u r d e f e ct i v e La s e r Pr o d u ct f o r i n s p e c tion, we will inform you
of our assessment of your claim within 7 days. When we contact you, we will firstly let you know whether you have a valid
claim under t his Warrant y, and if so, we will inform you whet her your defective Laser Product will be replaced or repaired,
together with the number of days you can expect to wait to receive your replaced or repaired Laser Product.
Our goods come wi t h guar ant ees t hat cannot be excluded under t he Aust r al ian Consumer Law. You ar e ent itled t o a
replacement or refund for a major failure and compensation for any other reasonably foreseeable loss or damage. You ar e
also ent it led t o have t he goods repaired or replaced if t he goods fail t o be of accept abl e qualit y and the failure does not
amount t o a maj or f ailure.
/