Page is loading ...

MGP 641 xi Series • Setup Guide
The MGP 641 xi Series, consisting of MGP 641 xi and MGP 641 xi SDI, are multi-window video signal processors that display
multiple video sources on a single screen in picture-in-picture or picture-by-picture format. They feature dedicated connectivity
for each of the four windows, fully customizable window layouts, HDCP 1.4 and 2.3 support, logo and background image
support, logo keying, and ultra-high resolution support up to 2560x1600 and 4K at 60 Hz on both inputs and outputs. The
MGP 641 xi Series can be controlled and congured using the front panel controls, Simple Instruction Set™ (SIS™) commands,
the internal web page, and the Videowall Conguration Software (VCS).
Both models have four HDMI inputs, one HDMI background input, one HDMI output, and one buffered DTP3 output. In addition,
the MGP 641 xi SDI model has four 12G-SDI inputs. Each input is dedicated to one window.
The VCS program is available at www.extron.com. For information on using VCS, see the VCS Help File, also available on the
Extron website.
About this Guide
This guide provides instructions for an experienced installer to install and congure the MGP 641 xi Series processors.
In this guide, the terms “MGP 641 xi Series” and “MGP” are used interchangeably to refer to both products in the MGP 641 xi
Series.
For full installation, conguration, and operation details, see the MGP 641 xi Series User Guide, available at www.extron.com.
Rear Panel Features and Connections
100-240V
~
1.5A MAX
50-60Hz
MGP 641 xi
INPUTS
1
HDMI
4
HDMI
1A
HDMI
HDMI
3
HDMI
2
HDMI
BACKGROUND
INPUT
OUTPUTS (DTP3/XTP/HDBT)AUDIO OUT
REMOTE
OUT
SIG LINK
1B
DTP3
DTP
DTP
POWER
900mA
DEVICES
1
2
LAN
RESET
LR
Tx Rx G
RS-232
A
A
AB
B
BC
C
CD
D
DE
E
EF
F
FG
G
GI
I
IJ
J
J
H
H
H
K
K
K
MGP 641 xi
100-240V
~
1.5A MAX
50-60Hz
INPUTS
HDMI HDMI
1A
HDMI
HDMIHDMIHDMI
BACKGROUND
INPUT
OUTPUTS (DTP3/XTP/HDBT)AUDIO OUT
REMOTE
OUT
SIG LINK
1B
DTP3
DTP
DTP
POWER
900mA
DEVICES
1
2
LAN
RESET
LR
Tx Rx G
RS-232
1 SDI 2 SDI 3 SDI 4 SDI
MGP 641 xi SDI
A
A
AL
L
LC
C
CD
D
DE
E
EF
F
FG
G
GI
I
IJ
J
J
H
H
H
B
B
B
MGP 641 xi SDI
K
K
K
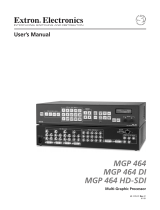
A AC power connector E DTP remote power LEDs I Ethernet LAN connector
B HDMI inputs F DTP/XTP/HDBT output (output 1B) J ANALOG AUDIO OUT connector
C HDMI live BACKGROUND INPUT G USB device connectors K REMOTE RS-232 connector
D HDMI output (output 1A) H RESET button and LED L SDI inputs
Figure 1. Rear Panels
1
IMPORTANT:
IMPORTANT:
Go to www.extron.com for the complete
user guide, installation instructions, and
specifications before connecting the
product to the power source.
1

Installation Steps
1. Mount the MGP to a rack using the pre-installed side mounting brackets. The unit has a 1U high, full rack wide enclosure.
Alternatively, attach the four provided rubber feet to the bottom of the MGP and place the unit in the desired location.
2. Connect HDMI (or DVI with an appropriate adapter) sources to the HDMI input connectors (inputs 1 through 4) (see figure1,
B on the previous page).
MGP 641 xi SDI only: Connect SDI sources to the 12G-SDI input connectors (L) (optional).
3. If desired, connect a source to the HDMI live BACKGROUND INPUT connector (C). The MGP 641 windows are displayed in
front of this unscaled background video source.
NOTE: You must set the output resolution to match that of the background source, or the background video is not
displayed. The refresh rates do not need to match.
4. Make the following output connections as needed:
zConnect an HDMI (or DVI with an appropriate adapter) display to the HDMI output 1A connector (D).
zConnect a DTP endpoint, XTP matrix switcher, or HDBaseT compatible receiver to the buffered DTP/XTP/HDBT output
connector 1B (F). For cable wiring and recommendations, see the MGP 641 User Guide.
NOTE: RS-232 data can be inserted via Ethernet (see the MGP 641 User Guide or the VCS Help File).
5. Connect a balanced or unbalanced analog audio output device (such as a DSP device or an amplifier) to the 5-pole captive
screw AUDIO OUT connector (J) for 2-Ch audio from the selected input. This connector is configurable via VCS or SIS as
two discrete mono outputs or as one stereo output (see “Audio Wiring” for details).
6. If the MGP 641 is connected to a computer or to a host controller for remote control, do one of the following:
zConnect an RS-232 cable from the host serial port to the Tx, Rx, and G pins (the remaining two pins are not used) of the
5-pole Remote RS-232 rear panel connector (K). The default protocol for the RS-232 port is 9600 baud, 1 stop bit, no
parity, and 8 data bits, with no flow control.
zConnect a USB-A to USB-C cable from the host USB-A port to the MGP 641 front panel USB-C CONFIG port (see
figure3, A on the next page).
zConnect an RJ-45 network cable from the host Ethernet port to the MGP 641 rear panel LAN port.
7. (Optional) Connect USB devices such as USB touch panels, keyboards, mice, or flash drives to one or both USB-A 3.0
Devices ports for use with the annotation function (LinkLicense required), and to save images (see figure1, G).
8. Connect power to the MGP by plugging a standard IEC power cord (provided) from a 100 to 240 VAC, 50-60 Hz power
source into the AC power connector (A).
9. Apply power to all connected devices.
Audio Wiring
Wire the audio output connectors as shown in gure2. Use the supplied tie wrap to strap the audio cable to the extended tail of
the connector.
Balanced Audio Output
Tip
Ring
Tip
Ring
Sleeves
Unbalanced Audio Output
Tip
No Ground Here
No Ground Here
Tip
Sleeves
LR
LR
Do not tin the wires
!
Figure 2. Wiring the Audio Output Connectors
ATTENTION:
• For unbalanced outputs, do not connect wires to the “-” poles.
• Pour les sorties asymétriques, ne connectez pas de câbles aux pôles «-» .
NOTE: The length of exposed wires is important. The ideal length is 3/16 inch (5 mm).
2
MGP 641 xi Series • Setup Guide (Continued)
2

Front Panel Controls
The MGP 641 xi Series front panel buttons, ADJUST knobs, and the LCD screen menus provide navigation of general settings
required to initially control and congure the MGP. When you press a button or rotate a knob, the LCD screen displays the
available settings.
MGP 641 xi
MULTI-GRAPHIC PROCESSOR
CONFIG
WINDOW SELECT
1
MENU
NEXT
MUTE
FREEZE
PRESET
RECALL
/SAVE
ENTER
WINDOW
/IMAGE
SIZE
WINDOW
/IMAGE
POSITION
WINDOW
/IMAGE
ZOOM
AUTO
IMAGE
2 3 4
ADJUST
AA
A
BB CC DD EE FF GG HH
A USB CONFIG port E Picture control buttons
B Window and input selection buttons F LCD screen
C MUTE and FREEZE buttons G Menu navigation buttons
D PRESET RECALL/SAVE and ENTER buttons H Horizontal and vertical ADJUST knobs
Figure 3. MGP 641 xi Series Front Panel
A USB CONFIG port — Connect a host device to this USB-C port for device configuration, control, file transfer, and firmware
upgrades.
B Window selection buttons — Press these buttons to select windows (inputs) 1 through 4 for configuration. The selected
button lights orange.
C MUTE and FREEZE buttons —
zMUTE — Press this button to mute the selected window. The button lights orange when the mute is enabled. To unmute,
press the lit MUTE button again.
zFREEZE — Press this button to freeze the selected window. The button lights orange when freeze is enabled. To unfreeze
the window, press the lit FREEZE button again.
D PRESET RECALL/SAVE and ENTER buttons — In combination, these buttons save the current settings to a window
preset or recall a stored preset (up to 128). See Saving and Recalling Presets on page4 for more information on using
these buttons.
E Picture control buttons — Press these buttons to adjust the size, position, and zoom, or to perform an auto-image
adjustment on the selected window.
zPress WINDOW/IMAGE SIZE, WINDOW/IMAGE POSITION, or WINDOW/IMAGE ZOOM once to select the window (the button
lights orange) or twice to select the image within the window (the button lights green).
Use the horizontal ([) and vertical ({) ADJUST knobs to adjust the settings shown on the left and right sides of the LCD
screen, respectively.
zPress AUTO IMAGE to perform an auto image adjustment on the selected input window. Press it again to confirm the
adjustment.
F LCD screen — Displays the configuration menus, messages, and your selections.
G Menu navigation buttons — Press MENU to step through the menus on the LCD screen. From each menu, press NEXT to
step through its submenus.
H Horizontal and vertical ADJUST knobs — Turn these knobs to step through submenu options and preset slots, and to
adjust picture controls.
3
3

Setting Up the MGP 641 xi Series Using the Front Panel
After installing and connecting the MGP, use the front panel controls to congure and
adjust the unit for use. Press the MENU button to access the Main Menu (shown at right).
Then, repeatedly press the MENU button to cycle through the menus and access the Input
Conguration, Output Conguration, and Advanced Conguration menus to perform
steps 1 through 4.
1. Use the Input Conguration menu to configure inputs 1 through 4, including EDID
selection, aspect ratio selection, HDCP authorization, input format (SDI xi only), and
image rotation (available only for inputs 2 and 4). Some of these settings may require
about 3 seconds to take effect after selection.
2. Use the Output Conguration menu to configure the outputs, including signal type,
resolution and rate, HDCP Note (encryption notification), TP and HDMI format, and
display rotation.
3. From the Advanced Conguration menu, Test Pattern submenu, use the crop and
grayscale test patterns to adjust the display settings.
4. Use the front panel menu system to set the IP address for the unit:
a. Press the MENU button repeatedly until the View Com Settings menu name is
displayed on the LCD screen.
b. Press and hold the NEXT button until the LCD screen displays Edit Comm
Settings.
c. Press the NEXT button repeatedly until IP Address appears on the LCD screen.
d. Rotate the horizontal ADJUST knob ([) to select a section of the address (octet)
to edit, and the vertical ADJUST knob ({) to increase or decrease the selected
number.
e. Repeat step d for the remaining octets.
5. Use the picture control buttons to size and position each window as desired for your
application.
6. Save each window configuration to any of the 128 window preset slots for easy recall
of window settings.
Saving and Recalling Presets
To save the current conguration as a preset:
1. Press and hold the PRESET RECALL/SAVE button until the LCD screen displays
Window Preset/Save to #nnn (approximately 2 seconds). The button lights orange.
2. Rotate either ADJUST knob to select the preset number or name to which you want to
save this configuration.
3. Press the ENTER button. The button lights orange. Both the PRESET RECALL/SAVE and
the ENTER buttons remain lit until the preset is saved, then turn off.
To recall a saved preset, press the PRESET RECALL/SAVE button and
immediately release it. The button lights orange, and the LCD window displays
Window Preset/Recall #nnn. Rotate either ADJUST knob to select a preset number,
then press ENTER. The ENTER button lights orange and remains lit until the window preset
is recalled, then both buttons turn off. The LCD window displays WINDOW PRESET #nnn
Saved.
Power
On
Output
Configuration
MENU
MENU
MENU
30 sec.
Image/Logo
Configuration
MENU
30 sec.
30 sec.
Default
Cycle
Advanced
Configuration
MENU
NEXT
Exit Menu
Press NEXT
MENU
30 sec.
View Comm
Settings
MENU
30 sec.
Input
Configuration 30 sec.
30 sec.
MENU
Window
Configuration
NEXT
Hold 5 sec.
Edit Comm
Settings 30 sec.
MENU
2 sec.
Extron
MGP 641 xi [SDI]
60-1574-1n
FW n.nn.nnnn
30 sec.
2 sec.
MGP 641 xi Series • Setup Guide (Continued)
4

SIS Commands
As an alternative to the front panel controls, you can issue SIS commands via RS-232, USB, or Ethernet from the host to set up
and control the MGP 641 (see the MGP 641 xi Series User Guide at www.extron.com for a complete list of SIS commands).
Command ASCII Response Additional Description
Input Video Type
Set video type X!*X#\ ItypX!*X#] Set input X! to format X#.
View video type X!\ ItypX#] View video type X# set for input X! .
View detected format X!*\ ItypX!*X1*] View actual video format X1* on input X!.
Window and Preset
Mute (blank) a window X!*1B VmtX!*1]Blank (mute) window X!.
Unmute a window X!*0B VmtX!*0]Unmute window X!.
Save window preset 1*X1$,1Spr*X1$] Save current window settings as preset X1$.
Recall window preset 1*X1$.1Rpr*X1$] Recall window preset X1$.
Audio
Audio input switch X!$ InX!•Aud]Select (switch) the audio from input X!.
Global audio mute X$Z AmtX$] Set mute state of all audio outputs to X$.
Discrete audio mute X@*X$Z AmtX@*X$] Set mute state of audio output X@ to X$.
View global mute status ZX$•X$•X$] View audio mute status:
HDMI, DTP, analog audio
View discrete audio mute X@*Z X$] View mute status X$ of audio output X@.
Front Panel Lock Mode
Set front panel lock mode X3%X ExeX3%] Set front panel lock mode to X3%.
Read front panel lock mode XX3%] View front panel lock mode X3%.
IP Setup
Set IP address E X10& CI}Ipi•X10&] Set unit IP address X10&.
Read IP address E CI} X10&] View the unit IP address (X10&).
Set subnet mask E X11# CS}Ips•X11#] Set unit subnet mask X11#.
Read subnet mask E CS} X11#] View the unit subnet mask (X11#).
Set gateway address E X10& CG}Ipg•X10&] Set IP address X10& for your gateway.
Read gateway address E CG} X10&] View the gateway IP address for the unit.
Set DHCP mode E X1)DH}IdhX1)] Enable or disable DHCP.
View DHCP mode E DH} X1)] View the DHCP setting.
Reboot networking E2Boot}Boot2]Restart the network after IP setting changes.
KEY:
X! = Input (window) number 1 - 4. 0 = all windows (mute and freeze only)
X@ = Output number 1 = HDMI output, 2 = TP output, 3 = Analog audio output, 99 = All outputs
X# = Input video type 1 = HDMI/DVI, 2 = SDI (auto detect)
X$ = Mute status 0 = unmuted, 1 = muted
X1) = DHCP on or off status 0 = off or disabled, 1 = on or enabled
X1$ = Window preset number 1 - 128
X1* = Detected input format 0 = no signal, 1 = HDMI, 2 = DVI, 3 = SDI, 4 = HD-SDI, 5 = 3G-SDI,
6 = 6G-SDI, 7 = 12G-SDI, 8 = Unknown
3 through 8 apply to MGP 641 xi SDI only.
X3% = Front panel lock (executive) mode 0 = Off (front panel unlocked, default), 1 = Complete front panel lockout
2 = Only window preset recall, mute, freeze, and auto image are available.
X10& = IP or gateway address nnn.nnn.nnn.nnn. Leading zeros are optional in each octet.
X11# = Subnet mask nnn.nnn.nnn.nnn. Leading zeros are optional in each octet.
NOTE: IP and subnet commands require an ESC 2BOOT command before any changes are applied (see the Reboot
Networking command, above).
5

For information on safety guidelines, regulatory compliances, EMI/EMF compatibility, accessibility, and related topics, see the
Extron Safety and Regulatory Compliance Guide on the Extron website.
© 2023 Extron — All rights reserved. www.extron.com
All trademarks mentioned are the property of their respective owners.
Worldwide Headquarters: Extron USA West, 1025 E. Ball Road, Anaheim, CA 92805, 800.633.9876
68-2396-51
Rev. A 06 23
/