Kohler R3935-2-NA User manual

Type
User manual
Tools and Materials
Tape Measure
Safety Glasses
Painter’s Tape
Felt-tip Marker
Scissors
Utility Knife
Saw
Level
Square
Bladed Screwdriver
Clamps
Silicone Sealant
Suitable Support Framing Material [1/2 (13 mm) Max Thickness]
Screws
Important Information
WARNING: Risk of personal injury. Metal surfaces are
sharp and can cause severe cuts. Use gloves and handle sink
edges carefully.
IMPORTANT! Before beginning this installation, refer to the
Roughing-In section for cabinet dimensional requirements.
IMPORTANT! Long screws may damage adjacent cabinets. Ensure
the screws are long enough to secure the support framing, but short
enough not to extend through the inner walls of the adjacent
cabinets.
This guide provides two methods of installation: new
construction and retrofit. Follow the sections that apply to your
installation.
Use proper fasteners and techniques to ensure that the frame will
support a minimum of 300 lbs (136 kg). Locate the fasteners for
easy access in the event the sink needs to be removed.
For K-3935 Only: This sink is intended for installation into a
standard 30 base cabinet.
For K-3942 and K-3944 Only: This sink is intended for
installation into a standard 36 base cabinet.
1166708-2-B 2 Kohler Co.
Important Information (cont.)
For ease of installation, install the strainer assemblies to the sink
prior to installing the sink.
Inspect the drain and supply tubing; replace if necessary.
Observe all local plumbing and building codes.
Kohler Co. 3 1166708-2-B
Roughing-In
IMPORTANT! The countertop must be flat. This sink will not
install to countertops with integral drip edges.
IMPORTANT! The countertop thickness should not exceed 1-1/2
(38 mm).
IMPORTANT! The countertop should not overhang the cabinet face
more than 1-1/2 (38 mm).
IMPORTANT! The countertop must be fully supported by the
cabinet.
B = 8-3/8" (213 mm) Min
Top of Countertop to Top of Door
Apron
False Drawer Front
Drawer Opening
Countertop
A = 8-1/8" (206 mm) Max
Top of Countertop to Bottom
of Drawer Opening
8-1/4"
(210 mm)
A
B
Integral Drip
Edge
1166708-2-B 4 Kohler Co.
Using the Compatibility Template
IMPORTANT! The countertop must be flat. This sink will not
install to countertops with integral drip edges.
IMPORTANT! The countertop thickness should not exceed 1-1/2
(38 mm).
IMPORTANT! The countertop should not overhang the cabinet face
more than 1-1/2 (38 mm).
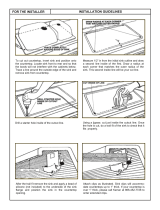
If your countertop is already installed, use the Pre-installation,
Sink, Counter, and Cabinet Compatibility Template to qualify
your installation site.
Position the compatibility template onto the countertop as shown.
The front of the template should rest against the cabinet face (not
the drawer front or door).
Verify the backsplash, counter overhang, and cabinet doors do not
interfere with positioning the template as shown.
With the template in place, verify clearance to open and close the
doors, and ensure that the drawer opening will be covered by the
sink apron.
Overhang
Clearance
Back Edge
of Sink
Compatibility
Template
Door
Clearance
Ensure
opening
is covered.
Kohler Co. 5 1166708-2-B
Using the Compatibility Template (cont.)
For retrofit installation: Ensure the template extends to or beyond
the back of the existing sink.
1166708-2-B 6 Kohler Co.
Prepare the Cabinet
For retrofit installation, proceed to the Prepare the Countertop -
Retrofit section.
Remove the false drawer front from your cabinet. Use care not to
damage the cabinet.
TIP: Apply painter’s tape to the cabinet to protect cabinet
surfaces when cutting.
If your cabinet has a center support, cut along the bottom of the
support even with the drawer opening.
Remove and discard the top rail.
Cut away
top rail.
Remove false
drawer front.
Kohler Co. 7 1166708-2-B
Install the Countertop
IMPORTANT! The countertop thickness should not exceed 1-1/2
(38 mm).
IMPORTANT! The countertop should not overhang the cabinet face
more than 1-1/2 (38 mm).
IMPORTANT! The countertop must be fully supported by the
cabinet.
Shim the countertop as needed. Ensure the countertop is fully
supported along the entire depth of the cabinet.
Using the compatibility template, verify the cabinet’s door
clearance, and ensure that the drawer opening will be covered by
the sink apron.
Install the countertop.
If additional height is
needed, shim along
entire cabinet.
Door
Clearance
Compatibility
Template
Ensure
opening
is covered.
1166708-2-B 8 Kohler Co.
Prepare the Countertop
IMPORTANT! Ensure the countertop overhang measurement
(distance C) is accurately transferred to the top of the countertop.
Apply painter’s tape at the centerline of the cabinet from the
backsplash to the edge of the countertop.
Apply painter’s tape across the top edge of the countertop along
the entire width of the sink base cabinet.
Mark the centerline of the cabinet onto the painter’s tape.
Apply a second piece of painter’s tape along the front edge of the
top of the countertop.
Measure the countertop overhang from the front of the cabinet
(distance C). Transfer distance C to the top of the cabinet onto
the painter’s tape.
Painter's
Tape
Front of
Cabinet
Mark distance "C"
onto painter's tape.
Measure
distance "C."
Centerline
Countertop
Overhang
Kohler Co. 9 1166708-2-B
Trace the Template
Cut out the template along the marked line.
Cut out the triangle on the template.
Position the template on the countertop. Align the template with
the lines marked on the painter’s tape.
Use tape to secure the template in place.
Trace the template.
Apply painter’s tape to the front of the countertop to prevent
chipping the laminate when cutting.
Extend the marked lines down the front of the countertop onto
the painter’s tape as shown.
Cut out the triangle
to see centerline.
Apply tape and extend
lines down the front.
1166708-2-B 10 Kohler Co.
Cut the Countertop
IMPORTANT! To avoid damaging visible cabinet surfaces, cut the
countertop in the order instructed.
TIP: To prevent chipping the laminate, apply painter’s tape to the
edge of the countertop before cutting.
First, cut the countertop along the inside marked line.
Second, carefully cut away from the cutout to the marked notch
line. Use care not to damage the cabinet face.
Repeat for the other side.
Third, carefully cut in from the edge of the countertop to intersect
with the previous cut. Use care not to damage the cabinet face.
Repeat for the other side.
Proceed to the Install Support Rails and Sink section.
1. Cut inside line.
Do not cut
beyond
marked line.
2. Cut away from cutout,
flush with cabinet face.
3. Cut to intersect
with previous cut.
Do not damage
cabinet face.
Kohler Co. 11 1166708-2-B
Prepare the Countertop - Retrofit
IMPORTANT! Ensure the countertop overhang measurement
(distance C) is accurately transferred to the top of the countertop.
Remove the false drawer front from your cabinet. Use care not to
damage the cabinet.
Apply painter’s tape around the perimeter of the existing cutout.
Measure the countertop overhang from the front of the cabinet
(distance C). Transfer distance C to the top of the cabinet onto
the painter’s tape.
To support the template, apply a taut strip of painter’s tape across
the centerline of the cutout.
Mark the centerline of the cabinet on each end of the painter’s
tape.
Painter's
Tape
Front of
Cabinet
Mark distance "C"
onto painter's tape.
Measure
distance "C."
Centerline
Countertop
Overhang
1166708-2-B 12 Kohler Co.
Trace the Template - Retrofit
Cut out the template along the marked line.
Cut out the triangle on the template.
Position the template on the countertop. Align the template with
the lines marked on the painter’s tape.
Use tape to secure the template in place.
Trace the corner notches at the front of the template.
Remove the template.
Using a square, extend the vertical mark of the corner notches to
the appropriate depth at the back of the countertop.
Draw a line connecting the depth marks at the back of the
countertop.
Apply painter’s tape to the front of the countertop to prevent
chipping the laminate when cutting.
Extend the marked lines down the front of the countertop onto
the painter’s tape as shown.
Cut out the triangle
to see centerline.
Apply tape and extend
lines down the front.
Mark
corners.
Kohler Co. 13 1166708-2-B
Cut the Countertop - Retrofit
IMPORTANT! To avoid damaging visible cabinet surfaces, cut the
countertop in the order instructed.
TIP: To prevent chipping the laminate, apply painter’s tape to the
edge of the countertop before cutting.
First, cut the countertop along the inside marked line.
Second, carefully cut away from the cutout to the marked notch
line. Use care not to damage the cabinet face.
Repeat for the other side.
Third, carefully cut in from the edge of the countertop to intersect
with the previous cut. Use care not to damage the cabinet face.
Repeat for the other side.
Fourth, cut away the top rail and discard.
4.
Remove
top rail.
1. Cut inside line.
Do not cut
beyond
marked line.
2. Cut away from cutout,
flush with cabinet face.
3. Cut to intersect
with previous cut.
1166708-2-B 14 Kohler Co.
Install Support Rails and Sink
To protect the cabinet finish, temporarily apply painter’s tape
around the cabinet cutout.
Carefully lower the sink into the cabinet.
From inside the cabinet, mark the bottom edge of the basin onto
each side wall of the cabinet.
Carefully remove the sink and set aside.
Remove the painter’s tape.
Cut two support rails to fit along the inside wall of the cabinet.
Rails should be no more than 1/2 (13 mm) thick.
Position the bottom of the support rail along the marked line.
Verify level.
Secure the rail to the cabinet wall. Ensure the fasteners do not
extend through the inside walls of the adjacent cabinets.
Apply a bead of silicone sealant around the countertop cutout.
Carefully lower the sink into the cabinet.
Immediately wipe away any excess sealant.
Support Rail
Kohler Co. 15 1166708-2-B
Install the Clips
Slide two back clips into either side of the back rail of the sink.
Slide three side clips into each side rail of the sink.
Evenly space the clips.
Back Clips (x4)
Side Clips (x6)
1166708-2-B 16 Kohler Co.
Secure the Sink
Rotate the back clips to engage the countertop. Use a bladed
screwdriver to tighten securely.
Rotate the side clips to engage the bottom of the basin and the
rails. Tighten evenly to finger-tight.
Immediately wipe away any excess sealant from around the sink
edges.
Apply silicone sealant to the ends of the side clip assemblies.
Install caps to the threads of each side clip assembly.
Complete the Installation
Apply a bead of silicone sealant around the apron where it meets
the cabinet.
Install the faucet according to the manufacturer’s instructions.
Connect the drain piping.
Run water into the sink and check all connections for leaks.
Side Clips
Rail
Back Clip
Basin
Rail
Cap
Kohler Co. 17 1166708-2-B
  • Page 1 1
  • Page 2 2
  • Page 3 3
  • Page 4 4
  • Page 5 5
  • Page 6 6
  • Page 7 7
  • Page 8 8
  • Page 9 9
  • Page 10 10
  • Page 11 11
  • Page 12 12
  • Page 13 13
  • Page 14 14
  • Page 15 15
  • Page 16 16
  • Page 17 17
  • Page 18 18
  • Page 19 19
  • Page 20 20
  • Page 21 21
  • Page 22 22
  • Page 23 23
  • Page 24 24
  • Page 25 25
  • Page 26 26
  • Page 27 27
  • Page 28 28
  • Page 29 29
  • Page 30 30
  • Page 31 31
  • Page 32 32
  • Page 33 33
  • Page 34 34
  • Page 35 35
  • Page 36 36
  • Page 37 37
  • Page 38 38
  • Page 39 39
  • Page 40 40
  • Page 41 41
  • Page 42 42
  • Page 43 43
  • Page 44 44
  • Page 45 45
  • Page 46 46
  • Page 47 47
  • Page 48 48
  • Page 49 49
  • Page 50 50
  • Page 51 51
  • Page 52 52
  • Page 53 53
  • Page 54 54
  • Page 55 55
  • Page 56 56

Kohler R3935-2-NA User manual

Type
User manual

Ask a question and I''ll find the answer in the document

Finding information in a document is now easier with AI