
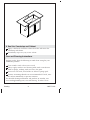
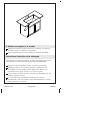
Installation and Care Guide
Apron-Front Kitchen Sink
Français, page “Français-1”
Español, página“ Español-1”
20243
1307771-2-A

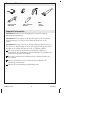
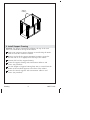
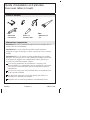
Tools and Materials
Important Information
IMPORTANT! Refer to the ″Roughing-In″ section for cabinet
dimensional requirements.
IMPORTANT! This sink must be installed prior to the installation
of the countertop. Cut-line is based from the front face of the
cabinet.
IMPORTANT! Long screws may damage adjacent cabinets. Ensure
the screws are long enough to secure the support framing, but short
enough not to extend through the walls of adjacent cabinets.
Due to the nature of under-mount installations, Kohler Co.
recommends that under-mount sink installations be performed by
trained and experienced installers.
This sink is intended for installation into a standard framed 36″
base cabinet.
Anchors and fasteners to be provided and installed by the
countertop manufacturer.
Observe all local plumbing and building codes.
Plus:
• 2x4s
• Screws
100% Silicone
Sealant
Construction
Adhesive
1307771-2-A 2 Sterling

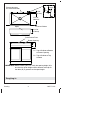
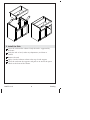
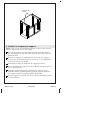
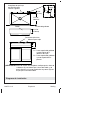
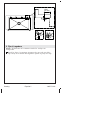
Roughing-In
17-7/16"
(443 mm)
Apron
1-5/8"
(41 mm)
Front of Cabinet
AB
False Drawer Front
Drawer Opening
B = Top of Cabinet to Top
of Doors
Top of Cabinet to Bottom
of Drawer Opening
A =
Ensure clearance
for faucet installation.
6-11/16"
(170 mm)
Before installing this sink, verify the opening height (A) is
less than the apron height and the distance to the top of
the doors (B) is greater than the apron height.
IMPORTANT!
1-5/8"
(41 mm)
Sterling 3 1307771-2-A

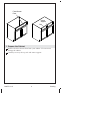
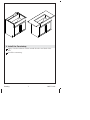
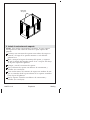
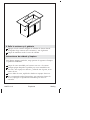
1. Prepare the Cabinet
Remove the false drawer front from your cabinet. Use care not to
damage the cabinet.
Carefully cut away the top rail and center support.
Center
Support
Rail
False Drawer
Front
1307771-2-A 4 Sterling

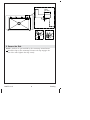
2. Install Support Framing
NOTICE: For proper countertop installation, the top of the sink
must not extend above the top of the cabinet.
Using 2x4s, construct support framing to extend along the inside
walls on each side of the base cabinet.
Measure and mark the support mounting locations; ensure the
sink rim will sit at or slightly below the top of the cabinet.
Position and level the support framing.
Secure the support framing with construction adhesive and
screws (not provided).
Cut four lengths of support framing from 2x4s to extend from the
bottom of the installed supports to the floor of the cabinet.
Secure the vertical supports with construction adhesive and
screws (not provided).
Support
Framing
Sterling 5 1307771-2-A

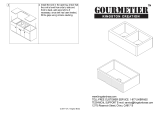
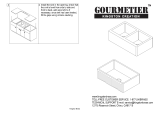
3. Install the Sink
Lower the sink into the cabinet. Verify the sink is supported by
the frame.
Verify the sink is level, make any adjustments, and shim as
needed.
Remove the sink.
Apply a bead of silicone sealant to the top of each support.
Lower the sink onto the supports and push in to ensure the apron
is flush to the front of the cabinet.
1307771-2-A 6 Sterling

4. Install the Countertop
Apply a bead of silicone sealant around the sides and back of the
sink.
Install the countertop.
Sterling 7 1307771-2-A

5. Secure the Sink
NOTE: Anchors are pre-installed by the countertop manufacturer.
Install the clips to the countertop. Ensure each clip engages the
rim of the sink. Tighten the clips evenly.
1-5/8"
(41 mm)
1307771-2-A 8 Sterling

6. Seal the Countertop and Cabinet
Apply a thin bead of silicone sealant where the sink meets the
countertop and cabinet.
Immediately wipe away any excess sealant.
Care and Cleaning Instructions
For best results, keep the following in mind when caring for your
STERLING product:
Clean stainless steel at least once a week.
Always apply stainless steel cleaner/polish with a non-abrasive
cloth or sponge, working with, not across, the grain.
Do not use steel wool, wire brushes or abrasive sponge pads.
Cleaners containing chloride are not recommended. If used, rinse
the surface immediately to prevent corrosion.
For detailed cleaning information and products to consider, visit
www.sterlingplumbing.com/care-and-cleaning. To order Care &
Sterling 9 1307771-2-A

Care and Cleaning Instructions (cont.)
Cleaning information, call 1-800-456-4537.
Warranty
Stainless Steel Sinks deeper than 6″- LIFETIME LIMITED
Stainless Steel Sinks less than or equal to 6″ deep - 5 YEARS
LIMITED
Based on the classification specified above, STERLING stainless steel
sinks deeper than 6” are warranted to be free of manufacturing defects
for as long as the original consumer purchaser owns his/her home;
STERLING stainless steel sinks less than or equal to 6” in depth are
warranted to be free of manufacturing defects for 5 years from the date
of sale.
Kohler Co. will, at its election, repair, rectify or replace a fixture when
inspection by Kohler Co. discloses any such defects occurring in
normal usage within the time period of coverage stated above. Kohler
Co. is not responsible for removal or installation costs where
replacement is indicated. Damages due to improper handling,
installation or maintenance are not considered manufacturing defects
and are not covered by this warranty. This warranty is valid for the
original, consumer purchaser only.
To obtain warranty service, contact Sterling, either through your
plumbing contractor, home center, wholesaler or dealer, or by calling or
writing Sterling, Consumer Services, 444 Highland Drive, Kohler,
Wisconsin 53044, 1-800-783-7546.
TO THE EXTENT PERMITTED BY LAW, ALL IMPLIED
WARRANTIES INCLUDING THOSE OF MERCHANTABILITY
AND FITNESS FOR A PARTICULAR PURPOSE ARE HEREBY
DISCLAIMED. KOHLER CO. AND SELLER HEREBY DISCLAIM
ANY LIABILITY FOR SPECIAL, INCIDENTAL, OR
CONSEQUENTIAL DAMAGES. Some states/provinces do not allow
limitations on how long an implied warranty lasts, or the exclusion or
limitation of special, incidental or consequential damages, so these
limitations and exclusions may not apply to you. This warranty gives
you specific legal rights. You may have other rights which vary from
state/province to state/province.
This is the exclusive written warranty for Kohler Co.
1307771-2-A 10 Sterling
Page is loading ...
Page is loading ...
Page is loading ...
Page is loading ...
Page is loading ...
Page is loading ...
Page is loading ...
Page is loading ...
Page is loading ...
Page is loading ...
Page is loading ...
Page is loading ...
Page is loading ...
Page is loading ...
Page is loading ...
Page is loading ...
Page is loading ...
Page is loading ...
Page is loading ...
Page is loading ...
Page is loading ...

USA: 1-800-STERLING
(1-800-783-7546)
México: 001-877-680-1310
SterlingPlumbing.com
©2017 Kohler Co.
1307771-2-A
-
 1
1
-
 2
2
-
 3
3
-
 4
4
-
 5
5
-
 6
6
-
 7
7
-
 8
8
-
 9
9
-
 10
10
-
 11
11
-
 12
12
-
 13
13
-
 14
14
-
 15
15
-
 16
16
-
 17
17
-
 18
18
-
 19
19
-
 20
20
-
 21
21
-
 22
22
-
 23
23
-
 24
24
-
 25
25
-
 26
26
-
 27
27
-
 28
28
-
 29
29
-
 30
30
-
 31
31
-
 32
32


Sterling Ludington™ Installation guide
- Type
- Installation guide
- This manual is also suitable for
Ask a question and I''ll find the answer in the document
Finding information in a document is now easier with AI
in other languages
- français: Sterling Ludington™ Guide d'installation
- español: Sterling Ludington™ Guía de instalación
Related papers
-
Sterling 11449-NA Installation guide
-
Sterling Plumbing 442001-0 Installation guide
-
-
-
-
Kohler Sterling 1628 Installation guide
-
Unbranded 11403-4-NA User manual
-
-
-
Other documents
-
AKDY KS0066 Installation guide
-
 Kingston Brass YGKFA301810DS Installation guide
-
Kingston Brass YGKFA361810BC Installation guide
-
 Kingston Brass HGKFA361810SQ Installation guide
-
Kohler K-6486-33 Installation guide
-
Kohler K-6489-FT Installation guide
-
Kohler K-6488-58 Installation guide
-
Kohler K-T10423-4S-G Installation guide
-
-
DXV 1180DB3620.291 Installation guide

