Garmin PRO Control® 2 Remote Launch System Owner's manual

Category
Pet care
Type
Owner's manual

This manual is also suitable for

Garmin PRO Control® 2 Remote Launch System helps you train your dogs effectively, with a range of up to 1,200 yards, waterproof construction, and long battery life. Using handheld device, you can activate a variety of remote devices connected to your dog's receiver collar, such as remote launchers and releasers.

Garmin PRO Control® 2 Remote Launch System helps you train your dogs effectively, with a range of up to 1,200 yards, waterproof construction, and long battery life. Using handheld device, you can activate a variety of remote devices connected to your dog's receiver collar, such as remote launchers and releasers.

PRO Control
®
2
Owner’s Manual
January 2016 190-01894-00_0B
All rights reserved. Under the copyright laws, this manual may not be copied, in whole or in part, without the written consent of Garmin. Garmin reserves the
right to change or improve its products and to make changes in the content of this manual without obligation to notify any person or organization of such
changes or improvements. Go to www.garmin.com for current updates and supplemental information concerning the use of this product.
Garmin
®
, the Garmin logo, and PRO Control
®
are trademarks of Garmin Ltd. or its subsidiaries, registered in the USA and other countries. These trademarks
may not be used without the express permission of Garmin.
IC: 1792A-A2125
M/N: O2ADNH02
Table of Contents
Introduction.....................................................................1
Charging the Handheld Device................................................... 1
Charging the Receiver................................................................ 1
Turning the Handheld Device On or Off..................................... 1
Turning the Receiver On and Off................................................ 1
Selecting an Operating Mode..................................................... 1
Remote Training Devices.............................................. 1
PRO Control 2 Receiver Overview............................................. 2
Remote Control Keys..................................................................2
Remote Control Display.............................................................. 2
Receiver Pairing......................................................................... 2
Attaching the Receiver................................................................3
Connecting a Receiver to a Training Device.............................. 3
Activating a Remote Device........................................................3
Activating Multiple Devices Simultaneously................................3
Rapid Launch..............................................................................3
Receiver Sound.......................................................................... 3
Dog Training................................................................... 4
Dog Training Keys...................................................................... 4
Dog Training Display.................................................................. 4
Dog Collar Device....................................................................... 4
Training Intensities and Methods................................................ 5
Training Modes........................................................................... 5
Choosing the Correct Intensity Level.......................................... 5
Device Information......................................................... 6
PRO Control 2 Handheld Device Specifications......................... 6
PRO Control 2 Remote Receiver Device Specifications............ 6
Getting More Information............................................................ 6
Registering Your Device............................................................. 6
Device Maintenance....................................................... 6
PRO Control 2 Battery Replacement Instructions...................... 6
Updating the Receiver Software................................................. 7
Downloading a Custom Sound................................................... 7
Resetting the Receiver to Factory Defaults................................ 7
Index................................................................................ 8
Table of Contents i
Introduction
WARNING
See the
Important Safety and Product Information guide in the
product box for product warnings and other important
information.
Charging the Handheld Device
NOTICE
To prevent corrosion, thoroughly dry the USB port, the weather
cap, and the surrounding area before charging or connecting to
a computer.
NOTE: The device does not charge when it is outside the
approved temperature range (PRO Control 2
Handheld Device
Specifications, page
6)
.
You should fully charge the battery before you use the device for
the first time. Charging a fully depleted battery takes about 2
hours.
1
Lift the weather cap
À
.
2
Plug the small end of the power cable into the USB port
Á
on
the device.
3
Plug the other end of the power cable into an appropriate
power source.
The LCD display on the handheld device shows the current
battery charge level. Charging is complete when the battery
charge level icon stops flashing.
Charging the Receiver
NOTICE
To prevent corrosion, thoroughly dry the USB port, the weather
cap, and the surrounding area before charging or connecting to
a computer.
NOTE:
The device does not charge when it is outside the
approved temperature range (
PRO Control
2 Remote Receiver
Device Specifications, page
6).
1
Lift the weather cap from the USB port.
2
Plug the small end of the power cable into the USB port.
3
Plug the large end of the USB cable into an AC adapter or a
computer USB port.
4
Plug the AC adapter into a standard wall outlet.
5
Charge the device completely.
The LED is solid red while charging. The LED is solid green
when the device is fully charged.
NOTE: The battery takes four hours to fully charge.
Battery Status
When the device is on, the status LED flashes every few
seconds. The color of the status LED indicates the battery
power level.
Green Good battery power.
Yellow Low battery power. Charge the battery soon.
Red Critically low battery power or missing battery. Charge the
battery immediately. Launching is disabled.
Turning the Handheld Device On or Off
The handheld device turns off automatically after you have not
used it for one hour. You cannot turn off the device manually.
NOTE:
The device and LCD display use very little power while
the device is not transmitting, and the one-hour delay does not
significantly impact battery life.
Select any key to turn on the device.
The LCD display turns on, and the device keys can be used
immediately.
Turning the Receiver On and Off
1
Hold the power key until the LED is solid green to turn on the
receiver.
After you release the power key, the LED flashes to indicate
the battery level (Battery Status, page 1)
.
2
Hold the power key until the LED is solid red to turn off the
receiver.
Selecting an Operating Mode
The
PRO Control
2 handheld device operates in either remote
launcher mode or dog training mode. The features, display, and
key functions change based on the mode.
Select MODE to switch the operating mode.
A training mode indicator appears at the bottom of the LCD
display (
Dog Training Display,
page
4) when the device is in
dog training mode.
Remote Training Devices
The
PRO Control
2 handheld device can control up to 18
compatible
PRO Control series receivers. A PRO Control series
receiver can activate several brands of third-party devices,
including remote launchers, remote releasers, and other remote
accessories. Each receiver includes a speaker to play a sound
and two ports to connect remote devices.
Your PRO Control
2 handheld device can remotely activate the
sound and two remote devices on each receiver. You can also
use the rapid launch feature to activate multiple devices in rapid
succession.
Introduction 1
PRO Control
2 Receiver Overview
À
3.5 mm line-out audio jack (under weather cap)
Á
USB port (under weather cap)
Â
LED
Ã
Power key
Ä
3.5 mm output jacks (under weather cap)
Remote Control Keys
À
Select to use rapid launch.
Á
Select to switch between remote launcher mode and dog training
mode.
Â
Select to play the receiver sound.
Ã
Select to activate the left port of the receiver.
Ä
Select to activate the right port of the receiver.
Å
Select to change the active receiver or to select the order of rapid
launch activation.
Æ
Select to change the receiver sound.
Remote Control Display
À
Selected receiver number
NOTE:
A letter indicating the order of rapid launch activation may
also appear. L indicates left ports activate first, and r indicates right
ports activate first.
Á
Battery charge level
Â
Selected sound
Receiver Pairing
You can pair the
PRO Control 2
handheld device with a
PRO
Control
2 receiver (
Pairing a PRO Control 2 Receiver,
page 2)
or a
PRO Control G Series receiver (Pairing with a
PRO Control G Series Receiver, page 2).
Pairing a PRO Control 2 Receiver
Before you can control a PRO Control 2 receiver with the
handheld device, you must pair them.
1
On the handheld device, select MODE
, and select the remote
launcher mode (
Selecting an Operating Mode, page 1).
When you are in remote launcher mode, training mode
indicators
À
do not appear on the LCD display of the
handheld device.
2
On the handheld device, select or to select the number
of the receiver to pair.
The number of the receiver appears on the LCD display of
the handheld device.
3
Hold the power key from 3 to 5 seconds until the LED on the
receiver is solid green and changes to solid blue.
You can perform this step even if the receiver is turned off
initially. You must continue to hold the power key while
pairing.
4
While the LED on the receiver is blue, select L, R
, or
on
the handheld device.
The handheld device beeps when the devices are paired.
5
Select to verify that the receiver paired.
CAUTION
The speaker is very loud. You should avoid activating the
speaker near a person. If you must use the speaker near a
person, muffle the speaker before activating it to decrease
the volume.
The speaker plays the current sound.
Pairing with a PRO Control G Series Receiver
Before you can control your receiver with your PRO Control 2
handheld device, you must pair the receiver with the handheld
device.
1
On the handheld device, select or to choose the
number with which to pair the receiver.
TIP:
The selected number determines the sound played by
receiver when you select
(PRO Control G Series Receiver
Sounds,
page
4).
2
If necessary, turn on the receiver.
3
On the receiver, select
SET.
2 Remote Training Devices
The red LED is solid when the receiver is in pairing mode.
4
Within five seconds, select on the handheld device.
The red LED on the receiver flashes and turns off.
The receiver is paired with the selected number on the handheld
device.
Attaching the Receiver
NOTICE
Do not attach the receiver in the path of the launch. Verify that
the receiver does not interfere with the releasing mechanism of
the launch device.
1
Attach the receiver to the mounting plate.
2
Attach the mounting plate to the third-party launch device
according to the manufacturer's instructions.
Connecting a Receiver to a Training Device
You can connect two third-party launch devices using the left
and right output jacks of the receiver.
1
Pull back the weather cap
À
from the left or right output jack
of the receiver.
2
Connect one end of the 3.5 mm cable to the output jack
Á
of
the receiver.
3
Connect the other end of the 3.5 mm cable to the input jack
of the training device.
4
Repeat steps 1 through 3 to attach a second training device
to the unused output jack.
Activating a Remote Device
Before you can activate a receiver, you must pair it with the
handheld device.
1
Select or to select a receiver.
2
Select to play the receiver sound (optional).
3
Select an option:
Select L to activate the device plugged into the left
receiver port.
Select R
to activate the device plugged into the right
receiver port.
Activating Multiple Devices Simultaneously
You can pair multiple receivers with the same number on the
handheld device to activate multiple devices at the same time.
For example, you can activate multiple remote releasers
simultaneously to simulate a flushed flock of birds.
1
While pairing your receivers, select the same number on the
handheld device for each of the receivers that you intend to
activate simultaneously (Pairing a PRO Control 2 Receiver,
page 2)
.
2
Select or to select the number paired with the
receivers.
3
Select an option:
Select
L to activate the left port of all receivers paired with
the selected number.
Select
R to activate the right port of all receivers paired
with the selected number.
Rapid Launch
The rapid launch feature allows you to activate multiple remote
devices in sequence. You can activate all left ports on receivers
1 through 18 in sequence, all right ports on receivers 1 through
18 in sequence, or all ports on one side followed by all ports on
the other side.
To use the rapid launch feature most effectively, you should pair
your receivers numerically in the order you want to activate
them. You can pair your receivers to new numbers on the
handheld device at any time (
Receiver Pairing,
page
2).
Activating Multiple Devices Sequentially
1
On the handheld, select to select receiver 1.
2
Select an option:
Select to select
L for rapid launch of all left ports in
sequence, followed by all right ports in sequence.
Select to select r for rapid launch of all right ports in
sequence, followed by all left ports in sequence.
3
Select to switch between rapid launch of all left and all
right ports, if necessary.
4
Select an option:
Select
RAPID LAUNCH.
The device activates the selected port of the next remote
device in order each time you select the key.
Hold
RAPID LAUNCH.
The device rapidly activates the selected ports in order for
as long as you hold the key. After the device activates
receiver 18, activation restarts on receivers 1 through 18
for ports on the other side.
5
Release
RAPID LAUNCH to stop rapid launch.
6
Repeat step 4 to resume rapid launch.
Rapid launch resumes with the next receiver number.
Receiver Sound
CAUTION
The speaker is very loud. You should avoid activating the
speaker near a person. If you must use the speaker near a
person, muffle the speaker before activating it to decrease the
volume.
The receiver includes a speaker that can play multiple sounds.
The sounds can be used as a training tool in coordination with
remote device launches. You can also use the sound to help
locate a lost or hidden receiver.
Selecting the PRO Control 2
Receiver Sound
Before you can select the receiver sound, you must be in remote
launcher mode (
Selecting an Operating Mode,
page
1).
Remote Training Devices 3
On the handheld device, select to select a color.
On the LCD display, moves to a new color each time you
select . Each color indicates a different sound.
Blue (left) Duck call
Black (middle) "Hey, hey, hey"
Red (right) Beep/tone
PRO Control
G Series Receiver Sounds
The receiver can play several different sounds. You can choose
the sound that plays when you select
. The sound associated
with each PRO Control G Series receiver is determined by the
number you use to pair the receiver to the handheld device
(Pairing with a PRO Control G Series Receiver, page 2).
Sound Paired Receiver Number
Duck 1, 2, 3, 4, 12, 13, 14, 15
Tone 5, 8, 16
2 tone 6, 9, 17
3 tone 7, 10, 18
No sound 11
Activating the Receiver Sound
1
Select or to select a receiver.
2
Select .
Using an External Speaker with the PRO Control 2
Receiver
When training dogs at field trial distances of more than 400
yards, you can connect a powered, external speaker for
additional sound performance.
NOTE:
Your external speaker must be a powered speaker with
a built-in amplifier.
1
Lift the weather plug from the audio jack on the receiver.
2
Connect the cable from your external speaker to the audio
jack.
Dog Training
You should research and investigate the training methods best
suited for you, your dog, and your needs.
When used properly, the
PRO Control training system is an
effective training tool to aid your dog in reaching its full potential.
The use of the training system should be part of an overall
training program.
Dog Training Keys
À
Select to change the functions of the training keys
Â
.
Á
Select to choose an intensity level.
Â
Select to activate a stimulation on the dog collar device.
Ã
Select to choose the active dog collar device.
Ä
Select to switch to remote launcher mode.
Dog Training Display
À
Selected dog collar device
Á
Stimulation intensity level
Â
Battery charge level
Ã
Selected training mode
Dog Collar Device
You can use up to 3 dog collar devices with a single handheld
device.
Each dog collar device must be paired with the handheld device
before it can be used. During the pairing process, each dog
collar device is associated with a different color on the handheld
device. indicates the selected color.
Fitting the Collar on Your Dog
CAUTION
To prevent irritation from the contact points, remove the collar
for at least eight hours out of every 24-hour period.
This device is not intended for human use. Do not attempt to
use on any person.
Do not spray the device or collar with harsh chemicals including
but not limited to flea or tick spray. Always ensure that any flea
or tick spray that is applied to the dog is completely dry before
placing the collar on the dog. Small amounts of harsh chemicals
can damage the plastic components and collar laminate.
In order to effectively train the dog, the collar and device must fit
the dog properly. If the collar is too loose or positioned
incorrectly, stimulation may be inconsistent. This can delay or
prevent successful training.
1
Position the device at the front of the dog's neck, with the
status LED facing toward the dog's chin and the contact
points against the throat.
2
Tighten the strap so that it is very snug around the dog's
neck, and fasten the buckle.
NOTE: The collar should fit tightly and should not be able to
rotate or slide on the dog's neck. The dog must be able to
swallow food and water normally. You should observe your
dog's behavior to verify that the collar is not too tight.
4 Dog Training
3
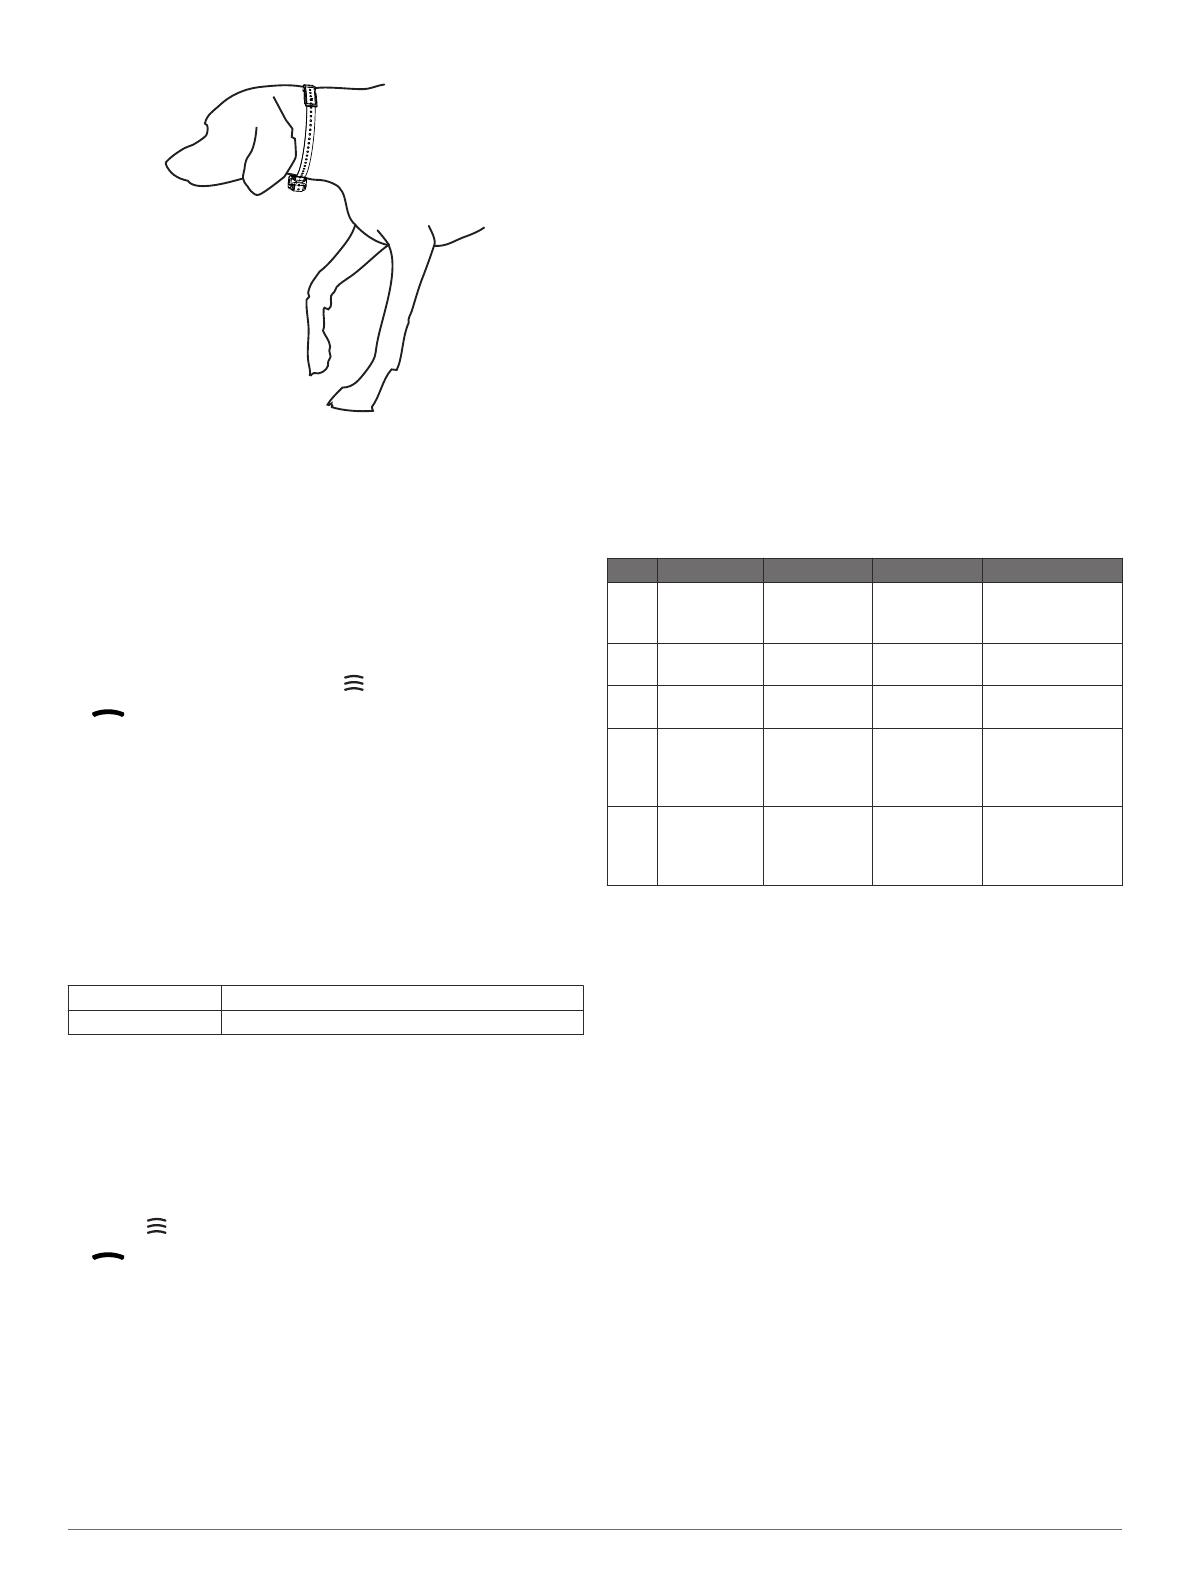
Wiggle the device to work the contact points through the
dog's coat.
NOTE: The contact points must have contact with the dog's
skin to be effective.
4
If the strap is too long, cut off the excess, leaving at least
8 cm (3 in.) to spare.
TIP:
You can mark the hole used to fasten the buckle for
future reference.
Pairing a Dog Collar Device with the Handheld Device
1
Turn on the dog collar device and the handheld device.
2
On the handheld device, select to select a color.
indicates the selected color.
3
On the handheld device, select an intensity level greater than
0
(
Changing the Intensity Level,
page
6).
4
On the dog collar device, hold the power key.
You must continue to hold the power key during the pairing
process.
The device beeps once when you select the power key and
again after five seconds.
5
After the second beep, select a training key on the handheld
device.
The dog collar device turns off and beeps to indicate that the
devices paired successfully.
Short beep Devices paired successfully
Long beep Devices did not pair
TIP:
If the devices did not pair successfully, you should verify
the batteries in both devices are fully charged and the intensity
level is greater than 0.
Selecting a Dog Collar Device
Before you can select and control a dog collar device, you must
pair the dog collar device with the handheld device (Pairing a
Dog Collar Device with the Handheld Device, page 5)
.
Select
to choose the color.
indicates the selected color.
The training keys control the dog collar device associated with
the selected color.
Training Intensities and Methods
You can use several methods to train your dog. The PRO
Control system provides 18
stimulation intensity levels, which
increase sequentially from 1 to 18.
Momentary stimulation
: Applies a brief stimulation when you
press the training key, regardless of how long the key is
depressed.
Continuous stimulation: Applies stimulation to the dog the
entire time you press the training key, for a maximum of 8
seconds. Your stimulations should typically be much shorter
than 8 seconds.
Tone: Activates an audible tone the entire time you press the
training key, for a maximum of 8 seconds. A tone can be
used as either a positive or negative training cue, depending
on your training program.
Vibration: Applies vibration instead of stimulation to the dog the
entire time you press the training key, for a maximum of 8
seconds. The effectiveness of vibration may vary based on
the dog's temperament and experience.
Training Modes
The
PRO Control system provides several training modes,
which assign different combinations of momentary stimulation,
continuous stimulation, tone, and vibration to the training keys
(Training Intensities and Methods,
page
5)
. The three vertical
letters on the LCD display correspond to the training key
functions, from top to bottom. Some modes provide keys
designated for high or low stimulations for different training
purposes. A low stimulation is perceived by the dog to be less
intense than a high stimulation.
Mode Top Key Middle Key Bottom Key Description
TVM Tone Vibration Momentary
(low)
Beginning trainer,
sensitive dog, or
minor corrections
VCM Vibration Continuous
(high)
Momentary
(high)
All-around training
TCM Tone Continuous
(high)
Momentary
(high)
All-around training
CMM Continuous
(high)
Momentary
(high)
Momentary
(low)
Advanced
training, popular
for bird-dog
training
MCC Momentary
(high)
Continuous
(high)
Continuous
(low)
Advanced
training, popular
for obedience
training
Selecting a Training Mode
You can select a training mode that applies to all three dog
collar devices.
1
Select a dog collar device (Selecting a Dog Collar Device,
page 5)
.
2
Select
RAPID LAUNCH to move through the available
training modes.
Choosing the Correct Intensity Level
1
Set the intensity to the lowest level (Changing the Intensity
Level
, page
6).
2
Press a training key.
3
Observe the dog for a reaction, such as a head shake, neck
movement, or just a change in expression.
Sometimes dogs will vocalize due to the surprise of the
electrical stimulation. If the dog vocalizes more than once,
the intensity level is too high for beginning training.
4
If there is no reaction, increase the intensity level by one level
until the dog has a slight but recognizable reaction to the
stimulation.
The intensity level that causes a slight but recognizable reaction
is your dog's baseline level for beginning collar training. You do
not need to, and should not, apply this intensity selection test
again.
After you begin training, the dog’s performance guides your
intensity selection. As the dog advances in training, you may
need to change the level depending upon the training situation.
Dog Training 5
Changing the Intensity Level
You can select a different intensity level for each dog collar
device.
1
Select a dog collar device (Selecting a Dog Collar Device,
page 5).
2
Select or to increase or decrease the intensity level.
The numerical intensity level appears on the LCD display.
TIP:
You can hold
or to cycle through intensity levels
quickly.
Device Information
PRO Control
2 Handheld Device
Specifications
Battery type Rechargeable, replaceable lithium-ion
Operating temperature range From -4° to 158°F (from -20° to 70°C)
Charging temperature range From 32° to 104°F (from 0° to 40°C)
Storage temperature range From -4° to 122°F (from -20° to 50°C)
Water rating IEC 60529 IPX7*
*The device withstands incidental exposure to water of up to 1 m
for up to 30 min. For more information, go to www.garmin.com
/waterrating.
PRO Control 2 Remote Receiver Device
Specifications
Battery type Rechargeable, replaceable lithium-ion
Operating temperature range From -20° to 60°C (from -4° to 140°F)
Charging temperature range From 0° to 45°C (from 32° to 113°F)
Storage temperature range From -20° to 70°C (from -4° to 158°F)
Water rating IEC 60529 IPX7*
*The device withstands incidental exposure to water of up to 1 m
for up to 30 min. For more information, go to www.garmin.com
/waterrating.
Getting More Information
You can find more information about this product on the Garmin
®
website.
Go to www.garmin.com/outdoor.
Go to http://buy.garmin.com, or contact your Garmin dealer
for information about optional accessories and replacement
parts.
Registering Your Device
Help us better support you by completing our online registration
today.
Go to www.garmin.com/express.
Keep the original sales receipt, or a photocopy, in a safe
place.
Device Maintenance
PRO Control 2 Battery Replacement
Instructions
WARNING
This product contains a lithium-ion battery. To prevent the
possibility of personal injury or product damage caused by
battery exposure to extreme heat, store the device out of direct
sunlight.
Do not use a sharp object to remove batteries.
CAUTION
Contact your local waste disposal department to properly
recycle the batteries.
PRO Control 2 Handheld Device Components
À
Security screws
Á
Back plate
Â
Battery
Ã
Battery connector
Ä
Gasket
Replacing the PRO Control 2 Handheld Device Battery
Before you replace the battery, you must remove all dirt, water,
and debris from the device. You also need the security
screwdriver included with the new battery.
You can purchase a replacement battery at
http://buy.garmin.com. You should use only an official Garmin
replacement part.
1
Remove the six security screws from the back of the device.
2
Lift up the back plate.
3
Grip the battery connector wires close to the connector, and
pull the connector parallel to the circuit board to disconnect
the battery connector from the device.
4
Remove the old battery from the back plate, noting the
orientation of the battery.
The battery fits tightly. It may be necessary to pry the battery
out of the back plate using a non-sharp, non-metal object.
5
Install the new battery into the back plate with the label side
up, using the same orientation as the old battery.
6
With the new battery, connect the battery connector to the
device.
When properly installed, the connector plug snaps into the
port.
7
Verify the gasket is not damaged and is completely seated in
the groove.
8
Hold the back plate and the device firmly together, and
replace all six security screws without tightening.
9
Verify the back plate and the device are aligned with no gaps.
10
Tighten the screws evenly.
6 Device Information
PRO Control
2 Receiver Components
À
Security screws
Á
Battery connector
Â
Receiver housing
Ã
Screws for battery plate
Ä
Battery plate
Å
Battery
Replacing the PRO Control
2 Receiver Battery
Before you replace the battery, you must remove all dirt, water,
and debris from the device.
You can purchase a replacement battery at
(
http://buy.garmin.com)
. You should use only an official Garmin
replacement part.
1
Remove the eight security screws from the back of the
device.
2
Lift up the receiver housing.
3
Press down firmly on the release tab for the battery
connector, and disconnect the battery connector from the
device.
4
Remove the screws from the battery plate, and remove the
plate.
5
Remove the old battery, noting the orientation of the battery.
The battery fits tightly. You may pry the battery out of the
back plate using a non-sharp, non-metal object.
6
Install the new battery with the label side up, using the same
orientation as the old battery.
7
Replace the battery plate, and replace its screws.
8
Verify that the gasket is not damaged and is completely
seated in the groove in the receiver housing.
9
Connect the battery connector to the device.
10
Hold the bottom plate and the device firmly together, and
replace all eight security screws without tightening.
11
Verify the bottom plate and the device are aligned with no
gaps.
12
Tighten the screws evenly.
Updating the Receiver Software
1
Connect your device to a computer using the USB cable
(Connecting the Device to Your Computer, page 7).
2
Go to garmin.com/express.
3
Follow the on-screen instructions.
Connecting the Device to Your Computer
NOTICE
To prevent corrosion, thoroughly dry the USB port, the weather
cap, and the surrounding area before charging or connecting to
a computer.
1
Pull up the weather cap from the USB port on the device.
2
Plug the small end of the USB cable into the USB port on the
device.
3
Plug the large end of the USB cable into a computer USB
port.
Your device appears as a removable drive in My Computer
on
Windows
®
computers and as a mounted volume on Mac
®
computers.
Downloading a Custom Sound
Before you can download a custom sound from your computer
to your receiver, your sound file must be in the proper audio
format
(
Custom Sound File Requirements, page 7).
1
Name the custom sound file to associate it with a color.
Color Filename
Blue (left) 1.wav
Black (middle) 2.wav
Red (right) 3.wav
2
Connect the receiver to your computer (Connecting the
Device to Your Computer, page 7)
.
Depending on your computer operating system, the device
appears as either a portable device, a removable drive, or a
removable volume.
3
On your computer, browse to the custom sound file location.
4
Copy the custom sound file to the GARMIN/WAV folder on
your receiver.
When you select the receiver sound (Selecting the PRO Control
2 Receiver Sound, page 3)
, the custom sound plays.
Custom Sound File Requirements
Audio file format Waveform (.wav)
Channels Mono or stereo
Resolution 16-bit
Sample rate 32 kHz
Maximum duration 50 sec. for mono for all three sounds
25 sec. for stereo for all three sounds
Resetting the Receiver to Factory Defaults
A factory reset unpairs the receiver, erases sounds stored on
the receiver, and restores the original factory sounds.
1
Connect the receiver to the computer or charger (Connecting
the Device to Your Computer,
page
7)
.
2
Hold the power key for 15 seconds until the LED is solid
yellow.
Factory reset is complete when the LED turns off.
Device Maintenance 7
Index
A
accessories 
6
B
battery
1
charging 
1
level 
2
, 4
life
1
replacing 
6
, 7
C
charging
handheld 
1
receiver 
1
collar
fitting
4
pairing 
4
, 5
computer, connecting 
7
contact points 4
D
data, transferring 7
device, registration 
6
dog
training 
1
training basics 
4
training intensity levels 
5
dog collar device 
4
, 5
F
files, supported types 
7
I
intensity level 
4
changing 
6
choosing 
5
K
keys
2
, 4
P
pairing, collar 
4
, 5
power key
1
, 2, 4
product registration 
6
R
rapid launch 
3
receiver
attaching 
3
connecting 
3
mounting plate 
3
pairing 
2
sound 
3
, 4, 7
registering the device 
6
remote control 
1
–3
rapid launch 
3
resetting the device 
7
S
software, updating 
7
speaker, connecting 
4
specifications 
6
storing data 
7
T
training, modes
4
, 5
troubleshooting 
6
, 7
U
updates, software
7
USB, connector 
2
8 Index
www.garmin.com/support
1800 235 822 +43 (0) 820 220230
+ 32 2 672 52 54 0800 770 4960
1-866-429-9296
+385 1 5508 272
+385 1 5508 271
+420 221 985466
+420 221 985465
+ 45 4810 5050
+ 358 9 6937 9758 + 331 55 69 33 99
+ 39 02 36 699699 (+52) 001-855-792-7671
0800 427 652 0800 0233937
+47 815 69 555
00800 4412 454
+44 2380 662 915
+35 1214 447 460 +386 4 27 92 500
0861 GARMIN (427 646)
+27 (0)11 251 9800
+34 93 275 44 97
+ 46 7744 52020 +886 2 2642-9199 ext 2
0808 238 0000
+44 870 850 1242
+49 (0) 89 858364880
zum Ortstarif - Mobilfunk
kann abweichen
913-397-8200
1-800-800-1020
© 2015–2016 Garmin Ltd. or its subsidiaries
  • Page 1 1
  • Page 2 2
  • Page 3 3
  • Page 4 4
  • Page 5 5
  • Page 6 6
  • Page 7 7
  • Page 8 8
  • Page 9 9
  • Page 10 10
  • Page 11 11
  • Page 12 12
  • Page 13 13
  • Page 14 14

Garmin PRO Control® 2 Remote Launch System Owner's manual

Category
Pet care
Type
Owner's manual
This manual is also suitable for

Garmin PRO Control® 2 Remote Launch System helps you train your dogs effectively, with a range of up to 1,200 yards, waterproof construction, and long battery life. Using handheld device, you can activate a variety of remote devices connected to your dog's receiver collar, such as remote launchers and releasers.

Ask a question and I''ll find the answer in the document

Finding information in a document is now easier with AI