Page is loading ...

LIMITED 90 DAYS WARRANTY
iPets warrants this product to be free of defects in parts, materials and workmanship
for a period of 90 days, from date of purchase.
Should any repairs or servicing under this warranty be required, contact Customer
Service by phone or email for instructions on how to pack and ship the product to
iPets.
iPets CUSTOMER SERVICE
Telephone: 1-866-877-7949 (USA & Canada only)
Email: service@ipets-mall.com
Hours: Weekdays 9:00 AM- 6:00 PM EST
This warranty gives you specific legal rights and you may also have other rights
which vary from state to state.
15
Common size of different dogs
Size Neck
(cm)
Chest
Measurement
(cm)
Back
Length
(cm)
Type
Mini
20-22
25-30
19
Chihuahua, Yorkshire
Termier
Small
20-24
29-36 23
Chihuahua, Yorkshire
Temier, Poodle, Pomeranian
Medium
23-28 35-42
28
Maltese Dog, Shih Tzu
Large
27-31
41-47
31
Miniature Schnauzer,
Pekingese
large
30-34 46-53 35
Schnauzer, English
Cocker Spaniel
Large
33-37
52-59 40
Beagle
47-52 88-97 65
Labrad or Retriever
52-62 92-110 70
Golden Retriever, Old
English Sheepdog
Huge
43-48
76-84 60
Husky

Table of Contents:
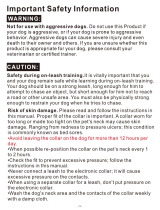
Important Safety Information
WARNING: NOT FOR AGGRESSIVE DOGS. Do not use this product if your dog
is aggressive, or if your dog is prone to aggressive behavior, Aggressive dogs can
cause severe injury and even death to their owner and others. If you are unsure
whether this product is appropriate for your dog, please consult your veterinarian
or certified trainer.
CAUTION:
Risk of skin damage: Please read and follow the instructions carefully in this guide,
Proper fit of the collars is important because a loose collar may cause inconsistent
performance. A collar worn for too long or made too tight on the pet's neck may
cause skin damage, ranging from redness to pressure ulcers (commonly known
as bedsores). These collars can cause pressure necrosis if used incorrectly and
is often misidentified as burns.
Avoid leaving the collar on the dog for more than 12hours per day.
When possible reposition the collar on the pet's neck every 1 to 2hours.
Check the fit to prevent excessive pressure, and it is okay to trim any excess
strap length.
Never connect a lead to the electronic collar because it may cause excessive
pressure on the contacts.
Wash the dog's neck area and contacts of the collar weekly with a damp cloth.
Examine the contact area daily for signs of a rash or a sore.
If a rash or sore is found, discontinue use of the collar until the skin has healed.
If the condition persists beyond 48 hours, see your veterinarian.
These steps will help your pet safe and comfortable. Millions of pets are comfortable
while wearing stainless steel contacts. Some pets are sensitive to contact pressure.
You may find after some time that your pet is very tolerant of the collar. If so you
may relax some of these precautions. It is important to continue daily checks of
the contact area. If redness or sores are detected, discontinue use until the skin
has fully healed.
Thank you for choosing the iPets brand! You and your pet deserve a companionship
that includes memorable moments and a shared understanding together. Our
mission is to ensure your pet's safety by providing you the tools and techniques
to successfully train your pet. Should you have any queries, please contact our
customer service.
NOTE: Please charge before using the product.
Important Safety Information....................................................................... 2
Components.............................................................................................. 3
How the dog training system works?.............................................................4
Features....................................................................................................4
Key Definitions...........................................................................................5
Collar Receiver...........................................................................................6
Operating Guide.........................................................................................6
Step 1 - Prepare the Remote Transmitter and Receiver Collar................... 6
Step 2 – Pairing Collar Receiver to Transmitter........................................ 7
Step 3 - Test the Training System Functions.............................................8
Step 5 Re-thread the collar (as diagram)................................................11
Frequently Asked Questions......................................................................12
Troubleshooting.......................................................................................13
Step 4 – Assemble and Fit the Collar Receiver........................................10
General Training Tips................................................................................14
LIMITED 90 DAYS WARRANTY..................................................................15
iPets CUSTOMER SERVICE......................................................................15
1 2
Remote Transmitter.................................................................................... 5

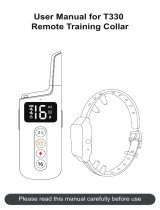
Components:
PET619-1(1 for 1)
PET619-2(1 for 2)
How the dog training system works?
iPets products are reliable, effective, and comfortable for large or small dogs.
The system assists in controlling your dog without a leash in a range up to 330
yards away! Instantly send a signal from the Remote Transmitter, which activates
your dog's Collar Receiver. The dog will receive an annoying but safe, harmless
stimulation. With correct, consistent use of this product, the dog will associate his
misbehavior with your corrections, and soon enough, you will have a well-trained
dog. This particular model features adjustable levels of stimulation, enabling the
user to tweak accordingly to the dog's temperament, removing the risk of over
stimulation.
Features
Rechargeable Remote Transmitter and Collar Receiver.
Waterproof Remote Transmitter and Collar Receiver.
100 intensity levels of Vibration.
100 intensity levels of Static Shock.
Standard Tone.
Easy to use, adjustable Intensity Dial.
Simple, ergonomic design layout.
Quick and straightforward pairing process.
Range of 330 Yards.
Capable of simultaneous control of two dogs (extra receiver is purchasable).
Adjustable TPU strap to accommodate any size of dog.
Auto-off feature to conserves power when not in use to extend battery life.
Remotely turn on/off Collar Receiver.
3
4

Key Definitions
Remote Transmitter
1. Antenna: Transmits signal from Remote Transmitter to the Collar Receiver.
2. Transmitter Indicator Light: Flashes green when any of the stimulation buttons
are pressed. Will blink red if battery power is low to indicate the transmitter needs
recharging.
3. Intensity Dial: Rotate the dial to adjust the level of vibration or static shock
stimulation from 0 to 100.
4. Toggle Switch (Dog Selection): Switches control between Collar Receiver 1
or Collar Receiver 2 (Dog 1 or Dog 2).
5. Vibration Button: Delivers vibration to a Collar Receiver, depending on the
position of the Toggle Switch.
6. Stimulation Button: Delivers electronic pulse stimulation to a Collar Receiver,
depending on the position of the Toggle Switch.
7. Sound Button: Delivers a sound to a Collar Receiver, depending on the position
of the Toggle Switch.
8. Charging Port: Charges the battery of the Remote Transmitter when connected
to a power source.
Collar Receiver
1. ON/OFF Button: Powers on/off the Collar Receiver and used for Pairing or
Synchronization of the Collar Receiver to the Remote Transmitter.
2. Electrodes: Contact points cover the electrodes, and through them electronic
pulse stimulation is delivered.
3. Charging Port: Charges the battery of the Collar Receiver when connected to
a power source.
4. Indicating Light: Flashes green when any of the stimulations are pressed.
Will blink red if the battery power is low to indicate the Collar Receiver needs
recharging.
Operating Guide
Step 1 - Prepare the Remote Transmitter and Receiver Collar:
Charge the Remote Transmitter and Receiver Collar
1. Uncover the Charging Port by lifting the rubber cover.
2. Insert the charging connector into the Charging Port.
3. Plug the charger into a standard wall outlet.
4. A solid red light will appear on the Indicator Light, indicating charging
is occurring.
5. Once charging is complete, the solid red light will turn to a solid green
light.
6. Remove the charging connector, and replace the rubber cover to protect
the Charging Port.
Step
1
5
6
Antenna
LED indicator
Channel button
Charging hole
Static shock mode
Vibration mode
Beep mode
1-100 level
Metal Probes
ON/OFF/Encode
Button
Rubber Cover
Charging Hole

Step
2
Powering on and off the Remote Transmitter
There is no need to turn off the transmitter. When there is no buttons
being pressed on transmitter, the unit turns off automatically. Press any
button and the transmitter will power back on automatically.
Powering on and off the Collar Receiver
There are two ways to power on and off the Remote Collar Receiver:
Option 1:
Press the ON/OFF button on the receiver to power the unit on or off. When
the receiver is powered on, the indicating light will flash green.
Option 2:
Press and hold the Vibration and Sound Button at the same time for a
few seconds to turn on or off the receiver. Please note, this feature can
only be utilized if the distance between the transmitter and receiver is
less than 100 feet or 30 meters and the transmitter and receiver must
already be paired.
Step 2 – Pairing Collar Receiver to Transmitter
Note: Transmitter and receiver are pre-paired when leaving our
manufacturing facility. In case the pairing is not established or you would
like to repair the units, please follow the instructions below:
1. Power on the Collar Receiver by pressing the ON/OFF button on the
Collar Receiver.
2. Press and hold the ON/OFF button for about 3 seconds until a beep
sounds, and the indicating light will begin flash quickly.
3. Press any button on the transmitter once the Collar Receiver beeps.
When the Remote Transmitter and Collar Receiver are paired successfully
the indicating will stop flashing quickly.
4. If needing to pair a second Collar Receiver, follow the same steps but
first push your Toggle Switch in the other direction.
Step 3 - Test the Training System Functions
The testing methods will help determine whether the training system is
functioning as intended and will also teach you how to operate the system.
Please ensure that the pairing process is complete before attempting to
test the functionality.
Testing the Electronic Pulse Stimulation
Electronic Pulse Stimulation Tester
In your package that you received, you will find a clear almost translucent
plastic piece that has a light bulb/fuse in the middle of it. This is your
Electronic Pulse Stimulation tester. This component DOES NOT attach
to the Collar Receiver by any means and is only for testing the static shock
mode. To test the Electronic Pulse Stimulation, follow these steps:
1. Put the test light over the Electrodes of the Collar Receiver you wish
to test.
2. Ensure the Toggle Switch is in the correct position for the Collar Receiver
you're testing.
3. Adjust the Intensity Dial off of 100.
4. Press the Static Shock Button on your Remote Transmitter.
5. If done correctly, the test bulb should flash orange indicating the
electronic pulse stimulation is operating correctly.
Step
3
8
7
Note: Before first use, charge the Remote Transmitter and Receiver Collar
until completion.
(Figure 3-1)

Step
4
Step 4 – Assemble and Fit the Collar Receiver
Attaching the Collar Strap to the Collar Receiver
The Collar Receiver attaches to the Collar Strap by sliding through the
tabs on e ach si de and g oing w rapp ing ar oun d the bac k of the C olla r
Receiver. To accomplish this correctly, please view the diagram below:
(Include diagram/picture of the collar strap attaches to the collar receiver.)
Make sure it's the collar receiver for the model mentioned.
Fitting the Collar Receiver
Important: The proper fit and placement of the Collar Receiver is essential
for effective training. The electrodes must have direct contact with the
dog's skin.
(1) To fit the Collar Receiver, attach the Collar Strap to the Receiver.
(2) With the dog standing in front of you, place the Collar Receiver around
the dog's neck, so the receiver box and Contact Points are on the underside
of your dog's neck, making direct contact with the dog's skin. If direct
contact is not possible, shaving some fur away, to ensure good contact
is recommended.
(3) Fasten the collar strap. The fit should be snug, but not taut. A finger
should be able to be placed beneath the collar strap when around the
dog's neck.
(4) Allow the dog to wear the Collar Receiver for several minutes and
check the strap again. The dog will soon become more familiar with the
Collar Receiver, so it is crucial to ensure the fit comfortable and flattering.
10
9
Testing the Vibration Functions
1. Ensure the Toggle Switch is in the correct position for the Collar Receiver
you're testing.
2. Adjust the Intensity Dial off of 100.
3. Press the Vibration Button on your Remote Transmitter.
4. If done correctly, the Collar Receiver will vibrate.
Testing the Sound Functions
1. Ensure the Toggle Switch is in the correction for the Collar Receiver
you're testing. Press the Sound Button on your Remote Transmitter.
2. If done correctly, the Collar Receiver will emit sound.
(Figure 3-2)
(Figure 3-3)
Note: If wanting to test the shock function on yourself, please ensure your
finger or hand is across both contact points to ensure the connection
is complete. Otherwise, user will feel no stimulation.
CAUTION: RISK OF SKIN DAMAGE
For comfort, safety and effectiveness of this product please check
the fit of the dog's collar frequently. If observing any skin irritation,
immediately discontinue use of the collar for a few days. If the skin
condition persists beyond 48 hours, consult a veterinarian. These
collars can cause pressure necrosis, commonly known as bed sores,
if used incorrectly and is often misidentified as burns.

Frequently Asked Questions:
How old does the dog have to be before using the system?
Your dog should have learned basic obedience commands such as, “sit” or “stay.”
The Collar Receiver might be too large for dogs under 15lbs.
Once my dog completes training and is been obeying my commands, will he
have to wear the collar?
Probably not, but you may try to reinforce training with the collar.
Can I use the iPets rechargeable training collar with more than one dog?
Yes, you just need to purchase another Collar Receiver for the system.
Is the Collar Receiver waterproof?
Yes, but always ensure that the Rubber Cover seals the Charging Port.
Can I replace the Collar receiver with another kind of collar?
No.
Can I attach a leash to the Collar Receiver?
No, this can result in pulling the Contact Points too tightly against the dog's neck.
Attach a leash to a separate, nonmetallic collar or a harness. Ensure the extra
collar does not put pressure on the Contact Points.
12
11
Do not attach a leash to the collar, which can result in squeezing the
Contact Points too tightly against your dog's neck.
The design of the Collar Receiver discourages constantly wearing
the device. iPets recommends the collar not be worn for more than
12 hours out of every 24-hour period.
Most dogs feel uncomfortable when wearing the collar for the very
first time. Do not use any functions until the dog is accustomed to
the collar.
iPe ts s ugg es ts g ivi ng t he d og, t he v ib rat io n stimu la tio n be fo re
following it with a static shock. After training for a while using this
method, the dog will be aware that after vibration comes a static
shock. Vibration will act as a warning, and static shock only acts as
a menace that might be necessary sometimes.
Step 5 Re-thread the collar (as diagram)
Regular Maintenance
Ensure Contact Points are not too tight on a weekly basis.
Rinse the Contact Points with alcohol on a weekly basis.
Check the dog's neck for irritation and wash the dog's neck on a
weekly basis.
Feel free to cut any additional Collar Strap material if it's too long
for your dog.
Step
5
How long can I leave the Collar Receiver on my dog?
The design of the collar discourages constant wearing. We recommend not having
the dog wear the collar for more than 12 hours out of every 24-hour period.
Is the training system suitable for all dogs?
The collar is adjustable from length 5.9” (15cm) to 19.6” (50cm), if the dog's neck
circumference is smaller than 5.9”, you will be forced to rethread the collar, if the
dog's neck circumference is larger than 22”, this collar may not be suitable for the
dog. This collar is not suitable for dogs under 15lbs.

General Training Tips:
Follow these tips on how to get the best out of your iPets Training Collar.
(1) Make training sessions short and positive (between 10-15 minutes long for
each session.) This will enable the dog to keep its attention focused on the trainer.
(2) Train one dog at a time.
(3) During the first initial training sessions, keep the dog in a familiar outdoor
environment. Training in new locations may cause the dog to become distracted,
causing you to reinforce commands with the Collar Receiver more than necessary.
(4) Use a long leash fastened to a non-metallic collar to help the dog's learning.
Ensure the additional collar and leash does not interfere with the Contact Points
on the Collar Receiver. Do not use the remote training collar without a long leash
until your dog is fully trained.
(5) More success will occur by teaching the dog a command first before trying to
reinforce the command with the Remote Transmitter.
(6) For basic obedience training, vibration is more useful.
(7) Issue one obedience command at a time, this will reduce confusion and allow
the dog to remain focused. Do not use the training system for commands that the
dog has not learned.
(8) During training, look for all the positive changes in the dog's behavior and
remember to reinforce them promptly with ample praise and reward.
(9) Avoid over-correcting your dog. Use as little remote correction as possible
during the training process.
(10) When the dog has become apparently perplexed, shift the focus of the training
by drawin g the dog's at tenti on to a c omman d t hey have fa milia rity. Ex ample :
Tell the dog to sit and give abundant praise and encouragement on successful
completion of the sit command.
(11) Do not use the training system to correct or eliminate forms of aggression or
biting behavior. When the dog is showing signs of aggressive behavior, immediately
contact a professional dog trainer in your local area.
(12) Please keep in mind, that you should keep training sessions short and end
every session on a high note. Stop training and play with the dog as soon the dog
has accomplished a new level of proficiency.
If needing more training tips, please visit us at www.ipets-mall.com or www.facebook.
com/ipetsmall for plenty of resources.
13
14
Ensure the Remote Transmitter and Collar Receiver are powered on.
Check the intensity levels of vibration and static shock, making sure it is not
set to 0.
Ensure the Collar Receiver has sufficient power to operate.
Check the collar to ensure it fits snugly against your dog's neck.
If tested for all of the above and the dog is still not responding, please try re-
pairing the Remote Transmitter and Receiver Collar.
The Remote Transmitter does not work.
Check the battery status of the Remote Transmitter.
If the battery is low, please recharge the Remote Transmitter
My collar-receiver works great for some time, yet it does not work after charging.
First, check if the receiver has been charged correctly. Check the “prepare
the collar receiver” part of the guide for the correct charging method.
Check if the receiver has been powered on.
I want to test the Collar Receiver on myself, but it does not work.
When testing the Collar Receiver with your hands, please touch the two
electrodes simultaneously, as touching one electrode will not work.
Troubleshooting
My dog is not responding after successfully setting up the training system.
Charge the Remote Transmitter and Collar Receiver for 6 hours, separately
before first use.
/