Page is loading ...

FOR MORE INFORMATION:
CALL 13 2200
VISIT telstra.com/tbox
VISIT A TELSTRA STORE OR PARTNER
133860 – T-Box User Guide

ALL YOU
NEED TO KNOW
ABOUT YOUR NEW
TELSTRA TBOX
®

2
Everything you need is here. Your T-Box is how
you watch movies and TV at home, with ease.
Step inside a digital library of on demand
movies, watch and record your favourite TV
programs with the personal video recorder,
sit back and relax. The T-Box even brings you
a full range of internet TV channels and
on-demand content. It’s time to entertain the
whole family and its time to watch what you
want, when you want.
This user guide will make sure you get the
most out of your T-Box, so you can start
enjoying all of the benets waiting for you
and your family.
HELLO, IT'S TIME
TO MEET YOUR
TELSTRA TBOX
®

01
WHAT’S
INSIDE
03 KEEP SAFE
03 Before you set up your T-Box
®
04 Before you switch your
T-Box on or off
04 Before you start using your T-Box
05 Before you replace the remote
control battery
05 Before you throw away any parts
or packaging
06 SAY HELLO TO YOUR NEW TBOX
06 Here's what you can look forward to
06 Give yourself a box seat
07 The benets of a BigPond
®
broadband connection
07 Enjoy the show
08 OUT OF THE BOX AND INTO THE NEW
08 What’s in the box?
08 Getting to know your T-Box
09 Making the right connections
09 Connecting T-Box to your TV
11 Setting your TV format
11 Connecting T-Box to a home
theatre system
11 Remote control at the ready
11 Putting the power in your hands
12 Entering text
13 LET’S GET SET
13 Pair your remote control to your T-Box
14 Set a Parental Control PIN
14 Connect to the Internet
15 Making your connection
19 Tune in digital free-to-air TV
20 Register your T-Box, join BigPond
Movies and subscribe to Foxtel
22 LET YOUR TBOX WORK FOR YOU
22 The Home menu
22 Watching what you like
25 Time Shift features
25 The Program Guide
26 Checking a TV channel’s
homepage
27 Recording your favourite programs
29 Playing recorded programs
and movies
29 Using my recordings
30 Features in My Recordings
31 Accessing BigPond Movies
32 Browse BigPond Movies
33 Paying for BigPond Movies
34 Using a BigPond voucher once
a movie has been selected
35 Using a BigPond Voucher through
'My T-Box Account'
35 Using My Rentals
35 Accessing and subscribing to
Foxtel on T-Box
37 How Foxtel on T-Box works
38 The play menu and
program options
38 Managing your settings

02
42 A FEW USEFUL BITS
42 LED status indications
42 Standby mode
42 Sleep mode
42 Updates
43 Reset options
44 PROBLEM SOLVING
44 Trouble with your remote control
pairing and connectivity
46 T-Box
®
freezing
46 T-Box power issues
47 Trouble with BigPond
®
Movies
48Trouble with your account
48 Trouble with registering your
T-Box or signing up to movies
49 Trouble with hard drive checks
49 Trouble with your internet connection
51 Trouble with your program guide
51 Trouble with free-to-air
channel reception
52 Trouble with multi-recording
54 Trouble with recording
55 Trouble with your picture
56 Trouble with Foxtel on T-Box
56 Trouble with BigPond TV
58 THE WORKING CONDITIONS
58 PRODUCT WARRANTY
60 THE LEGALS
61 TECHNICAL INFO

03
WARRANTY WARNING: All repairs need to be carried out by a qualified Telstra
technician. Do NOT try to repair or replace any part of your T-Box
®
yourself. Not only is
it dangerous, but any attempt to open, modify or dismantle your T-Box or its software
will immediately void your warranty, subject to any other rights or remedies that are
available to you under law, which cannot be excluded. See page 58 for details
KEEP
SAFE
For your own safety, please read the following instructions:
BEFORE YOU SET UP YOUR TBOX:
•YourT-BoxanditsaccessoriesaredesignedtobeusedinAustralia,insidethehome.
•KeepyourT-Boxanditsaccessoriesincludinganyplastic,packagingand
batteries out of reach of children
•OnlyusecordsandaccessoriesthatareprovidedwithorrecommendedforyourT-Box
•AvoidsituationswhereyourT-Boxcouldfall,bedroppedorbumped
•KeepyourT-Boxanditsaccessoriesshelteredfromanyheatsource,humidity,
dust and direct sunlight
•DonotplaceyourT-Boxoritsaccessoriesnearanelectromagneticsource
•YourT-Boxmustbeplacedonarmandatsurfacetoavoidanypossibilityofit
falling or being bumped
•Leaveatleast3cmofspacearoundandaboveyourT-Box,toensureadequate
ventilation for cooling
•NeverobstructtheventilationopeningsonyourT-Boxwiththingslike
newspapers, tablecloths or curtains, as it may overheat
•Don’tputanythingontopofyourT-Box
•NeverattempttoinsertanythinginsideyourT-Box,apartfromusingtheUSB
ports and plugs
•Neverputanyopename,suchasalitcandle,onornearyourT-Boxoritsaccessories
•KeepyourT-Boxandaccessoriesinamoderatetemperaturerange–onlyuse
the T-Box in a temperature range of 0°C to 45°C
•ProtectyourT-Boxanditsaccessoriesfromspillsandsplashes,andneverput
any vases or drinks on top of the equipment
•MakesureyouunplugthepowersupplytoyourT-Boxbeforeyouconnectany
audio, video or network equipment

04
BEFORE YOU SWITCH YOUR TBOX
®
ON OR OFF:
•Pressthepowerbuttonontheremotefor3secondsuntilyouseetheon-screen
message ‘Entering sleep mode; please wait.’ Only when the T-Box powers down,
is it safe to then switch off from the power point
•NeverpullthecordoutoftheT-Boxdirectlyasitcouldcauseissueswithyour
T-Box hard-drive
•Avoidconnectingtoomanydevicestothesameelectricpowersource,otherwise
you could cause an overload that leads to electric shock or a re
•OnlyusethepowersupplycordprovidedwithyourT-Box.Thiscordshouldnot
be used for any other devices
•DonotconnectyourT-Boxtoanon-standardAustralianpowerpoint
•Makesureyoupushthepowersupplyplugrightintothepowerpoint.Apoor
connection could cause an electric arc, shock or re
•Wheneveryoudisconnectthepowersupply,rstswitchoffthepowerpointand
then pull the plug out by the adaptor block – never by the cord
•ThepowerpointisusedtoturnofftheT-Boxsomakesureyou’llhaveeasy
access to the switch
BEFORE YOU START USING YOUR TBOX:
•Whenyou’renotusingyourT-Box,leaveitinstandbymode
•Duringstorms,andwhenyouleaveyourhomeforalongperiod,werecommend
disconnecting your T-Box from its power supply
•MakesureyoudisconnectyourT-Boxfromthepowersupplybeforeyoucleanit
•Thesurfacecanbecleanedwithasoft,slightlydampcloth–butdonotuseany
abrasive or alcohol based products
IMPORTANT: before disconnecting the power supply, first turn your T-Box off.
IMPORTANT: There is a risk of explosion if you use the wrong type of battery.
Take the old battery as a sample when you purchase a replacement, and ask
a specialist for advice if you’re not sure.

05
BEFORE YOU REPLACE THE REMOTE CONTROL BATTERY
•Neverattempttorechargeyourremotecontrolbattery
•Donotexposethebatterytohightemperaturesordirectsunlight
•Neverattempttodismantleoldbatteriesorexposethemtore
•Donotputbatteriesinyourdomesticrubbish–useanappropriatedisposal
or recycling service
BEFORE YOU THROW OUT ANY PARTS OR PACKAGING
Please consider the environment when you dispose of any T-Box
®
materials.
The packaging your T-Box came in is recyclable, please sort and dispose of it
accordingly and in line with local laws. When your T-Box reaches the end of its
life please dispose of it correctly.

06
SAY HELLO TO
YOUR NEW TBOX
®
Thanks for choosing the Telstra T-Box
®
.You’renowtheproudownerofaDigital
Set Top Box, which can bring you movies and other great content from the
internet, as well as free-to-air broadcast TV channels.
HERE'S WHAT YOU CAN LOOK FORWARD TO:
•DigitalTV.Tuneinandwatchallthestandarddenitionandhighdenition
free-to-air digital TV channels available in your area
•PersonalVideoRecorder.Recordandwatchprogramswhenitsuitsyou.
There’s even a Series Record feature, so you can automatically record every
episode of your favourite show
•BigPond
®
Movies. Enjoy Hollywood blockbusters and award-winning
Australian lms
•BigPondTV.WatchBigPondTVonlinechannelsonyourTV.
•SubscriptiontoFoxtelonT-Box(ifeligible)
•BigPondVideos.Watchanyofthevideoclipsfromourhugecollection
on demand, whenever it suits you
•ProgramGuide.Seewhat’sonwithanElectronicProgramGuideforthe
coming week - complete with images, program details and one touch recording
•ApplicationsincludingtheAFLGameAnalyser,YouTubeandPicasa
GIVE YOURSELF A BOX SEAT:
Getting the most out of your T-Box features and viewing options is easy.
This User Guide will be a big help to you. Plus you should make sure you:
•UsetheGettingStartedGuidetoinstallyourT-Box
•ConnectyourT-BoxtotheinternetthroughaneligibleBigPondbroadbandService.
Please refer to your Getting Started Guide for the best connection options
•RegisteryourT-Box
•SignupforBigPondMovies
•SubscribetoFoxtelonT-Box(ifeligible)

07
THE BENEFITS OF A BIGPOND
®
BROADBAND CONNECTION:
YoureligibleBigPondbroadbandconnectionisthekeytogettingthemostfrom
your T-Box
®
. Along with access to a world of great content, using your BigPond
broadband connection means you’ll be able to enjoy the benets of:
•RemotesoftwareupdatesautomaticallydownloadedandinstalledonyourT-Box
so that you are always up to date
•AccesstoallthecurrentT-Boxfeatures,aswellasanynewfeatureswhen
they’re launched including:
•ContentsuchasBigPondMovies,BigPondTV,FoxtelonT-Box(ifeligible)
and BigPond Videos
•7dayProgramGuideforfree-to-air,BigPondTVandFoxtelonT-Boxchannels
•AllMyRecordingsfeaturessuchasonetouchrecord,SeriesRecord,
Reminders and Favourites
•ApplicationsincludingtheAFLGameAnalyser,YouTube
®
and Picasa
ENJOY THE SHOW:
Even without its BigPond broadband connection, your T-Box can still give you a
great range of viewing features:
•Enjoyallthefree-to-airdigitalTVchannelsavailableinyourarea
•Watchonechannelwhileyourecordanother
•Pauseandrewindlivefree-to-airTVprograms
•GetinformationaboutcurrentandupcomingTVprogramsvia'NowandNext’Guide
•Manuallyrecordprogramstowatchlater
IMPORTANT: During set up, we recommend that you connect your T-Box to an eligible
BigPond broadband service such as ADSL2+, Cable, Velocity or a Telstra broadband
serviceontheNationalBroadbandNetwork(NBN)providedoverbre.Ensureyour
T-Box remains connected to the internet through your BigPond broadband service so
that you receive all these features including the latest software updates on your T-Box.
If for some reason you have not connected your T-Box to the internet using a BigPond
broadband service we will only be able to provide limited support for your T-Box. For
the best experience, connect your T-Box via an Ethernet network cable or use a Home
Network Extender to your modem.

08
OUT OF THE BOX
AND INTO THE NEW
WHAT'S IN THE BOX?
Here’s what you should nd when you rst unpack your T-Box
®
:
•YourTelstraT-Box
•Powersupplycord
•RemotecontrolwithtwonewCR2032batteries
•TVaerialcable(2m)
•TVaerialadaptor
•HDMIvideocable(1.25m)
•Mini-DIN-to-Composite/Componentvideocable(1.25m)
•Ethernetnetworkcable(3m)
•GettingStartedGuide
•ThisUserGuide
•GettingStartedDVD
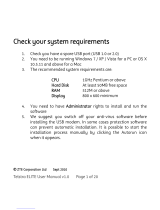
GETTING TO KNOW YOUR TBOX
Youdon’tneedtoknowhowyourT-Boxworkstoenjoyusingit.Butwe’llbe
referringtovariouspartsandports(plugs)inthisguide,soit’sworthbeing
familiar with what bits are where.
T-Box
External TV Aerial
BigPond
®
Modem
High Denition TV

09
MAKING THE RIGHT CONNECTIONS
Now that you know your way around, and you’ve read the Safety Information
you’re ready to set up your T-Box
®
.
It’s not hard to connect it to the power supply, the BigPond
®
broadband Internet
serviceandyourTV(plusyourhometheatresystem,ifyou’vegotone).Just
follow Steps 1 to 6 in the Getting Started Guide, then follow the on-screen
instructions. Easy.
CONNECTING YOUR TBOX TO YOUR TV
YourT-BoxwillworkwitharangeofTVsandthedifferentcablesintheboxwilllet
you set up one of three different connections.
1. HDMI (recommended)
Connect your T-Box to your TV with the HDMI cable provided. The HDMI cable
carries Audio and Video to your TV set, so it’s all you need.

10
2. Component (HD Option)
YoucanalsousetheMini-DIN-to-Composite/ComponentcableforHDTV.
Connect the round black plug end to your T-Box
®
. Then connect the blue, green
and red video plugs to your TV's video inputs; and the red and white audio plugs
to the TV’s audio inputs.
3. Composite (non-HD)
If your TV doesn’t support HD inputs, you can connect the round black plug on
theMiniDIN-to-Composite/ComponentcabletoyourT-Box,thenconnectthe
yellow video plug to your TV’s video input, and the red and white audio plugs
to the TV’s audio inputs.

11
SETTING YOUR TV FORMAT
All the menus and screens on your T-Box
®
have been optimised for display on
widescreen 16:9 TV screens. So, to enjoy the best possible picture, make sure your
T-Box is connected to a TV labelled either ‘Full HD’ or ‘HD Ready’, using the HDMI cable.
If you connect to a standard 4:3 aspect ratio screen, or you just use the Mini-
DIN-to-Component/Compositecablewithcomponentorcompositeconnectors,
your picture will be of lower quality, and you’ll need to select the 4:3 TV Option
during the on-screen set-up process.
CONNECTING YOUR TBOX TO A HOME THEATRE SYSTEM
Great sound can make an incredible difference to your entertainment experience.
So you might want to enhance your T-Box by connecting it to a home theatre or
Hi-Fi sound-system.
YourT-Boxhasdigitalaudio(S/PDIF)andRCAaudio(leftandright)connectors
that you can use. However you’ll need either digital audio optical cable or RCA
audiocables,whicharen’tincludedwithyourT-Box.Youcanpurchasethese,
and any additional accessories, from any good electronics retailer.
REMOTE CONTROL AT THE READY
To make life easy, we’ve designed a dedicated remote control that only has the
buttons you’ll need to drive your T-Box.
This controller uses radio signals rather than infrared light, so it doesn’t even
have to be pointed directly at your T-Box to work. Its effective range will depend
on the layout of your home and where you place your T-Box.
PUTTING THE POWER IN YOUR HANDS
Before you can actually use your T-Box remote control, it will need to be ‘paired’
with your T-Box. We’ll show you how to do that on page 13. But rst, the remote
control is supplied with new batteries installed – along with a special yellow
plastic insulator that stops the batteries from being drained in transit.
You’llneedtoremovethisyellowstripfromtheremotecontrolbattery
compartment when you’re setting up your T-Box. Here’s how to do that:
•Openthebatterycoverbyslidingitdownwards
•Pullawaytheprotectivestrip
•Makesurethebatteriesareinsertedcorrectly
•Closethebatterycover

12
ENTERING TEXT
The remote control also features ‘multi-tap’ keys that you can use to enter text.
It’s just like writing SMS text messages with a conventional mobile phone keypad:
•Pressthe2to9keysrepeatedlyuntilyougettheletteryouwant.Youcanenterupper
and lower case letters by continued presses
•Pressthe1keyrepeatedlytogetafullstoporcomma
•Pressthe0keytoenteraspace

13
LET'S
GET SET
Get ready to be entertained! The Getting Started Guide will help you connect
your T-Box
®
toyourTVaerialcableandTVset.Justfollowtheon-screenprompts
to set up your preferences and BigPond
®
broadband connection.
Once that’s done, your T-Box will check for any software updates and install
them for you. Please don’t try to use your T-Box until after your T-Box restarts
itself with any new software that might be available. Then you can enjoy all the
very latest features – and everything your T-Box has to offer. But rst, here’s
some more in-depth information about the steps that you'll go through in the
on-screen instructions.
Please connect your T-Box to your TV as described earlier in this guide and
switchonyourT-BoxandTV.There’snophysical‘on/off’buttonontheboxitself.
Please use the Power button on the top right corner of your remote control.
•Pressthepowerbuttonontheremotefor3secondsuntilyouseetheonscreen
message ‘Entering sleep mode; please wait.’
•Thenswitchofffromthepowerpoint.NeverpullthecordoutoftheT-Boxdirectly
as it could cause issues with the hard drive of your T-Box
PAIR YOUR TBOX REMOTE CONTROL TO YOUR TBOX
YouneedtopairyourremotecontrolwithyourT-Box,tomakesurethetwo
devices are ‘talking to each other’ properly.
First, check page 11 to make sure you’ve prepared your remote and activated the
batteries. Then just use your remote control to enter the pairing code shown on
your TV screen.
Re-enter the code when you’re asked to, and conrm the connection. It’s that easy.
If you ever need to pair your remote control again, refer to page 43 for
instructions on using the Reset Button under your T-Box.
WARNING: Before disconnecting the power supply, rst turn your T-Box off.
Here is how to correctly power off your T-Box:
Note: If you’ve previously used your remote with another T-Box, or you’ve just
resetyourT-Box,you’llneedtocancelanypreviouspairingcodes.Youcandothis
by pressing and holding the remote’s 1 and 7 buttons together for 5 seconds.

14
SET A PARENTAL CONTROL PIN
YouneedtosetaParentalControlPINduringyourT-Box
®
set-up, even if you
don’t intend to use it.
When prompted by the on-screen instructions, enter a 4-digit Parental Control
PINusingthenumericalbuttonsonyourremotecontrol.You’llbeaskedto
conrmyourPINagainbyre-enteringit.You’llalsobeaskedonthenextscreen
to select the type of content you would like to restrict from viewing on the T-Box.
If you select ‘No restrictions’, you’ll be able to watch all content on your T-Box
without any restriction.
Make sure you keep a secure record of the PIN you set, as you’ll need it to unlock
access to certain channels and programs based on their classication.
The Parental Control function is designed to help you control what channels and
programs are watched in your home. However, it should never replace adult supervision,
and we recommend you be involved in what programs your family chooses to watch.
CONNECT TO THE INTERNET
YourT-Boxdoesn’tjustbringyoufree-to-airdigitalTVchannels–italso
connects to BigPond
®
broadband so that you can watch a range of live BigPond
TV channels, BigPond Videos and choose from movies and TV shows from
the BigPond Movies library. To enjoy all of this extra entertainment, plus the
benets of the latest software updates, you need to connect your T-Box to the
internet through your Wi-Fi enabled multiport Home Network Gateway modem,
compatiblewith802.11g/nandaneligibleBigPondbroadbandconnection.For
more information please visit telstra.com.au/tbox
The speed of your BigPond broadband connection will determine the speed at which
your T-Box can deliver your BigPond TV and Movie services. So when you first connect
to the internet, the available media streaming quality – ‘high’ or ‘standard’ – will be
displayed on screen.
If you want to change this streaming quality later, you can do so from the Settings menu.
See page 56, 'Trouble with BigPond TV' for more information.
YourT-BoxiscompatiblewithBigPondCable,ADSLandVelocityHomeNetwork
Gateways(Wi-Fimodems).Howevertheactualbroadbandspeedavailableon
your T-Box will vary with the number of computers and internet devices using your
access connection at the same time, the type of home network connection and
your BigPond broadband plan.
Note: If you lose your Parental Control PIN you’ll have to reset your T-Box or contact
Telstra Customer Service on 13 2200. To reset your T-Box, see page 43.

15
YoucanaskyourlocalTelstrastoreorpartnerforadviceonhomenetworking
accessories such as Home Network Extenders, compatible modems and plans
or call us on 13 2200.
MAKING YOUR CONNECTION
There are three ways to connect your T-Box
®
to the internet:
1. Use the Ethernet network cable (Recommended)
If your Home Network Gateway or modem is close enough to your T-Box, you’ll
get the best speeds by using the Ethernet network cable provided to connect them.
If your T-Box is a long distance away from your modem, we recommend that you
use a Home Network Extender such as Ruckus or Power line to connect your T-Box
to the Home Network Gateway in order to improve the quality of internet connection.
When you get to the Internet Connection step, follow the on-screen instructions:
Select ‘Connect via Ethernet’ on the screen.
Make sure you’ve connected the Ethernet network cable provided from your
T-BoxtoyourHomeNetworkGateway/modem.PressOKwhenaskedandwait
a few seconds to activate the connection. The connection will be conrmed on
screen after a few seconds, and you can move onto the next step.
2. Use Wi-Fi for a wireless connection
AlthoughitisrecommendedthatyouconnectyourT-Boxtothemodem/
Home Network Gateway using Ethernet cable directly or using a Home
Network Extender device such as Powerline or Ruckus, if you can’t link
your T-Box and Home Network Gateway with an Ethernet cable, a Wi-Fi
connection could be an option.
When connecting by Wi-Fi you need to be aware that there are lots of factors
which will impact the speed of your connection, including the distance between
your T-Box and the Wi-Fi gateway, what’s in between the two of them, and
potentially interference from other electrical devices. In some situations your
T-Box may not be able to locate your Wi-Fi home network, in which case you’ll
need to either move things around or use the Ethernet cable provided.
YoucansetupWi-FiwithyourT-Boxinacoupleofways-eitherwithapassword
orbyusingWi-FiProtectedSetup(WPS).
Before you start setting up your Wi-Fi connection for your T-Box, ensure that
your Wi-Fi modem is powered on.

16
To set up a Wi-Fi connection using your security key or password you’ll need to know:
•ThenameofyourWi-Fihomenetworkname(alsocalledSSID)
•YourWi-Fipassword(alsoknownasyourwirelesssecuritykey)
•WEPorWPAsecurityforyournetwork.YoushouldalwayssecureyourWi-Finetwork
with one of these key codes
If you need to check these details, the default network SSID and password key
will be printed on the underside of your BigPond
®
gateway, on the Wi-Fi key card
supplied with your gateway, or somewhere in its user’s manual.
When you get to the Internet Connection on-screen instructions:
•Selecttheoptiononthescreencalled‘ConnectviaWi-Fi’andpressOK
•SelectyourWi-Finetworknamefromthelist
•EnteryourWi-Finetworkkey/password
•YouwillneedtoenteryourWi-Fikey/passwordusingthemulti-tapalphanumeric
buttons on your remote control. Use the delete button on your remote control
tocorrectanymistakes.Youcanndthedeletebuttononthebottomofyour
remote control
If your Wi-Fi network is masked, choose ‘Other network’ from the list then enter
the name and key of your Wi-Fi network manually:
•SelectOK when you’re ready to check and establish the connection.
•IfyouneedyourT-Box
®
’s Wi-Fi MAC address you can nd this in the System
InformationpageintheSettingsmenu,onpage38.YoucanalsondyourWi-Fi
modem/routerMACaddressonthesamescreen.
If you still can’t connect wirelessly,checkthelightsonyourWi-Figateway/
modem to make sure Wi-Fi is enabled, and use a Wi-Fi enabled device like your
laptop to the check the signal strength at your T-Box.
Note: Be careful to use upper or lower case, as your security information will be
case sensitive.

17
Set up a Wi-Fi connection using Wi-Fi Protected Setup (WPS)
To connect using WPS you will need a compatible Wi-Fi modem or gateway.
Below is the current range of Telstra recognised and supported WPS modems.
If you have your own Wi-Fi modem or gateway check your user manual
to see if it has WPS.
Telstra Supported WPS Wi-Fi modem gateways:
•TechnicolorTG587n3(PremiumHNG)orTechnicolorTG797nV3(T-Gateway)
for ADSL connections
•NetgearCG3100v2orNetgearCGD24Nforcableconnections
•NetgearEVG2000sforVelocityconnections
When you get to the Internet Connection follow the on-screen instructions:
•Selecttheoptiononthescreencalled‘ConnectviaWi-Fi’andpressOK.
•Select‘ConnectusingWPS’
•PrepareyourWi-FimodemtoconnectbypressingandholdingtheWPSbutton.
•Theindicatorlightsshouldashwhilepairing.Itmaytakeafewminutesfor
your T-Box
®
andgateway/modemtopairup
•AconrmationscreenwillbedisplayedonyourTV
Once you have a conrmed connection, you can continue the setup process.
Note: Because your Wi-Fi network can still work if your home network gateway
loses its internet connection, connecting your T-Box to the modem doesn’t
automatically mean you have an internet connection. Please see page 49 for more
information about System Information and network diagnostics.
/