Page is loading ...

1
ZTE F165
Durable HSDPA 3G Mobile Phone
User Manual

2
PC Software Requirements
Join Me PC Software included supports Microsoft Vista, Windows 2000 with Service Pack 4 or
Windows XP with Service Pack 2 only. 64 bit systems or MAC OS are not supported.
Warnings and Safety Notices
Please read all the safety notices before using this device
Copyright © 2007 ZTE Corporation All Rights Reserved.
1
st
Edition August 2007
No part of this publication may be excerpted, reproduced, translated or utilized in any form or by
any means, electronic or mechanical, including photocopying and microfilm, without the prior
written permission of ZTE Corporation.
ZTE Corporation operates a policy of continuous development. ZTE Corporation reserves the right
to make changes and improvements to any of the products described in this document without prior
notice.
Limitation of Liability
ZTE shall not be liable for any loss of profits or indirect, special, incidental or consequential
damages resulting from or arising out of or in connection with using this product, whether or
not ZTE had been advised, knew or should have known the possibility of such damages.
The user should refer to the enclosed warranty card for full warranty and service information.

3
Contents
How to use your belt clip .............................................................................................. 6
Extendable Antenna ......................................................................................................8
RF Safety Information.................................................................................................... 8
General Safety Information......................................................................................... 10
Support and Warranty Information............................................................................. 12
Key Layout.................................................................................................................... 13
Display Icons................................................................................................................15
1. Getting Started.........................................................................................................16
1.1 Install the (U)SIM Card.....................................................................................16
1.2 Insert the Battery..............................................................................................17
1.3 Switch the Phone on and Connect the Charger................................................18
1.4 Charging and Battery Life.................................................................................19
1.5 Basic Navigation ..............................................................................................20
1.6 Enter Your Contacts .........................................................................................22
1.7 Edit Your Contacts to Change Ringtones and Groups......................................24
1.8 Set Speed Dials................................................................................................25
1.9 Make a Call......................................................................................................26
1.10 Receive a Call..................................................................................................28
1.11 Send a SMS (Text Message)............................................................................29
1.12 Emergency Calls..............................................................................................30
1.13 Notes on Text Modes, Predictive Text and Special Characters.........................31

4
1.14 Personalise Your Phone...................................................................................33
1.15 Using File Manager..........................................................................................39
1.16 Make a Video Call............................................................................................42
1.17 Receive a Video Call........................................................................................43
1.18 Set Alarms and Appointments..........................................................................44
1.19 Send an E-mail ................................................................................................46
1.20 Take Pictures and Videos.................................................................................47
1.21 Send a Multimedia Message (MMS) ................................................................49
1.22 Receive a Multimedia Message........................................................................50
1.23 Browse the Internet using Telstra My Place......................................................50
1.24 Download Music, Pictures, Ringtones and Games...........................................51
1.25 Use your Phone as a Music Player (MP3 Player).............................................52
1.26 Synchronize with a Network Server (SyncML)..................................................54
2 Advanced Operation...........................................................................................55
2.1 Use Join Me to Connect your Phone to your PC..............................................55
2.2 Installing Join Me .............................................................................................56
2.3 Use Join Me to Copy your Pictures to your PC.................................................57
2.4 Use Join Me to Copy Music Files from your PC to your Phone........................59
2.5 Enter your Contacts using Join Me...................................................................61
2.6 Import your Contacts from Microsoft Outlook ...................................................63
2.7 Use Join Me to Connect your PC to the Internet..............................................64
2.8 Connect to a Bluetooth Device.........................................................................66
2.9 Other Facilities.................................................................................................70
2.10 Advanced Message Settings............................................................................75
2.11 Advanced Handset Settings.............................................................................77
2.12 Advanced Call Settings....................................................................................78
3 Technical Information and Help.........................................................................80

5
3.1 Troubleshooting and FAQ’s..............................................................................80
3.2 Glossary of Terms ............................................................................................82
3.3 Technical Parameters.......................................................................................83
4 Environmental Statement ..................................................................................84
5 Menu Listing .......................................................................................................86

6
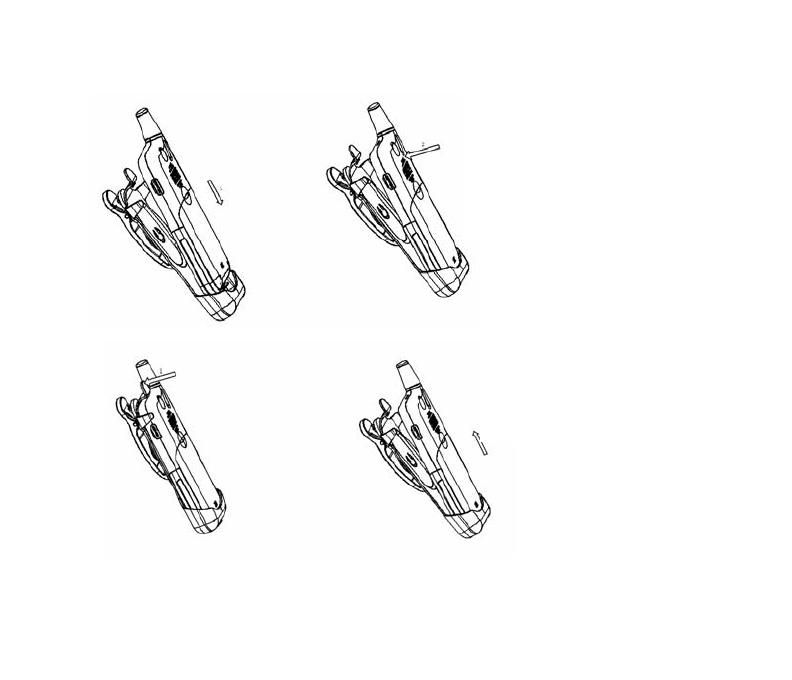
How to use your belt clip
Please Note
The handset will only fit one way into the belt clip. It clips in gently and does not need to be
forced. The screen faces inwards to provide protection and to prevent the screen getting
scratched. Do not force the handset the wrong way into the clip as this will mark the handset
casing.
How to insert your phone into the belt clip
Hold the handset upright with the screen facing the inside of the belt clip.
Insert the bottom of the handset into the bottom of the belt clip.
Gently push the handset in towards the top clip to secure the handset.
How to remove your phone from the belt clip
Gently push the top lever towards the back of the belt clip.
The handset will be released.
7
Insert the handset with the
screen facing towards the
back of the belt clip.
Remove the handset by
gently pressing the top lever.

8
The phone has an external antenna located on the
top of the handset. To get maximum call quality and
coverage you should extend the antenna whenever
you make or receive a call. If you do extend the
antenna, you should pull it out to its full extent. The
antenna should not be left in the half way position
during a call as call quality may be affected.
Extendable Antenna
Note on the Antenna Design:
The antenna is designed with a small insulating frame on
the front of the antenna stub mounting. This moulding
improves the signal strength of the antenna while
reducing the radiation towards the user.

9
RF Safety Information
The handset has an external antenna located on the top of the handset. For optimum
performance with minimum power consumption always extend the antenna fully and do not
cover it with your hand. Covering the antenna affects call quality, may cause the handset to
operate at higher power level than needed, and may shorten talk and idle times.
Radio Frequency Energy
Your handset is a low-power radio transmitter and receiver. When switched on it
intermittently transmits radio frequency (RF) energy (radio waves). The transmit power level
is optimized for best performance and automatically reduces when there is good quality
reception. Maximum power is only used at the edge of network coverage so under most
circumstances the power output is very low. Under poor network conditions the phone will
transmit at a higher power, may get hot and will have a significantly shorter battery life.
Declaration of Conformity
We declare under our sole responsibility that the product(s) detailed in this manual, and in
combination with our accessories, conform with the essential requirements of The Radio
Communications Standard (Electromagnetic Radiation Human Exposure) 2003 and the
Australian Communications and Media Authority Section 376 of the Telecommunications Act
1997.
Liquid Damage - Important Note
The handset has a durable rubber shell but it is NOT waterproof and should not be
immersed in any liquid. The unit contains liquid detecting stickers and liquid damage will be
warranty void. Always close the charger and antenna port covers to maximise protection
against liquid ingress.

10
General Safety Information
The handset contains delicate electronic circuitry, magnets and battery systems. You should
treat it with care and pay attention to the following points:
• Handle the handset with care. Do not
drop or throw the handset down roughly.
• Do not immerse in any liquid. The
handset contains a liquid detection sticker
and the warranty will be voided by any
liquid damage.
• Do not place the handset near computer
disks, credit cards, and other magnetic
media. The information contained on
disks or cards may be erased or
damaged.
• Do not leave the handset or battery in
direct sunlight or near other heat sources
where the temperature could exceed 45
°C.
• Keep the handset, battery, charger and
any other accessories away from
children.
• In the unlikely event of a battery leak
avoid contact with your eyes or skin. In
the event of contact please flush
thoroughly with water and consult a
doctor.
• Observe and obey warning signs at petrol
stations, airports and hospitals.
• The operation of some medical electronic
devices, such as hearing aids and
pacemakers, may be affected by the
handset.
• Take care not to allow metal objects such
as coins or keys to come into contact with
the battery.
• Do not dispose of batteries in a fire.
• Do not throw used batteries into
household rubbish, return them to a
recycling point. (see Chapter 4)
• Do not connect the handset to any other
chargers or cigarette lighter chargers.
• Only use the supplied charger.
• Be careful not to pierce the battery with

11
sharp objects and do not use damaged
batteries.
• Do not disassemble or modify the battery.
• Stop using the battery if abnormal heat,
odour, discolouration, deformation, or
abnormal condition is detected during use,
charge, or storage.
• Do not put the battery in your mouth.
• Only use original batteries. Using any
unauthorized battery may affect your
handset performance or may cause
danger of explosion, etc.
• Only use original replacement batteries.
• Do not attempt to dismantle the handset
or any of its accessories.
• Do not place the handset close to the
edge of a table in case it moves when set
on vibrate mode.
• Do not put the handset into a microwave
oven, dryer, or high-pressure container.
• Do not use your handset while driving or
operating other machinery.
• Do not use the handset where blasting is
in progress.
• Switch your phone off when boarding
aircraft.
• Do not leave your handset at the bottom
of a bag where it may be damaged by
sharp objects.
• Do not leave the handset discharged or
disconnected for a long time, otherwise
your personal data may be lost.
• Remember to make backup copies of all
important data on your handset
• Take care when your phone is in your
pocket. Sitting down may damage the
handset.
• It is normal for the handset to become
warm while the battery is being charged.
• Under poor network conditions battery life
is considerably reduced
• When the battery is thrown away cover
the terminals with insulating tape.
• Please recycle the packaging and all
parts as stated in Chapter 4.
• Please use original accessories or
accessories that are authorized by ZTE.

12
Support and Warranty Information
• For technical support please consult this manual and search our web site and FAQ
section at www.zte.com.au. For Warranty Service in the event of a fault please call 1800
670 796.
• Please do not call the warranty service line for general support enquiries.
• All calls for PIN number enquiries, Network problems, Telstra Next G Services, BigPond
account information, Web Access, Account and Billing Information, (U)SIM card
registration and general enquiries should be directed to Telstra on 125 111.
Warranty Information
The warranty does not apply to defects or errors in the product caused by:
(a) Reasonable abrasion
(b) Misuse including mishandling, physical damage, improper installation, unauthorized
disassembly of the product
(c) Water or any other liquid damage
(d) Any unauthorized repair or modification
(e) Power surges, lightning damage, fire, flood or other events outside ZTE’s reasonable
control
(f) Use of the product with any unauthorized third party products such as generic chargers
(g) Any other cause beyond the range of normal usage for products.
The End User shall have no right to reject, return, or receive a refund for any product from ZTE
under the above-mentioned situations.

13
Key Layout
LCD
Earpiece
Arrow Keys
(Left/Right/Up/Down/OK)
Right Select Key
Left Select Key
Back key
Call key
Long press the # Key to activate
Meeting mode with vibrate
Clear key
End / Exit and ON/OFF Key
Microphone
Long press the * Key to
activate the key lock
Camera
Extendable Antenna
14
Camera Key
Volume Keys
Left View
Back View
Antenna port
for connection
to car kit
Camera
Micro SD Port
Right View
Charger, USB Port
and Headset Jack
Key Layout
Notes
• Key lock is enabled by holding down the
* Key.
• Long press the # Key to activate Meeting mode with vibrate.
15
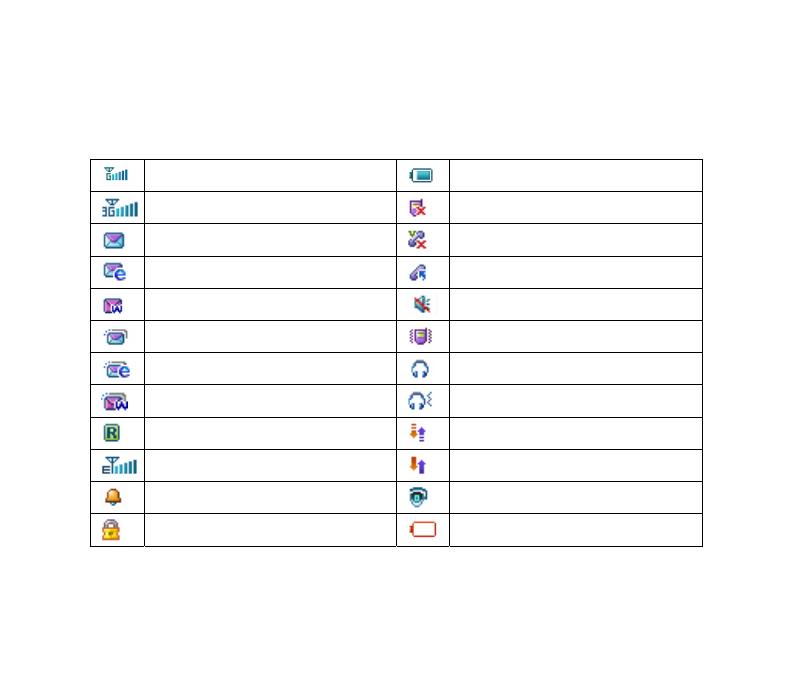
Display Icons
GPRS Network Signal Strength
Battery Level Indicator
3G Network Signal Strength
Missed Call
New SMS or Multimedia Message
Missed Video Call
New E-mail
Divert All Calls is activated
New Wap Push Message
Silent Mode
SMS or MMS Memory is Full
Vibrate mode enabled
E-mail Memory is Full
Headset Mode
Wap Push Message Memory is Full
Headset and Vibrate Mode
Roaming
GPRS Attach
EDGE Network Signal Strength
PDP Context Established
Alarm is set
Bluetooth ON
Secure Internet Sites
Low battery Level

16
1. Getting Started
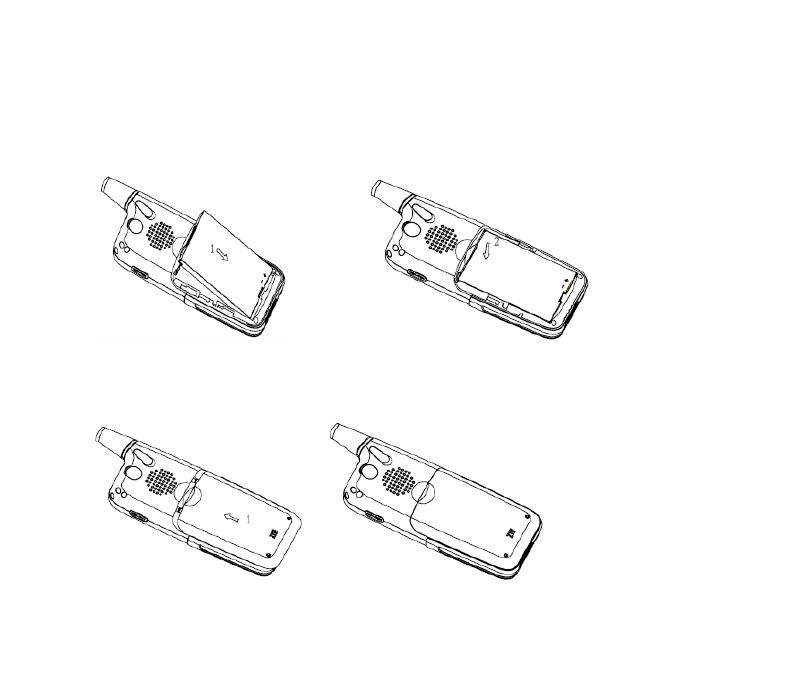
1.1 Install the (U)SIM Card
The (U)SIM card (Universal Subscriber Interface Module) is the small plastic chip with gold
contacts supplied by Telstra. This contains your phone number and acts as a store for your
contacts. It can be moved between different phones if required. Insert this face down into the
carrier inside the back panel of the phone. Make sure it is pushed all the way down as shown
below:
17
1.2 Insert the Battery
Insert the battery carefully with the contacts located against the gold springs in the handset.
The battery will only fit one way.
Close the case by locating the plastic cover into the grooves and sliding the cover up to
close it. Do NOT force the cover down by pressing on it. This will damage the cover. Slide the
cover up gently.

18
1.3 Switch the Phone on and Connect the Charger
Press and hold the key for two seconds to switch your phone on. The phone takes
about 20 seconds to initialize. Enter the PIN number supplied by Telstra with your (U)SIM
card. The start up screen below is referred to throughout the manual as the Idle Screen:
Charge Your Phone
• Open the charger port on the bottom of the handset and rotate the rubber cover to one
side.
• Insert the charger lead carefully with the plug arrow facing the top of the handset
• The plug only fits one way. Do NOT use excessive force to insert the plug
• Check the plug is the right way round and lined up correctly and insert it gently.
• You can also charge your phone by connecting it to your PC using the USB data lead
supplied. Please see the Advanced Section for more details on PC applications.

19
1.4 Charging and Battery Life
• Only use the charger supplied.
• Normal charge time is 4-5 hours.
• When not using the phone for a long period, remove the battery and store it in a cool dry
place.
• Do not leave the phone connected to the charger for more than 24 hours..
• If the battery is not fully charged after 8 hours please stop charging.
• Charge the battery between 0°C~50°C. If the temperature of the handset is too high,
switch it off and let it cool.
• Battery life can be maximized by regularly allowing the phone to fully discharge before
recharging the battery.
• Charge the battery promptly when flat.
• Under poor network conditions (less than 2 bars) it is normal for the battery to only last 1
day.
• To maximize battery life, turn off Bluetooth and reduce the back lighting to 10 seconds
(see Section 1.14 - ‘Personalise your Phone’).
• You can charge the phone in the ON or OFF state. In the OFF state you will see the
Charging Battery animation. Remember to switch your phone ON after charging by
holding the key for 2 seconds.
20
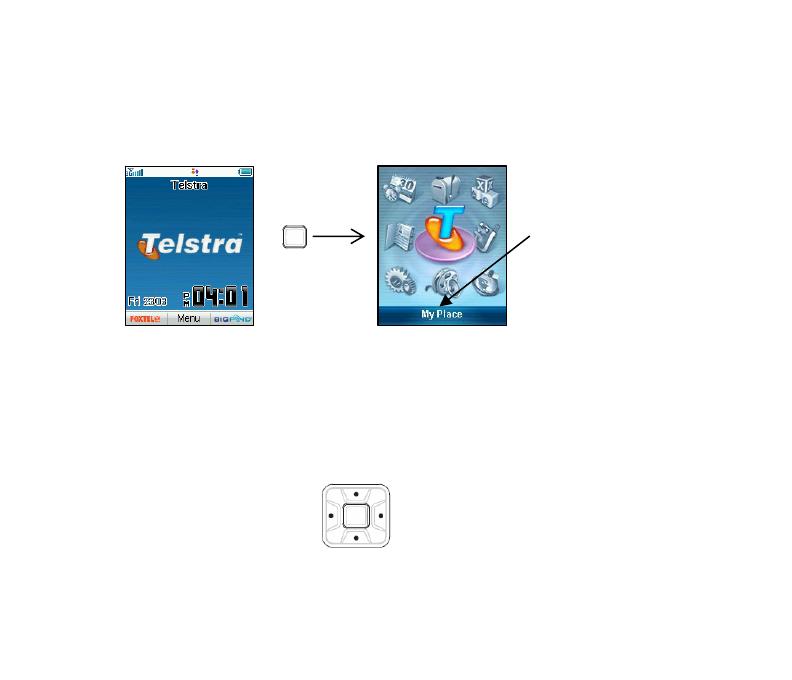
1.5 Basic Navigation
From the Idle Screen press the OK Key to access the Main Menu:
The icons are described
at the bottom of the
screen.
Idle Screen Main Menu
Arrow Keys
Use the Arrow Keys for shortcuts to menus, to move around the Main Menu and to move
the cursor
Up (Shortcut to My Place)
Left (Shortcut to E-mail) Right (Shortcut to Message)
Down (Shortcut to Contacts)
OK Key
/