Page is loading ...

BLOOD GLUCOSE MONITORING SYSTEM
USER GUIDE
Bayer Stamp.pdf 11/1/07 1:08:13 PM

1
3
2
b
a
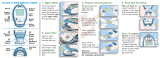
as ea s y a s 1-2-3...
1
Open meter,
insert 10-test disc,
close meter.
2
Pull (a) and
push (b) handle
to expose test strip.
3
Apply sample.
Smaller Blood Drop,
Faster Test Results, and
Increased Memory Capacity
NEW!
Ta b l e o f Co n T e n T s
Bayer Customer Service: 800-348-8100
In T r o d u C T I o n
In t r o d u c t I o n 1
A Lo o k A t Yo u r Me t e r 2
ex p L A n A t I o n o f dI s p L A Y sY M b o L s 4
te s t I n g MAterIAL s 6
ev e r y d a y use
In s e r t I n g A 10-te s t dI sc 7
ru n n I n g A bL o o d gL uc os e test 10
marking a deleted blood test 18
understanding your test results 19
alternative site testing 20
ru n n I n g A co n t r o L te st 22
marking a control test 24
be y o n d ev e r y d a y use
re c AL L I ng tes t re s u L t s 26
viewing your averages 27
clearing stored test results 28
se t up fu n ct Io n 29
setting the time 29
setting the date 30
setting the buzzer level 32
setting the time format 33
setting the date format 34
trA n s f er r I n g re s u L t s to A co M p u t e r 35
cL e A n I n g Yo u r Me t e r 36
re p LA c I ng t h e bAtte rY 37
Bayer Stamp.pdf 11/1/07 1:08:13 PM

b
a
www.bayerdiabetes.com/us
Ta b l e o f Co n T e n T s
i
I
n T r o d u C T I o n
In t r o d u c t I o n 1
A Lo o k A t Yo u r Me te r 2
ex p L A n A t I o n o f dI s p L A Y sY M b o L s 4
te s t I n g MAte r I AL s 6
ev e r y d a y use
In s e r t I n g A 10-te s t dI sc 7
ru n n I n g A bL o o d gL uc os e test 10
marking a deleted blood test 18
understanding your test results 19
alternative site testing 20
ru n n I n g A co n t r o L te st 22
marking a control test 24
be y o n d ev e r y d a y use
re c AL L I ng tes t re s u L t s 26
viewing your averages 27
clearing stored test results 28
se t up fu n ct Io n 29
setting the time 29
setting the date 30
setting the buzzer level 32
setting the time format 33
setting the date format 34
trA n s f er r I n g re s u L t s to A co M p u t e r 35
cL e A n I n g Yo u r Me t e r 36
re p LA c I ng t h e bAtte rY 37
Bayer Stamp.pdf 11/1/07 1:08:13 PM

In T r o d u C T I o n :
Thank you for choosing the Br e e z e
®
blood glucose
monitoring system! We are proud to be your partner in
helping you manage your diabetes. We understand that
people who regularly check their blood glucose levels want
a meter that is simple, straightforward and easy to use. As
you use your B
r e e z e system, you will appreciate the:
•NoCoding™technologyoftheteststrips;
•smallsamplevolume;
•fastreadingtime;
•convenienceofa10-testdisc;
•simple“PullandPush”steptobegintesting;
•user-friendlydesign.
This ease of use comes with the added bonus of the
reliability that you count on from Bayer.
This user guide shows you how to use your B
r e e z e
system. It will answer any questions you might have and
guide you through the testing process. It is here to help you!
The user guide is divided into color-coded sections to
help you easily find the information you need. See the
TableofContentsforacompletelistoftopics.
CAUTION: Before using any product to test your
blood glucose (sugar), read all instructions carefully
and practice the test.
TeC hnICa l In f o r m aT I o n
specIfIcAtIons 40
per f o r MA n c e evA Lu At Io n s 40
so lv I n g Prob lem s
so L v I n g pr ob L e M s 41
tr o u b L e s h o o t I n g A n d er r or co d e s 42
cu s t o M e r se rvI c e 47
rep L A c eM e n t It e M s 48
WA r rA n t Y In f o r M At I o n 49
The B
REEZE
®
blood glucose monitoring system (meter, test strips and
controls) is intended for self-testing by persons with diabetes and by
healthcare professionals, to monitor the level of glucose in whole blood.
The B
REEZE system is specific for glucose and has been referenced to
plasma/serum glucose.
Bayer Customer Service: 800-348-8100
Ta b l e o f Co n T e n T s In T r o d u C T I o n
ii
Bayer Stamp.pdf 11/1/07 1:08:13 PM

www.bayerdiabetes.com/us
In T r o d u C T I o n :
Thank you for choosing the Br e e z e
®
blood glucose
monitoring system! We are proud to be your partner in
helping you manage your diabetes. We understand that
people who regularly check their blood glucose levels want
a meter that is simple, straightforward and easy to use. As
you use your B
r e e z e system, you will appreciate the:
•NoCoding™technologyoftheteststrips;
•smallsamplevolume;
•fastreadingtime;
•convenienceofa10-testdisc;
•simple“PullandPush”steptobegintesting;
•user-friendlydesign.
This ease of use comes with the added bonus of the
reliability that you count on from Bayer.
This user guide shows you how to use your B
r e e z e
system. It will answer any questions you might have and
guide you through the testing process. It is here to help you!
The user guide is divided into color-coded sections to
help you easily find the information you need. See the
TableofContentsforacompletelistoftopics.
CAUTION: Before using any product to test your
blood glucose (sugar), read all instructions carefully
and practice the test.
TeC hnICa l In f o r m aT I o n
specIfIcAtIons 40
per f o r MA n c e evA Lu At Io n s 40
so lv I n g Prob lem s
so L v I n g pr ob L e M s 41
tr o u b L e s h o o t I n g A n d er r or co d e s 42
cu s t o M e r se rvI c e 47
rep L A c eM e n t It e M s 48
WA r rA n t Y In f o r M At I o n 49
The B
REEZE
®
blood glucose monitoring system (meter, test strips and
controls) is intended for self-testing by persons with diabetes and by
healthcare professionals, to monitor the level of glucose in whole blood.
The B
REEZE system is specific for glucose and has been referenced to
plasma/serum glucose.
In T r o d u C T I o n
1
Bayer Stamp.pdf 11/1/07 1:08:13 PM

2
Bayer Customer Service: 800-348-8100
Screen
This is where
your test results
will be displayed.
Battery Holder
(side of meter)
Holds one
CR2032lithium
battery (included).
On/Off
Button
Used to manually
turn the meter
on or off, check
the number of
strips and check
the date/time.
Data Port
(side of meter)
Insert cable
here to allow
communication
between the
meter and
a personal
computer.
Release Button
Press to release and discard
the used test strip.
Meter Handle
Use this handle to push out a test strip
and automatically turn on the meter.
Back (Base)
of Meter
On/Off
Button
Used to manually
turn the meter
on or off, check
the number of
strips, and check
the date/time.
Memory
Button
Used to view your
blood glucose
results stored in
memory and to
view your test
result averages.
Setup
Button
Used to enter
the Setup mode
and easily change
the time,
date or
other features.
a lo o k a T yo u r breeze meTer:
Top End
of Meter
Release
Button
Test Strip
Slot
Button Door
Open to expose
meter buttons.
Tab to Open
Button Door
Bayer Stamp.pdf 11/1/07 1:08:13 PM

3
www.bayerdiabetes.com/us
Data Port
(side of meter)
Insert cable
here to allow
communication
between the
meter and
a personal
computer.
Meter Handle
Use this handle to push out a test strip
and automatically turn on the meter.
Up/
Down
Buttons
Used to display
additional
results or options.
Button Door Open
Open Latch
Press in and
pull up on the
base to open
the meter.
Back (Base)
of Meter
NOTE: Simply place the easy reference sticker
on the Button Door as shown. See the sheet
of stickers provided in your meter package
and select the language of your choice.
On/Off
Button
Used to manually
turn the meter
on or off, check
the number of
strips, and check
the date/time.
Memory
Button
Used to view your
blood glucose
results stored in
memory and to
view your test
result averages.
Setup
Button
Used to enter
the Setup mode
and easily change
the time,
date or
other features.
a lo o k a T yo u r breeze meTer:
Release
Button
Test Strip
Slot
Button Door
Open to expose
meter buttons.
Tab to Open
Button Door
Accept
Button
Used to accept
changes made
in the Setup
mode.
Tab to Open
Button Door
Bayer Stamp.pdf 11/1/07 1:08:13 PM

ex P l a n a T I o n o f dI s P l a y sy m b o l s :
A full display, as shown here, indicates that all elements in
the display are working properly. To view the full display,
press and hold the On/Off button ( ) or pull the meter
handleallthewayout.Compareyourmetertothedisplay
shown here before you run each test. If there is a difference,
pleasesee“TroubleshootingandErrorCodes”onpage42.
Here is what each display element means:
The units
of measure
(mg/dL or
mmol/L) for
your blood
glucose
result
Where the time, date,
andAM/PMaredisplayed;
also the type of average
Here is what each display element means:
Additional
results and
options are
available by
pressing the
and
buttons
Bayer Customer Service: 800-348-8100
The number
of test
strips left in
the disc
Test result and error
codes are displayed here
Insert a new
test disc
4
Bayer Stamp.pdf 11/1/07 1:08:13 PM

www.bayerdiabetes.com/us
The result
is not to be
included in
the averages
The volume of
the buzzer
ex P l a n a T I o n o f dI s P l a y sy m b o l s :
A full display, as shown here, indicates that all elements in
the display are working properly. To view the full display,
press and hold the On/Off button ( ) or pull the meter
handleallthewayout.Compareyourmetertothedisplay
shown here before you run each test. If there is a difference,
pleasesee“TroubleshootingandErrorCodes”onpage42.
Here is what each display element means:
The units
of measure
(mg/dL or
mmol/L) for
your blood
glucose
result
Here is what each display element means:
Battery is
low or dead
Apply blood to
the test strip
Temperature is
too high or too low
Insert a new
test disc
The result is a
control test
5
Bayer Stamp.pdf 11/1/07 1:08:13 PM

6
Bayer Customer Service: 800-348-8100
ev e r y d a y use
In s e r T I n g a 10-TesT dIsC:
WARNING: Never open the
meter with the meter handle
pulled out.
Open Meter
1. Turn the meter over so the
display screen is facing down.
Open the meter by pressing
in on the back edge of the
open latch and then pulling
up on the base.
Open Test Disc Package
2.Openanew10-test
discpackage.Checkthe
expiration date on the disc.
Te s TI n g ma T e r I a l s :
Br e e z e
®
10-test disc
(Disc contains ten test strips)
(Included with some kits)
B
r e e z e
®
normal control
(Included with some kits)
M
i c r o l e t
®
2 lancing device
and lancets
(Included with some kits)
OR
Ascensia
®
Mi c r o l e t
®
adjust-
able lancing device and lancets
(Included with some kits)
Please refer to the Ascensia
M
i c r o l e t device package
insert for complete instructions
on using this lancing device.
Bayer Stamp.pdf 11/1/07 1:08:13 PM

ev e r y d a y use
7
www.bayerdiabetes.com/us
In s e r T I n g a 10-TesT dIsC:
WARNING: Never open the
meter with the meter handle
pulled out.
Open Meter
1. Turn the meter over so the
display screen is facing down.
Open the meter by pressing
in on the back edge of the
open latch and then pulling
up on the base.
Open Test Disc Package
2.Openanew10-test
discpackage.Checkthe
expiration date on the disc.
Te s TI n g ma T e r I a l s :
Bayer Stamp.pdf 11/1/07 1:08:13 PM

Bayer Customer Service: 800-348-8100
8
Helpful Hint: The meter must be kept fl at when
closing. If the meter is not kept fl at, the disc may move
and become damaged and you may waste test strips.
Your meter will also tell you
when you need to insert a new
10-test disc. It will do this by
showing a picture of a disc
being inserted into the meter.
Insert Disc
3.Insertanew10-testdisc
(with the bumpy side up),
aligning the 5 notches in
the disc with the tabs on
the meter.
Close Meter
4.Closethemeterand
snap it shut. Keep
the meter fl at when
closing it.
Counting the Number of Strips Left
Your Br e e z e meter will
automatically count down the
number of test strips you have
left. The number is shown with
your test result. To see the
count when the meter is off,
press the button.
NOTE: This count is reset to 10
every time you open the meter.
To keep an accurate count,
open the meter only when all
10 of the test strips have been
used in the 10-test disc.
Bayer Stamp.pdf 11/1/07 1:08:13 PM

9
www.bayerdiabetes.com/us
Helpful Hint: The meter must be kept fl at when
closing. If the meter is not kept fl at, the disc may move
and become damaged and you may waste test strips.
Your meter will also tell you
when you need to insert a new
10-test disc. It will do this by
showing a picture of a disc
being inserted into the meter.
Insert Disc
3.Insertanew10-testdisc
(with the bumpy side up),
aligning the 5 notches in
the disc with the tabs on
the meter.
Close Meter
4.Closethemeterand
snap it shut. Keep
the meter fl at when
closing it.
Counting the Number of Strips Left
Your Br e e z e meter will
automatically count down the
number of test strips you have
left. The number is shown with
your test result. To see the
count when the meter is off,
press the
button.
NOTE: This count is reset to 10
every time you open the meter.
To keep an accurate count,
open the meter only when all
10 of the test strips have been
used in the 10-test disc.
Bayer Stamp.pdf 11/1/07 1:08:13 PM

Bayer Customer Service: 800-348-8100
10
ru n nI n g a bl o o d gl u C o s e TesT:
1. Wash your hands well with
soapandwarmwater.Rinse
and dry thoroughly.
NOTE: For testing sites other
than fi ngertips, see page 20.
Prepare Lancing Device
Refer to the package insert for
your lancing device for com-
plete instructions.
2.Removetheendcapfromthe
M
i c r o l e t 2 lancing device
with your thumb on the grip
indent as shown.
3.Loosentheroundprotective
cap on a lancet by rotating it
¼ turn, but do not remove it.
Always use M
i c r o l e t lancets
for best operation.
Insert the lancet fi rmly into
the lancing device until it
comes to a full stop. This will
cock the device. You can also
pull and release the cocking
handle.
Twist off the lancet cap. Be
sure to save it for disposing of
the used lancet.
4.Replacethegrayendcapprior
to getting your blood drop.
Push Out Test Strip
5. Your Br e e z e meter uses
a special, easy-to-use “Pull
and Push” design.
Here’s how it works:
Hold the meter comfortably in
one hand. Firmly grasp the me-
ter handle with the other hand
(shownhere).Now,just“Pull
and Push”—“Pull”thehandle
outuntilitstopsand“Push”it
back in until it stops again.
Helpful Hint: There is no
need to turn the meter on—just
“PullandPush.”
Bayer Stamp.pdf 11/1/07 1:08:13 PM

11
www.bayerdiabetes.com/us
ru n nI n g a bl o o d gl u C o s e TesT:
1. Wash your hands well with
soapandwarmwater.Rinse
and dry thoroughly.
NOTE: For testing sites other
than fi ngertips, see page 20.
Prepare Lancing Device
Refer to the package insert for
your lancing device for com-
plete instructions.
2.Removetheendcapfromthe
M
i c r o l e t 2 lancing device
with your thumb on the grip
indent as shown.
3.Loosentheroundprotective
cap on a lancet by rotating it
¼ turn, but do not remove it.
Always use M
i c r o l e t lancets
for best operation.
Insert the lancet fi rmly into
the lancing device until it
comes to a full stop. This will
cock the device. You can also
pull and release the cocking
handle.
Twist off the lancet cap. Be
sure to save it for disposing of
the used lancet.
4.Replacethegrayendcapprior
to getting your blood drop.
Push Out Test Strip
5. Your Br e e z e meter uses
a special, easy-to-use “Pull
and Push” design.
Here’s how it works:
Hold the meter comfortably in
one hand. Firmly grasp the me-
ter handle with the other hand
(shownhere).Now,just“Pull
and Push”—“Pull”thehandle
outuntilitstopsand“Push”it
back in until it stops again.
Helpful Hint: There is no
need to turn the meter on—just
“PullandPush.”
Bayer Stamp.pdf 11/1/07 1:08:13 PM

Deep
Puncture
Shallow
Puncture
Use the
Gray
endcap
Bayer Customer Service: 800-348-8100
12
CAUTION:
• Yourmeterisdesignedtopushoutoneteststrip
at a time. Do not attempt to push out a new test
strip with one already showing.
• Discardanyteststripthathasbeenremovedfrom
the meter. Never re-insert a test strip into the meter.
NOTE: After the meter handle
is pushed in, the release button
is UP, a test strip is pushed out,
and a series of “apply blood”
prompts appears. The meter
is now ready to run a blood
glucose test.
9. Your test strip is like a
straw—it sips in a sample of
blood. Move the entire front
edge of the test strip until
it touches the edge of the
blood drop. The blood
is automatically pulled into
the test strip and fi lls the
test strip.
Get the Blood Drop—
Fingertip Testing
The puncture depth depends
on the endcap setting and the
amount of pressure applied
to the puncture site. You will
quickly determine which combi-
nation works best for you.
Test
Hold the test strip in place
until the meter beeps, then
move the meter away.
7. Stroke your hand and fi nger
towards the puncture site to
form a drop of blood. Do not
squeeze around the puncture
site.
8. Test immediately after a good
blood drop has formed.
6. Press the endcap fi rmly
against the puncture site and
press the blue release button
with your thumb.
Bayer Stamp.pdf 11/1/07 1:08:13 PM

Deep
Puncture
13
www.bayerdiabetes.com/us
CAUTION:
• Yourmeterisdesignedtopushoutoneteststrip
at a time. Do not attempt to push out a new test
strip with one already showing.
• Discardanyteststripthathasbeenremovedfrom
the meter. Never re-insert a test strip into the meter.
NOTE: After the meter handle
is pushed in, the release button
is UP, a test strip is pushed out,
and a series of “apply blood”
prompts appears. The meter
is now ready to run a blood
glucose test.
9. Your test strip is like a
straw—it sips in a sample of
blood. Move the entire front
edge of the test strip until
it touches the edge of the
blood drop. The blood
is automatically pulled into
the test strip and fi lls the
test strip.
Test
Hold the test strip in place
until the meter beeps, then
move the meter away.
7. Stroke your hand and fi nger
towards the puncture site to
form a drop of blood. Do not
squeeze around the puncture
site.
8. Test immediately after a good
blood drop has formed.
Bayer Stamp.pdf 11/1/07 1:08:13 PM

Bayer Customer Service: 800-348-8100
14
10. After the beep, the display
countsdownfrom“5”
to“1.”
Your test result then appears
on the screen.
Helpful Hint: The number
displayed in the upper left cor-
ner is the number of test strips
remaining in your 10-test disc.
IMPORTANT: If you want to
mark this result as a deleted
blood test, you must do that
now, while the result is still be-
ing displayed. See “Marking a
Deleted Blood Test” on page 18.
11. To release the used test
strip, hold the meter with
the test strip pointing down
over a waste container. Press
the release button. Be sure
the heel of your hand is not
against the meter handle.
NOTE: If you block the meter
handle with your hand, the test
strip may not release properly.
12.Pressthe button to turn the meter off.
NOTE: If you forget to turn your meter off, it will turn off
automatically after three minutes. This will save battery
power.
For best results:
• Blood is pulled IN the test
strip, not dropped ON.
• Do not allow blood to
run down into the meter.
• Do not add more blood
to the test strip after the
meter beeps.
Bayer Stamp.pdf 11/1/07 1:08:13 PM

15
www.bayerdiabetes.com/us
10. After the beep, the display
countsdownfrom“5”
to“1.”
Your test result then appears
on the screen.
Helpful Hint: The number
displayed in the upper left cor-
ner is the number of test strips
remaining in your 10-test disc.
IMPORTANT: If you want to
mark this result as a deleted
blood test, you must do that
now, while the result is still be-
ing displayed. See “Marking a
Deleted Blood Test” on page 18.
11. To release the used test
strip, hold the meter with
the test strip pointing down
over a waste container. Press
the release button. Be sure
the heel of your hand is not
against the meter handle.
NOTE: If you block the meter
handle with your hand, the test
strip may not release properly.
12.Pressthe
button to turn the meter off.
NOTE: If you forget to turn your meter off, it will turn off
automatically after three minutes. This will save battery
power.
Bayer Stamp.pdf 11/1/07 1:08:13 PM

Remove the used lancet
Bayer Customer Service: 800-348-8100
16
PRECAUTIONS:
• Testyourbloodagainifyourglucoseresultisbelow
50 mg/dL, above 250 mg/dL or if the meter shows
“LO” or “HI.” If your glucose level is still below
50 mg/dL, above 250 mg/dL, or if the meter again
shows “LO” or “HI,” it may indicate a potentially
serious medical condition.
If this is the case: Consult your physician or healthcare
professional immediately.
• Donotchangeyourmedicationbasedonblood
glucose results with your B
REEZE meter without
the advice of a physician or healthcare professional.
• Your meter has been preset and locked to display
results in mg/dL (milligrams of glucose per deciliter).
Test results in mg/dL will never include a decimal point.
In some countries, the meters are preset to display
results in mmol/L (millimoles of glucose per liter). Test
results in mmol/L will always include a decimal point.
Example:
or
If your test result is displayed in the wrong unit of
measure (mmol/L), contact your authorized Bayer
representative or call Customer Service (see the
bottom of the page).
1. In one hand, hold the lanc-
ing device with your thumb
on the grip indent, with your
other hand, hold the gray
endcap dial as shown, and
gently snap off the endcap.
2.Placetheroundprotective
lancet cap on a fl at surface
with the Bayer logo facing
down.
With the used lancet still in
the lancing device, push the
lancet needle completely into
the middle of the exposed
side of the cap.
3.While(a) pressing the blue
release button, (b) pull the
blue cocking handle, and the
lancet will drop into the con-
tainer you have selected.
Dispose of the used lancet
carefully to prevent injury or
contamination to others.
Do not reuse lancets. Use a
new M
i c r o l e t lancet each
time you test.
Bayer Stamp.pdf 11/1/07 1:08:13 PM
/