Page is loading ...

User Guide
BLOOD GLUCOSE MONITORING SYSTEM
(Bai An Jie
®
)
®
18211 NE 68th Street,
E120 Redmond, WA 98052
T425-881-5454
Breeze 2 Rebranding UG - Hong Kong
DATE:
CLIENT:
DESCRIPTION:
SCHAWK JOB#:
BAN#:
SKU#:
DIMENSIONS:
PRINTER SPEC:
V-0
ENGLISH (HONG KONG)
PROCESS CYAN
PROCESS MAGENTA
PROCESS YELLOW
PROCESS BLACK
COLORS
Avenir, Berthold
Akzidenz,
DFPGYaYi,
DFPGBiaoSong,
Futiger, Futura,
Helvetica, Times
FONTS
August 8, 2011
Bayer HealthCare
Breeze 2 Rebranding UG - English
907186
82076779 Rev. 07/11
N/A
6.0" (H) x 4.5" (W)
PUSG0494 REV F
®
82076779_BRZ2_UG_EN_FpBp_v0.indd ofc1
82076779_BRZ2_UG_EN_FpBp_v0.indd ofc1
8/8/11 12:45:16 PM
8/8/11 12:45:16 PM

1
3
2
b
a
www.bayerdiabetes.com
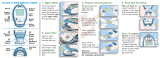
AS EASY AS 1-2-3...
1
Open meter,
insert 10-test disc,
close meter.
2
Pull (a) and
push (b) handle
to expose test strip.
3
Apply sample.
Smaller Blood Drop,
Faster Test Results, and
Increased Memory Capacity
TABLE OF CONTENTS
Bayer Customer Service: (852) 8100 6386
i
INTRODUCTION
INTRODUCTION 1
A LOOK AT YOUR METER 2
EXPLANATION OF DISPLAY SYMBOLS 4
TESTING MATERIALS 6
EVERYDAY USE
INSERTING A 10-TEST DISC 7
RUNNING A BLOOD GLUCOSE TEST 10
MARKING A DELETED BLOOD TEST 18
UNDERSTANDING YOUR TEST RESULTS 19
ALTERNATIVE SITE TESTING 20
RUNNING A CONTROL TEST 22
MARKING A CONTROL TEST 24
BEYOND EVERYDAY USE
RECALLING TEST RESULTS 26
VIEWING YOUR AVERAGES 27
CLEARING STORED TEST RESULTS 28
SETUP FUNCTION 29
SETTING THE TIME 29
SETTING THE DATE 30
SETTING THE BUZZER LEVEL 32
SETTING THE TIME FORMAT 33
SETTING THE DATE FORMAT 34
TRANSFERRING RESULTS TO A COMPUTER 35
CLEANING YOUR METER 36
REPLACING THE BATTERY 37
82076779_BRZ2_UG_EN_FpBp_v0.indd ifc2-i
82076779_BRZ2_UG_EN_FpBp_v0.indd ifc2-i
8/8/11 12:45:18 PM
8/8/11 12:45:18 PM

TABLE OF CONTENTS
Bayer Customer Service: (852) 8100 6386
ii
www.bayerdiabetes.com
INTRODUCTION:
Thank you for choosing the
щଥ
®
(Bai An Jie
®
) blood
glucose monitoring system! We are proud to be your partner
in helping you manage your diabetes. We understand that
people who regularly check their blood glucose levels want a
meter that is simple, straightforward and easy to use. As you
use your
щଥ
(Bai An Jie ) system, you will appreciate the:
• No Coding™ technology of the test strips;
• small sample volume;
• fast reading time;
• convenience of a 10-test disc;
• simple “Pull and Push” step to begin testing;
• user-friendly design.
This ease of use comes with the added bonus of the
reliability that you count on from Bayer.
This user guide shows you how to use your
щଥ
(Bai An Jie )
system. It will answer any questions you might have and
guide you through the testing process. It is here to help you!
The user guide is divided into color-coded sections to
help you easily fi nd the information you need. See the
Table of Contents for a complete list of topics.
CAUTION: Before using any product to test your
blood glucose (sugar), read all instructions carefully
and practice the test.
TECHNICAL INFORMATION
SPECIFICATIONS 40
PERFORMANCE EVALUATIONS 41
SOLVING PROBLEMS
SOLVING PROBLEMS 42
TROUBLESHOOTING AND ERROR CODES 43
CUSTOMER SERVICE 48
REPLACEMENT ITEMS 49
WARRANTY INFORMATION 50
The
щଥ
®
(Bai An Jie
®
) blood glucose monitoring system (meter,
test strips and controls) is intended for self-testing by persons with
diabetes and by healthcare professionals, to monitor the level of glucose
in whole blood. The M
ICROLET
®
2 lancing device is not suitable for use
by healthcare professionals. It must not be used on more than one person
due to the risk of infection. The
щଥ
(Bai An Jie ) system is specifi c
for glucose and has been referenced to plasma/serum glucose.
INTRODUCTION
ii 1
82076779_BRZ2_UG_EN_FpBp_v0.indd ii-1
82076779_BRZ2_UG_EN_FpBp_v0.indd ii-1
8/8/11 12:45:20 PM
8/8/11 12:45:20 PM

2
Bayer Customer Service: (852) 8100 6386
3
www.bayerdiabetes.com
Screen
This is where
your test results
will be displayed.
Battery Holder
(side of meter)
Holds one
CR2032 lithium
battery (included).
On/Off
Button
Used to manually
turn the meter
on or off, check
the number of
strips and check
the date/time.
Data Port
(side of meter)
Insert cable
here to allow
communication
between the
meter and
a personal
computer.
Release Button
Press to release and discard
the used test strip.
Meter Handle
Use this handle to push out a test strip
and automatically turn on the meter.
Up/
Down
Buttons
Used to display
additional
results or options.
Accept
Button
Used to accept
changes made
in the Setup
mode.
Button Door Open
Open Latch
Press in and
pull up on the
base to open
the meter.
Back (Base)
of Meter
NOTE: Simply place the easy reference sticker
on the button door as shown. See the sheet
of stickers provided in your meter package
and select the language of your choice.
On/Off
Button
Used to manually
turn the meter
on or off, check
the number of
strips, and check
the date/time.
Memory
Button
Used to view your
blood glucose
results stored in
memory and to
view your test
result averages.
Setup
Button
Used to enter
the Setup mode
and easily change
the time,
date or
other features.
A LOOK AT YOUR
щଥ
®
(Bai An Jie
®
) METER:
Top End
of Meter
Release
Button
Test Strip
Slot
Button Door
Open to expose
meter buttons.
Tab to Open
Button Door
Tab to Open
Button Door
82076779_BRZ2_UG_EN_FpBp_v0.indd 2-3
82076779_BRZ2_UG_EN_FpBp_v0.indd 2-3
8/8/11 12:45:20 PM
8/8/11 12:45:20 PM

4
Bayer Customer Service: (852) 8100 6386
www.bayerdiabetes.com
The result
is not to be
included in
the averages
The volume of
the buzzer
EXPLANATION OF DISPLAY SYMBOLS:
A full display, as shown here, indicates that all elements in
the display are working properly. To view the full display,
press and hold the On/Off button ( ) or pull the meter
handle all the way out. Compare your meter to the display
shown here before you run each test. If there is a difference,
please see “Trouble shooting and Error Codes” on page 43.
Here is what each display element means:
The units
of measure
(mg/dL or
mmol/L) for
your blood
glucose
result
Where the time, date,
and AM/PM are displayed;
also the type of average
Here is what each display element means:
Additional
results and
options are
available by
pressing the
and
buttons
Battery is
low or dead
Apply blood to
the test strip
The number
of test
strips left in
the disc
Temperature is
too high or too low
Test result and error
codes are displayed here
Insert a new
test disc
The result is a
control test
5
82076779_BRZ2_UG_EN_FpBp_v0.indd 4-5
82076779_BRZ2_UG_EN_FpBp_v0.indd 4-5
8/8/11 12:45:21 PM
8/8/11 12:45:21 PM

6
Bayer Customer Service: (852) 8100 6386
EVERYDAY USE
7
www.bayerdiabetes.com
INSERTING A 10-TEST DISC:
WARNING: Never open the
meter with the meter handle
pulled out.
Open Meter
1. Turn the meter over so the
display screen is facing down.
Open the meter by pressing
in on the back edge of the
open latch and then pulling
up on the base.
Open Test Disc Package
2. Open a new 10-test
disc package. Check the
expiration date on the disc.
TESTING MATERIALS
щଥ
®
(Bai An Jie
®
)
10-Test Disc (Disc contains
ten test strips)
(Not included with the kit)
щଥ
®
(Bai An Jie
®
)
Control Solution
(Not included with the kit)
M
ICROLET
®
2 Lancing Device
and M
ICROLET
®
Lancets
(Included with the kit)
WARNING: The MICROLET2 lancing device is intended
for self testing by a single patient. It must not be used
on more than one person due to the risk of infection.
Use a new M
ICROLET lancet each time you test because
it is no longer sterile after use.
idiii dd
82076779_BRZ2_UG_EN_FpBp_v0.indd 6-7
82076779_BRZ2_UG_EN_FpBp_v0.indd 6-7
8/8/11 12:45:22 PM
8/8/11 12:45:22 PM

Bayer Customer Service: (852) 8100 6386
8 9
www.bayerdiabetes.com
Helpful Hint: The meter must be kept fl at when
closing. If the meter is not kept fl at, the disc may move
and become damaged and you may waste test strips.
Your meter will also tell you
when you need to insert a new
10-test disc. It will do this by
showing a picture of a disc
being inserted into the meter.
Insert Disc
3. Insert a new 10-test disc (with
the bumpy side up), aligning
the 5 notches in the disc with
the tabs on the meter.
Close Meter
4. Close the meter and
snap it shut. Keep
the meter fl at when
closing it.
Counting the Number of Strips Left
Your
щଥ
(Bai An Jie )
meter will automatically count
down the number of test strips
you have left. The number is
shown with your test result. To
see the count when the meter
is off, press the
button.
NOTE: This count is reset to 10
every time you open the meter.
To keep an accurate count,
open the meter only when all
10 of the test strips have been
used in the 10-test disc.
82076779_BRZ2_UG_EN_FpBp_v0.indd 8-9
82076779_BRZ2_UG_EN_FpBp_v0.indd 8-9
8/8/11 12:45:23 PM
8/8/11 12:45:23 PM

Bayer Customer Service: (852) 8100 6386
10 11
www.bayerdiabetes.com
RUNNING A BLOOD GLUCOSE TEST:
1. Wash your hands well with
soap and warm water. Rinse
and dry thoroughly.
NOTE: For testing sites other
than fi ngertips, see page 20.
Prepare Lancing Device
Refer to the MICROLET2 insert
for complete instructions.
2. Remove the endcap from the
M
ICROLET2 lancing device
with your thumb on the grip
indent as shown.
3. Loosen the round protective
cap on a lancet by rotating it
¼ turn but do not remove it.
Always use M
ICROLET lancets
for best operation.
Insert the lancet fi rmly into
the lancing device until it
comes to a full stop. This will
cock the device. You can also
pull and release the cocking
handle.
Twist off the lancet cap. Be
sure to save it for disposing
of the used lancet.
4. Replace the gray endcap
prior to getting your blood
drop.
Push Out Test Strip
5. Your
щଥ
(Bai An Jie )
meter uses a special, easy-to-use
“Pull and Push” design.
Here’s how it works:
Hold the meter comfortably
in one hand. Firmly grasp the
meter handle with the other
hand (shown here). Now, just
“Pull and Push”—“Pull” the
handle out until it stops and “Push”
it back in until it stops again.
Helpful Hint: There is no
need to turn the meter on—
just “Pull and Push.”
82076779_BRZ2_UG_EN_FpBp_v0.indd 10-11
82076779_BRZ2_UG_EN_FpBp_v0.indd 10-11
8/8/11 12:45:24 PM
8/8/11 12:45:24 PM

Deep
Puncture
Shallow
Puncture
Use the
Gray
endcap!
Get the Blood Drop —
Fingertip Testing
The puncture depth depends
on the endcap setting and the
amount of pressure applied
to the puncture site. You will
quickly determine which combi-
nation works best for you.
6. Press the endcap fi rmly
against the puncture site and
press the blue release button
with your thumb.
Bayer Customer Service: (852) 8100 6386
12 13
www.bayerdiabetes.com
CAUTION:
• Your meter is designed to push out one test strip at
a time. Do not attempt to push out a new test strip
with one already showing.
• Discard any test strip that has been removed from
the meter. Never re-insert a test strip into the meter.
NOTE: After the meter handle
is pushed in, the release button
is UP, a test strip is pushed out,
and a series of “apply blood”
prompts appears. The meter
is now ready to run a blood
glucose test.
9. Your test strip is like a
straw—it sips in a sample of
blood. Move the entire front
edge of the test strip until
it touches the edge of the
blood drop. The blood
is automatically pulled into
the test strip and fi lls the
test strip.
Test
Hold the test strip in place
until the meter beeps, then
move the meter away.
7. Stroke your hand and fi nger
towards the puncture site to
form a drop of blood. Do not
squeeze around the puncture
site.
8. Test immediately after a good
blood drop has formed.
82076779_BRZ2_UG_EN_FpBp_v0.indd 12-13
82076779_BRZ2_UG_EN_FpBp_v0.indd 12-13
8/8/11 12:45:28 PM
8/8/11 12:45:28 PM

Bayer Customer Service: (852) 8100 6386
14 15
www.bayerdiabetes.com
For best results:
• Blood is pulled IN the test
strip, not dropped ON.
• Do not allow blood to
run down into the meter.
• Do not add more blood
to the test strip after the
meter beeps.
11. To release the used test
strip, hold the meter with
the test strip pointing down
over a waste container.
Press the release button.
Be sure the heel of your
hand is not against the
meter handle.
NOTE: If you block the meter
handle with your hand, the test
strip may not release properly.
12. Press the
button to turn the meter off.
NOTE: If you forget to turn your meter off, it will
turn off automatically after three minutes. This will
save battery power.
Your test result then appears
on the screen.
Helpful Hint: The number
displayed in the upper left cor-
ner is the number of test strips
remaining in your 10-test disc.
IMPORTANT: If you want to
mark this result as a deleted
blood test, you must do that
now, while the result is still be-
ing displayed. See “Marking a
Deleted Blood Test” on page 18.
10. After the beep, the display
counts down from “5” to “1.”
82076779_BRZ2_UG_EN_FpBp_v0.indd 14-15
82076779_BRZ2_UG_EN_FpBp_v0.indd 14-15
8/8/11 12:45:30 PM
8/8/11 12:45:30 PM

Bayer Customer Service: (852) 8100 6386
16 17
www.bayerdiabetes.com
PRECAUTIONS:
• Test your blood again if your glucose result is below
2.8 mmol/L, above 13.9 mmol/L or if the meter
shows “LO” or “HI.” If your glucose level is still
below 2.8 mmol/L, above 13.9 mmol/L, or if the
meter again shows “LO” or “HI,” it may indicate a
potentially serious medical condition.
If this is the case: Consult your physician or healthcare
professional immediately.
• Do not change your medication based on blood
glucose results with your
щଥ
(Bai An Jie )
meter without the advice of a physician or health-
care professional.
• Your meter has been preset and locked to display
results in mmol/L (millimoles of glucose per liter).
Test results in mmol/L will always include a decimal
point. In some countries, the meters are preset to
display results in mg/dL (milligrams of glucose per
deciliter). Test results in mg/dL will never include a
decimal point.
Example:
or
If your test result is displayed in the wrong unit of
measure (mg/dL), contact your authorized Bayer
representative or call Customer Service (see the
bottom of the page).
Remove the used lancet
1. In one hand, hold the lanc-
ing device with your thumb
on the grip indent; with your
other hand, hold the gray
endcap dial as shown, and
gently snap off the endcap.
2. Place the round protective
lancet cap on a fl at surface
with the Bayer logo facing
down.
With the used lancet still in
the lancing device, push the
lancet needle completely into
the middle of the exposed
side of the cap.
3. While pressing the blue
release button
a , pull the
blue cocking handle
b
, and
the lancet will drop into the
container you have selected.
Dispose of the used lancet
carefully to prevent injury or
contamination to others.
Do not reuse lancets. Use a
new M
ICROLET lancet each
time you test.
82076779_BRZ2_UG_EN_FpBp_v0.indd 16-17
82076779_BRZ2_UG_EN_FpBp_v0.indd 16-17
8/8/11 12:45:31 PM
8/8/11 12:45:31 PM

Bayer Customer Service: (852) 8100 6386
18 19
www.bayerdiabetes.com
Understanding Your Test Results
Expected Blood Glucose Values
Blood glucose values will vary from time to time depending
on food intake, medication dosages, health, stress or exercise.
Consult your physician or healthcare professional for the target
glucose values appropriate for you. Standard medical practice
goals for a typical non-pregnant individual with diabetes are:
1
• Before a meal: 5.0 to 7.2 mmol/L
• 2 hours after a meal: less than 10.0 mmol/L
Symptoms of High or Low Blood Glucose
You can better understand your test results by being aware of
the symptoms of high or low blood glucose; this will also help
you decide what to do if your results seem unusual. Some of the
most common symptoms are:
2
High blood glucose (hyperglycemia): frequent urination,
excessive thirst, blurred vision, increased fatigue, extreme
hunger, and irritability.
Ketones (ketoacidosis) from untreated hyperglycemia:
shortness of breath, nausea and vomiting, very dry mouth.
Low blood glucose (hypoglycemia): shakiness, sweating, fast
heartbeat, blurred vision, strange behavior, confusion, passing
out, and seizure.
If you are experiencing any of these symptoms, test your
blood glucose. If your result is below 2.8 mmol/L or above
13.9 mmol/L, or is displayed as “LO” or “HI,” contact your
doctor immediately.
1
American Diabetes Association: Standards of Medical Care for Patients With
Diabetes Mellitus (Position Statement). Diabetes Care 29 (Suppl. 1): S10; 2006.
2
For additional information and symptoms, refer to the website for the American
Diabetes Association: www.diabetes.org
Marking a Deleted Blood Test
NOTE: Marking a test result as a deleted blood test
excludes it from all of the averages that are calculated by
your meter.
You must mark the result immediately after the test is
performed — while the result is still displayed on the
screen. To do this, follow these steps:
1. Open the button door
(see page 3).
2. Press the
button to mark
as deleted.
3. The
symbol indicates a
deleted result.
4. Press
to accept.
5. Press
to turn your
meter off.
82076779_BRZ2_UG_EN_FpBp_v0.indd 18-19
82076779_BRZ2_UG_EN_FpBp_v0.indd 18-19
8/8/11 12:45:36 PM
8/8/11 12:45:36 PM

Suggested drop size
Use the
CLEAR
endcap!
IMPORTANT: Do not use Alternative Site Testing under the follow-
ing conditions. Use fi ngertip testing in any of these cases:
• If you think your blood glucose is low (hypoglycemia).
• When blood glucose is changing rapidly (after a meal, insulin dose
or exercise).
• If you have hypoglycemic unawareness (lack of symptoms).
• If you get alternative site blood glucose results that do not agree
with how you feel.
• During illness or times of stress.
• If you will be driving a car or operating machinery.
Consult your healthcare professional to determine if alternative site
testing is right for you.
Attach the clear AST endcap to
the M
ICROLET2 lancing device.
Select a puncture site from a
fl eshy area on the palm. Avoid
veins, moles, bone and tendon.
i
t
i
s not nece
s
s
-
sary to rub the skin or pump the
sary
to
rub
the
skin
or
pump
the
de
vi
ce
. Pr
ess
t
h
e
c
l
ear
endca
p
fi
rmly against the puncture site
a
nd then press the blue release
butto
n
.
Maintain steady pressure until
the blood drop reaches the sug-
gested size (1.0 μL).
Lift the device away from the
skin without smearing the
blood.
Do not test the blood sample
if you get:
• Smeared blood
• Clotted blood
• Runny blood
• Clear fl uid mixed with the
blood.
Bayer Customer Service: (852) 8100 6386
20 21
www.bayerdiabetes.com
Unusual Test Results
If your blood glucose result doesn’t match the way you feel,
follow these steps:
1. run a control test (see page 22);
2. retest your blood glucose (see page 10);
3. call your doctor immediately if your result still does
not agree with the way you feel.
Alternative Site Testing (AST)
(If you want to do alternative site testing,
please call Bayer Diabetes Care Service at
(852) 8100 6386 to order the clear AST endcap.)
Use AST only when it has been more than two hours after any
one of the following: a meal, diabetes medication, or exercise.
Palm testing is recommended as an alternative site when using
the M
ICROLET2 device. For forearm testing, or if using AUTODISC
test strip discs, use the M
ICROLET VACULANCE lancing device.
82076779_BRZ2_UG_EN_FpBp_v0.indd 20-21
82076779_BRZ2_UG_EN_FpBp_v0.indd 20-21
8/8/11 12:45:36 PM
8/8/11 12:45:36 PM

Bayer Customer Service: (852) 8100 6386
22 23
www.bayerdiabetes.com
RUNNING A CONTROL TEST:
There are times when you will want to do a quality control
test so you know that your system is working properly.
You may also want to do a control test to check the way
you do your test. Simply follow these steps:
Push Out Test Strip
1. Hold the meter comfortably in
one hand. Firmly grasp the meter
handle with the other hand
(shown here). Now, just “Pull
and Push”—“Pull” the handle
out until it stops and “Push” it
back in until it stops again.
NOTE:
After the meter handle is pushed in, the release
button is UP, a test strip is pushed out and a series of
“apply blood” prompts appears. The meter is now ready
to run a control test.
2. Squeeze a small drop of
щଥ
(Bai An Jie )
control
solution onto a nonabsorbent
surface (such as a clean piece
of wax paper). Do not apply
control solution to the test strip
directly from the bottle.
NOTE: The control solution contains a red dye and may stain.
Test
3. Move the entire front edge of
the test strip until it touches
the edge of the drop of the
control solution. The control
solution is automatically
pulled into the test strip.
IMPORTANT: Hold the test
strip in place until the meter
beeps, then move the meter away.
4. After the beep, the display
counts down from “5” to “1.”
Your control test result then
appears on the screen.
82076779_BRZ2_UG_EN_FpBp_v0.indd 22-23
82076779_BRZ2_UG_EN_FpBp_v0.indd 22-23
8/8/11 12:45:39 PM
8/8/11 12:45:39 PM

LOW NORMAL HIGH
LOW NORMAL HIGH
2.6-4.8 5.8-8.3 13.9-18.1
2.6-4.8 5.8-8.3 13.9-18.1
1A2164AA
1A2164AA
2007-03
2007-03
LOT:
LOT:
EXP:
EXP:
mmol/L
mmol/L
CONTROL RANGES
CONTROL RANGES
Bayer Customer Service: (852) 8100 6386
24 25
www.bayerdiabetes.com
Compare this control test
result with the control range
printed on the bottom fl ap
of the carton of
щଥ
(Bai An Jie
) test strips.
NOTE: You will want to “mark”
your Control test now so that it
will not be included in your averages.
Marking a Control Test
Marking a test result as a control test excludes it from
being included in your test averages.
You must mark the result immediately after the test is
performed—while the result is still displayed on the
screen. To do this, follow these steps:
5. Open the button door.
Press the
button to mark
as a control.
The
symbol indicates a
control result.
Press
to accept.
6. To release the used test strip,
hold the meter with the test
strip pointing down over a
waste container. Press the
release button. Be sure the
heel of your hand is not
against the meter handle.
NOTE: If you block the meter
handle with your hand, the test
strip may not release properly.
7. Press
to turn your meter off.
82076779_BRZ2_UG_EN_FpBp_v0.indd 24-25
82076779_BRZ2_UG_EN_FpBp_v0.indd 24-25
8/8/11 12:45:41 PM
8/8/11 12:45:41 PM

BEYOND
EVERYDAY USE
Bayer Customer Service: (852) 8100 6386
26 27
www.bayerdiabetes.com
RECALLING TEST RESULTS:
Your
щଥ
(Bai An Jie ) meter can store up to 420
test results in its memory. This makes it easy to see your
previous blood glucose test results. To view those results:
1. Open the button door.
2. Press the
button.
The meter shows you the
most recent test result.
3. Press the
button to see
each of your stored results.
Helpful Hint: When only is shown on the display,
you are seeing the most recent result; when only
is
shown, you are seeing the oldest result.
Helpful Hint: Your meter can store up to 420 test
results. If there are no stored test results in memory, the
meter will tell you this by showing three dashes. When the
memory is full, the meter will save the newest result and
discard the oldest.
Viewing Your Averages
Your
щଥ
(Bai An Jie ) meter calculates several differ-
ent averages of your blood glucose results. You can view
averages for 1 day (the previous 24 hours), 7 days, 14 days,
and 30 days. To see the averages, simply follow these steps.
1. Open the button door and press the
button. The
meter will show you your last result.
2. Press the
button again
to see your blood glucose
average for the last 14 days.
3. Press the
and buttons
to see each of your averages
(30 days, 1 day [24 hours],
7 days, and 14 days). The
bottom line of the display will
show you which average is
being displayed.
NOTE: If there are no results
in the memory for the average
you have selected, it will
be displayed as 3 dashes.
Otherwise, the averages will be based on the results
available, even if there are fewer days than the specifi c
average.
4. Press the
button again to review your individual
stored test results.
82076779_BRZ2_UG_EN_FpBp_v0.indd 26-27
82076779_BRZ2_UG_EN_FpBp_v0.indd 26-27
8/8/11 12:45:42 PM
8/8/11 12:45:42 PM

Bayer Customer Service: (852) 8100 6386
28 29
www.bayerdiabetes.com
Clearing Stored Test Results
To clear the stored results from your meter, follow these
simple steps:
1. Open the button door.
2. Press the
button.
3. Press the button again
and hold it.
4. While holding the
button,
press and hold the
button.
5. Hold both buttons together
until all three dashes are
continuously lit (for about
3 seconds).
If you change your mind and do not want to clear results,
simply let go of the buttons before all three dashes have
been lit.
SETUP FUNCTION:
Helpful Hint: You can press the button at any time
during Setup to turn the meter off. Just remember to
press the
button fi rst to store your changes!
Setting the Time
1. Open the button door
(see page 3).
2. Press
.
3. Press or as needed to
change the hour.
When the correct hour is
being displayed, press
to
accept it and move on.
4. Press
or to change
the minutes.
Press
to accept and
move on.
Helpful Hint: You may
want to change the time when
you travel to a different time
zone or when the time changes
with daylight savings time.
82076779_BRZ2_UG_EN_FpBp_v0.indd 28-29
82076779_BRZ2_UG_EN_FpBp_v0.indd 28-29
8/8/11 12:45:43 PM
8/8/11 12:45:43 PM

Bayer Customer Service: (852) 8100 6386
30 31
www.bayerdiabetes.com
5. Press or to select AM
or PM.
Press
to accept and
move on.
Setting the Date
NOTE: If you have just set the time, skip ahead to step 4.
1. Open the button door.
2. Press .
3. Press until you see the
“day” display fl ashing.
4. Press
or to change
the day.
Press
to accept and
move on.
5. Press
or
to change
the month
.
Press
to accept and
move on.
6. Press
or to change
the year.
Press
to accept and
move on.
82076779_BRZ2_UG_EN_FpBp_v0.indd 30-31
82076779_BRZ2_UG_EN_FpBp_v0.indd 30-31
8/8/11 12:45:43 PM
8/8/11 12:45:43 PM

Bayer Customer Service: (852) 8100 6386
32 33
www.bayerdiabetes.com
Setting the Buzzer Level
Your
щଥ
(Bai An Jie ) meter has an easy-to-use volume
control for the buzzer. There are three different buzzer levels:
high low off
NOTE: If you have just set the date, skip ahead to step 4.
1. Open the button door.
2. Press .
3. Press until you see
the “buzzer” symbol.
4. Press
or to change
the buzzer level.
Press
to accept and
move on.
Setting the Time Format (12- or 24-hour Clock)
Your meter can display the time format as either 12-hour
(
) or 24-hour ( ). You can change the time format
as follows:
NOTE: If you have just set the buzzer level, skip ahead to
step 4.
1. Open the button door.
2. Press
.
3. Press until you see the
“time format” display.
4. Press
or to change the
time format.
Press
to accept and
move on.
82076779_BRZ2_UG_EN_FpBp_v0.indd 32-33
82076779_BRZ2_UG_EN_FpBp_v0.indd 32-33
8/8/11 12:45:44 PM
8/8/11 12:45:44 PM

Bayer Customer Service: (852) 8100 6386
34 35
www.bayerdiabetes.com
CAUTION: The
щଥ
(Bai An Jie ) meter has not
been tested or certifi ed by Bayer for use with any
software other than Bayer’s diabetes management
software. Bayer is not responsible for any erroneous
results from the use of other software.
Setting the Date Format
Your meter can display the date format as either
“month-day” (
) or as “day-month” ( ).You can
change the date format as follows:
NOTE: If you have just set the time format, skip ahead to
step 4.
1. Open the button door.
2. Press
.
3. Press until you see the
“date format” display.
4. Press
or to change the
date format.
Press
to accept.
TRANSFERRING RESULTS TO A COMPUTER:
You can transfer test
results from the
щଥ
(Bai An Jie
) meter to a
computer, where they can
be summarized in a report
with graphs and tables. To
make use of this feature,
you need Bayer’s diabetes
management software and
data cable.
For more information, call Customer Service or visit our
website (see the bottom of the page).
82076779_BRZ2_UG_EN_FpBp_v0.indd 34-35
82076779_BRZ2_UG_EN_FpBp_v0.indd 34-35
8/8/11 12:45:45 PM
8/8/11 12:45:45 PM
/