FOX-ESS FOX-ESS 3-25kW Three Phase Inverter Installation guide

Type
Installation guide

FOX-ESS FOX-ESS 3-25kW Three Phase Inverter is a powerful and versatile solar inverter designed for residential and commercial use. With a maximum power output of 25kW, it can handle even the largest solar installations. The inverter features multiple MPPT inputs, allowing you to connect multiple solar arrays and maximize your energy production. It also has a built-in Wi-Fi module, so you can monitor your system's performance remotely using the FOX-ESS app. The inverter is compatible with a wide range of batteries, so you can store excess solar energy for use at night or during power outages.

FOX-ESS FOX-ESS 3-25kW Three Phase Inverter is a powerful and versatile solar inverter designed for residential and commercial use. With a maximum power output of 25kW, it can handle even the largest solar installations. The inverter features multiple MPPT inputs, allowing you to connect multiple solar arrays and maximize your energy production. It also has a built-in Wi-Fi module, so you can monitor your system's performance remotely using the FOX-ESS app. The inverter is compatible with a wide range of batteries, so you can store excess solar energy for use at night or during power outages.

Step 1: Fix the bracket on the wall
Drill holes with electric drill, make
sure the holes are at least 50mm
deep, and then hten the expansion
tubes.
Choose the place you want to install
the inverter. Place the bracket on the
wall and mark the posion of the 4
holes from bracket.
Please make sure the inverter will be installed with a proper distance
as shown below.
Posi�on Min Size
Le 300mm
Riht 300mm
Top 500mm
Boom 500mm
Front 500mm
2. Inverter Installa�on
300mm300mm
500mm
500mm
Step 3: Match the inverter with wall bracket
Mount the inverter to the bracket. Secure the inverter with the M5
screw and washer.
Insert the expansion tubes into the
holes and hten them. Install the
bracket with the expansion screws.
AC Wiring
-
Cable dimensions
3. Wiring Steps
Power (kW) 3.0 4.0 5.0 6.0 8.0 10.0 12.0 15.0 17.0 20.0 23.0 25.0
Cable
Micro-Breaker 16A 25A 40A 50A 60A
2.5~6mm² 4~6mm² 6~10mm² 10mm²
Note: Please refer to local cable type and color for actual installa
· Insert the sleeve assembly into the cable.
-
Trim all the wires to 52.5mm and the PE wire to 55mm.
-
Use the crimpin pliers to trim 12mm of insulaon from all wire ends
as shown in the picture.
· Separate the AC plu into three parts.
L1/L2/L3: Brown/Red/Green or Yellow Wire
N: Blue/Black Wire
PE: Yellow & Green Wire
· Install the copper wire into the plu
terminal and lock the screw.
· Lock the lock nut and the sleeve(3~5N·m),
lock the sleeve and the plu(1.5~1.7N·m).
· Insert the plu assembly into the socket
(inverter end) and lock each other by the
couplin twist.
L2
L1
L3
N
PE
DC Wiring
· Turn othe DC switch.
· Choose 2.5 mm² wire to connect the PV module.
· Trim 6mm of insularom the wire end.
· Separate the DC connector as below.
· Insert striped cable into pin contact and ensure all conductor strands
are captured in the pin contact.
· Crimp pin contact by usin a crimpin plier. Put the pin
contact with striped cable into the correspondin
crimpin pliers and crimp the contact.
· Insert pin contact throuh the cable nut to assemble into back
of the male or female plu. When you feel or hear a “click” the
pin contact assembly is seated correctly.
Plu Pin contact cable nut
D-
D+
Grounding Wiring
Screw tround screw with screwdriver as shown below.
1. r checkin all connecns are correct, turn on the external DC /AC
breakers.
2. Turn the DC switch to “ON” posion.
3. lnverter will start automacally when PV panels enerate enouh
4. 
enery, the LED will .
Note:
· Please select the correct country code
· Set the the inverter usthe buon or by usin the APP.
4. Startup Procedure
V1.4
10-500-20001-04





≤15°
90°
××


· Please DO NOT apply USB3.0 on inverter USB port, the inverter USB
port only support for USB2.0.
Step 2: Install the filter on top side (for fan cooling inverter)





Radiator fins
(shaded)
Filter opening hole
towards in
sides of the filter
this direction
Fins can be
seen from the
holes on both
Missing corner
Filter
missing
corner


Please keep the filter edge
flush with the back of inverter,
and install into right position.
Please keep the bottom side
of the filter edge flush with
the top sides of fins,
and install into right position.



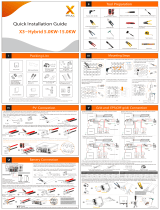
Quick Installaon Guide
3-25kW Three Phase Inverter
A B C D
E F G H I J
1. Packing List
Quick
Installation
Guide
K L M N
Object Quanty Descrip�on Object Quanty Descrip�on
A 1 Inverter
B 1 Bracket
C
2)
4/8
D 1 AC connector
Screwdriver
E
2)
4/8
DC pin contact
(posive contact*2/4,
ve contact*2/4)
Quick installaoe
G
F 1 Earth terminal
4Expansion tube
H
I
1)
J
K
L
WiFi/4G (Oponal)
1
1
1
1
Expansion screw4
DC connector
(F*2/4, M*2/4)
M 1 
inverter)
N2 Screw
Note



Descrip�on Qty Model


DC connector
DC pin contact
Female×2 Male×2
Female×4 Male×4
 
 


Communica�on and Monitoring
This series of inverters provide two RS485 ports. You can monitor the inverter via


of RS485/DRM0/ESTOP interface are as below.
Note


PIN Defini�on Remarks


RS485B1
RS485A1
RS485B2
RS485A2


1
2
3
4
5
6
7
8
GND
DRM0
+12V
ESTOP
  • Page 1 1

FOX-ESS FOX-ESS 3-25kW Three Phase Inverter Installation guide

Type
Installation guide

FOX-ESS FOX-ESS 3-25kW Three Phase Inverter is a powerful and versatile solar inverter designed for residential and commercial use. With a maximum power output of 25kW, it can handle even the largest solar installations. The inverter features multiple MPPT inputs, allowing you to connect multiple solar arrays and maximize your energy production. It also has a built-in Wi-Fi module, so you can monitor your system's performance remotely using the FOX-ESS app. The inverter is compatible with a wide range of batteries, so you can store excess solar energy for use at night or during power outages.

Ask a question and I''ll find the answer in the document

Finding information in a document is now easier with AI