6
Note: The Fabric Panel is preset to stop 36” from the
Housing. This posion can be changed to lower the
Fabric Panel as much as 84” from the Housing.
18.
19UP
See Figure 17
20
DOWN
the EasyShade to the current
Let the EasyShade stop on its own
See Figure 17
21UP and DOWN
simultaneously
See Figure 17
Note: The EasyShade is temporarily in Programming
Mode. The UP and DOWN buons on the
Remote Transmier must be pressed and held to
reposion the EasyShade. When either buon is
released, the Fabric Panel will stop moving.
22DOWN or UP
to adjust the new Down
marked in Step 10Figure 11
CAUTION: Do not let the EasyShade extend more
than 84” from the Housing. See Figure 18.
23STOP (my)
Down
UP and DOWN
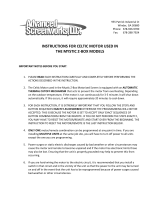
Figure 17
Figure 18
EasyShade
Housing
Housing
Fabric Panel Extension
Cable Guide
Bracket
Leading Bar in
Operang the EasyShade
24
UP and DOWN
24a. Press and release the UP
EasyShade will roll up into the EasyShade Housing
Up stop limit should stop
Appendix A
24b. Press and release the DOWN
EasyShade will unroll from the EasyShade Housing
Down stop limit should stop
Appendix A
25
Figure 2
CAUTION: Do not leave your Motorized EasyShade
extended during windy condions, as the uncontrolled
movement of the extended EasyShade Fabric Panel
could cause damage to the product and surrounding
items. Simply retract the Motorized EasyShade by
pressing the UP Buon on the Remote Transmier.
CAUTION: Do not permit the hand-held Remote
Transmier to get wet as this can aect its proper
operaon. It is recommended to keep the Remote
Transmier indoors when the EasyShade is not in use
or if rain is expected.
CAUTION: The installaon procedure for the
Motorized EasyShade includes the use of Cable
Guides to stabilize the extended Fabric Panel during
normal use. If your applicaon does not permit the
installaon of the necessary Cable Guides or you do
not plan to install them, you must use addional care
to prevent damage to your product. While we do
not recommend installing the Motorized EasyShade
without the supplied Cable Guides, some customers
may determine that their applicaon does not have a
vercal surface to install the supplied Cable Guides as
instructed.
Note: During an electrical outage, you will not have
the ability to operate your Motorized EasyShade.
“Congratulaons, your installaon is complete.”